Introduction
The HIDALIFE Smart Door Lock HL-300FL offers advanced keyless entry solutions for your home or office. This digital lock integrates fingerprint recognition, a keypad for passcodes, and traditional physical keys, providing multiple secure access methods. Designed for ease of use and durability, it includes features like auto-lock, anti-peek protection, and a passage mode for convenience.

Image: Front and back view of the HIDALIFE Smart Door Lock HL-300FL.
Package Contents
Verify that all components are present before beginning installation:
- Exterior Assembly (1)
- Interior Assembly (1)
- Lever (2)
- Latch (1)
- Rekeyable Cylinder (1)
- Key (3)
- Strike & Box
- Screws
- Pin Wrench (1)
- User Manual (1)
Image: All components included in the HIDALIFE Smart Door Lock HL-300FL package.
Specifications
| Brand | HIDALIFE |
| Model Name | HL-300FL |
| Lock Type | Biometric, Keypad |
| Material | Zinc Alloy |
| Color | Matte Black |
| Item Dimensions (L x W x H) | 5.12 x 2.72 x 2.36 inches |
| Item Weight | 2.13 Pounds |
| Control Method | Push Button |
| Special Features | Anti-Peeping Password, Auto-Lock, Fingerprint, Passage Mode, Rekeyable |
| Battery Requirement | 1x 9V battery (not included) |
Setup and Installation
Before installation, ensure your door meets the following requirements:
- Door Holes: 2-1/8" (54 mm)
- Backset: 2-3/8" or 2-7/8" (60mm or 70mm)
- Door Thickness: 1-3/8"-2" (35mm-50mm)
- Not compatible with 1-1/2" door holes.
- Requires a rectangular latch hole.
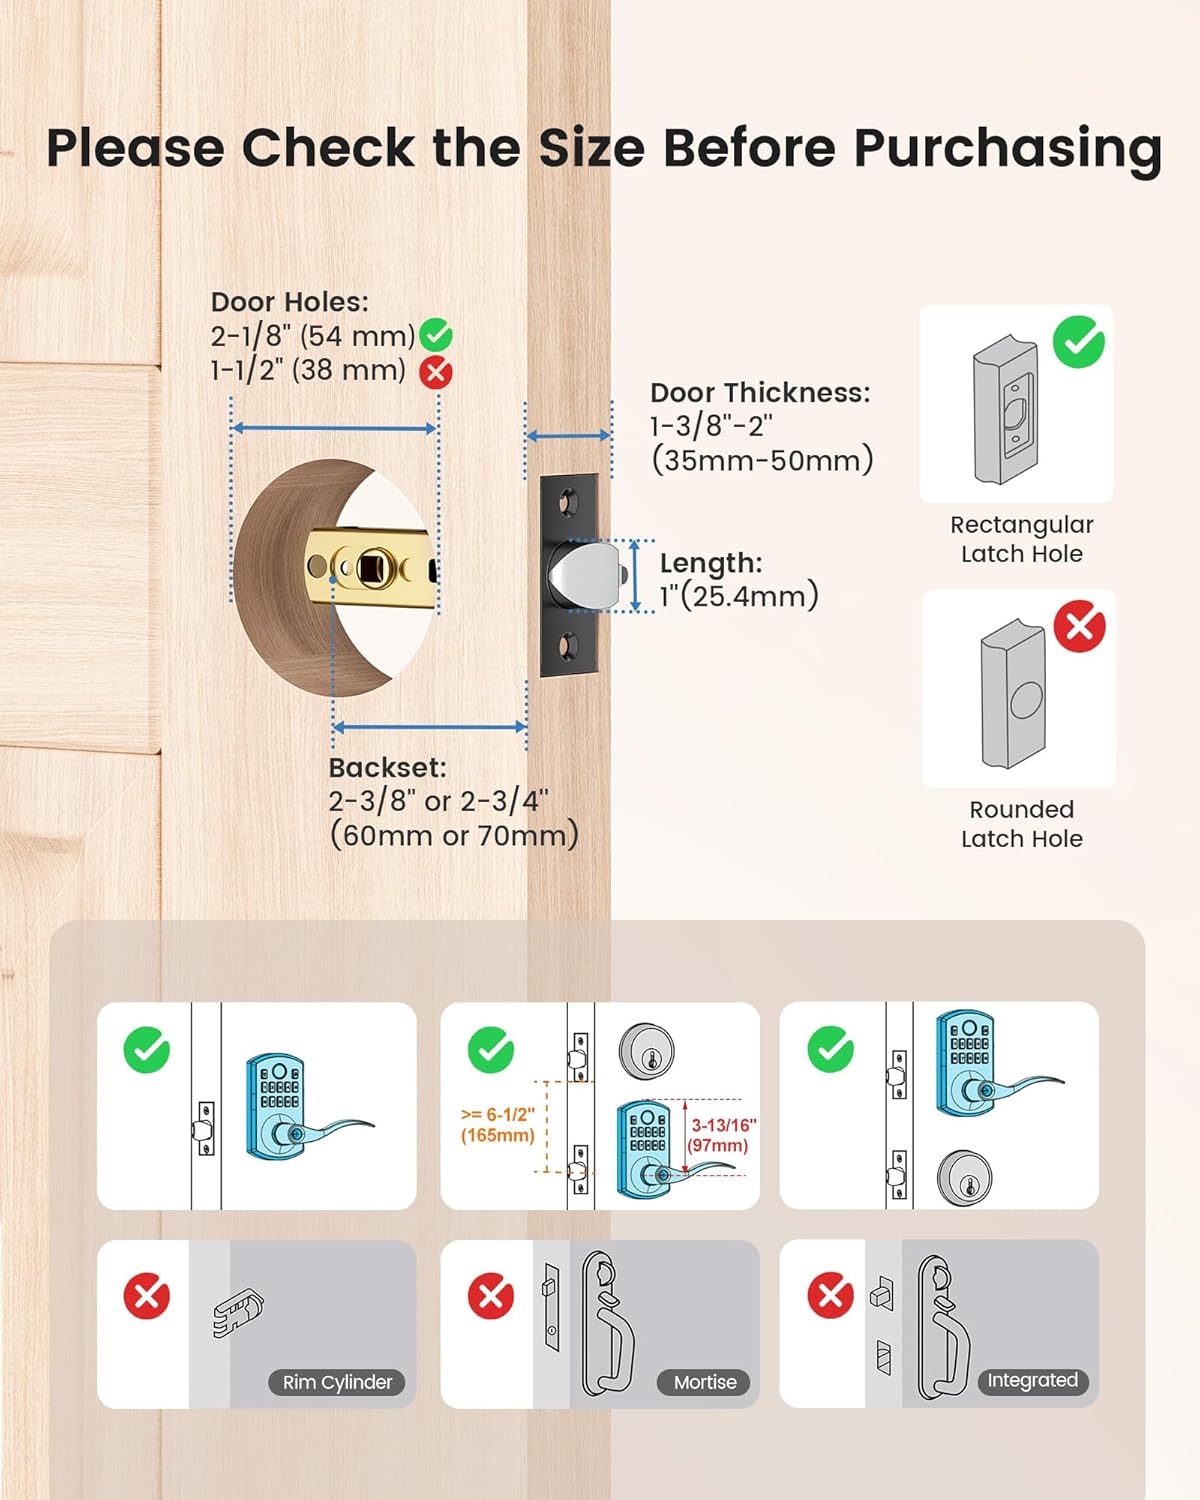
Image: Diagram illustrating door hole, backset, and thickness requirements for installation.
Installation Steps
- Prepare the Door: Ensure the door is properly drilled according to the dimensions above.
- Install the Latch: Adjust the latch length if necessary (2-3/8" or 2-7/8"). Insert the latch into the door edge, ensuring the fixed surface faces the direction of door opening. Secure with supplied screws.
Video: Step-by-step guide for installing the latch and adjusting its length.
- Install Exterior Assembly: Insert the keypad into the door through the hub of the latch. Pass the IC wire under the latch to the interior side of the door.
- Install Backplate: Install the backplate with 3 backplate screws, ensuring it is parallel with the exterior assembly and door edge. Make sure the IC wire is placed in the slot in the back of the keypad.
- Connect Wires: Connect the IC wire from the exterior assembly into the interior assembly.
- Secure Interior Assembly: Secure the interior assembly on the backplate with 2 interior assembly screws.
- Install Levers: Install the exterior and interior levers according to your door opening direction. Insert the cylinder into the handle. Push the handle all the way in until the square hole is no longer visible. Push the handle in firmly so that the buckle secures the handle.
- Install Battery: Install a new 9V alkaline battery (not included) into the interior assembly.
Initial Programming
After physical installation, you must set up the initial programming code.
Video: Instructions for changing the default programming code.
- Restore Default Settings: If needed, take off the battery cover, press the Reset Button for 5 seconds. You will hear 3 long beeps, indicating restoration is complete.
- Default Programming Code (PC): The default PC is 000000 (6 digits). The PC can only unlock the door when vacation mode is on.
- Default User Code (UC): The default UC is 1234 (4 digits).
- Change Programming Code:
- Enter current Programming Code + Unlock Key. Wait for 1 Green Light + 1 Beep.
- Press 1 + Unlock Key. Wait for 1 Green Light + 1 Beep.
- Enter New Programming Code (six numbers) + Unlock Key. Wait for 1 Green Light + 1 Beep.
- Note: The first four numbers of the programming code must be different from user codes. If not, the programming code cannot be changed.
Operating Instructions
Adding User Codes (UC)
You can add up to 20 sets of User Codes. After User Codes are added, the default User Code will be invalid.
- Enter Programming Code + Unlock Key. Wait for 1 Green Light + 1 Beep.
- Press 2 + Unlock Key. Wait for 1 Green Light + 1 Beep.
- Enter New User Code (four numbers) + Unlock Key. Wait for 1 Green Light + 1 Beep.
- Note: User Codes must be different from the first 4 numbers of the programming code.
Deleting User Codes (UC)
If you delete all user codes, the default code will be active.
- Enter Programming Code + Unlock Key. Wait for 1 Green Light + 1 Beep.
- Press 3 + Unlock Key. Wait for 1 Green Light + 1 Beep.
- Enter Unwanted User Code (four numbers) + Unlock Key. Wait for 1 Green Light + 1 Beep.
Adding User Fingerprints
Up to 50 fingerprints can be saved. If fingerprint collection fails, the lock will flash 3 Red Lights and 3 Beeps.
- Enter Programming Code + Unlock Key. Wait for 1 Green Light + 1 Beep.
- Press 4 + Unlock Key. Wait for 1 Green Light + 1 Beep.
- Press fingerprint successfully collected 5 times.
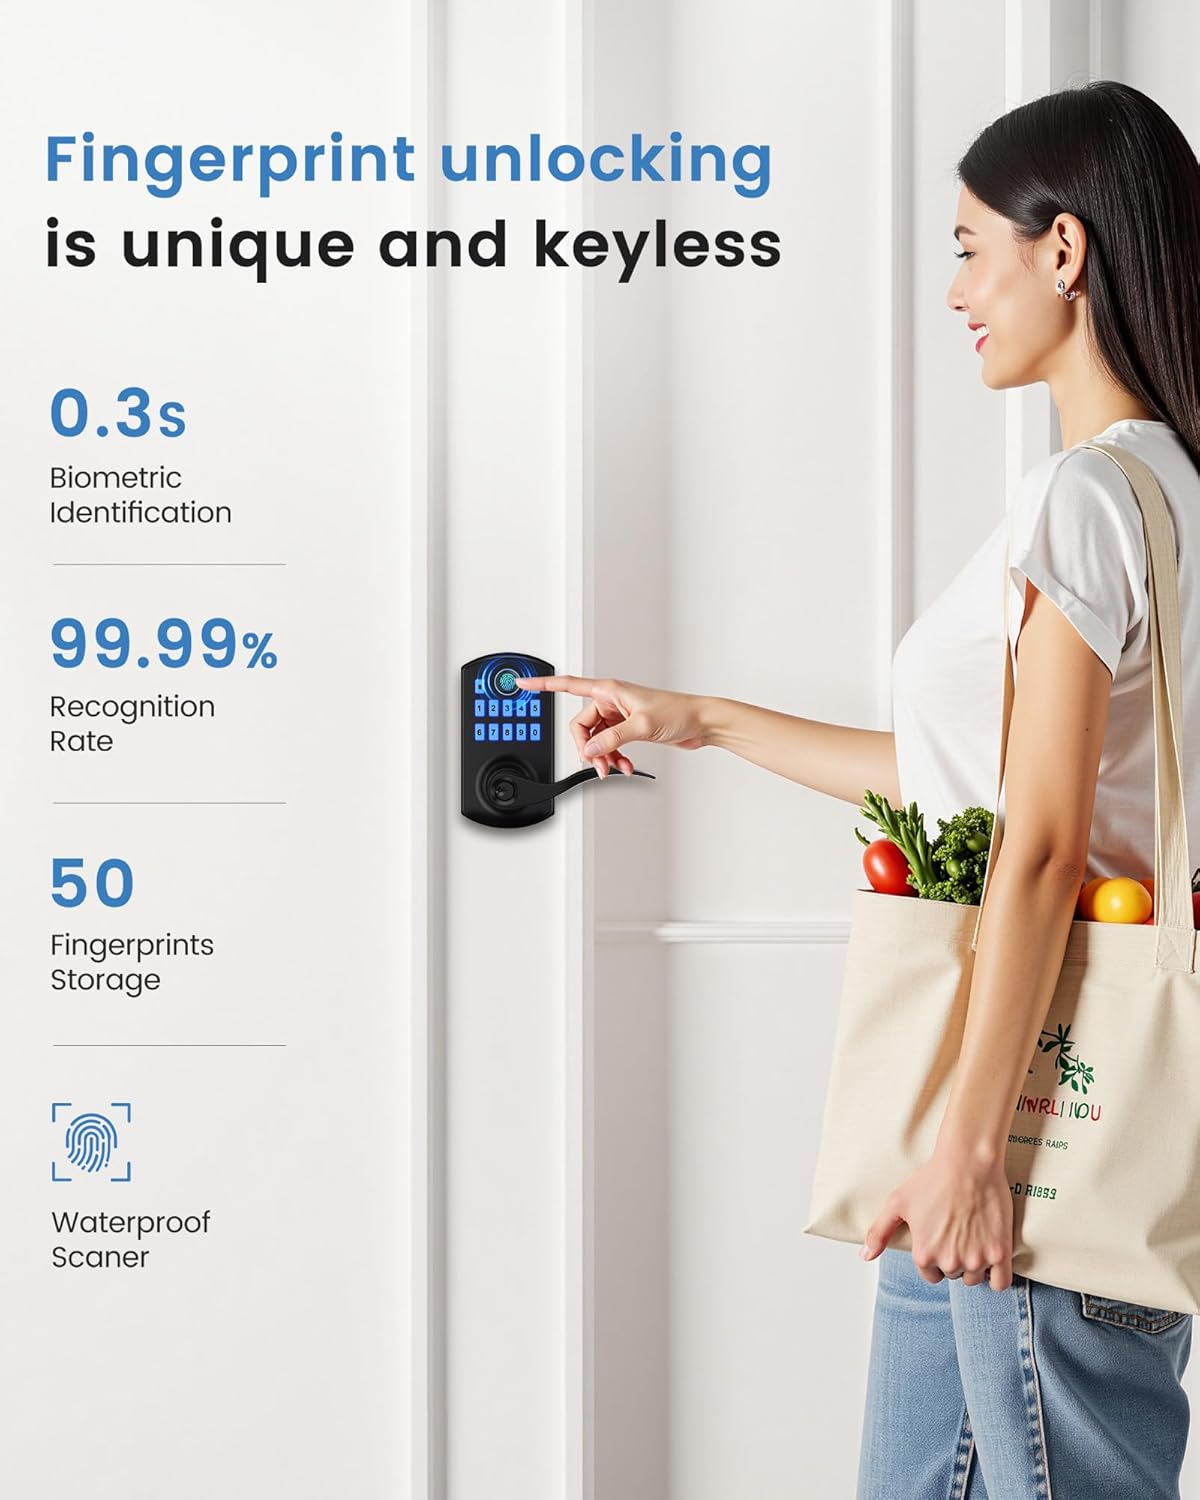
Image: Illustration of fingerprint unlocking with 0.3s biometric identification and 99.99% recognition rate.
Deleting User Fingerprints
To delete a specific fingerprint, you must use that fingerprint to enter it during the deletion process. Otherwise, the fingerprint can only be deleted by resetting the door lock.
- Enter Programming Code + Unlock Key. Wait for 1 Green Light + 1 Beep.
- Press 5 + Unlock Key. Wait for 1 Green Light + 1 Beep.
- Press Unwanted Fingerprint.
Adding One-Time Codes
One-time codes will be invalid after one-time use. One-time codes must be different from any user codes. If not, the one-time code cannot be added.
- Enter Programming Code + Unlock Key. Wait for 1 Green Light + 1 Beep.
- Press 8 + Unlock Key. Wait for 1 Green Light + 1 Beep.
- Enter One-time Code (four numbers) + Unlock Key.
Auto-Lock Delay Time (2-99s)
The default auto-lock time delay is 5 seconds. You can customize this setting.
Video: Guide to setting the auto-lock delay time.
- Enter Programming Code + Unlock Key. Wait for 1 Green Light + 1 Beep.
- Press 9 + Unlock Key. Wait for 1 Green Light + 1 Beep.
- Enter desired delay time (between 2-99 seconds) + Unlock Key.
Passage Mode
Passage mode keeps the door unlocked, ideal for high-traffic periods. The auto-lock feature is disabled in this mode.
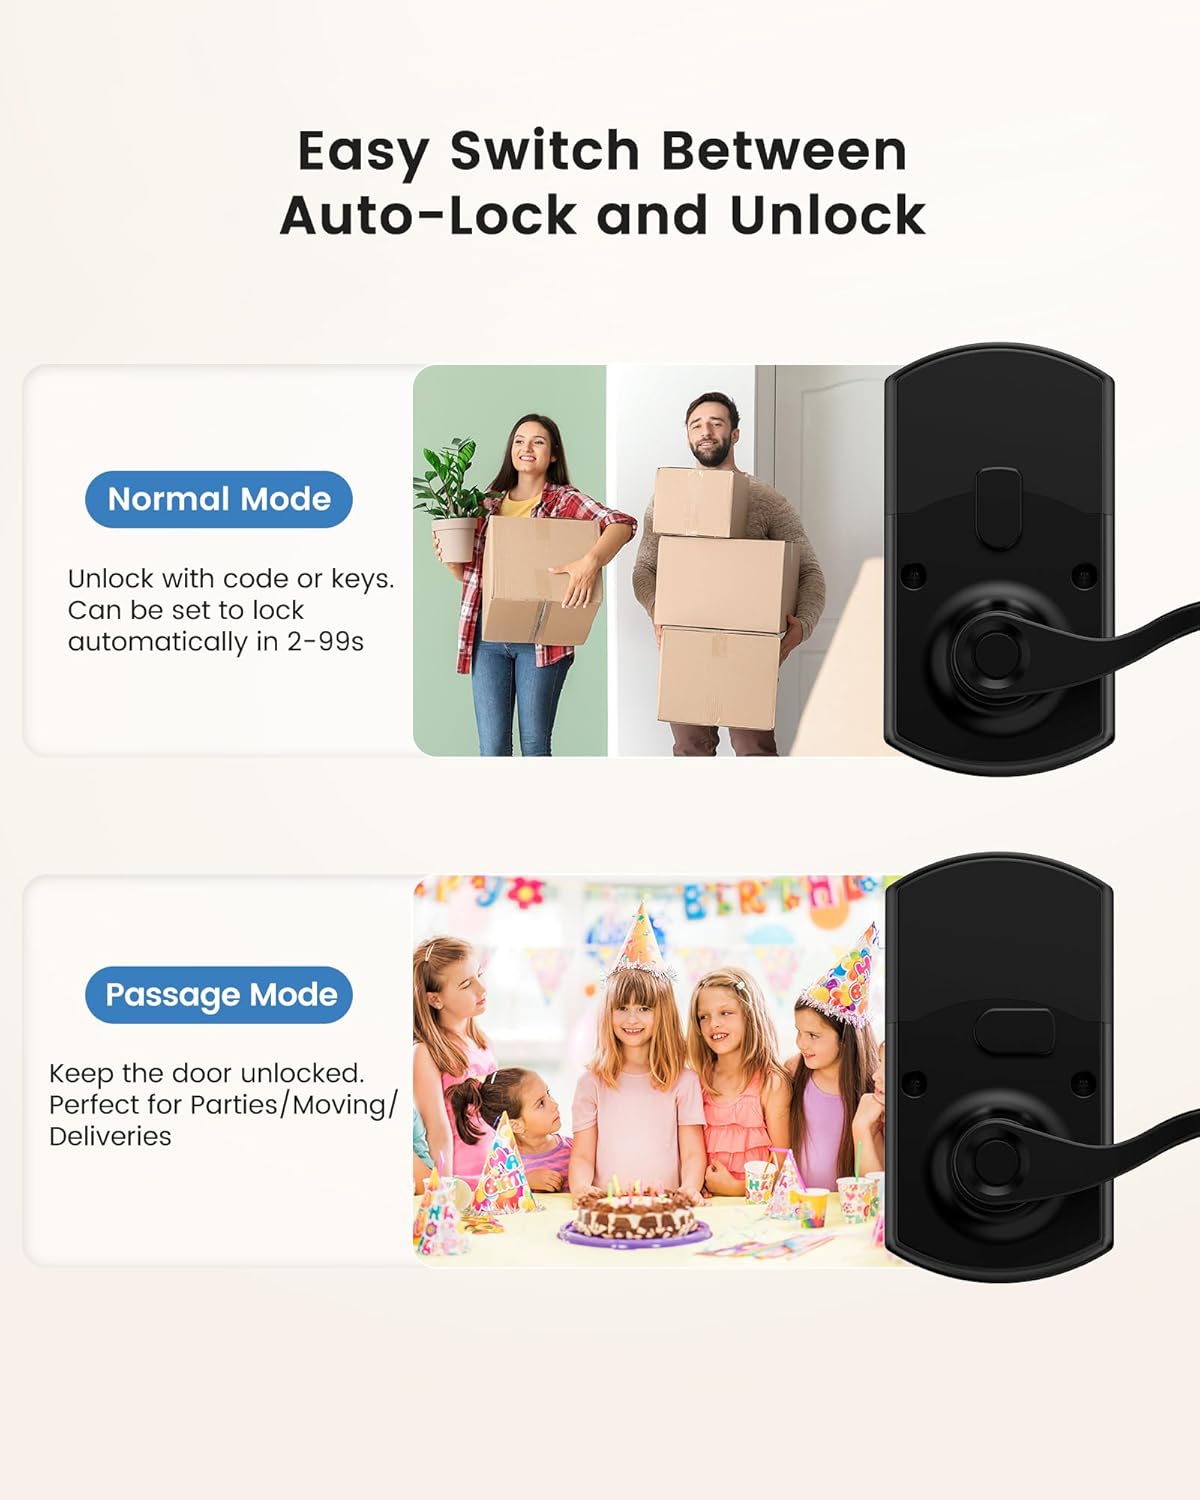
Image: Visual representation of Normal Mode (auto-lock) and Passage Mode (unlocked).
- Enable Passage Mode: Turn the turnpiece 90° to the right.
- Disable Passage Mode: Turn the turnpiece to vertical. The door will then be locked.
Silent Mode
Enable or disable silent mode for quiet operation.
- Enter Programming Code + Unlock Key. Wait for 1 Green Light + 1 Beep.
- Press 6 + Unlock Key. Wait for 1 Green Light + 1 Beep.
Vacation Mode
When vacation mode is set, only the Programming Code (PC) and physical key can unlock the door. User Codes (UC) and Fingerprints cannot unlock the door. The physical key cannot turn off vacation mode. Enter the PC code once to turn off vacation mode.
- Enter Programming Code + Unlock Key. Wait for 1 Green Light + 1 Beep.
- Press 7 + Unlock Key. Wait for 1 Green Light + 1 Beep.
Anti-Peek Protection
To enhance security, you can enter random numbers before or after your actual passcode. The lock will still recognize the correct sequence within the longer string of numbers, preventing others from guessing your code by observing your input.
Using Physical Keys
In case of battery depletion or other issues, physical keys provide a reliable backup access method.
- Insert the key into the keyhole.
- Turn the key 90° to the left to unlock.
- Turn the handle to open the door.
Maintenance
Battery Replacement
The lock operates on one 9V alkaline battery (not included). The lock will provide an alarm when the battery is running low. Replace the battery promptly to ensure continuous operation.
- Remove the interior assembly cover.
- Disconnect the old 9V battery and replace it with a new one.
- Replace the cover.

Image: Illustration of the 9V battery compartment and low battery indicator.
Cleaning
Wipe the lock's exterior with a soft, dry cloth. Avoid using abrasive cleaners or solvents that could damage the finish or electronic components.
Troubleshooting
- Fingerprint not recognized: Ensure your finger is clean and dry. Try re-registering your fingerprint if issues persist. After 4 failed attempts, the keypad becomes inoperable for 1 minute.
- Keypad not responding: Check the battery level. Replace the 9V battery if it's low.
- Programming code issues: Ensure the first four numbers of your programming code are not identical to any user codes. If you delete all user codes, the default user code (1234) becomes active.
- Handle not turning: Ensure the lock is in an unlocked state (either via code, fingerprint, or key).
- Door not locking automatically: Check if Passage Mode is enabled. If so, disable it. Verify the auto-lock delay time setting.
Warranty and Support
The HIDALIFE Smart Door Lock HL-300FL comes with a 1-year warranty.
For assistance, please contact us via email:
Email: support@hidalife.com
When contacting support, please provide your order number for faster service.


