1. Introduction
Thank you for choosing the Morpilot HS010-S Electric Milk Frother. This appliance is designed to create perfect milk foam for your coffee, lattes, cappuccinos, and hot chocolate, as well as heat milk. Please read this manual carefully before first use to ensure safe operation and optimal performance. Keep this manual for future reference.
2. Safety Instructions
- Read all instructions before using the appliance.
- Do not immerse the power base, cord, or plug in water or other liquids.
- Ensure the voltage rating on the appliance matches your local power supply.
- Always place the appliance on a stable, flat, heat-resistant surface.
- Do not operate the appliance with a damaged cord or plug, or if it malfunctions or has been damaged in any way.
- Keep the appliance out of reach of children.
- Do not touch hot surfaces. Use handles or knobs.
- Unplug from the outlet when not in use and before cleaning. Allow to cool before putting on or taking off parts, and before cleaning the appliance.
- Do not use attachments not recommended by the manufacturer.
- This appliance is for household use only. Do not use outdoors.
- Do not fill the milk frother beyond the MAX fill lines to prevent overflow.
- For best results, use milk with >3% fat content.
3. Product Overview
The Morpilot HS010-S Electric Milk Frother features a durable stainless steel jug and a separate power base, offering versatility and ease of use.
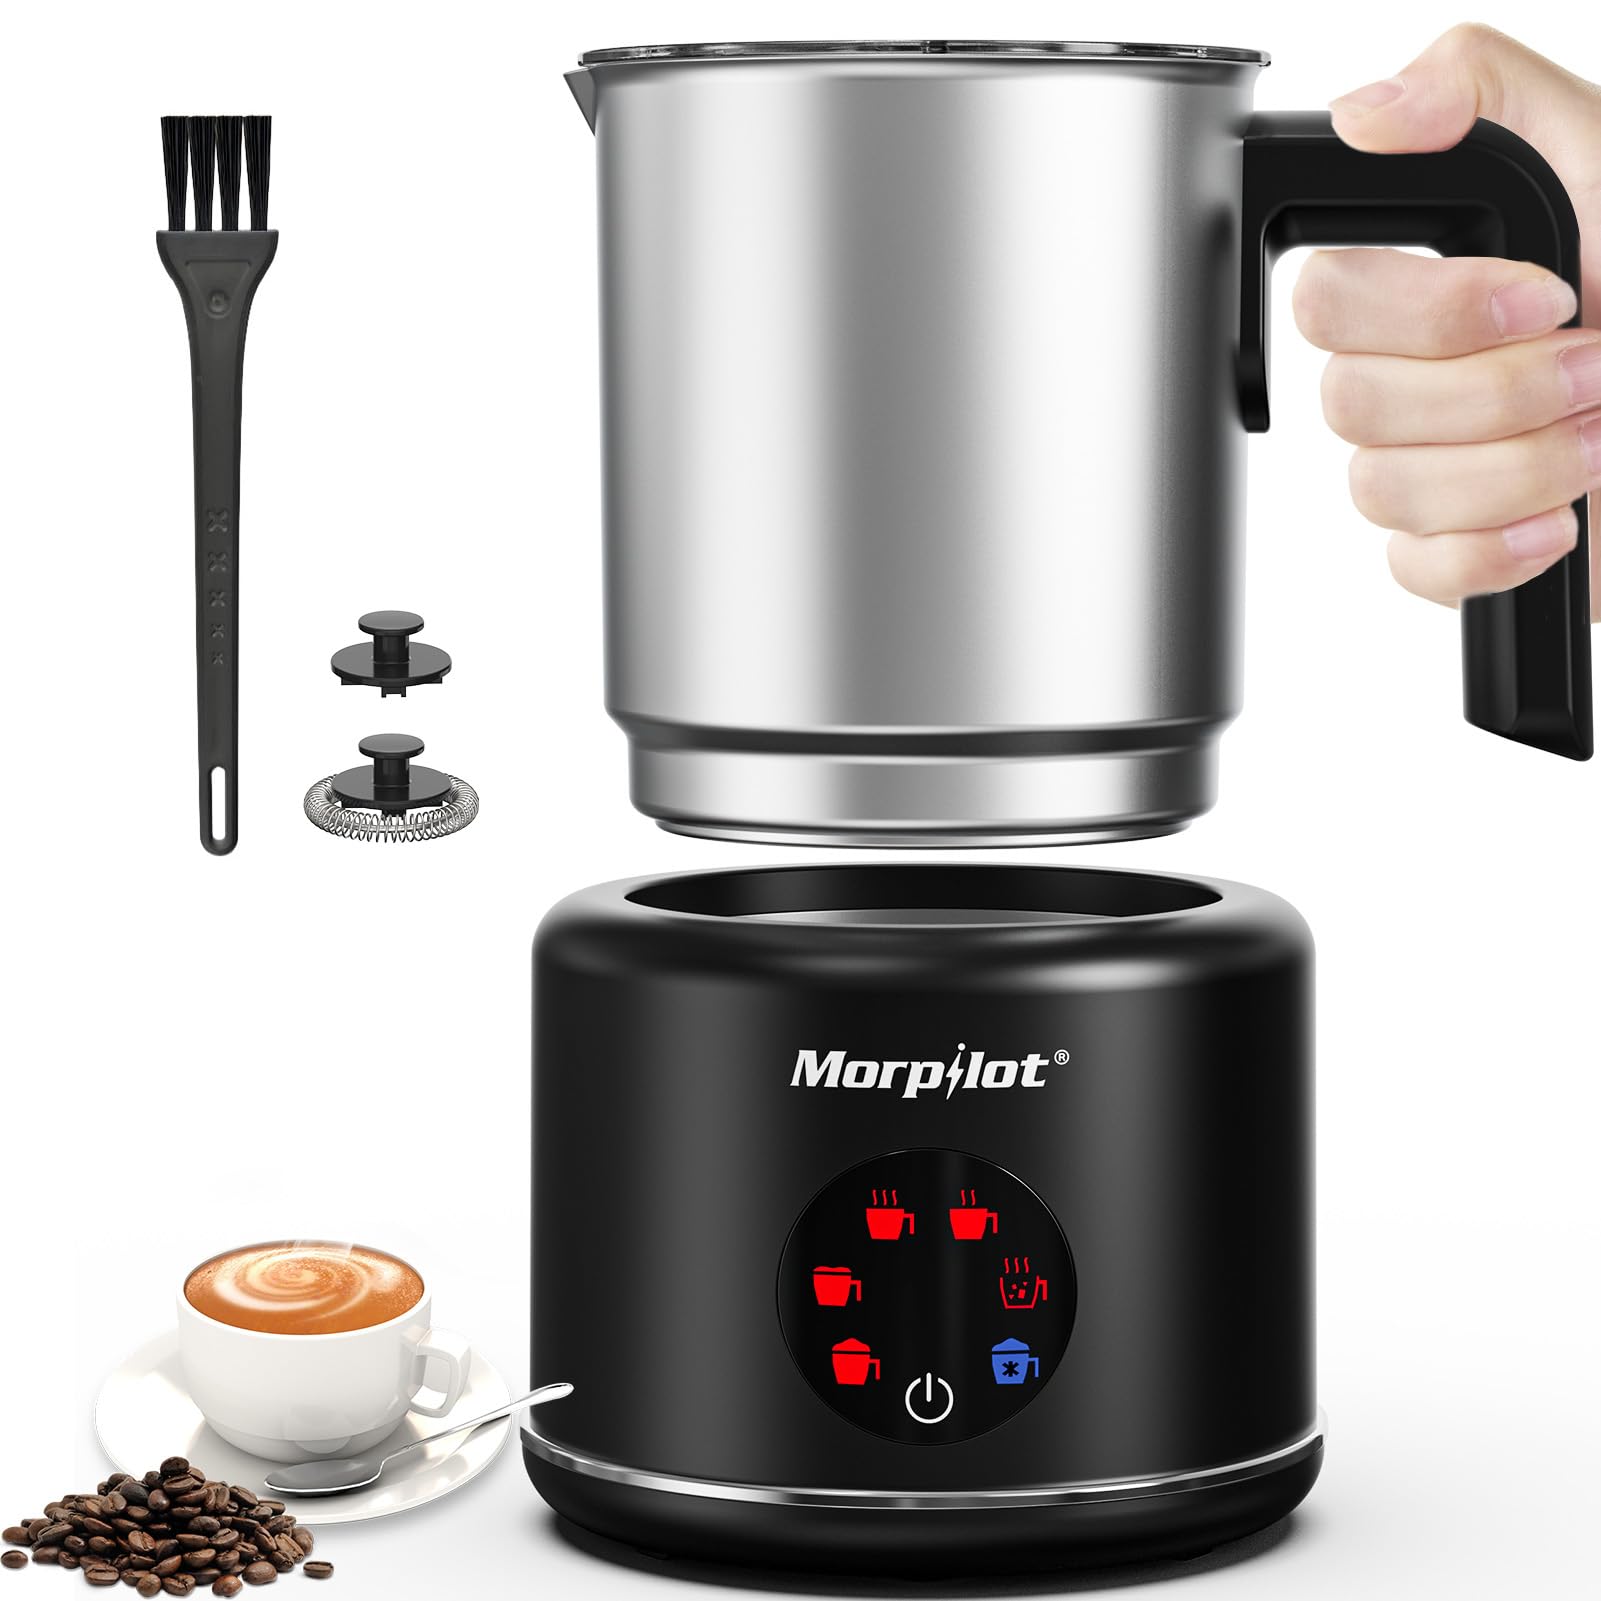
Image: Morpilot HS010-S Electric Milk Frother. This image shows the complete frother unit, consisting of a stainless steel jug with a handle and a black power base with control buttons.
Components:
- Stainless Steel Milk Jug with Handle
- Transparent Lid
- Frothing Whisk (for dense foam)
- Heating Whisk (for airy foam and hot milk)
- Power Base with Control Panel
Key Features:
- 6-in-1 Functionality: One-button operation for hot dense foam, hot airy foam, hot milk (high/low temperature), hot chocolate, and cold foam.
- Large Capacity: Heats up to 500ml of milk or froths up to 250ml of milk, suitable for multiple servings.
- Split Design: Detachable stainless steel jug for easy cleaning and enhanced safety.
- Durable Material: Constructed from high-quality stainless steel for longevity.
- Latte Art Spout: Designed for precise pouring to create beautiful latte art.
- Automatic Shut-off: Ensures safe operation and prevents overheating.

Image: Milk Level Indicator. This image displays the interior of the milk frother jug with clear markings for minimum (130ml), maximum frothing (250ml), and maximum heating (500ml) levels.
4. Setup
- Unpack: Carefully remove all components from the packaging. Retain packaging for future storage or transport.
- Clean: Before first use, wash the stainless steel jug and whisks with warm soapy water. Rinse thoroughly and dry. Wipe the power base with a damp cloth. Do not immerse the power base in water.
- Placement: Place the power base on a dry, level, and stable surface away from water sources and heat.
- Whisk Selection: Choose the appropriate whisk for your desired function. The frothing whisk (with coil) is for dense and airy foam. The heating whisk (without coil) is for hot milk and hot chocolate. Insert the chosen whisk onto the shaft at the bottom of the jug.
- Connect: Plug the power cord into a suitable electrical outlet.
5. Operating Instructions
The Morpilot HS010-S offers six functions controlled by a single button. Each function is indicated by a different color light.

Image: One Button, Six Functions. This graphic illustrates the six different functions of the frother, each with an icon and descriptive text, such as Hot Chocolate, Hot Dense Milk Foam, and Cold Milk Foam.
- Add Milk: Pour fresh, cold milk into the stainless steel jug. Observe the internal MAX fill lines:
- MAX 250ml for frothing (dense or airy foam).
- MAX 500ml for heating milk (without frothing).
- Ensure milk is above the MIN 130ml line for all functions.
- Select Whisk: Attach the frothing whisk for foam, or the heating whisk for hot milk/chocolate.
- Place Jug: Position the milk jug securely onto the power base.
- Choose Function: Press the power button repeatedly to cycle through the 6 functions. The indicator light will change color for each function:
- Red: Hot Dense Foam
- Orange: Hot Airy Foam
- Green: Hot Milk (High Temperature)
- Light Blue: Hot Milk (Low Temperature)
- Purple: Hot Chocolate
- Blue: Cold Foam
- Start: Once the desired function is selected, the frother will start automatically.
- Automatic Shut-off: The appliance will automatically stop when the cycle is complete.
- Pour: Carefully remove the jug from the base and pour the frothed or heated milk. The anti-scald handle and drip-tip spout facilitate easy pouring and latte art creation.
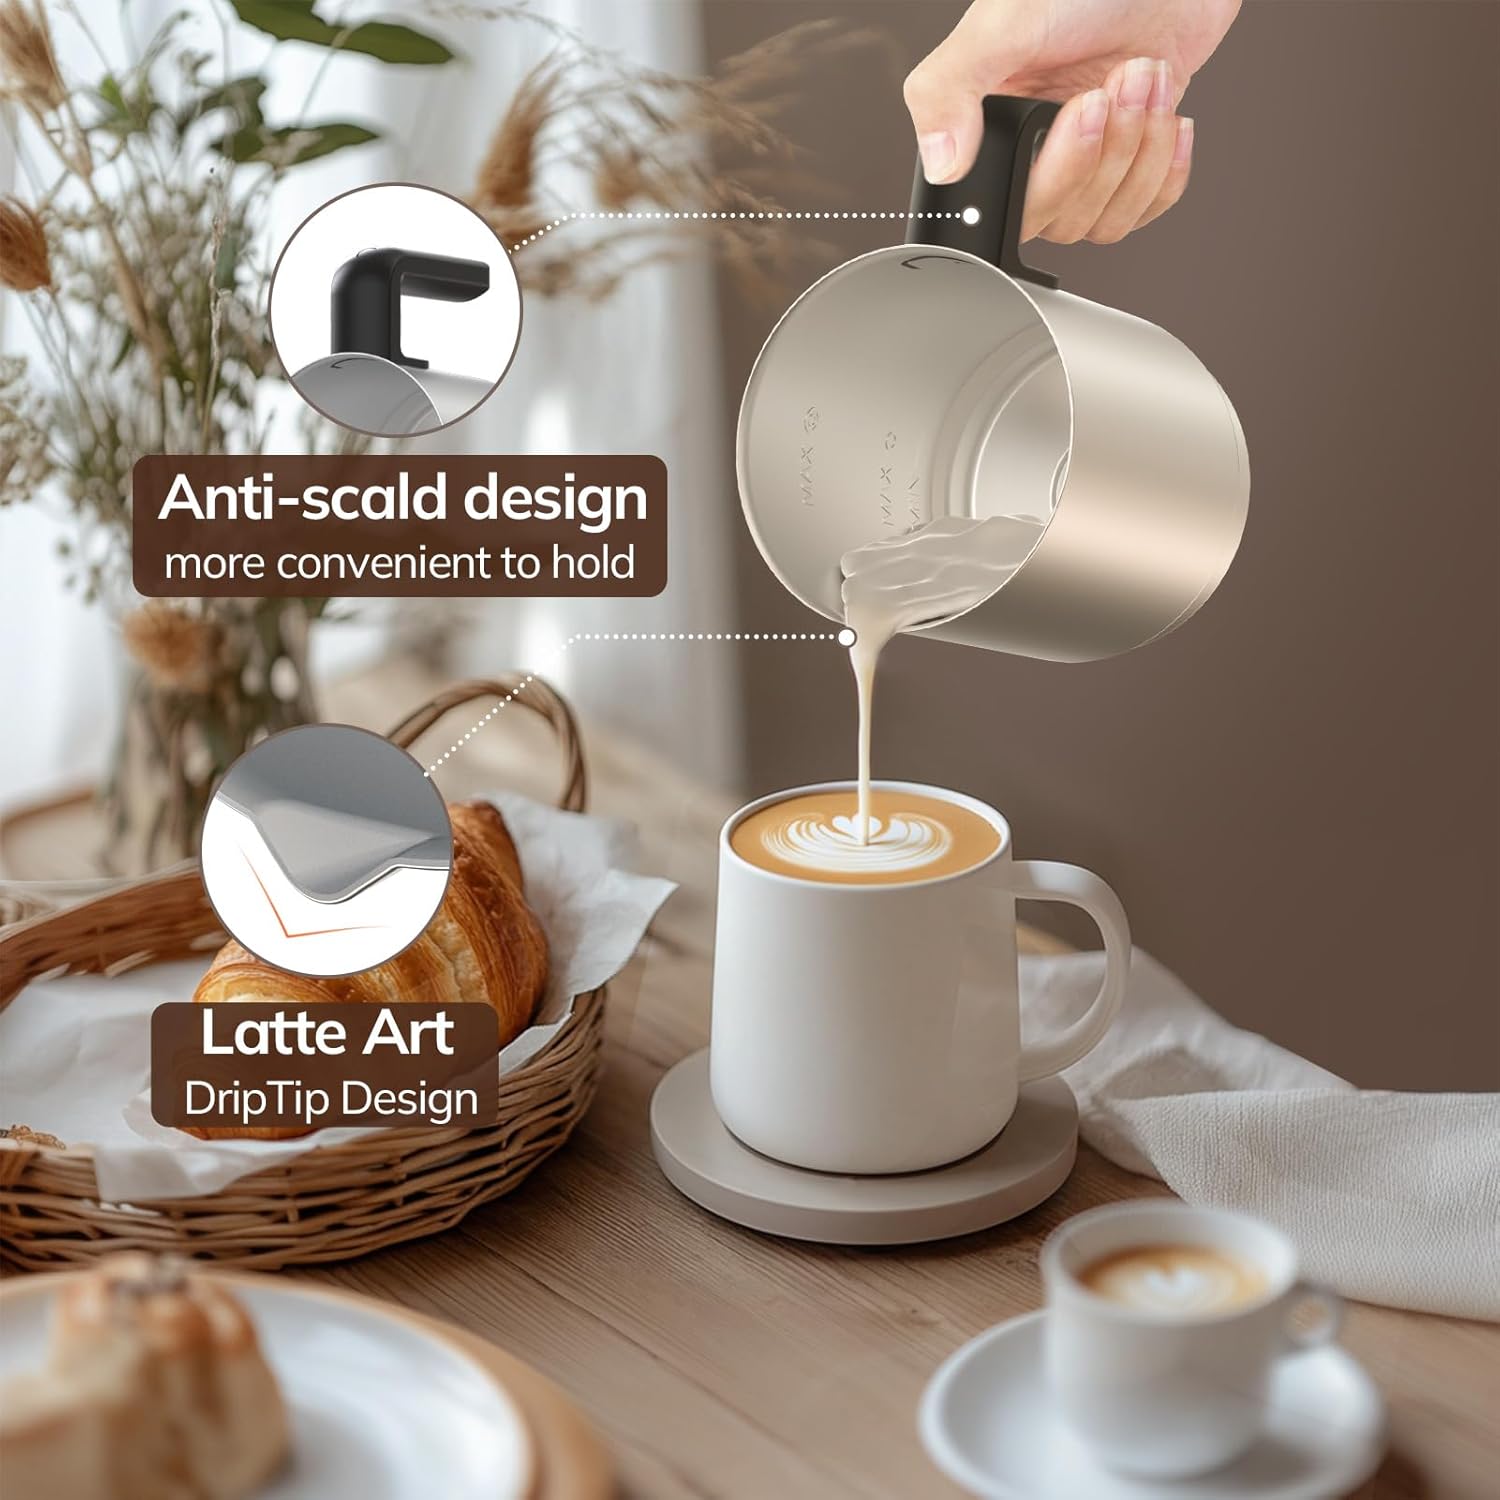
Image: Anti-scald Design and Latte Art. This image highlights the ergonomic handle for comfortable holding and the precision spout designed for pouring latte art.
Tips for Best Results:
- Always use fresh, cold milk for frothing.
- For optimal foam, use whole milk (full-fat milk). Plant-based milks (e.g., oat, almond) may produce varying results; barista-style plant milks are recommended.
- Do not overfill the jug beyond the indicated MAX lines.
- Clean the jug and whisk immediately after each use to prevent milk residue from drying.
6. Cleaning and Maintenance
Regular cleaning ensures the longevity and hygiene of your Morpilot Milk Frother.

Image: Dishwasher Safe. This image shows the detachable stainless steel jug placed inside a dishwasher, indicating its compatibility with dishwasher cleaning.
- Unplug: Always unplug the appliance from the power outlet before cleaning.
- Cool Down: Allow the frother to cool down completely before handling.
- Separate Components: Detach the stainless steel jug from the power base. Remove the whisk from the jug.
- Clean Jug and Whisk: The stainless steel jug and whisks are dishwasher safe. Alternatively, wash them by hand with warm soapy water and a non-abrasive sponge. Rinse thoroughly and dry immediately.
- Clean Power Base: Wipe the exterior of the power base with a soft, damp cloth. Do not use abrasive cleaners or scourers. Never immerse the power base in water or any other liquid.
- Storage: Store the cleaned and dried frother in a cool, dry place. Ensure the whisk is properly stored inside the jug or in a safe place to avoid loss.

Image: Easy Cleaning with Split Design. This image demonstrates the ease of cleaning the stainless steel jug separately from the power base, highlighting the split design for safety and convenience.
7. Troubleshooting
If you encounter issues with your Morpilot Milk Frother, please refer to the following table:
| Problem | Possible Cause | Solution |
|---|---|---|
| Frother does not start. | Not plugged in; Jug not correctly placed on base; Power outage. | Ensure plug is securely in outlet; Re-position jug on base; Check power supply. |
| Milk does not froth or froths poorly. | Incorrect whisk used; Milk level too high/low; Milk not cold enough; Type of milk used. | Ensure frothing whisk is used; Adjust milk level between MIN and MAX frothing lines; Use cold milk; Try whole milk or barista-style plant milk. |
| Milk overflows. | Milk level too high. | Do not exceed the MAX frothing (250ml) or MAX heating (500ml) lines. |
| Milk is not hot enough. | Incorrect function selected; Milk level too high. | Ensure a hot milk function is selected; Do not exceed MAX heating line. |
| Burning smell or residue. | Milk residue left on heating plate; Overheating. | Clean the jug thoroughly after each use. If residue persists, soak with warm soapy water. Ensure milk levels are correct. |
8. Specifications
| Feature | Specification |
|---|---|
| Brand | Morpilot |
| Model | HS010-S |
| Color | Black-s |
| Material | Stainless Steel |
| Capacity (Heating) | Max 500 ml |
| Capacity (Frothing) | Max 250 ml |
| Minimum Capacity | 130 ml (for heating & frothing) |
| Wattage | 600 watts |
| Item Weight | 1.04 Kilograms |
| Dimensions | 21.1 x 15.3 x 14.9 cm |
| Special Features | 6-in-1 Function, Large Milk Capacity, Drip-free Spout, One-touch Operation with Automatic Shut-off |
9. Warranty and Support
Morpilot products are manufactured to high-quality standards. This product is covered by a standard manufacturer's warranty against defects in materials and workmanship from the date of purchase. Please retain your proof of purchase for warranty claims.
For technical support, warranty claims, or any questions regarding your Morpilot HS010-S Electric Milk Frother, please contact Morpilot customer service through the retailer where the product was purchased or visit the official Morpilot website for contact information.
Do not attempt to repair the appliance yourself, as this will void the warranty.