1. Introduction
The ECO-WORTHY 5W Solar Panel is designed to provide a continuous and reliable power supply to compatible outdoor security cameras, eliminating the need for frequent battery changes. Featuring high-efficiency monocrystalline cells, a durable weather-resistant design, and versatile charging interfaces, this solar panel ensures your surveillance system remains operational with minimal maintenance.

Image 1.1: The ECO-WORTHY 5W Solar Panel connected to various outdoor security cameras, showcasing its multi-interface cable.
2. Package Contents
Please verify that all items listed below are included in your package before proceeding with installation. If any parts are missing, please contact customer support.
- 1x 5W 5V Solar Panel
- 1x 3m (9.8ft) Triple-Output Cable (USB-C, Micro USB, DC)
- 3x Interface Waterproof Caps
- 1x 360° Adjustable Triangular Bracket
- 1x Set of Screws and Wall Anchors
- 1x Positioning Sticker
- 1x Instruction Manual
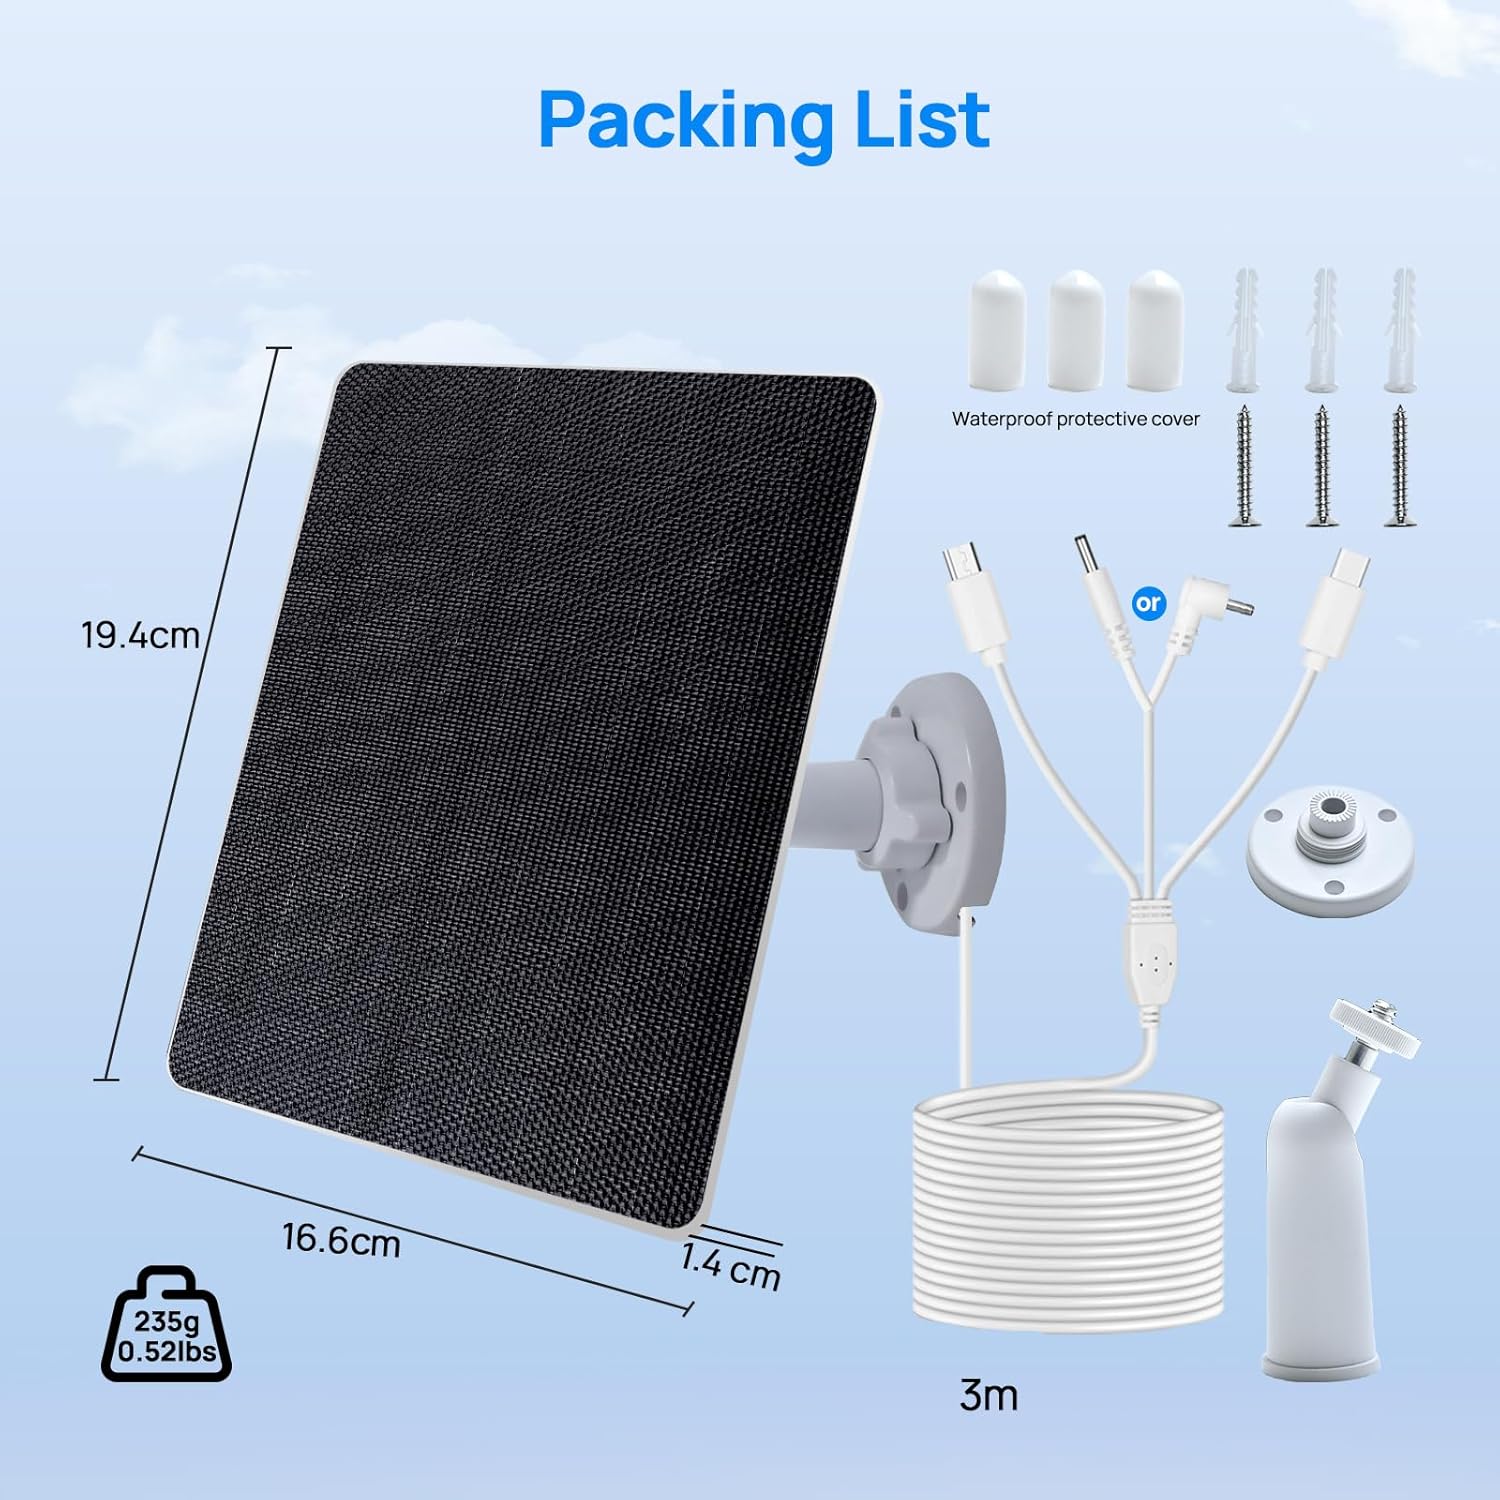
Image 2.1: A visual representation of all components included in the ECO-WORTHY solar panel kit, including the solar panel, multi-output cable, mounting bracket, and hardware.
Video 2.1: An unboxing and overview of the ECO-WORTHY 5W Solar Panel Kit, detailing all included components and their initial assembly.
3. Installation Guide
Follow these steps to properly install your ECO-WORTHY Solar Panel for optimal performance.
Step 1: Secure the Mounting Base
- Choose a location that receives maximum direct sunlight throughout the day.
- Use the provided positioning sticker to mark the drill holes.
- If mounting on a soft or unstable surface, pre-drill holes with a 6.0 mm drill bit and insert the expansion anchors before securing the base.
- Secure the mounting base to the desired location using the provided screws.
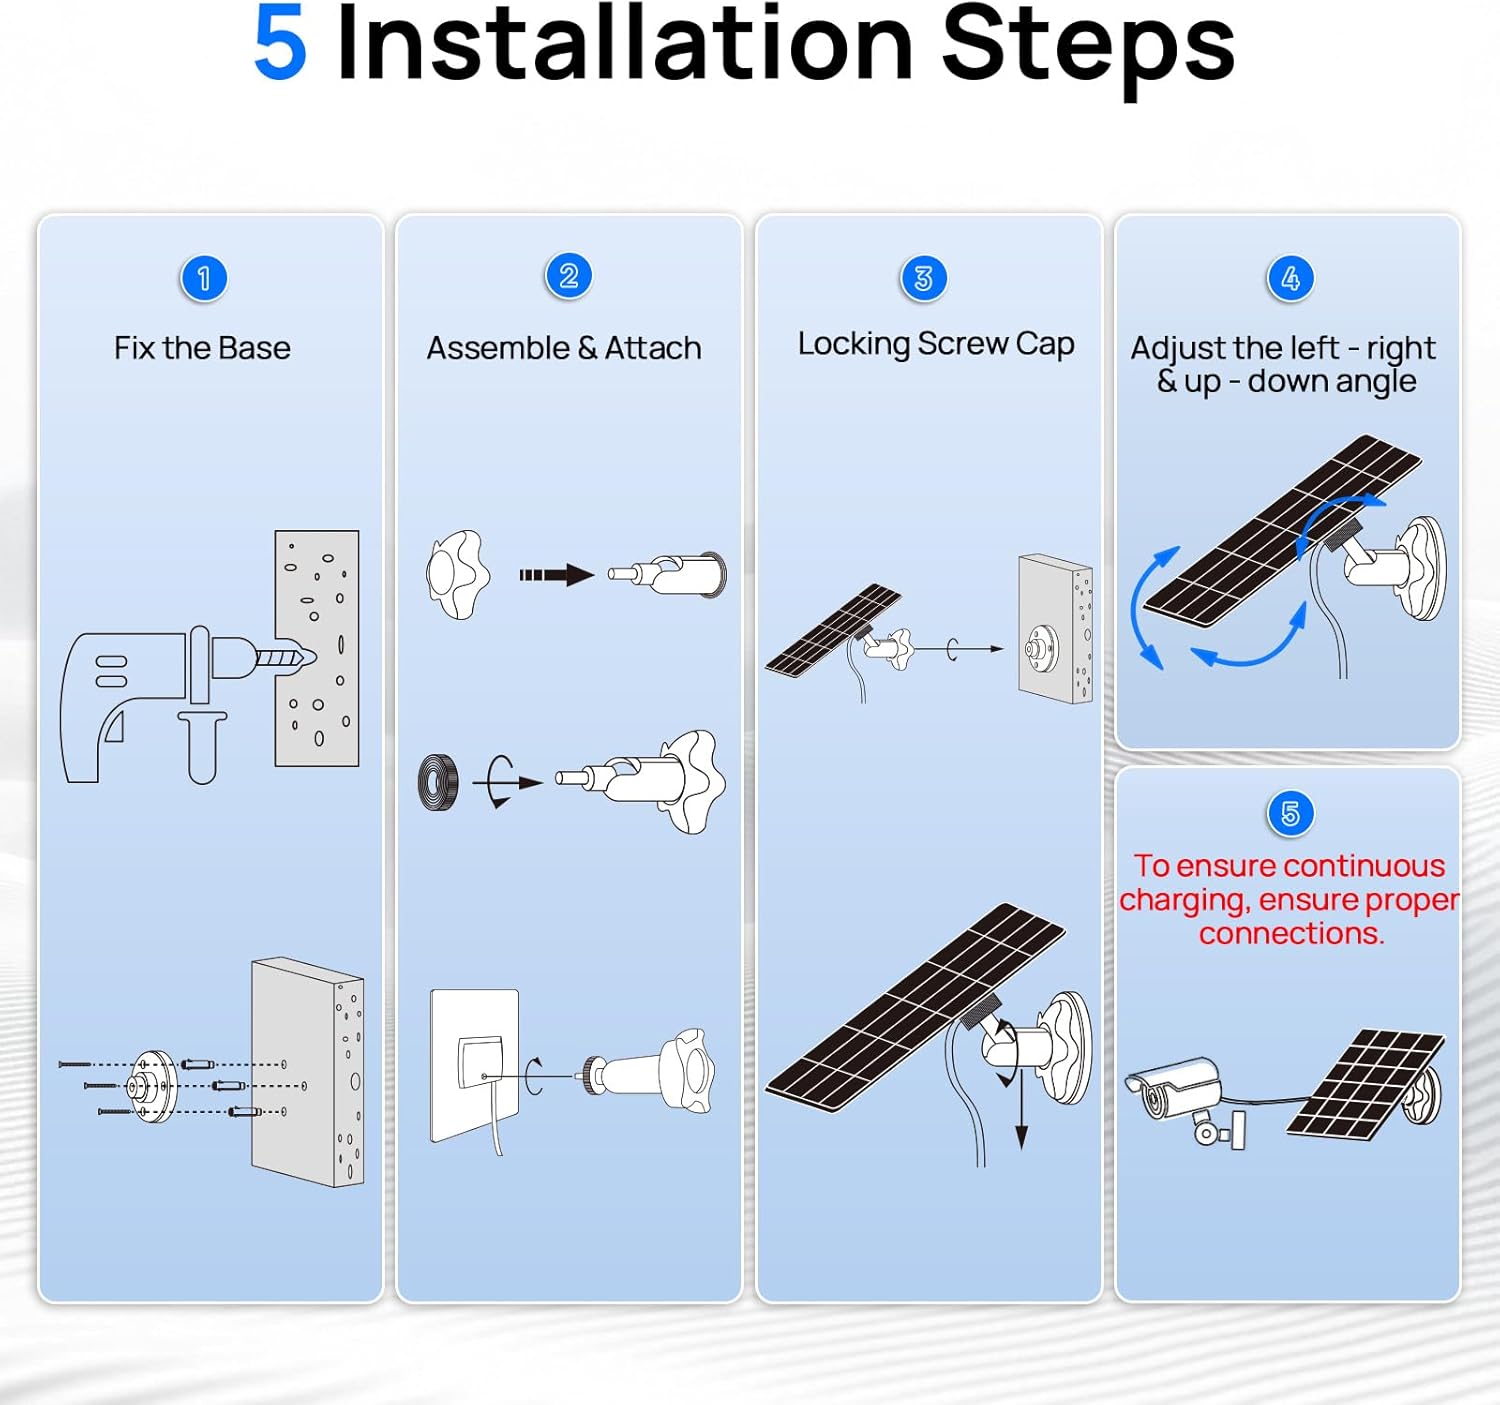
Image 3.1: A step-by-step diagram showing how to fix the base, assemble the joint, lock the screw cap, adjust the angle, and connect the camera.
Step 2: Install the Solar Panel
- Insert the locking nut into the ball joint of the adjustable bracket.
- Screw the round connector nut onto the ball joint.
- Screw the ball joint into the threaded hole on the back of the solar panel. Tighten it using the included nut.
- Attach the assembled solar panel and ball joint to the mounting base. Insert the locking nut at the bottom of the joint into the base, ensuring the ball joint tilts slightly upward.
Step 3: Adjust the Panel Angle
To maximize charging efficiency, adjust the solar panel angle to receive optimal direct sunlight. The panel can tilt 90° vertically, and the mount allows 360° horizontal rotation.
- Loosen the locking nut on the adjustable bracket.
- Adjust the tilt and rotation of the solar panel to face the sun directly.
- Once the desired angle is achieved, tighten the locking nut securely.
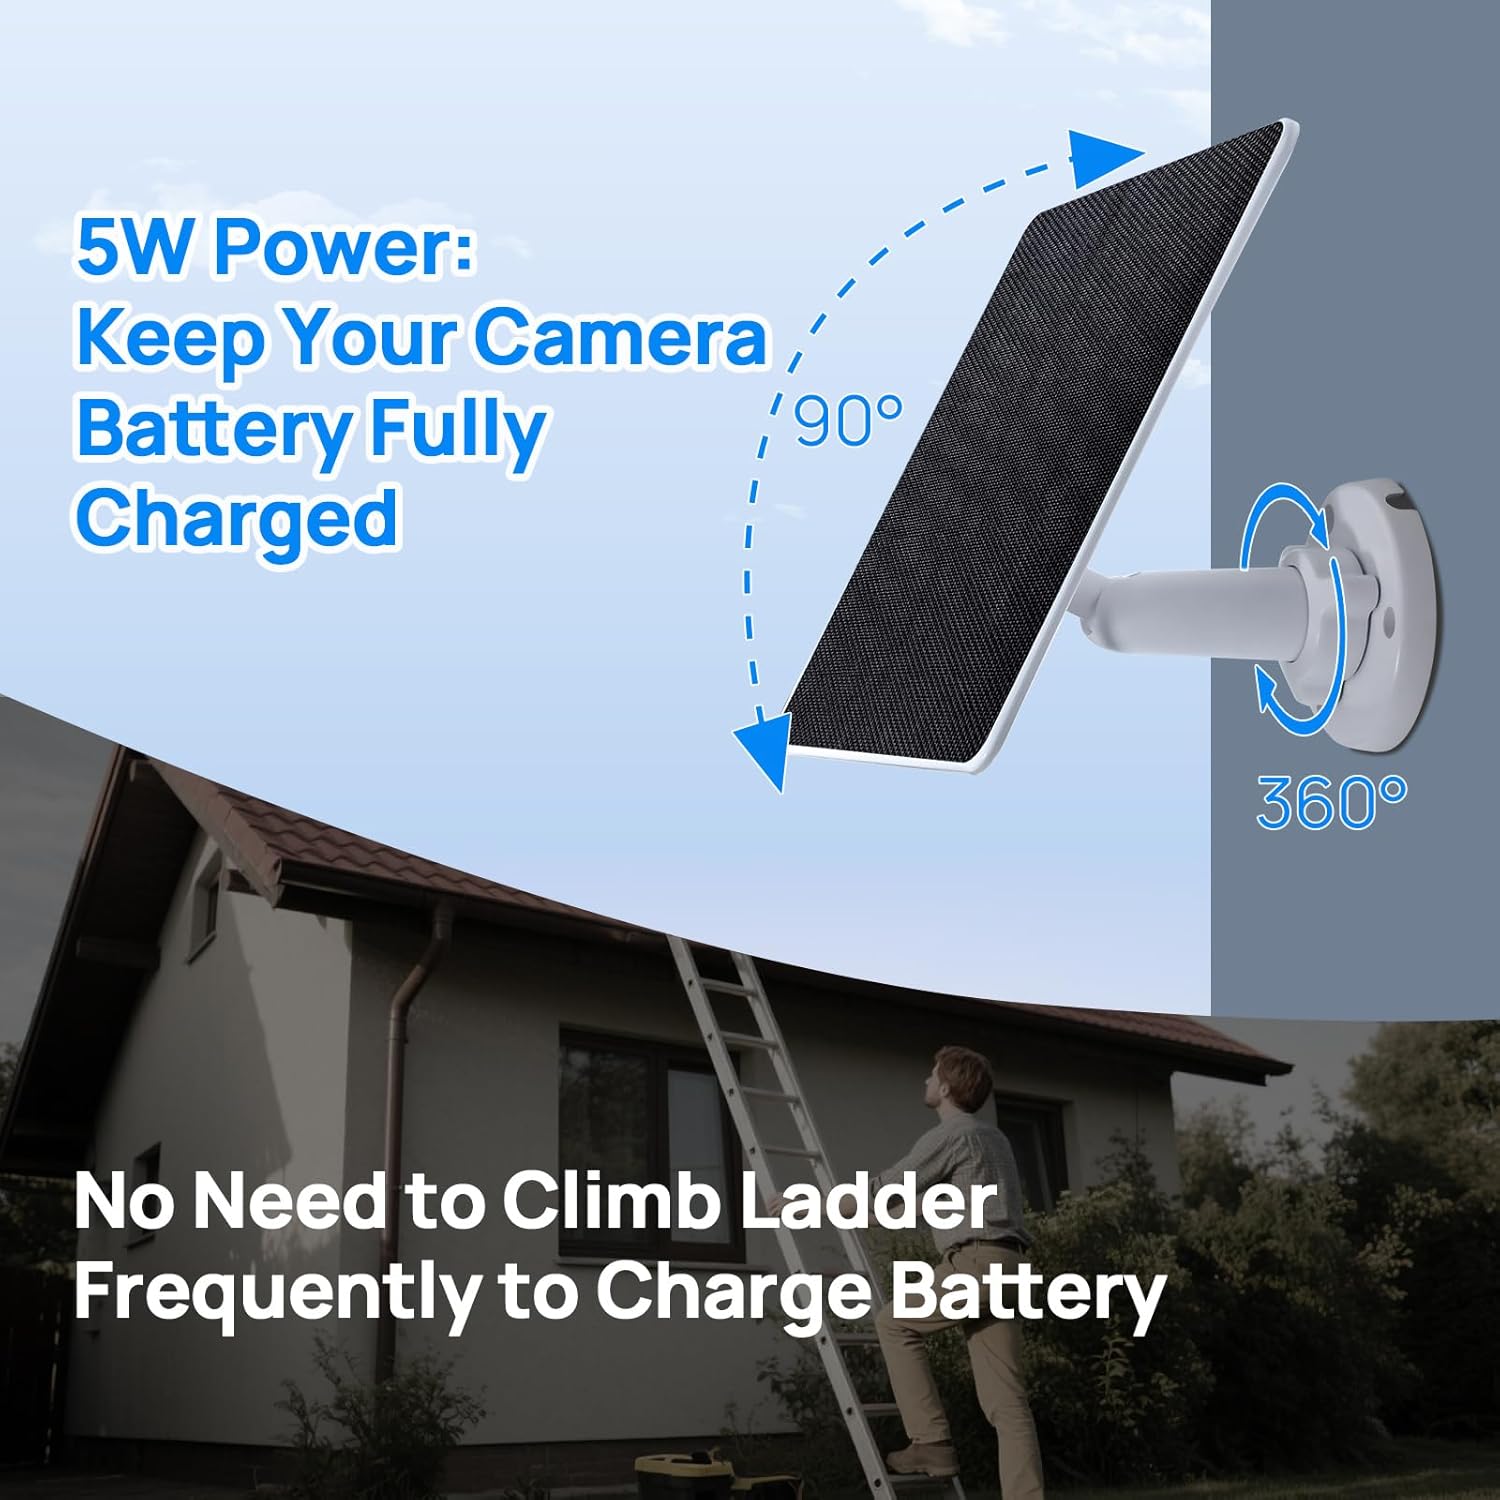
Image 3.2: The solar panel's adjustable mounting bracket, allowing for precise positioning to capture maximum sunlight.
Step 4: Check the Installation
After completing the physical installation, double-check all locking mechanisms and screws to ensure everything is securely fastened and stable.
Step 5: Connect the Camera for Power Supply
The included 3-meter (9.8ft) triple-output cable supports Type-C, Micro USB, and DC interfaces, making it compatible with a wide range of outdoor surveillance cameras.
- Connect the appropriate cable end to your security camera's power input.
- Use the provided IP65 waterproof caps to cover any unused cable ports. This protects the connectors from weather elements and ensures the waterproof integrity of the system.
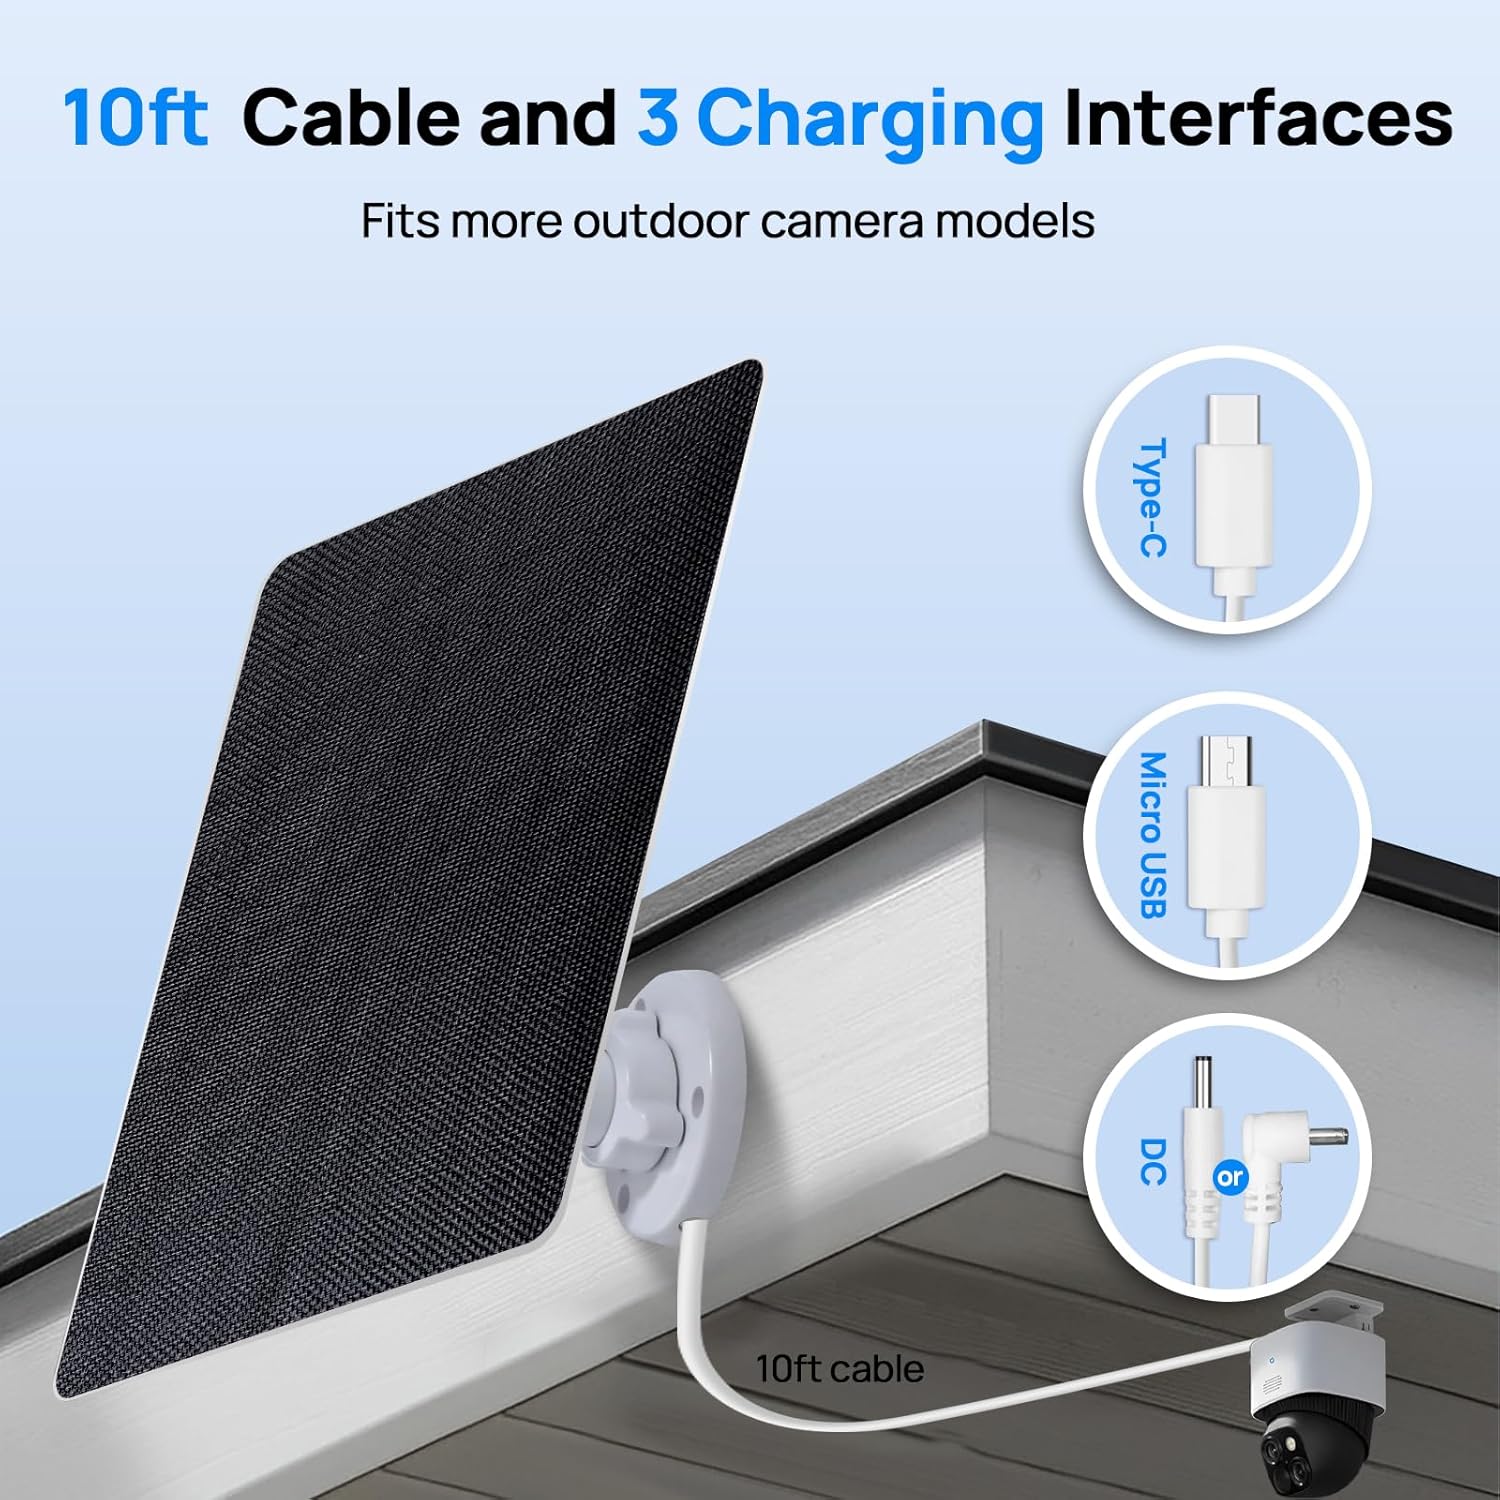
Image 3.3: The versatile 10-foot cable featuring Type-C, Micro USB, and DC connectors for broad compatibility with various cameras.
Video 3.1: A demonstration of the solar panel installation process, including securing the base, attaching the panel, adjusting the angle, and connecting the camera.
4. Operating Instructions
The ECO-WORTHY Solar Panel is designed for automatic operation. Once installed and connected, it will convert sunlight into electrical energy to power and charge your compatible security camera's battery.
- High Efficiency: The panel utilizes high-efficiency monocrystalline BC cells, achieving a power conversion efficiency of up to 25%.
- Optimal Sunlight: Ensure the panel is positioned to receive maximum direct sunlight throughout the day for optimal charging performance. Regularly check for any obstructions (e.g., leaves, dirt) that might block sunlight.
- Anti-Dust Surface: The uniquely upgraded anti-dust surface actively minimizes dust buildup, helping to maintain optimal light absorption and consistent charging performance.
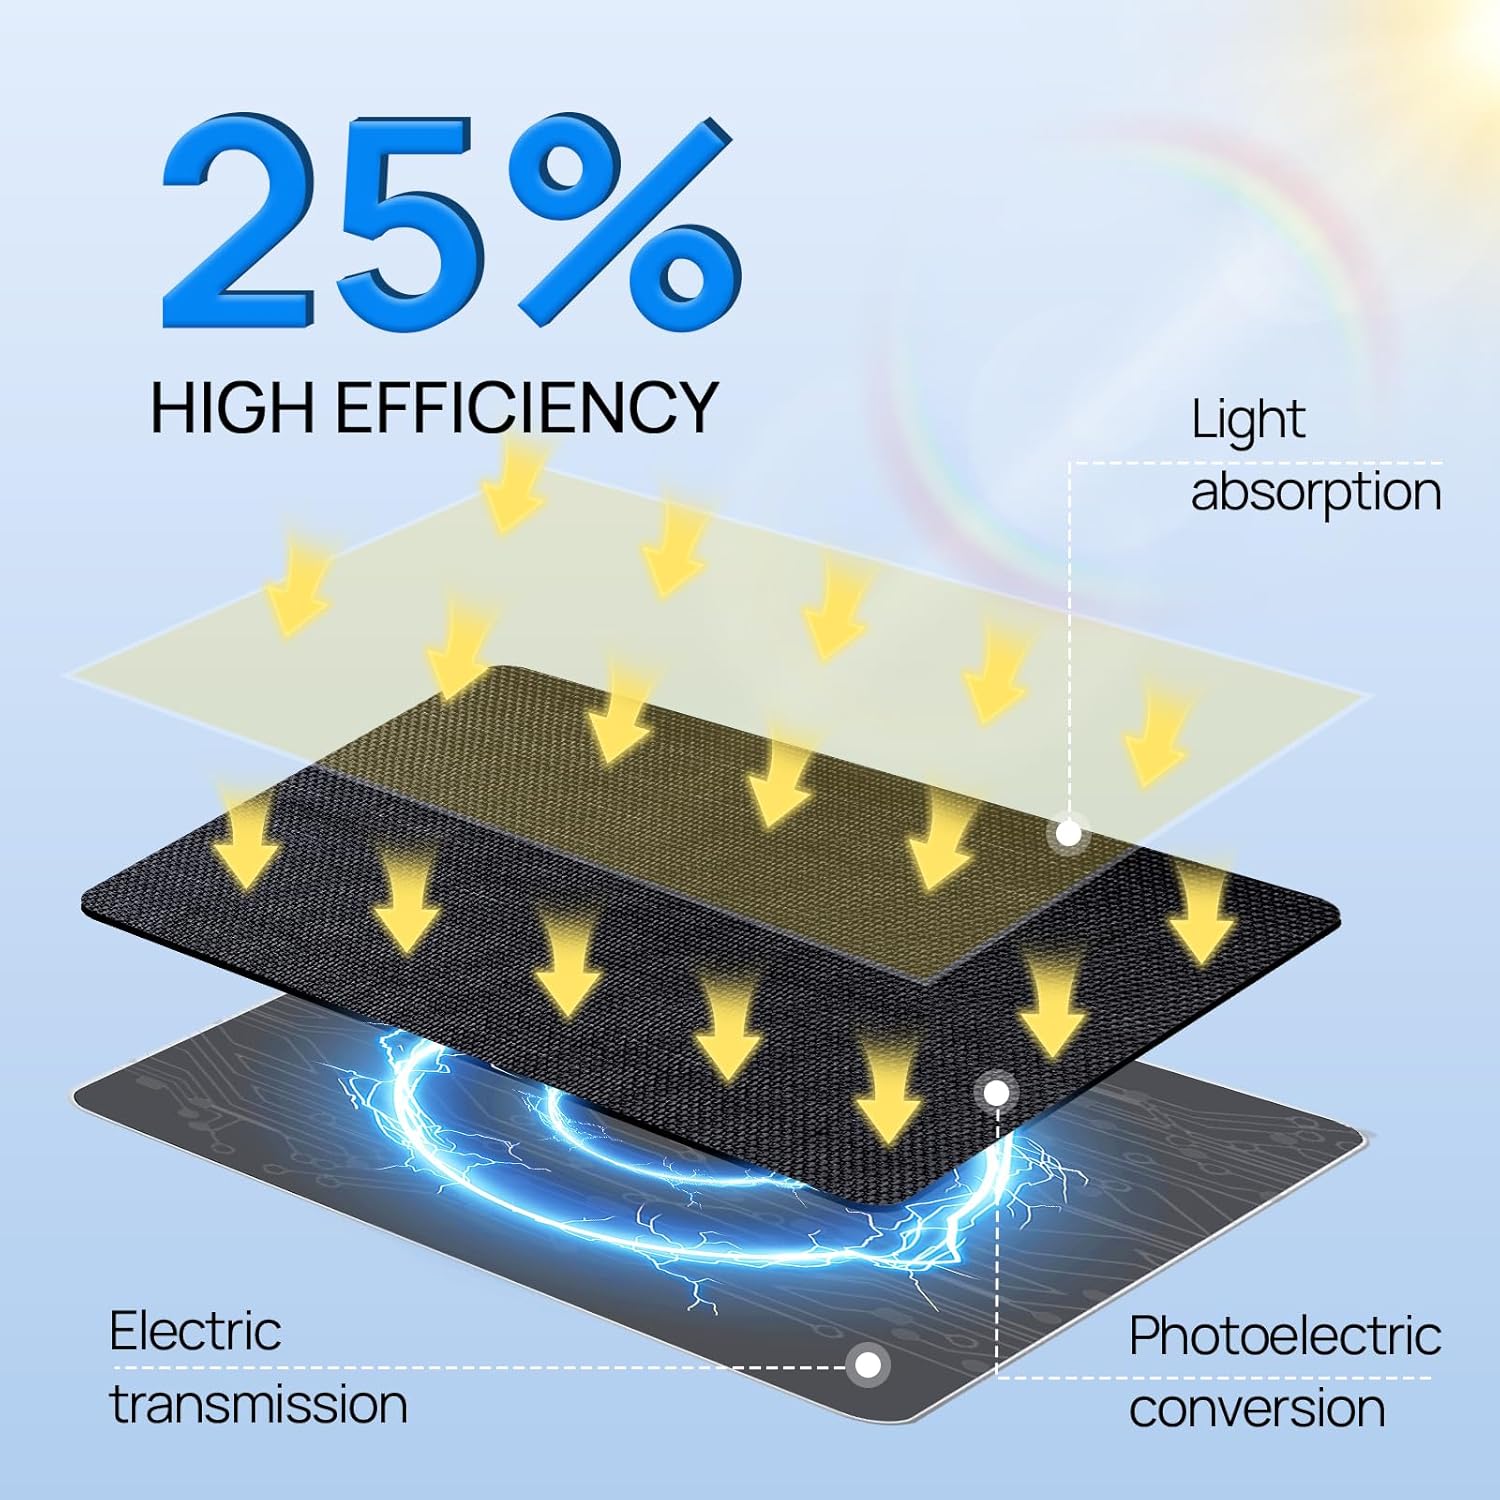
Image 4.1: An illustration demonstrating the 25% high efficiency of the solar panel, showing the process from light absorption to electric transmission.
5. Compatibility
This solar panel is designed for broad compatibility with various outdoor security cameras. Please review the compatibility details below:
- Compatible with:
- Ring outdoor cam (Stick Up Cam) battery / solar (2nd and 3rd Generation)
- Ring Spotlight Cam Plus/Pro battery/solar
- Wyze Outdoor Cam V1/V2
- NOT Compatible with:
- Ring outdoor cam (Stick Up Cam) (1st Generation)
- Ring Doorbell series
- Ring plug-in / wired camera versions
- Wyze Outdoor Battery Camera

Image 5.1: A clear chart indicating which Ring and Wyze camera models are compatible and incompatible with the ECO-WORTHY solar panel.
6. Maintenance
The ECO-WORTHY Solar Panel is designed for durability and minimal maintenance. Follow these guidelines to ensure long-lasting performance:
- Weather Resistance: The panel features an IP65 waterproof design, capable of withstanding harsh weather conditions such as heavy snow and torrential rain. The ETFE material provides excellent weather resistance and anti-aging properties, making it suitable for prolonged outdoor use.
- Dust Protection: The unique dust-proof surface effectively reduces dust accumulation. For optimal performance, periodically wipe the surface of the solar panel with a soft, damp cloth to remove any accumulated dirt or debris.
- Cable Protection: Always ensure any unused ports on the triple-output cable are covered with the provided waterproof caps to prevent moisture and dust ingress.
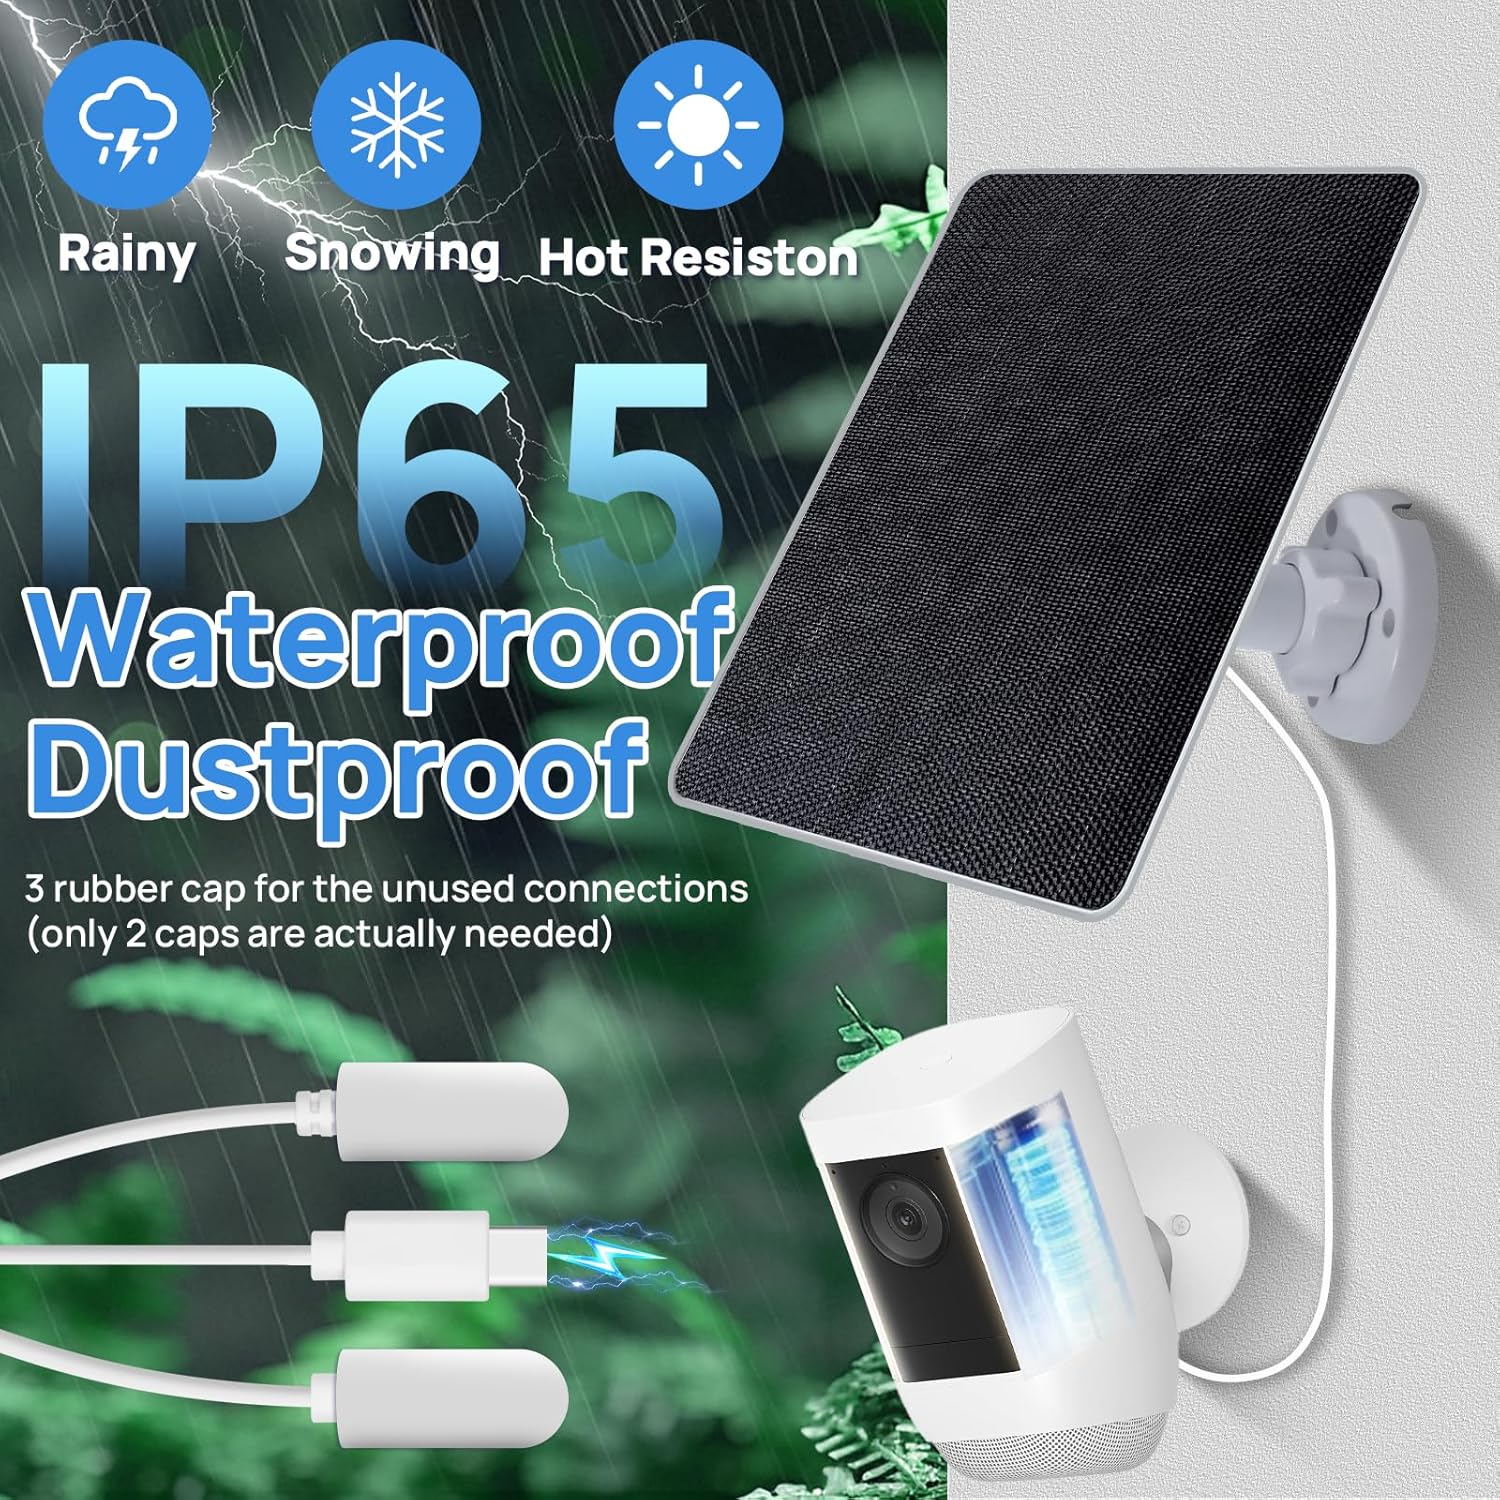
Image 6.1: The solar panel highlighting its IP65 waterproof and dustproof features, with a close-up of the waterproof caps protecting the cable connectors.

Image 6.2: The solar panel demonstrating its resilience in diverse weather conditions, emphasizing the ETFE weather-resistant material.
7. Troubleshooting
If your solar panel is not providing power to your camera, consider the following:
- No Sunlight: Ensure the solar panel is receiving direct sunlight. Obstructions like shade from trees, buildings, or dirt on the panel surface can significantly reduce charging efficiency.
- Incorrect Angle: Adjust the panel's angle to face the sun directly. Refer to Section 3, Step 3 for guidance on adjusting the panel angle.
- Loose Connections: Verify that all cable connections between the solar panel and the camera are secure.
- Incompatible Camera: Double-check your camera's compatibility with the solar panel. Refer to Section 5 for a list of compatible and incompatible devices.
- Uncovered Ports: Ensure all unused cable ports are covered with the waterproof caps to prevent short circuits or damage from moisture.
8. Specifications
| Feature | Specification |
|---|---|
| Brand | ECO-WORTHY |
| Model Number | AM-L02M5YN-1A |
| Material | Monocrystalline Silicon, ETFE, Aluminum |
| Product Dimensions | 8.31"L x 6.77"W x 1.89"H |
| Item Weight | 0.4 Kilograms (14 ounces) |
| Efficiency | 25% |
| Maximum Power | 5 Watts |
| Output Voltage | 5 Volts |
| Color | Black |
| Special Feature | Portable |
| UPC | 810127139213 |
9. Warranty and Support
ECO-WORTHY stands behind the quality and performance of its products. We offer comprehensive after-sales service to ensure your peace of mind.
- Warranty: This product comes with a two-year manufacturer's warranty.
- Technical Support: Enjoy 24/7 technical support for any issues you may encounter during use. Lifetime technical support is also provided.
Contact Information:
- Website: www.eco-worthy.com/
- Facebook: www.facebook.com/ecoworthy.store
- Email: customer.service@eco-worthy.com


