1. Introduction
The Radioddity HD-1 is a robust and reliable two-way radio designed for demanding environments. Featuring IP67 waterproofing, dustproofing, and shockproof construction, it ensures clear communication in various conditions. This manual provides detailed instructions for setup, operation, and maintenance to help you maximize your device's performance.
2. What's in the Box
- 6 x Radioddity HD-1 Walkie Talkies (Batteries Installed)
- 6 x Hand Straps
- 3 x Desktop Chargers
- 3 x 2-in-1 USB-C Charging Cables
- 3 x Adapters
- 6 x Belt Clips
- 18 x Screws
- 1 x User Manual
3. Product Features
3.1 Floating, Waterproof & Dustproof (IP67)
The HD-1 boasts IP67 protection, allowing it to resist water submersion for up to 30 minutes and block dust particles down to 0.1µm. Its floating design ensures it remains on the water surface, preventing loss during aquatic activities.

Image: Two Radioddity HD-1 walkie-talkies floating in water with bubbles, highlighting their IP67 waterproof and dustproof features. A close-up shows a waterproof ring seal.
Video: A demonstration of the HD-1's floating and waterproof capabilities, including a range test, presented by Matt Covers Tech.
3.2 Rugged & Durable Design (Shockproof)
Constructed from tough PC+TPE materials, the HD-1 is built to withstand harsh environments, offering resistance to heat, drops, and heavy pressure. It has successfully passed over 1000 drop tests from 2 meters, making it ideal for security, construction, emergency rescue, and extreme outdoor use.

Image: A Radioddity HD-1 walkie-talkie on a rocky terrain with dust and small rocks in motion, emphasizing its robust TPE+PC construction and shockproof design.
Video: A short demonstration of the HD-1's shockproof capabilities, showing it withstand impacts, titled 'When Hammers Fail, HD-1 Doesn’t'.
3.3 Long Battery Life & USB-C Charging
Equipped with a 2400mAh rechargeable lithium battery, the HD-1 provides 1-2 days of active usage and up to 4-5 days of standby time. It supports convenient USB-C direct charging and includes a desktop charging station for added flexibility.
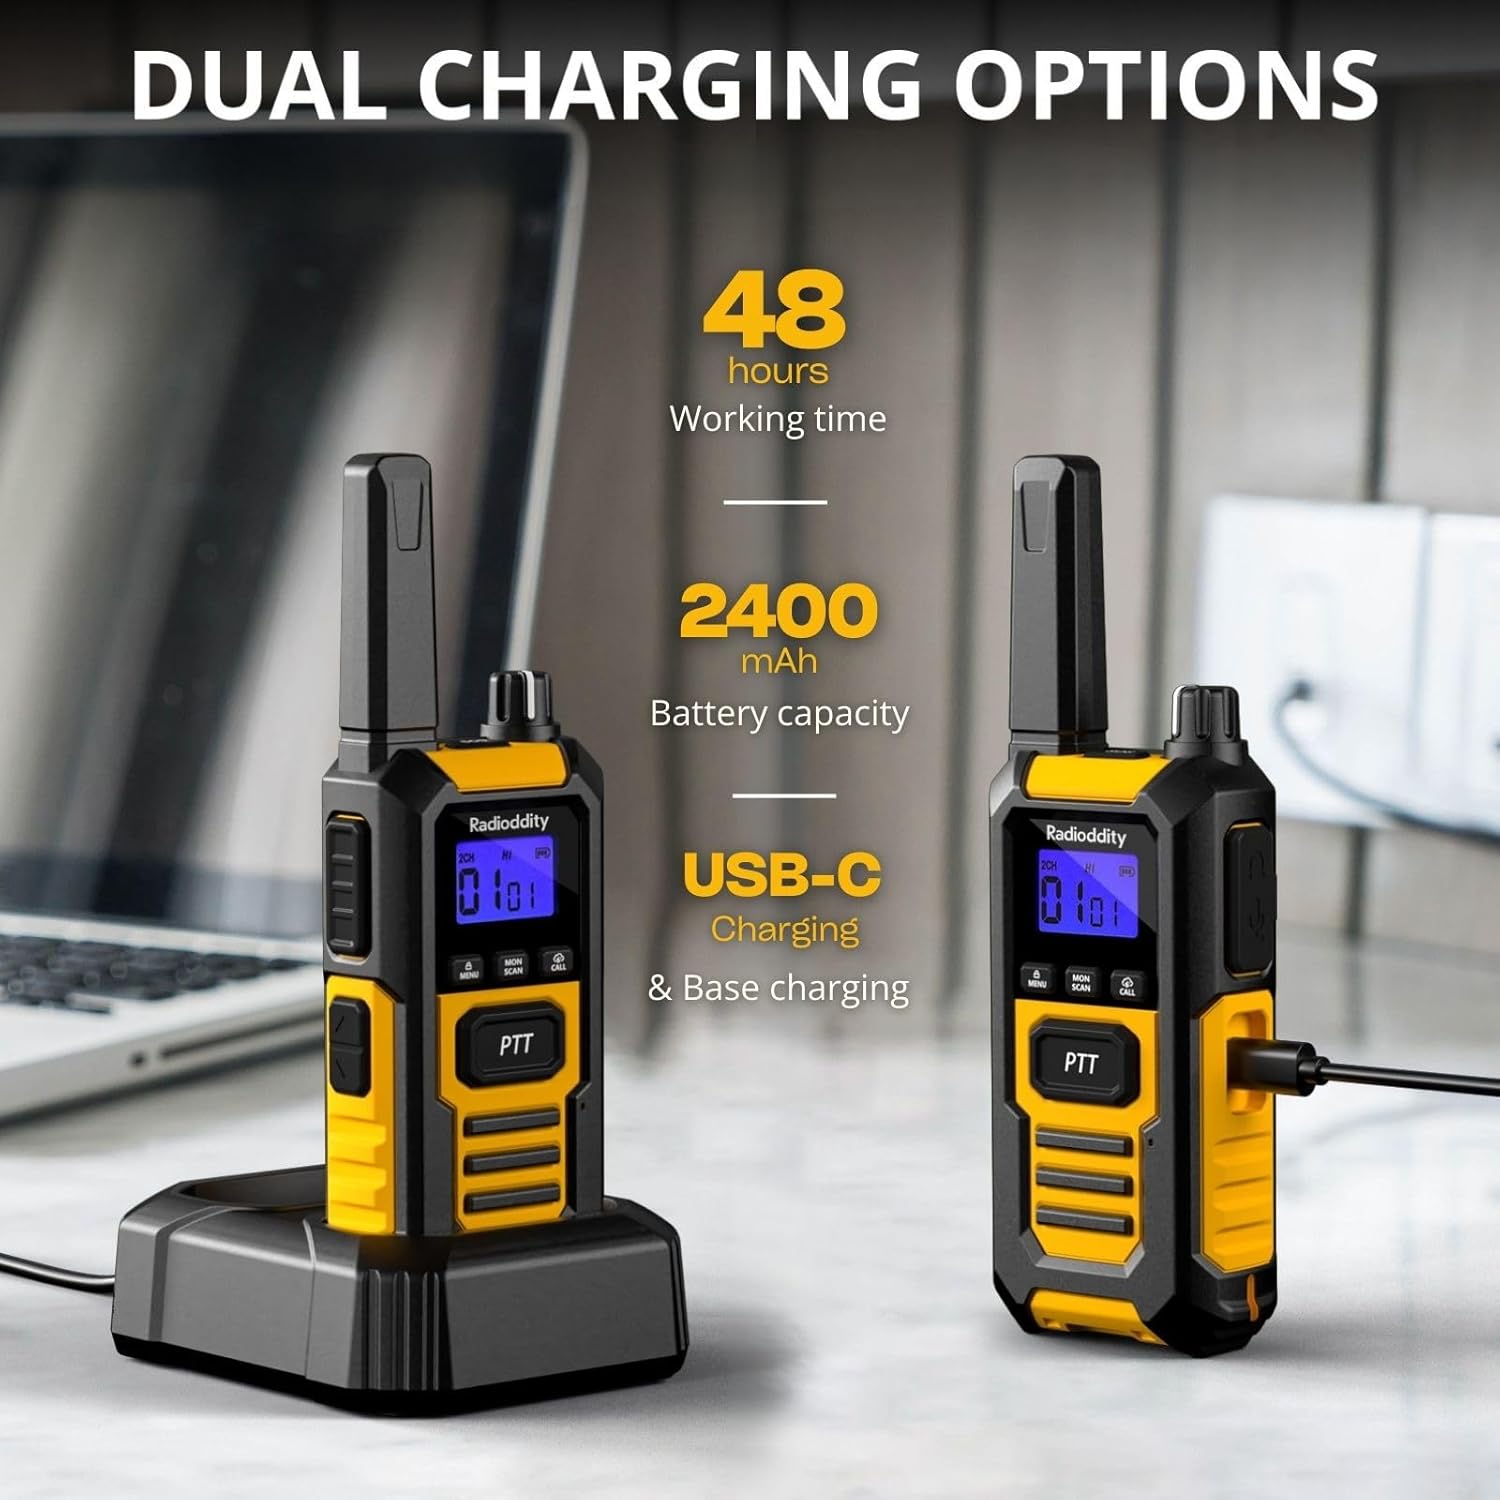
Image: Two Radioddity HD-1 walkie-talkies on a desk, one in a charging dock and the other connected via a USB-C cable, illustrating the dual charging options. Text indicates 48 hours working time and 2400mAh battery capacity.
3.4 Vibration Alerts & VOX
Stay informed in noisy environments with built-in vibration notifications. The Voice Operated Exchange (VOX) feature offers 9 adjustable sensitivity levels for hands-free communication, eliminating the need to press buttons in demanding work settings.

Image: Two construction workers, one with a Radioddity HD-1 walkie-talkie clipped to his vest, showing vibration alerts with visual cues. The other worker holds a walkie-talkie.
3.5 One-Key Group Call
Facilitate instant communication with your entire team by pressing a single button. This feature eliminates the need for channel setup, making it ideal for fast and efficient one-to-many communication in various scenarios like job sites, camping, or outdoor adventures.

Image: Three Radioddity HD-1 walkie-talkies illustrating the one-key group call feature. Two radios show incoming signals, and one hand presses the PTT button on a third radio.
3.6 SOS Emergency Alerts
In emergencies or when working alone, the SOS feature allows you to send a remote signal and a loud alarm to another HD-1 unit. This enables quick location and assistance, enhancing safety for activities like hiking, climbing, or traveling.
Image: A Radioddity HD-1 walkie-talkie with an SOS icon on its screen and a red alarm light, symbolizing its emergency alert capabilities.
4. Setup
4.1 Battery Installation
The Radioddity HD-1 walkie-talkies come with 2400mAh 9V batteries pre-installed. Ensure the battery compartment is securely closed before use.
4.2 Charging
Your HD-1 walkie-talkies can be charged using two methods: via the included desktop charging station or directly via the USB-C port on the side of the unit. When using the desktop charger, place the walkie-talkie with the logo facing the dock. The indicator light on the dock will turn red during charging and green when fully charged. For direct charging, connect the USB-C cable to the port on the side of the walkie-talkie.
Image: Two Radioddity HD-1 walkie-talkies on a desk, one in a charging dock and the other connected via a USB-C cable, illustrating the dual charging options. Text indicates 48 hours working time and 2400mAh battery capacity.
Video: A detailed guide on how to charge the walkie-talkie using both the USB-C port and the desktop charging dock, including explanations of indicator lights.
5. Operating Instructions
5.1 Power On/Off
To power on the device, press and hold the power button (usually the 'Menu' button or a dedicated power button) for approximately 3 seconds. The display will illuminate. To power off, repeat the same process.
5.2 Volume Adjustment
Adjust the volume using the dedicated volume up (+) and volume down (-) buttons. The HD-1 offers 7 volume levels. The current volume level will be displayed on the screen.
5.3 Channel Selection
The Radioddity HD-1 features 22 FRS channels. To change channels:
- Press the 'Menu' button once. The large channel number on the display will start to flash.
- Use the up/down arrow buttons to select your desired channel.
- Press the PTT button to confirm your selection and exit channel selection mode.
5.4 Encryption Code (CTCSS/DCS)
The HD-1 supports 99 encryption codes (38 CTCSS and 61 DCS codes) to enhance privacy and prevent interference. To set an encryption code:
- Press the 'Menu' button twice. The small encryption code number on the display will start to flash.
- Use the up/down arrow buttons to select your desired encryption code.
- Press the PTT button to confirm your selection and exit encryption code selection mode.
5.5 VOX (Voice Operated Exchange)
VOX mode enables hands-free communication. To activate and adjust VOX sensitivity:
- Press the 'Menu' button three times. The VOX icon will appear, and the sensitivity level will flash.
- Use the up/down arrow buttons to select the desired sensitivity level (0-9). 'OF' indicates VOX is off.
- Press the PTT button to confirm and exit.
5.6 Ringtone Selection
The HD-1 offers 10 different ringtones. To select a ringtone:
- Press the 'Menu' button four times. The display will show 'CA', and the ringtone number will flash.
- Use the up/down arrow buttons to preview and select your preferred ringtone.
- Press the PTT button to confirm and exit.
5.7 Keypad Sound
You can enable or disable keypad tones. To adjust:
- Press the 'Menu' button five times. The display will show 'TO', and the ON/OFF status will flash.
- Use the up/down arrow buttons to select 'ON' (keypad sound enabled) or 'OF' (keypad sound disabled).
- Press the PTT button to confirm and exit.
5.8 Intercom End Sound
You can enable or disable the 'beep' sound that signals the end of an intercom transmission. To adjust:
- Press the 'Menu' button six times. The display will show 'RO', and the ON/OFF status will flash.
- Use the up/down arrow buttons to select 'ON' (end tone enabled) or 'OF' (end tone disabled).
- Press the PTT button to confirm and exit.
5.9 High/Low Power Selection
The HD-1 allows you to choose between high (2W) and low (0.5W) transmission power. High power offers longer range but consumes more battery, while low power conserves battery life for shorter distances.
- Press the 'Menu' button eight times. The display will show 'PO', and the power icon (HI or LO) will flash.
- Use the up/down arrow buttons to select 'HI' or 'LO'.
- Press the PTT button to confirm and exit.
Note: Channels 1-7 and 15-22 support both high and low power. Channels 8-14 only support low power.
5.10 Scan Mode
Scan mode allows the walkie-talkie to automatically search for active channels. To activate:
- Briefly press the 'Scan/Monitor' button. The 'SCAN' icon will appear on the display.
- The device will cycle through channels, stopping on any active transmission.
- To exit scan mode, briefly press the 'Scan/Monitor' button again.
Note: Scan mode only locks the channel, not the privacy code. Setting an encryption code is recommended if you wish to avoid being disturbed by others scanning.
5.11 Monitoring Mode
Monitoring mode allows you to listen to transmissions on the current channel, even if the signal is weak or intermittent. To activate:
- Press and hold the 'Scan/Monitor' button for 3 seconds. The signal tower icon will appear on the display.
- Release the button to exit monitoring mode.
5.12 Key Lock
Key lock prevents accidental button presses. To activate/deactivate:
- Press and hold the 'Call' button for 3 seconds. A 'key' icon will appear on the display, indicating the keypad is locked.
- To unlock, press and hold the 'Call' button again for 3 seconds. The 'key' icon will disappear.
Note: When locked, only the PTT button for transmission and the 'Call' button for unlocking will function.
5.13 SOS Emergency Alert
In an emergency, you can activate the SOS alert. To use:
- Press the 'SOS' button (usually located on the side or front panel).
- The device will transmit an emergency signal and a loud alarm to other HD-1 units within range.
6. Specifications
- Item Weight: 7.4 ounces
- Product Dimensions: 2.4 x 1.1 x 7.1 inches
- Item Model Number: HD-1
- Batteries: 6 9V batteries required (included)
- Number of Channels: 22
- Special Features: Dual PTT, Emergency Alarm, Floating, Long Range, Weather Alert
- Frequency Range: FRS (462 MHz and 467 MHz) / PMR 446MHz
- Talking Range Maximum: 4 Miles
- Voltage: 3.7 Volts
- Water Resistance Level: Waterproof (IP67)
7. Maintenance
- Keep the device clean and dry. Wipe with a soft, damp cloth.
- Ensure all port covers are securely closed to maintain IP67 rating.
- Store in a cool, dry place away from direct sunlight and extreme temperatures.
- Charge batteries regularly to prolong their lifespan, even if not in active use.
8. Troubleshooting
- No Power: Ensure batteries are charged and correctly installed. Check if the power button is pressed long enough.
- No Sound/Poor Audio: Check volume level. Ensure both units are on the same channel and privacy code. Verify speaker/microphone ports are clear.
- Limited Range: Ensure high power mode is selected (if available for the channel). Obstructions like buildings or dense foliage can reduce range. Move to an open area for best results.
- Interference: Change channels or encryption codes to avoid interference from other users.
- Buttons Unresponsive: Check if Key Lock mode is activated. Unlock the keypad if necessary.
9. Warranty and Support
The Radioddity HD-1 comes with an 18-month warranty. For technical support, warranty claims, or further assistance, please refer to the contact information provided in the physical user manual included with your product or visit the official Radioddity website.


