Introduction
Thank you for choosing the OREiN Outdoor Motion Sensor Light. This manual provides essential information for the safe installation, operation, and maintenance of your new lighting fixture. Please read these instructions thoroughly before installation and keep them for future reference.
This outdoor light features a high-efficiency 3000 lumen LED, a 180-degree adjustable motion sensor, and three selectable color temperatures (2700K, 4000K, 6500K). Its robust IP65-rated construction ensures reliable performance in various outdoor conditions.
Safety Instructions
- Always disconnect power at the circuit breaker before installation, maintenance, or cleaning.
- Installation should be performed by a qualified electrician or a person familiar with the construction and operation of the product and the hazards involved.
- Ensure all wiring connections are secure and comply with local electrical codes.
- Do not look directly into the LED light source when it is illuminated, as this may cause eye damage.
- Do not modify the fixture or use it for purposes other than its intended use.
- Keep packaging materials away from children.
Package Contents
Please check that all components are present and undamaged:
- OREiN Outdoor Motion Sensor Light Fixture
- Mounting Bracket
- Mounting Screws and Wall Anchors
- Instruction Manual
Specifications
| Brand | OREiN |
| Model Number | 1 |
| Power Consumption | 27 W |
| Luminous Flux | 3000 lm |
| Color Temperature | 2700K / 4000K / 6500K (Adjustable) |
| LED Quantity | 160 LEDs |
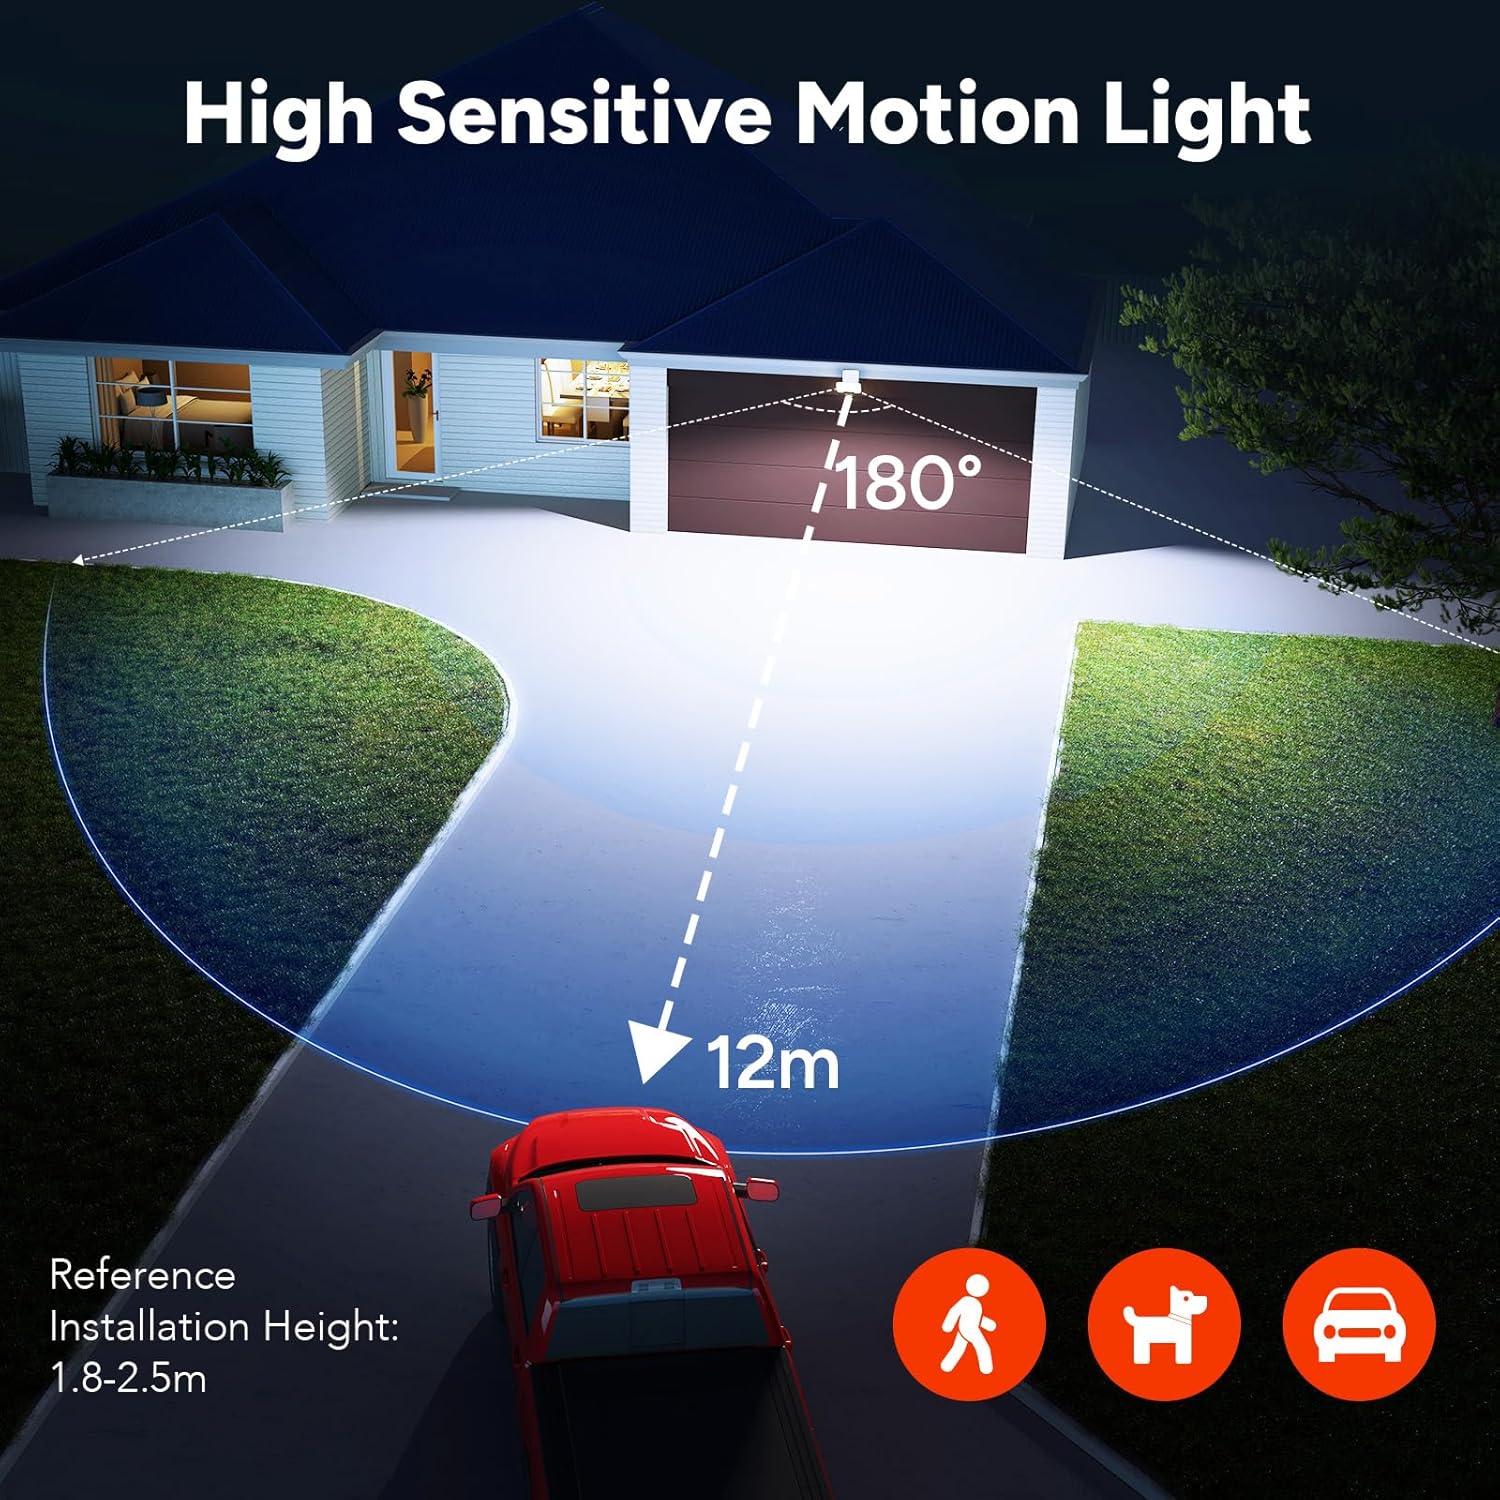
| Motion Detection Angle | 180 degrees |
| Motion Detection Distance | 2 - 12 meters |
| Lighting Duration (TIME) | 30 seconds - 8 minutes |
| Light Sensitivity (LUX) | 20 - 2000 LUX |
| IP Rating | IP65 (Waterproof) |
| Material | Acrylonitrile Butadiene Styrene (ABS) |
| Dimensions | 13 x 10 x 11 cm |
| Recommended Mounting Height | 1.8 - 2.5 meters |
| Lifespan | 50,000 hours |
| Voltage | 220 Volts |
Setup and Installation
- Prepare for Installation: Ensure the power supply to the installation area is turned off at the circuit breaker.
- Mark Drilling Points: Position the mounting bracket on the desired wall location. Use a pencil to mark the drilling points for the screws.
- Drill Holes and Insert Anchors: Drill holes at the marked points and insert the wall anchors (if necessary for your wall type).
- Mount the Bracket: Secure the mounting bracket to the wall using the provided screws.
- Wire the Fixture: Connect the electrical wires from your power supply to the fixture's terminals. Ensure correct connections for Live (L), Neutral (N), and Ground. The quick-connect technology allows for tool-free wiring.
- Attach the Light Fixture: Align the light fixture with the mounted bracket and securely attach it. The optimized installation design allows for quick attachment.
- Restore Power: Once the fixture is securely installed and wired, restore power at the circuit breaker.
Recommended Mounting Height: For optimal motion detection, install the light between 1.8 to 2.5 meters (5.9 to 8.2 feet) above the ground.

Operating Instructions
1. Adjustable PIR Sensor Settings
The motion sensor has three adjustable knobs on its underside to customize its behavior:
- TIME (Lighting Time): Adjusts how long the light remains on after motion is detected. Range: 30 seconds to 8 minutes.
- SENS (Detection Distance): Adjusts the sensitivity and range of the motion sensor. Range: 2 meters to 12 meters.
- LUX (Light Sensitivity): Determines the ambient light level at which the sensor becomes active.
- 20 LUX (Min): The sensor will only activate in dark environments (nighttime).
- 2000 LUX (Max): The sensor will activate in both daytime and nighttime conditions.

2. Color Temperature (CCT) Selection
The light offers three color temperature options. To switch between them, briefly click the CCT button (less than 0.5 seconds) located on the fixture:
- 2700K: Warm White, ideal for cozy evenings on a terrace or patio.
- 4000K: Neutral White, suitable for parking areas or bright work light.
- 6500K: Cool White, provides active security lighting for garages and entrances.

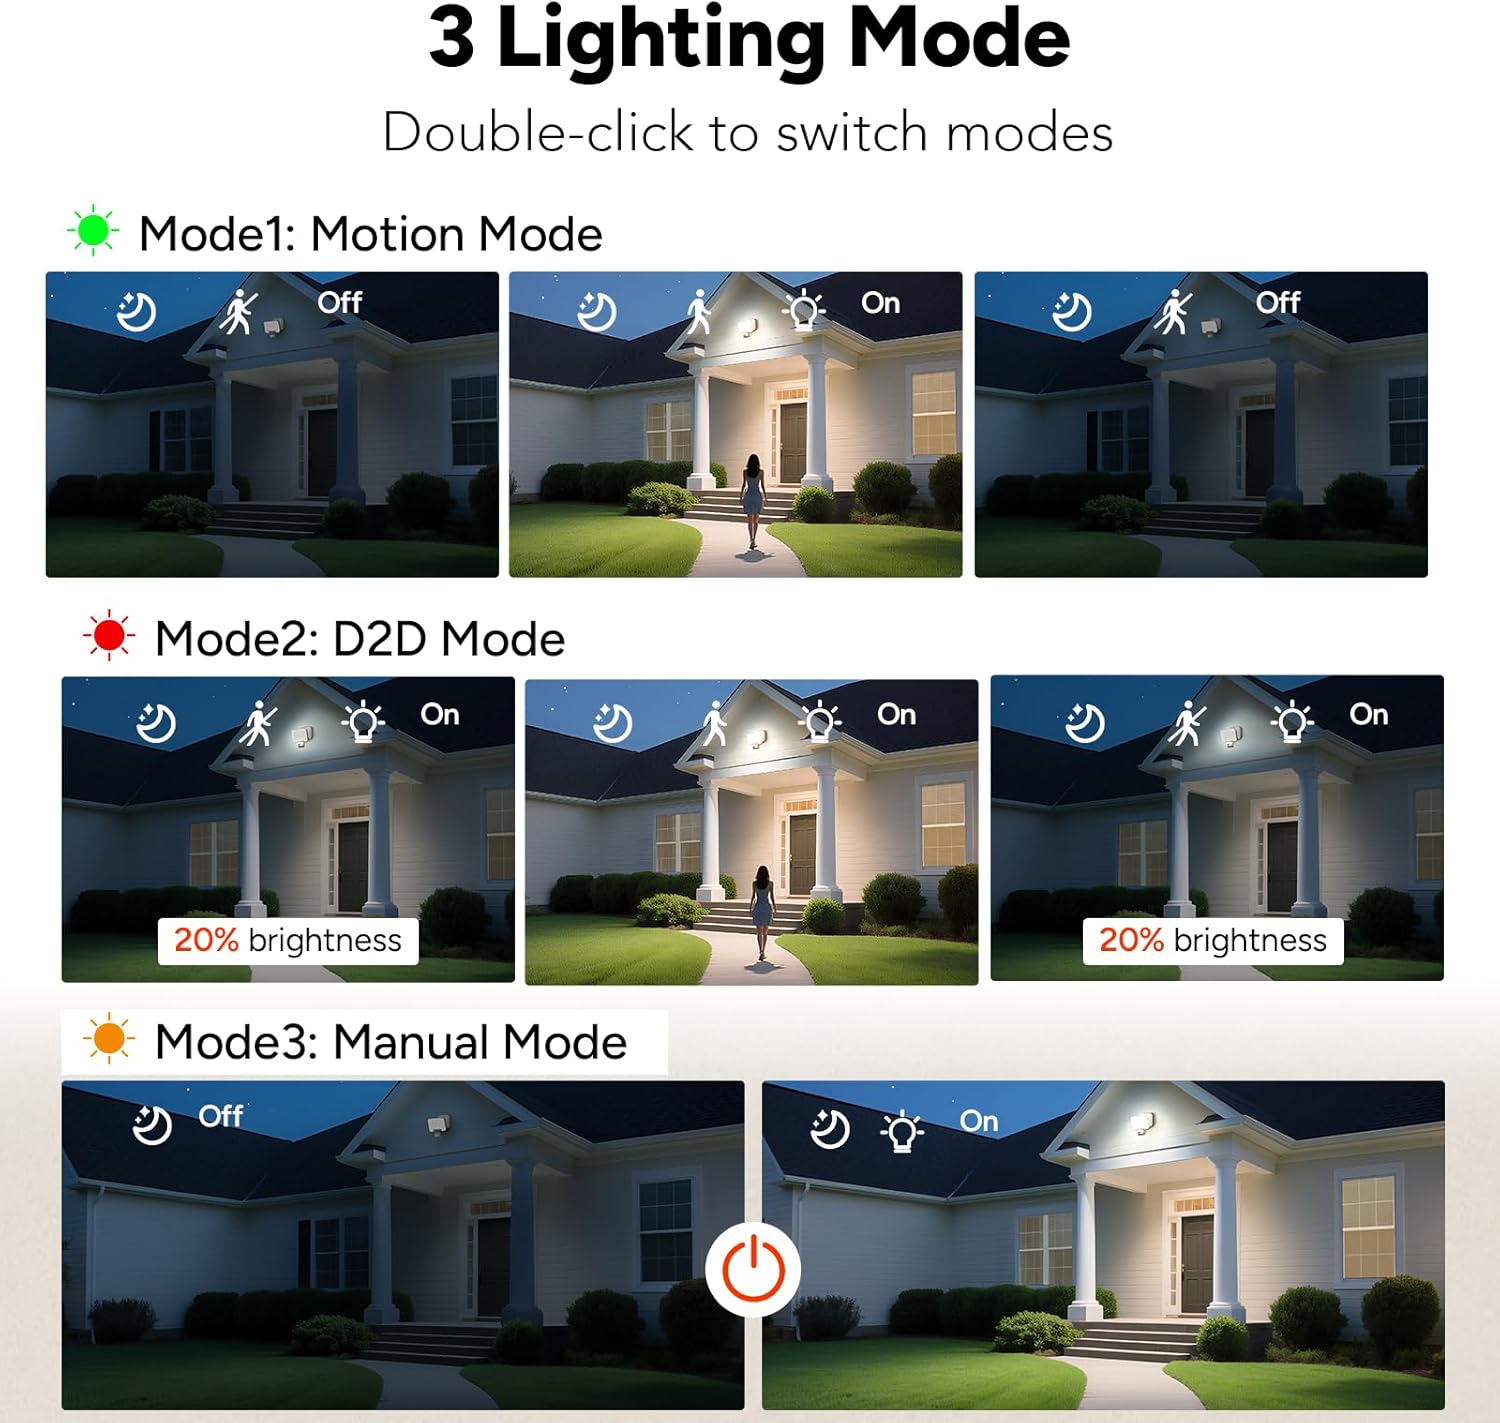
3. Lighting Modes
The fixture supports three operational modes. Double-click the CCT button to cycle through these modes:
- Mode 1: Motion Mode (Security Mode)
The light remains off until motion is detected. Upon detection, it illuminates at 100% brightness for the set TIME duration, then turns off. - Mode 2: D2D Mode (Dusk-to-Dawn Mode)
At night, the light stays on continuously at 20% brightness. When motion is detected, it brightens to 100% for the set TIME duration, then returns to 20% brightness. - Mode 3: Manual Mode
The light operates like a standard fixture, controlled by an external wall switch. The motion sensor is deactivated in this mode.

Maintenance
- Cleaning: To clean the fixture, ensure power is disconnected. Wipe with a soft, damp cloth. Do not use abrasive cleaners, solvents, or harsh chemicals, as these can damage the finish or electrical components.
- Inspection: Periodically inspect the fixture for any signs of damage, loose wiring, or wear. If any issues are found, disconnect power and consult a qualified electrician.
- LEDs: The LEDs in this fixture are designed for a long lifespan (50,000 hours) and are not user-replaceable.
Troubleshooting
| Problem | Possible Cause | Solution |
|---|---|---|
| Light does not turn on. | No power supply. LUX setting too low (only activates at night). Motion sensor obstructed or faulty. | Check circuit breaker and wiring. Adjust LUX knob to a higher setting (e.g., 2000 LUX for testing). Ensure clear line of sight for the sensor. |
| Light stays on continuously. | Continuous motion in detection zone. TIME setting too long. Fixture is in D2D Mode or Manual Mode. | Clear the detection area of constant movement. Adjust TIME knob to a shorter duration. Double-click CCT button to switch to Motion Mode. |
| Motion sensor not detecting. | SENS setting too low. Mounting height incorrect. Obstructions blocking sensor. | Adjust SENS knob to a higher range. Ensure mounting height is between 1.8-2.5m. Remove any objects blocking the sensor's view. |
| Light flickers. | Loose wiring connection. Unstable power supply. | Disconnect power and check all wiring connections. Consult an electrician to check power supply stability. |
Warranty and Support
This OREiN product comes with a 24-month warranty from the date of purchase, covering defects in materials and workmanship under normal use.
For technical assistance, troubleshooting, or warranty claims, please contact our customer support team. We offer 7x24 hours support to ensure your satisfaction.
Please retain your proof of purchase for warranty validation.


