
1. Introduction
This manual provides detailed instructions for the setup, operation, maintenance, and troubleshooting of your KNUP KP-GM038 Wireless Gaming Controller. Please read this manual thoroughly before using the product to ensure proper functionality and to maximize your gaming experience.
2. Safety Information
- Keep the controller away from water and other liquids.
- Do not expose the controller to extreme temperatures.
- Avoid dropping or subjecting the controller to strong impacts.
- Do not attempt to disassemble or repair the controller yourself. Contact qualified personnel for service.
- Use only the specified charging cable and power source.
3. Product Overview
The KP-GM038 is a versatile wireless gaming controller designed for comfort and precision across multiple platforms. It features customizable RGB lighting, programmable macro buttons, dual vibration, and a 6-axis motion sensor.
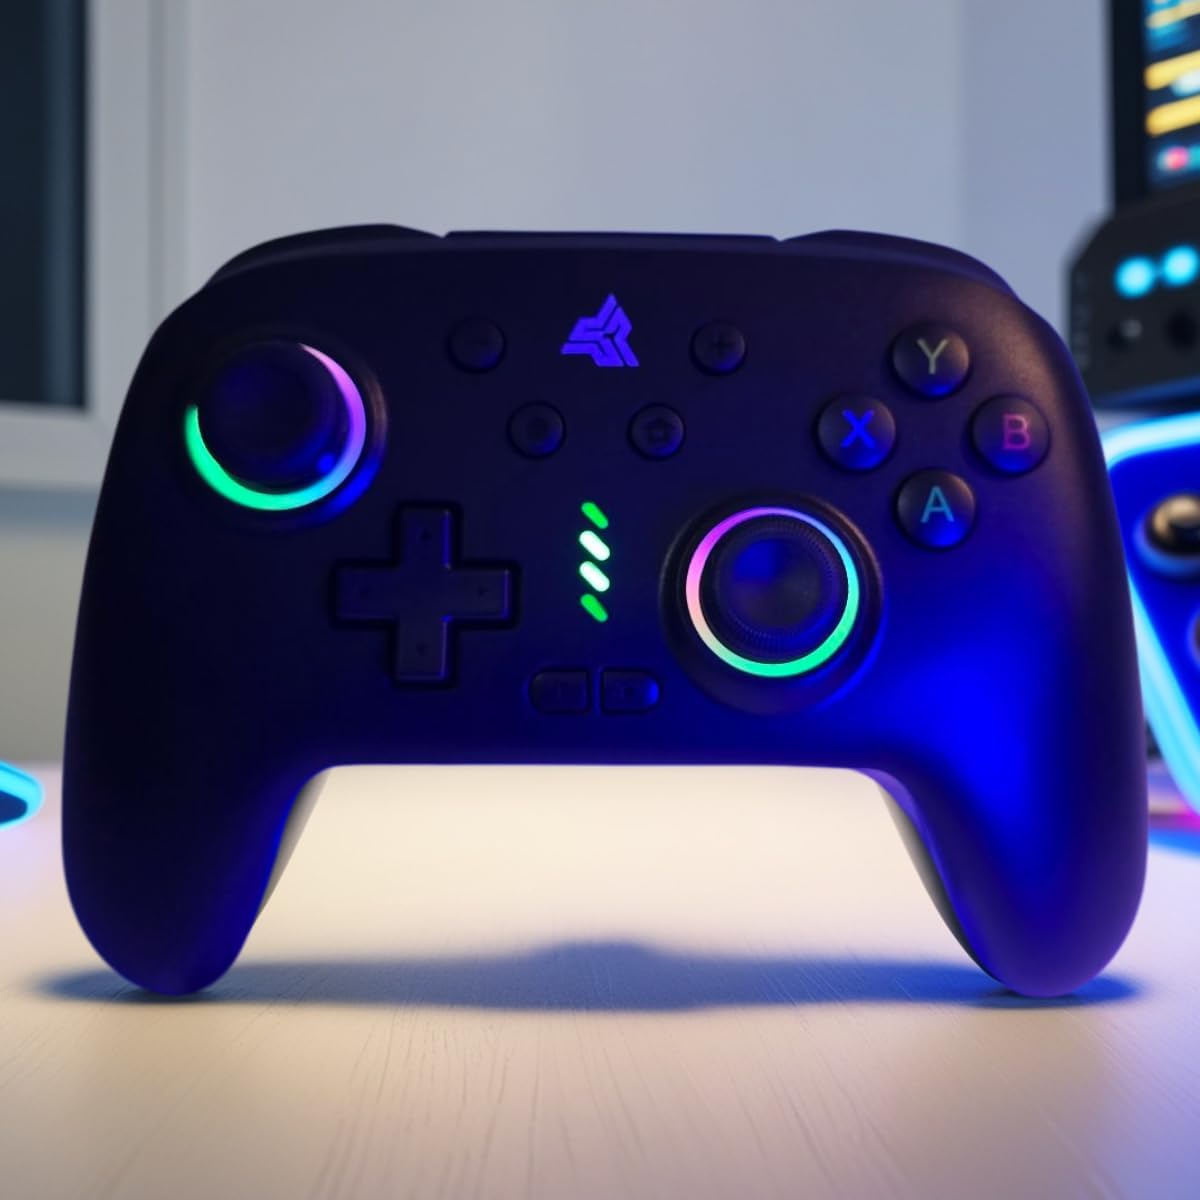
Figure 3.1: Front view of the KP-GM038 controller, showcasing its ergonomic design and illuminated RGB analog sticks and logo.
3.1 Controller Layout
Familiarize yourself with the buttons and features of your KP-GM038 controller:
- Analog Sticks: Left and Right analog sticks with RGB illumination.
- D-Pad: Directional Pad for precise movement.
- Action Buttons: A, B, X, Y buttons.
- Shoulder Buttons: L1, R1 (Triggers).
- Trigger Buttons: L2, R2 (Gatilhos).
- Function Buttons: Select, Start, Home, Turbo, Macro.
- Programmable Rear Buttons: 5 extra buttons located on the back of the controller.
- USB-C Port: For charging and wired connection.

Figure 3.2: Rear view of the KP-GM038 controller, highlighting the USB-C charging port and the 5 programmable extra buttons (M, ML, MR, SL, SR).
4. Setup
4.1 Charging the Controller
Before first use, fully charge the controller. Connect the provided USB-C cable to the controller's charging port and the other end to a USB power source (e.g., PC, USB wall adapter).
- Charging Time: Approximately 2-3 hours.
- Working Time: Approximately 12-14 hours on a full charge.

Figure 4.1: Image illustrating the high-performance battery of the KP-GM038 controller, showing 12-14 hours working time and 2-3 hours charging time.
4.2 Connecting the Controller
The KP-GM038 supports Bluetooth 5.0 wireless connection and wired connection.
4.2.1 Bluetooth Connection (Wireless)
To connect wirelessly, ensure the controller is charged and your device's Bluetooth is enabled.
- Power on the controller by pressing the Home button.
- Activate pairing mode (specific button combination may vary, refer to device-specific instructions or try holding the Home button for a few seconds until indicator lights flash rapidly).
- On your device (Android, iOS, PC, Nintendo Switch), search for Bluetooth devices.
- Select "KP-GM038" or a similar name from the list of available devices to pair.
- Once paired, the indicator lights on the controller will stabilize.
Note: For Nintendo Switch, ensure "Pro Controller Wired Communication" is enabled in the console's settings if experiencing connection issues.

Figure 4.2: Diagram showing the multi-platform compatibility of the KP-GM038 controller, including PC, Steam, Android, iOS, and Nintendo Switch.
4.2.2 Wired Connection (PC)
For PC gaming, you can connect the controller directly via the USB-C cable.
- Connect one end of the USB-C cable to the controller.
- Connect the other end to an available USB port on your PC (Windows 10 or 11).
- The PC should automatically detect and install the necessary drivers.
- The controller will be ready for use once recognized by the system.
5. Operating Instructions
5.1 Power On/Off
- Power On: Press the Home button.
- Power Off: Press and hold the Home button for 5 seconds, or the controller will automatically power off after a period of inactivity.
5.2 RGB Lighting Customization
The controller features customizable RGB lighting for its analog sticks and logo. Specific instructions for changing colors or modes are typically found in the product's quick start guide or by pressing a dedicated button (e.g., a "Light" or "RGB" button, if present, or a combination with the Turbo button).

Figure 5.1: Image highlighting the 9 customizable RGB LED colors available on the KP-GM038 controller, enhancing the gaming setup's aesthetics.
5.3 Programmable Macro Buttons
The KP-GM038 includes 5 programmable buttons on the rear (M, ML, MR, SL, SR). These buttons can be configured to perform complex sequences or map to other buttons for enhanced gameplay.
- Entering Programming Mode: Press and hold the "Macro" button (or a designated programming button) until an indicator light flashes.
- Assigning a Macro: Press the programmable button you wish to configure (e.g., ML). Then, input the sequence of buttons you want to assign (e.g., A, B, X). Press the "Macro" button again to save and exit programming mode.
- Clearing a Macro: Repeat the programming steps, but do not input any sequence after selecting the programmable button.
Note: Refer to the quick start guide for precise button combinations for macro programming, as these can vary.
5.4 Motion Sensor (6-Axis)
The integrated 6-axis motion sensor provides enhanced realism and control in games that support motion input. This feature is automatically active when supported by the connected platform (e.g., Nintendo Switch).

Figure 5.2: Image demonstrating the KP-GM038 controller's 6-axis motion sensor technology, enhancing immersive gameplay.
5.5 Dual Vibration
The controller features dual vibration motors that provide haptic feedback, increasing realism and immersion during gameplay. Vibration intensity is typically controlled by the game or the connected platform's settings.

Figure 5.3: Image illustrating the dual vibration feature of the KP-GM038 controller, providing real-time feedback for a realistic gaming experience.
5.6 Nintendo Switch One-Button Wake Up
The controller supports waking up a Nintendo Switch console with a single press of the Home button, provided it was previously paired with the console.
6. Maintenance
- Cleaning: Use a soft, dry cloth to clean the controller. Do not use harsh chemicals or abrasive materials.
- Storage: Store the controller in a cool, dry place away from direct sunlight and extreme temperatures when not in use.
- Battery Care: To prolong battery life, avoid fully discharging the controller frequently. Charge it regularly, even if not in constant use.
7. Troubleshooting
- Controller does not power on:
Ensure the controller is fully charged. Connect it to a power source using the USB-C cable and allow it to charge for at least 30 minutes before attempting to power on again.
- Unable to connect via Bluetooth:
Make sure the controller is in pairing mode (indicator lights flashing rapidly). Check that Bluetooth is enabled on your device and that the controller is within range. Try forgetting the device on your system's Bluetooth settings and re-pairing. Ensure no other Bluetooth devices are interfering.
- Buttons or analog sticks are unresponsive:
Try resetting the controller (if a reset button is available, usually a small pinhole on the back). Ensure the controller's firmware is up to date (check manufacturer's website if applicable). Test the controller with a wired connection to rule out Bluetooth issues.
- Vibration not working:
Verify that the game or platform settings have vibration enabled. Some games allow disabling vibration. Ensure the controller is fully charged.
8. Specifications
| Feature | Detail |
|---|---|
| Product Size | 155x106x60mm |
| Connection | Bluetooth 5.0 or Wired |
| Compatible Platforms | PC (Windows 10 & 11), Nintendo Switch, Android, iOS, Tablet PC |
| Material | High-Resistance Polymer |
| Battery Capacity | 600 mAh (Built-in) |
| RGB Lighting | Customizable |
| Motion Sensor | Yes, 6-Axis |
| Programmable Buttons | 5 (Rear) |
| Analog Sticks | With RGB |
| Triggers | 4 |
| Buttons | Micro switch |
| Nintendo Switch Wake Up | One-Button Wake Up |
| Product Weight | 400 g |
| Certification | ANATEL: 104732416154 |
| Release Date | June 1, 2024 |
9. Warranty and Support
9.1 Warranty Information
This product comes with a 3-month warranty against manufacturing defects. This warranty covers defects in materials and workmanship under normal use. It does not cover damage caused by misuse, accidents, unauthorized modifications, or normal wear and tear.
Please retain your proof of purchase for warranty claims.
9.2 Customer Support
If you encounter any issues not covered in the troubleshooting section or require further assistance, please contact your retailer or the manufacturer's customer support. Refer to your purchase documentation for contact details.