1. Introduction
This manual provides detailed instructions for the installation, setup, and operation of your new iCarSEPTON 9-inch Android 13 Car Radio. Designed specifically for Toyota Tacoma models from 2005 to 2011, this head unit offers advanced features including 4GB RAM, 64GB storage, 5G WiFi, Wireless CarPlay, Android Auto, GPS Navigation, Steering Wheel Control (SWC), Digital Sound Processor (DSP), Bluetooth 5.0, FM/RDS Radio, and Backup Camera support. Please read this manual thoroughly before installation and use to ensure proper functionality and safety.
2. What's in the Box
Verify that all components listed below are included in your package:
- Toyota Tacoma Radio (Main Unit)
- Back Camera
- Harness Cable
- Canbus Box
- Instructions and Installation Guide

Image: All components included in the iCarSEPTON car radio package.
Video: Unboxing and overview of the components included in the iCarSEPTON car radio package.
3. Specifications
| Feature | Detail |
|---|---|
| Item Weight | 3.75 pounds |
| Package Dimensions | 14.17 x 10.24 x 4.72 inches |
| Item Model Number | SPD-CAR13 |
| Display Size | 9 Inches |
| Operating System | Android 13 |
| RAM | 4GB |
| Storage | 64GB |
| Connectivity Technology | Bluetooth 5.0, USB, Wi-Fi (5G) |
| Special Features | 9 Inch Touch Screen, Split Screen Function, Backup Camera Support, Steering Wheel Controls, Bluetooth, Voice Control, GPS Navigation, 5G WiFi, Wireless/Wired Carplay & Android Auto, DSP |
| Map Type | North America (supports online/offline apps) |
| Audio Output Mode | Stereo |
| Mounting Type | Dashboard Mount |
4. Installation
This iCarSEPTON car radio is designed for a plug-and-play installation in Toyota Tacoma 2005-2011 models, retaining most original car features. No cutting of original wires is required for a non-destructive installation.
4.1. Pre-Installation Overview
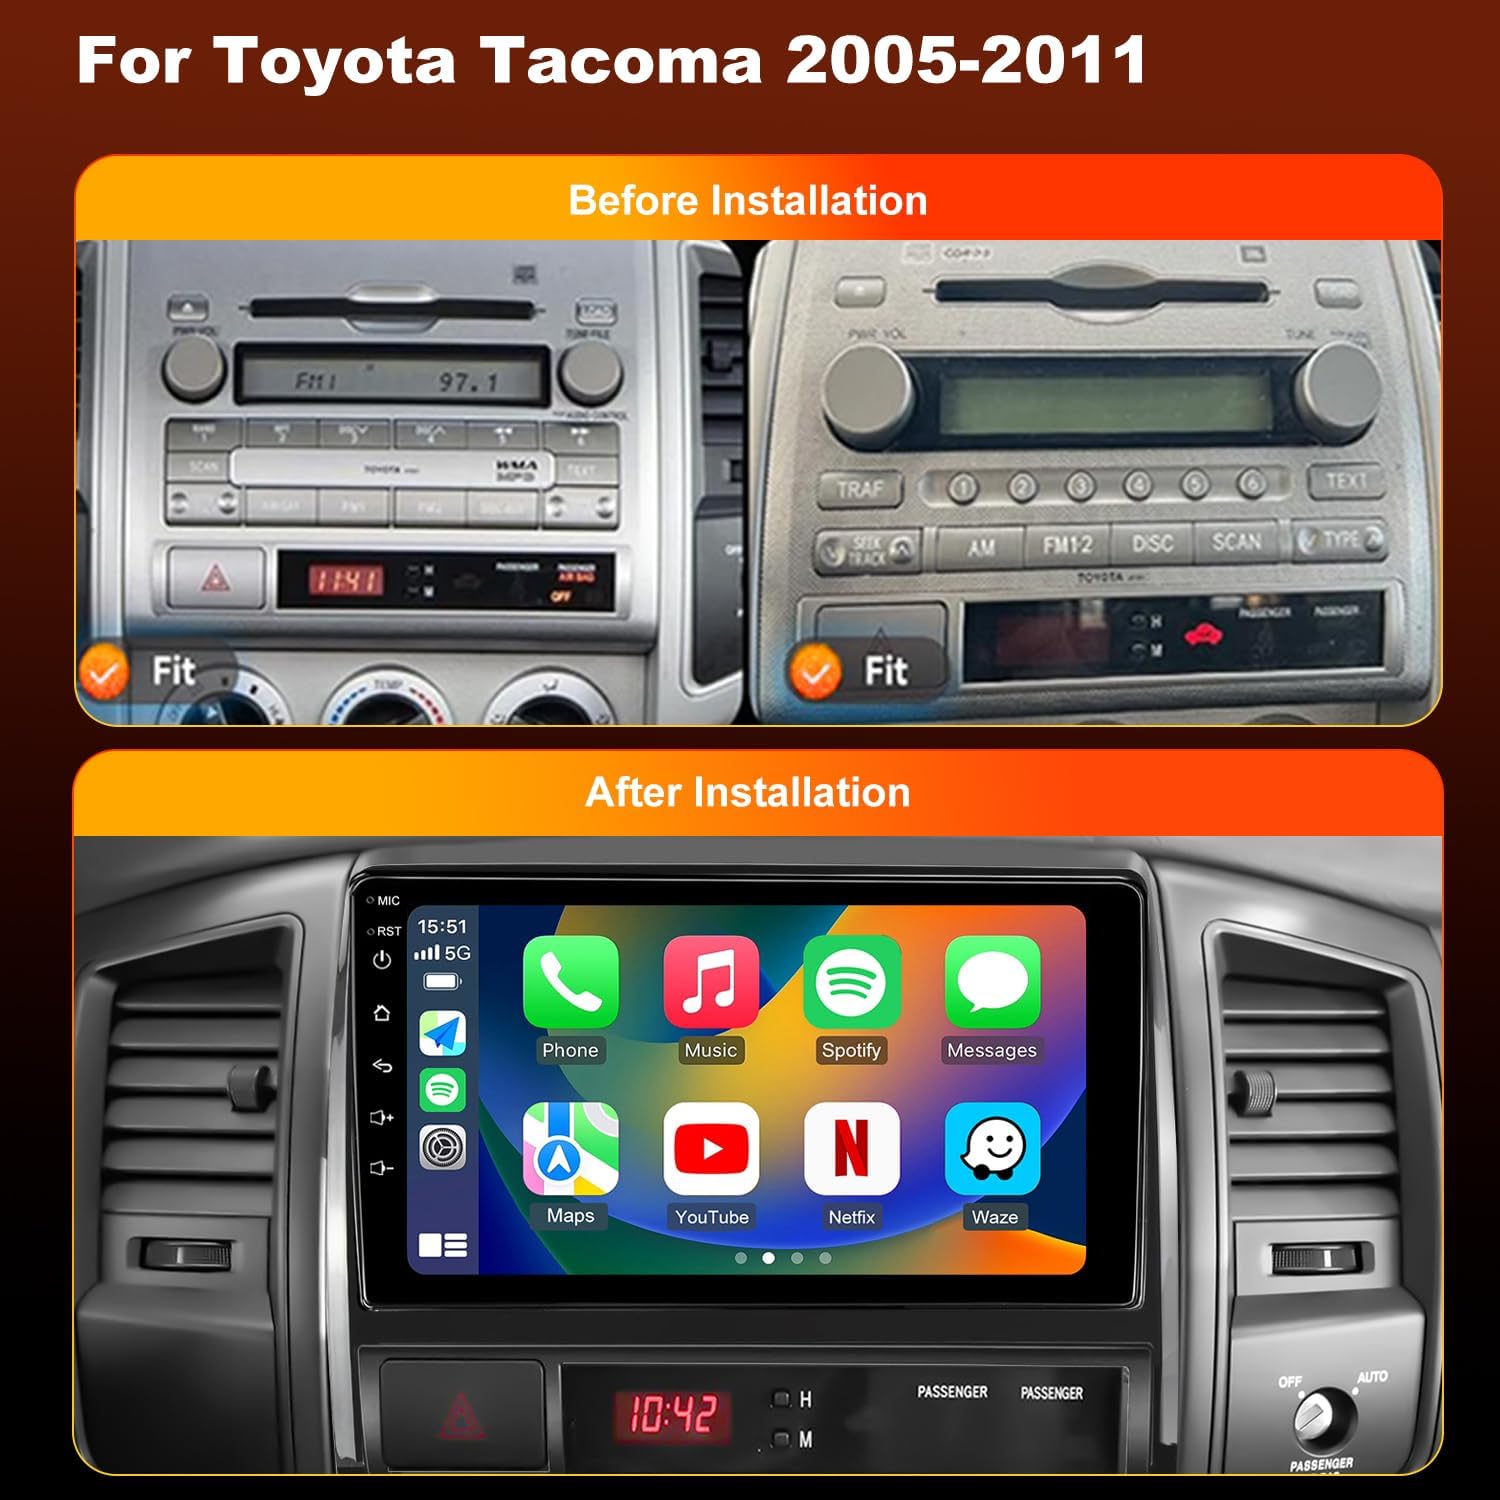
Image: Comparison of the Toyota Tacoma dashboard before and after installing the iCarSEPTON car radio.
Video: Installation guide for the Tacoma car radio.
4.2. Wiring Connections
Follow these steps to connect the necessary cables to the head unit:
- USB Cables: Connect the 6-pin and 4-pin USB cables to their respective ports on the back of the head unit.
- Rear Camera Signal Wire: Connect the 10-pin reversing video input interface.
- 4G Antenna: Connect the 4G antenna to its designated port.
- GPS Antenna: Connect the GPS antenna to its port.
- Radio Antenna: Connect the factory radio antenna to the ANT port.
- Power Cable: Connect the main power cable (plug and play) to the 16-pin port.
Video: Detailed wiring tutorial for the car radio installation.

Image: Plug and play connection diagram for the car radio.
4.3. Panel Disassembly and Assembly
Refer to the provided installation guide for specific steps on removing the original car panel and host, and then installing the new head unit. Use plastic opening tools to avoid scratching the interior.
Video: Step-by-step installation of the Android car radio in a Toyota Tacoma.
5. Initial Setup
5.1. Connecting Bluetooth
To connect your phone via Bluetooth:
- On the car radio, navigate to the Bluetooth settings and initiate a search for devices.
- On your phone, search for Bluetooth devices and select the car radio (usually named "BC8-Android" or similar).
- Enter the default password (0000) if prompted.
Video: Guide on connecting Bluetooth for Android Auto and Wi-Fi.
5.2. Wireless CarPlay & Android Auto
After connecting via Bluetooth, the system will automatically connect to Wireless CarPlay (for iPhone) or Android Auto (for Android phones). Ensure the CarPlay/Android Auto function is enabled in your phone's settings. If you experience issues with Android Auto, download the Android Auto app on your phone.
Video: Guide on connecting Bluetooth for CarPlay and Wi-Fi.

Image: Wireless CarPlay and Android Auto interfaces.
5.3. Wi-Fi Connectivity
Connect the head unit to a Wi-Fi network to access online features, download apps, and update maps. Go to Settings > Wi-Fi and select your desired network.

Image: Wi-Fi connectivity and app access on the car radio.
6. Operating Instructions
6.1. GPS Navigation
The built-in GPS module supports both online and offline navigation apps. Download your preferred navigation apps from Google Play Store. Ensure the GPS antenna is properly connected for optimal performance.

Image: GPS Navigation interface with online and offline map options.
6.2. FM/RDS Radio
Access the FM/RDS radio function for clear reception of broadcasts. The unit offers 18 preset FM stations and supports manual, semi-automatic, and automatic channel scanning.

Image: FM Radio interface.
6.3. Steering Wheel Controls (SWC)
The head unit supports your car's original steering wheel controls. You can easily control audio, calls, and other functions directly from your steering wheel. To configure SWC, navigate to the Steering Wheel Learning section in settings.

Image: Steering Wheel Learning interface.
6.4. Rear View Camera
The system supports a rearview camera for safer parking and reversing. When reversing, the screen will automatically display a clear image from the camera. Ensure the camera is properly installed and connected.

Image: Rear View Camera display with parking guidelines.
6.5. DSP (Digital Sound Processor)
Utilize the built-in DSP for enhanced audio customization. Adjust equalizer settings to optimize sound quality according to your preferences.

Image: EQ/DSP interface for audio settings.
6.6. Split Screen Function
The split-screen feature allows you to run two applications simultaneously, such as navigation and music, or video and maps, enhancing multitasking capabilities.

Image: Split Screen function displaying multiple apps.
7. Maintenance
To ensure the longevity and optimal performance of your iCarSEPTON car radio, follow these maintenance guidelines:
- Cleaning: Use a soft, dry cloth to clean the touchscreen and surrounding panel. Avoid abrasive cleaners or solvents that may damage the surface.
- Software Updates: Regularly check for and install software updates to ensure the system runs smoothly and has the latest features and security patches. Connect to Wi-Fi to perform updates.
- Temperature Control: Avoid exposing the unit to extreme temperatures for extended periods.
- Cable Connections: Periodically check all cable connections to ensure they are secure and free from damage.
8. Troubleshooting
If you encounter any issues with your iCarSEPTON car radio, refer to the following common troubleshooting tips:
- No Power: Check all power cable connections. Ensure the car's ignition is on.
- No Sound: Verify speaker connections and audio settings. Check the volume level on both the head unit and your connected device.
- Bluetooth/CarPlay/Android Auto Connection Issues: Ensure Bluetooth is enabled on both devices. Try forgetting the device on both ends and re-pairing. Clear background apps on the head unit.
- GPS Signal Loss: Ensure the GPS antenna is properly installed and has a clear view of the sky.
- Touchscreen Unresponsive: Try restarting the unit. If the issue persists, perform a factory reset (refer to the settings menu).
- Rear View Camera Not Displaying: Check the camera's power and video signal connections. Ensure the reverse gear is engaged.
For more complex issues, please contact customer support.
9. Warranty and Support
9.1. Warranty Information
The iCarSEPTON car radio comes with a 12-month warranty from the date of purchase. This warranty covers manufacturing defects and malfunctions under normal use. Please retain your proof of purchase for warranty claims.
9.2. Customer Service
If you encounter any installation, wiring, protocol, or feature issues, or have any questions regarding your product, please do not hesitate to reach out to iCarSEPTON customer service. We are available 24/7 to provide quick assistance and support.
For contact information, please refer to the product packaging or the official iCarSEPTON website.


