
Introduction
The JEKCA Blocky Hippo 01S is a detailed 3D animal building block kit designed for enthusiasts aged 14 and above. This manual provides step-by-step instructions for assembling your Blocky Hippo model, utilizing JEKCA's unique interlocking brick-through system for a sturdy construction without the need for glue. Enjoy the process of bringing your hippo to life!
What's Included
Before you begin, please verify that all components are present in your package:
- Bricks (approximately 1650 pieces)
- Instruction Manual (this document)
- Pins
- Pin Driver
- Quick Guide
If any parts are missing, please contact JEKCA customer support.
Setup and Assembly
Assembly of the JEKCA Blocky Hippo 01S requires careful attention to detail. Follow the included step-by-step manual for the best results. The unique interlocking system ensures a robust structure.
Understanding the Interlocking System
JEKCA models use a patented interlocking brick-through system. This system involves inserting pins through the bricks to secure them firmly, creating a sturdy sculpture without the need for adhesive.
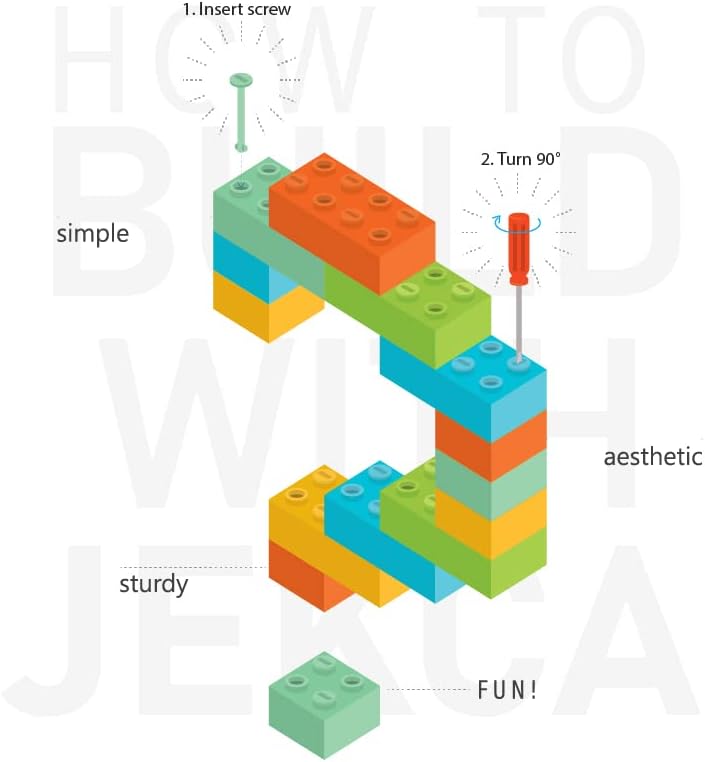
Image: Illustration of the JEKCA interlocking system. Step 1 shows inserting a pin through a brick. Step 2 shows turning the pin 90 degrees with a driver to lock it in place. This system ensures the model is sturdy and aesthetic.
- Preparation: Unpack all components and organize your bricks by color and size if desired. Refer to the Quick Guide for initial setup tips.
- Follow the Manual: The detailed instruction manual provided in the package illustrates each step of the assembly process. Pay close attention to the brick placement and pin insertion points.
- Pin Insertion: For each connection point, insert a pin through the designated holes in the bricks. Use the provided pin driver to gently push and turn the pin 90 degrees to secure the connection. Ensure pins are fully seated and turned to prevent loose connections.
- Layer by Layer: Build the model layer by layer, ensuring each section is stable before proceeding to the next.
- Review: Periodically review your progress against the manual to ensure accuracy.
Operating (Building Process)
The "operation" of your JEKCA kit involves the careful and methodical construction of the model. This is a manual process designed to be engaging and rewarding.
- Patience is Key: Building intricate models takes time and patience. Do not rush the process.
- Refer to Instructions: Always consult the step-by-step instruction manual for precise brick placement and pin usage.
- Secure Connections: Ensure all pins are properly inserted and turned to create a strong, stable structure.
- Enjoy the Process: The JEKCA building experience is designed for enjoyment and a sense of accomplishment upon completion.

Image: Front view of the completed JEKCA Blocky Hippo 01S model, showcasing its blocky design and grey color.

Image: Back view of the completed JEKCA Blocky Hippo 01S model, highlighting the texture and construction from a different angle.
Maintenance
Once assembled, your JEKCA Blocky Hippo 01S model requires minimal maintenance to preserve its appearance and structural integrity.
- Cleaning: Dust the model regularly with a soft, dry cloth or a soft brush. For more stubborn dirt, a slightly damp cloth can be used, but avoid excessive moisture.
- Storage: Store the model in a stable location away from direct sunlight and extreme temperatures to prevent material degradation or discoloration.
- Handling: While sturdy, avoid dropping or applying excessive force to the model to prevent bricks from detaching or pins from loosening.
Troubleshooting
Should you encounter any issues during assembly or with your completed model, refer to these common solutions:
- Loose Connections: If a section feels unstable, check that all pins in that area are fully inserted and turned 90 degrees with the pin driver. Re-insert and turn any loose pins.
- Missing Pieces: Carefully re-check your packaging and work area. If a piece is genuinely missing, contact JEKCA customer support with details of the missing part (shape, color, quantity).
- Difficulty Inserting Pins: Ensure the bricks are correctly aligned. Apply gentle, even pressure. If a pin is still difficult to insert, check for any debris in the brick holes.
- Incorrect Assembly: If a section does not look right or does not fit, carefully backtrack through the instruction manual to identify the error. Disassemble the incorrect section and reassemble it correctly.
Specifications
| Model Name | Blocky Hippo 01S |
| Model Number | ST19QML03 |
| Brand | JEKCA |
| Number of Pieces | Approximately 1650 |
| Material | Plastic |
| Color | Grey |
| Item Dimensions (L x W x H) | 5.67 x 8.11 x 10 inches (14.4 x 20.6 x 25.4 cm) |
| Recommended Age | 14 years and above |
| Assembly Required | Yes |
| Educational Objective | Concentration, Construction Skills |

Image: The JEKCA Blocky Hippo 01S model displayed next to a 13-inch iPad Pro, illustrating its 1:1 scale and providing a visual reference for its dimensions (Depth: 14.4cm, Width: 20.6cm, Height: 25.4cm).
Safety Information
This product contains small parts and is recommended for individuals aged 14 years and above. Keep small parts away from younger children to prevent choking hazards.
Warranty and Support
Warranty
JEKCA products are manufactured to high-quality standards. For information regarding product defects or missing parts, please retain your proof of purchase.
Customer Support
For further assistance, questions, or to report missing components, please visit the official JEKCA website or contact their customer service department. You can find more information at the JEKCA Store on Amazon.