
1. Introduction
This manual provides detailed instructions for the installation, operation, and maintenance of your Sogledwow ESP32 WLED LED Strip Light Controller. Please read this manual thoroughly before use to ensure proper functionality and safety.
2. Safety Information
- Ensure the power supply voltage matches the controller and LED strip requirements (5V/12V/24V).
- Do not exceed the maximum current rating of 15A for the controller.
- Avoid exposing the device to moisture or extreme temperatures.
- Disconnect power before making any wiring connections or adjustments.
- This device is designed for indoor use only.
3. Package Contents
Verify that all items are present in your package:
- 1 x Sogledwow ESP32 WLED LED Strip Light Controller
- 1 x User Instruction Manual
- 1 x 3cm Sticker

Video: Unboxing the Sogledwow ESP32 WLED LED Strip Light Controller. This video demonstrates the contents of the product packaging.
4. Product Overview
The Sogledwow ESP32 WLED LED Strip Light Controller is a versatile device for managing addressable LED strips. It features an ESP32 microcontroller, WLED firmware, a built-in microphone for dynamic lighting, and a Type-C UART port for programming.

Image: Front view of the Sogledwow ESP32 WLED LED Strip Light Controller, showing its compact design and connection points.
Key Features:
- Smart ESP32-WLED Control: Instant LED control via mobile app, Alexa voice commands, or custom automations with OTA updates.
- Built-in Mic Sensor: Analyzes ambient sounds for music synchronization.
- Expandable GPIO & USB-C Programming: Multiple programmable GPIO pins and a USB-C UART port for firmware flashing.
- 15A Circuit Protection: Resettable fuse protects high-wattage LED installations.
- Multi-Voltage Support: Compatible with 5V/12V/24V addressable strips (WS2811/12/13/14/15, SK6812, TM1814, etc.).
Component Identification:
- Input Terminals: For power supply connection (V+, V-).
- Output Terminals: For LED strip connection (V+, Data, GND).
- GPIO16 & GPIO2: General Purpose Input/Output pins.
- UART Port (Type-C): For firmware download and debugging.
- Mic: Built-in microphone for audio reactive effects.
- Restart Button: Resets the controller.
- Function Button: Short press for power on/off, long press for color switching, long press for 10 seconds to reset WLED-AP hotspot.

Image: Detailed view of the controller's pin functions, including 5V, IO25, IO18, IO19, 3.3V, and GND for DIY settings, program debugging, and supplying power to other sensors.

Image: Close-up of the Type-C UART port, highlighting its use for DIY lighting effects, stable data transfer, and firmware downloads.
5. Setup
5.1 Wiring Instructions
Connect your LED strip and power supply to the controller using the provided Wago-style connectors or DC socket.
- Power Connection: Choose between the V+, V- power interface or the 5.5x2.1mm DC Socket. Ensure correct polarity.
- LED Strip Connection: Connect the V+, Data, and GND wires from your addressable LED strip to the corresponding terminals on the controller.
- Secure Connections: For Wago-style connectors, open the connector upwards, insert the wire, and press down to secure.

Image: Illustration of the quick connect port design, demonstrating how to open the connector, insert wires, and secure them for convenient wiring.

Image: Shows the two power connection options: V+, V- screw terminals and a 5.5x2.1mm DC socket.
5.2 Software Installation (Hyperion)
To synchronize your LED strip with screen content, you will need to install Hyperion software on your computer.
- Open your web browser and navigate to the Hyperion project releases page: https://github.com/hyperion-project/hyperion.ng/releases.
- Download the appropriate version of Hyperion for your operating system (e.g., Hyperion-2.0.16-Windows-x64.exe).
- Run the installer and follow the on-screen prompts to complete the installation.
- After installation, click 'setting' to open the Hyperion web configuration interface.
Video: This video demonstrates the steps for installing and configuring Hyperion software for screen synchronization with the WLED controller.
5.3 Initial WLED Configuration
Configure the LED output settings within Hyperion to match your LED strip setup.
- In the Hyperion web interface, navigate to 'LED Instances' -> 'LED Output'.
- Under 'Controller type', select 'wled'.
- Under 'Devices Discovered', select your WLED controller (e.g., wled-a76450).
- Go to the 'LED Layout' tab.
- Set the IC quantity for 'Top', 'Bottom', 'Left', and 'Right' according to the actual number of LEDs on each side of your screen.
- Adjust the 'Input position' and 'Reverse direction' to ensure the light flow matches your physical setup.
- Click 'Identify' to test the settings, then 'Save settings'.
6. Operating
6.1 App Control
Control your LED strip using the WLED mobile application. The app allows you to select colors, effects, and manage segments.

Image: Screenshot of the WLED app interface, showing color selection and effect options for various addressable LED strip types like WS2811, SK6812, and RGBIC.
Video: Demonstrates various lighting effects and patterns achievable with the GLEDOPTO WLED LED Controller through the app.
6.2 Microphone Function
The built-in microphone allows the LED strip to react to ambient sounds, creating dynamic music synchronization effects.

Image: Illustrates the microphone function, showing LED strips reacting to music in a room setting.
6.3 Button Functions
The controller features two buttons for basic control:
- Restart Button: Pressing this button will power off the controller module, then release it to power it back on. Useful for restarting the controller after configuring the microphone.
- Function Button:
- Short press: Power on/off.
- Long press for 1 second: Switch colors.
- Long press for 10 seconds: Reset the WLED controller and activate the WLED-AP hotspot.

Image: Diagram showing the location and functions of the Restart and Function buttons on the controller.
6.4 Advanced Features
The controller offers advanced features for customization and energy efficiency.
- DIY Pin Function: Multiple programmable GPIO pins (5V, IO25, IO18, IO19, 3.3V, GND) allow connection of external sensors and accessories for custom projects.
- Energy Saving Relay: The controller can be configured with a relay to reduce power consumption when the LED strip is turned off, ensuring no current passes through the strip.

Image: Details the DIY pin functions, providing extended ports for user settings, program debugging, and supplying power to other sensors (5V/3.3V, 200mA).
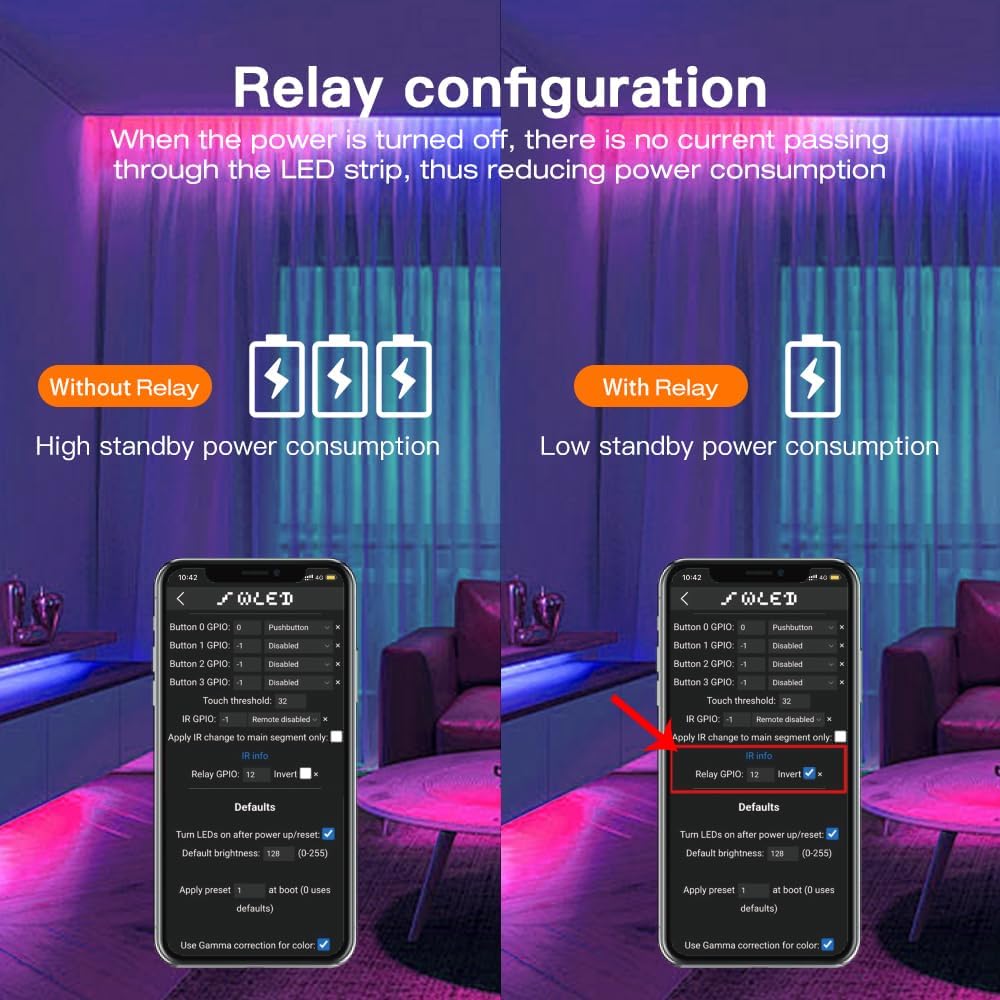
Image: Compares high standby power consumption without a relay to low standby power consumption with a relay, demonstrating the energy-saving feature.
Video: Shows how to set up staircase lighting effects using the GLEDOPTO WLED controller, demonstrating dynamic lighting for stairs.
Video: A short demonstration of the GLEDOPTO WLED controller used to decorate a Christmas tree with dynamic lighting effects.
7. Maintenance
7.1 Firmware Updates
The controller supports Over-The-Air (OTA) updates for hassle-free firmware upgrades without needing physical cable connections. Check the WLED community or official Sogledwow channels for the latest firmware versions and update instructions.
7.2 Circuit Protection
The controller is equipped with a heavy-duty 15A resettable fuse to protect your LED installations from power surges and short circuits. It also includes input reverse polarity protection.

Image: Close-up of the 15A fuse link on the controller board, indicating its role in circuit protection.

Image: Highlights the reliable circuit design, including the 15A fuse, input reverse polarity protection, and a stable 5V output for signal transmission.
8. Troubleshooting
If you encounter issues with your controller, consider the following common solutions:
- No Power: Check all power connections and ensure the power supply is functioning correctly. Verify the input voltage matches the controller's requirements.
- LEDs Not Lighting Up: Confirm LED strip connections (V+, Data, GND) are correct. Check the WLED configuration for correct LED count and GPIO pin settings. Ensure the LED strip type is supported.
- Incorrect Colors/Effects: Verify the color order setting in WLED (e.g., GRB, RGB). Check for proper data signal integrity.
- Wi-Fi Connectivity Issues: Ensure the controller is within range of your Wi-Fi network. Try resetting the WLED-AP hotspot by long-pressing the Function button for 10 seconds.
- Unresponsive Controller: Try pressing the Restart button. If issues persist, consider reflashing the firmware via the Type-C UART port.
9. Specifications

Image: Detailed product parameters and dimensions of the Sogledwow ESP32 WLED LED Strip Light Controller.
| Feature | Specification |
|---|---|
| Model Number | LT-GL-C-016WL-Black |
| Input Voltage | DC 5-12-24V |
| Output Current/Channel | 10A Max |
| Total Output Current | 15A Max |
| Operating Temperature | -20~45°C |
| Communication Protocol | Wi-Fi |
| Material Type | Plastic (Fireproof PC) |
| Item Weight | 0.11 Pounds (49.3g Net Weight, 57.3g Gross Weight) |
| Item Dimensions | 4.1 x 0.6 x 1.6 inches (108x45x18mm) |
| Supported LED Strips | WS2811, WS2812, WS2813, WS2814, WS2815, SK6812, TM1814, etc. |
| Special Features | Color Changing, Built-in Mic, UART, Energy Saving Relay |
| Water Resistance Level | Not Water Resistant |
10. Warranty and Support
For warranty information and technical support, please refer to the product packaging or contact the seller directly. Keep your purchase receipt for any warranty claims.