1. Product Overview
The VORGUT Wired Security Camera System provides reliable surveillance for your home or business. This system includes a 4-channel 5MP Lite AHD TVI DVR recorder with a pre-installed 500GB HDD and four wired CCTV bullet cameras. Designed for both indoor and outdoor use, it features smart motion detection, night vision, and remote access capabilities.
Key features include:
- Plug and Play Installation: Simple setup with BNC cables for stable, reliable performance.
- Smart Motion Detection: Reduces false alarms by detecting human movement and sends instant notifications.
- Pre-Installed 500GB HDD: Provides ample local storage for 24/7 recording without monthly fees.
- Remote Access: View live and recorded footage from your mobile devices via a free app.
- Weatherproof Cameras: IP66-rated cameras withstand various weather conditions for outdoor use.
2. What's in the Box
Carefully unpack the box and ensure all items are present and in good condition. If any items are missing or damaged, please contact customer support.
- 1x AHD DVR (with pre-installed 500GB HDD)
- 4x Wired Surveillance CCTV Bullet Cameras
- 1x User Guide
- Power Adapters
- 1 to 4 Power Splitter
- Screw Pack for mounting
- BNC Cables
- USB Mouse

Image: Packing List. This image displays the DVR, four security cameras, power adapters, a 1 to 4 power splitter, a screw pack, BNC cables, a USB mouse, and a user manual.
3. Setup Instructions
Follow these steps to set up your VORGUT Wired Security Camera System.
3.1 Camera and DVR Connection
- Mount Cameras: Choose suitable locations for your cameras, ensuring they cover the desired areas. The cameras can be mounted on a wall or ceiling.
- Connect Cameras to DVR: Use the provided BNC cables to connect each camera to the corresponding video input ports on the back of the DVR.
- Power Cameras: Connect the camera power cables to the 1 to 4 power splitter, then connect the splitter to a power adapter and plug it into an electrical outlet.
- Connect DVR to Monitor: Use an HDMI or VGA cable to connect the DVR to your TV or monitor.
- Connect DVR to Power: Plug the DVR's power adapter into an electrical outlet.
- Connect USB Mouse: Plug the USB mouse into one of the USB ports on the DVR for navigation.

Image: Easy Mounting – Wall or Ceiling. This image demonstrates how the cameras can be installed on both vertical wall surfaces and horizontal ceiling surfaces.
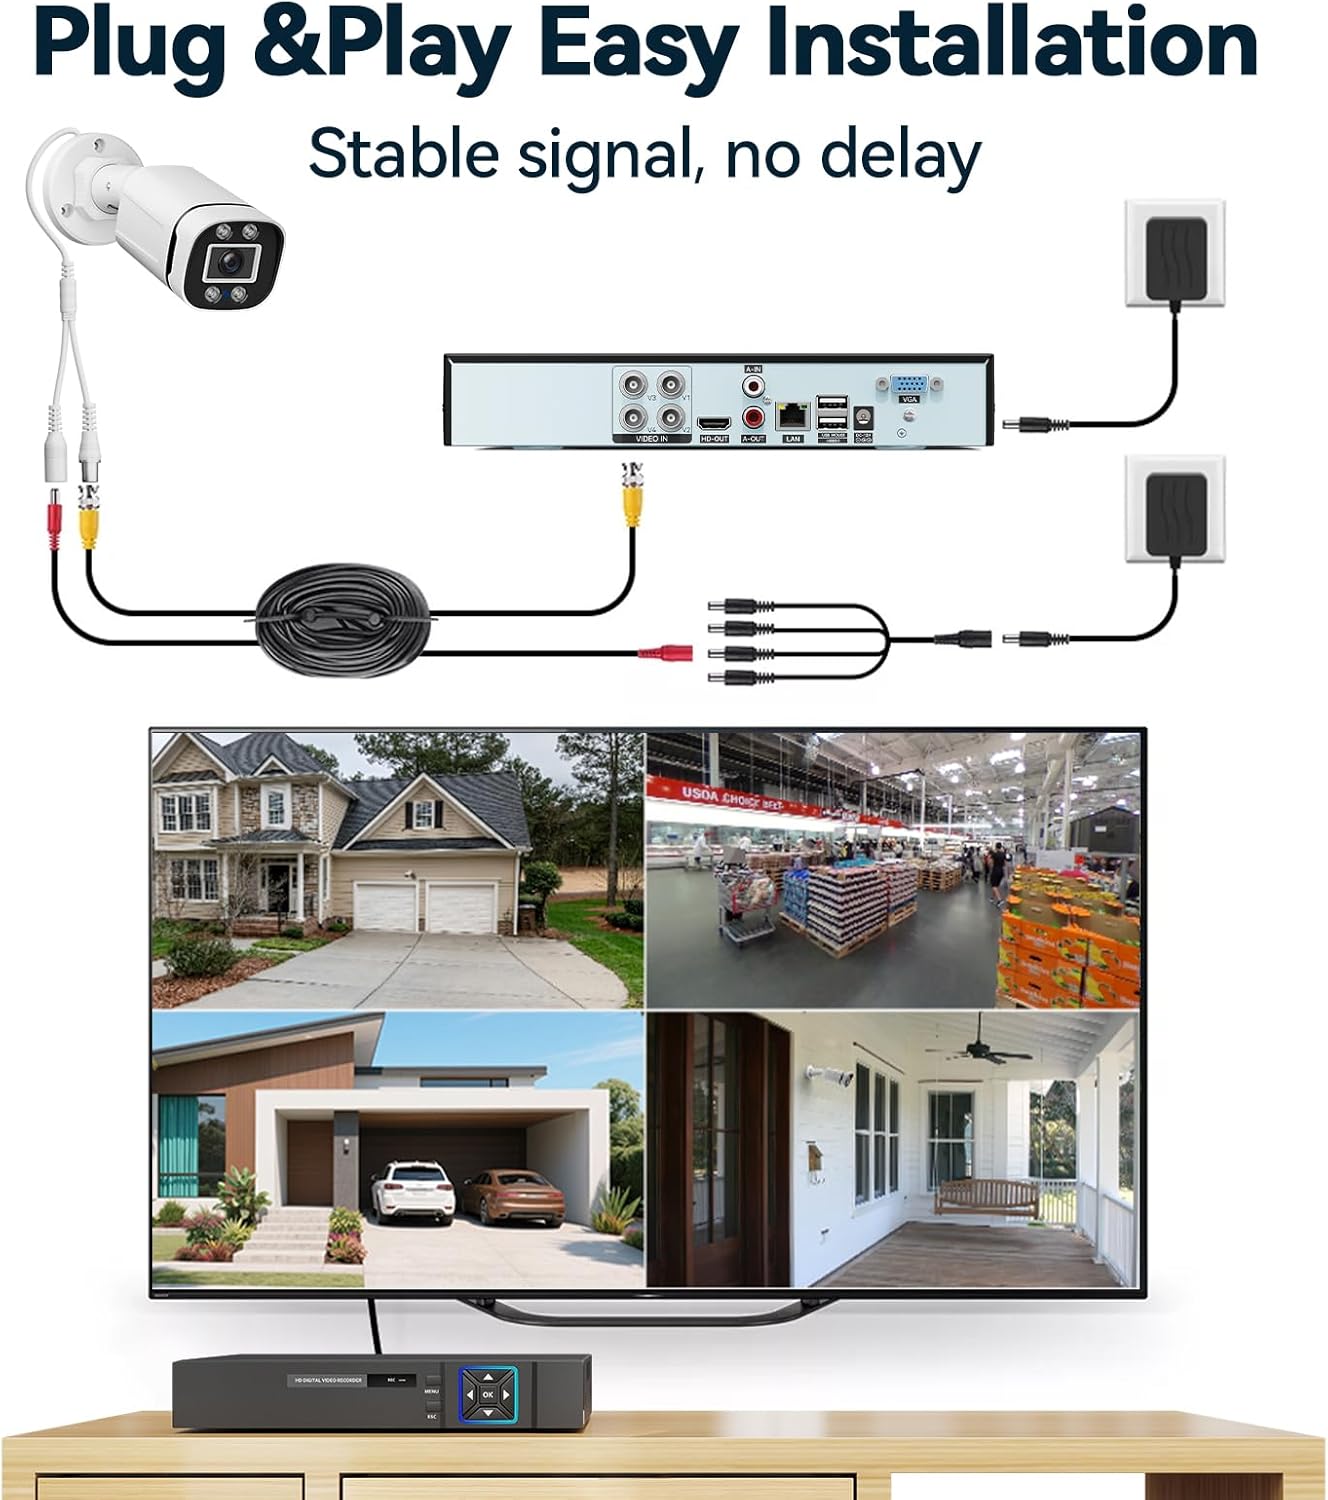
Image: Plug & Play Easy Installation. This diagram illustrates the simple wiring process: cameras connect to the DVR via BNC cables, power adapters provide electricity, and the DVR connects to a monitor for display.

Image: Stable Connection, Fast Transmission. This image highlights the reliable wired connection from the camera to the DVR and then to a display monitor.
3.2 Initial Setup and Remote Access
- Power On: Turn on the DVR and your monitor. The system should boot up and display the camera feeds.
- DVR Configuration: Follow the on-screen prompts to complete the initial DVR setup, including setting the date, time, and password.
- Connect to Router (for Remote Access): Connect the DVR to your internet router using an Ethernet cable.
- Download Mobile App: Download the free VORGUT security app on your smartphone or tablet.
- Add Device to App: Follow the in-app instructions to add your DVR system. This typically involves scanning a QR code displayed on your monitor or entering the device ID.
4. Operating Instructions
Understand the various functions of your VORGUT security system.
4.1 24/7 Recording and Storage
The system comes with a pre-installed 500GB Hard Disk Drive (HDD) for continuous recording. This allows for 24/7 video storage without any additional monthly fees.

Image: Support 24/7 Recording. This image shows a house with cameras and a DVR, emphasizing continuous recording with a 500GB HDD and H.264+ compression.
4.2 Smart Motion Detection
The system utilizes smart motion detection to identify human shapes, reducing false alarms from environmental factors like rain or moving branches. When motion is detected, the system can send instant notifications to your mobile app or email.
- Customizable Alerts: Configure specific areas for motion detection and set up alert preferences within the DVR settings or mobile app.
- App Push Notifications: Receive real-time alerts directly on your smartphone.
- Email Notifications: Get email alerts with snapshots of the detected event.

Image: Smart Motion Detection. This image illustrates a smartphone receiving a 'Device alarm' notification for person detection, with options for app push and email alerts.
Image: Motion Detection Zone. This image demonstrates how specific areas can be configured for motion detection.
4.3 Smart Playback
Easily review recorded footage using the smart playback feature. You can navigate through the timeline to quickly find events triggered by motion detection.

Image: Smart Playback. This image shows a timeline with red markers indicating detected events, allowing users to quickly review specific incidents.
4.4 Remote Monitoring
Access live video feeds and recorded footage from anywhere using the free mobile app on your smartphone, tablet, or computer.

Image: Real-Time Remote Monitoring. This image depicts a user viewing live camera feeds on a smartphone, with other devices like laptops and tablets also displaying multi-camera views.

Image: Multi-Device Remote Viewing. This image shows security camera feeds accessible on a smartphone, laptop, and tablet simultaneously.
5. Maintenance
Proper maintenance ensures the longevity and optimal performance of your security system.
- Camera Cleaning: Periodically clean the camera lenses with a soft, damp cloth to remove dust and dirt that may obstruct the view. Avoid harsh chemicals.
- Cable Inspection: Regularly check all cables for any signs of wear, damage, or loose connections. Secure or replace damaged cables promptly.
- DVR Placement: Ensure the DVR is placed in a well-ventilated area, away from direct sunlight, heat sources, and moisture, to prevent overheating.
- Software Updates: Check the manufacturer's website or the mobile app for any available firmware or software updates for the DVR to ensure optimal performance and security.
5.1 Weatherproof Design
The cameras feature IP66-rated ABS housing, designed to withstand various outdoor conditions, including rain, snow, and extreme temperatures.
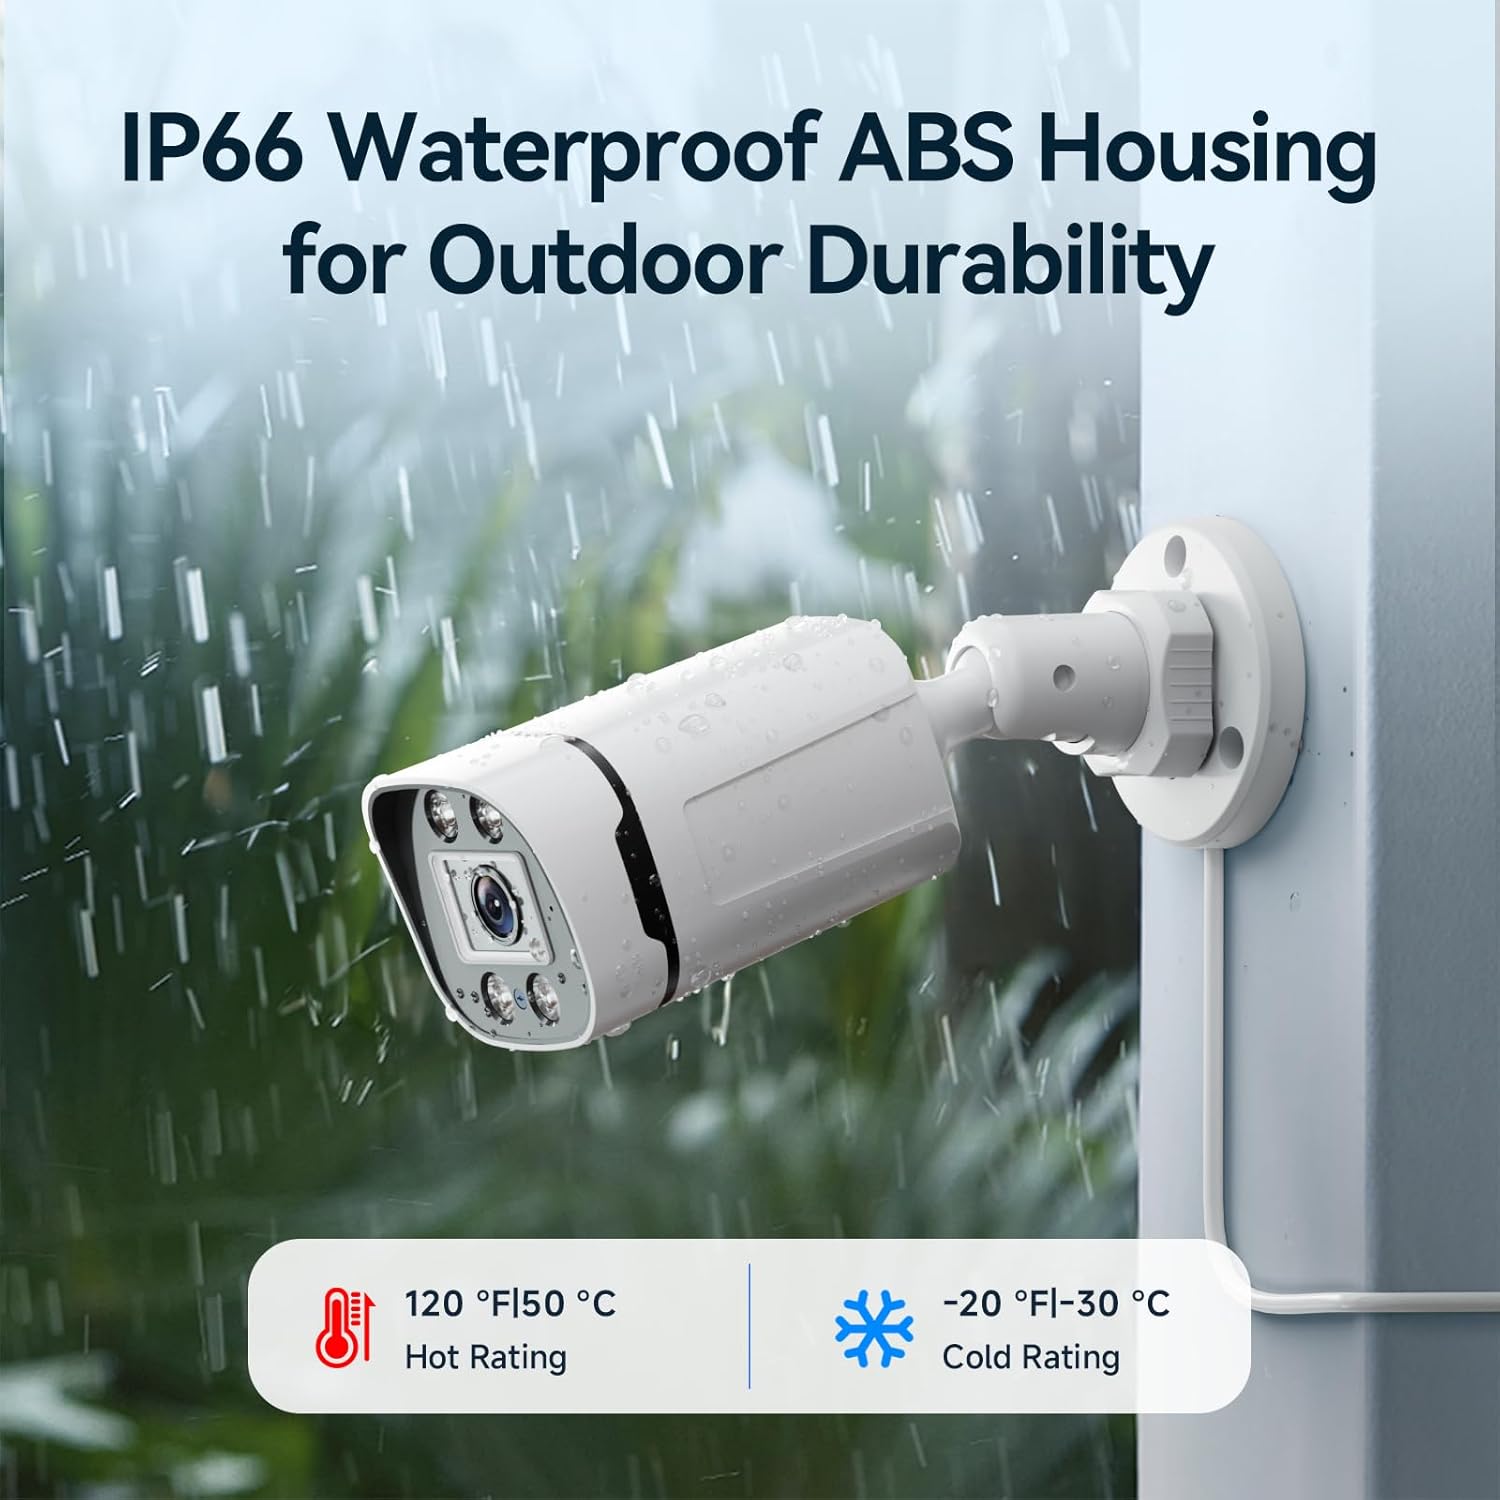
Image: IP66 Waterproof ABS Housing for Outdoor Durability. This image shows a camera enduring rain, highlighting its ability to operate in temperatures from -30°C to 50°C.
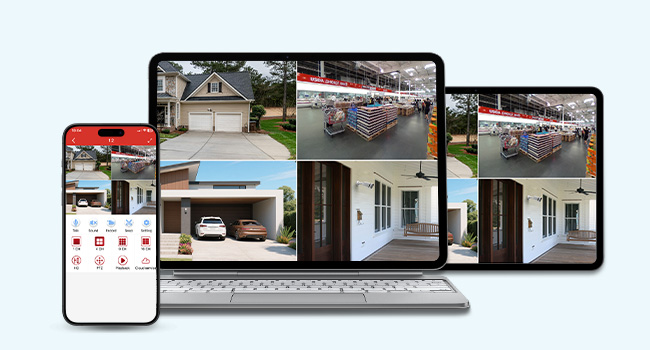
Image: Weather Resistance. This image shows a camera with a temperature range from -10°C/14°F to 55°C/131°F, demonstrating its ability to withstand various weather conditions.
6. Troubleshooting
Refer to this section for solutions to common issues.
| Problem | Possible Cause | Solution |
|---|---|---|
| No video display on monitor | Loose cable connection; DVR not powered; Incorrect input source on monitor. | Check HDMI/VGA cable connections. Ensure DVR is powered on. Select correct input source on your monitor (e.g., HDMI1, VGA). |
| No camera image | Camera power issue; BNC cable issue; Camera malfunction. | Check camera power connections and power adapter. Ensure BNC cables are securely connected. Test camera with a different port or cable if possible. |
| No remote access | DVR not connected to internet; Incorrect app settings; Network firewall. | Ensure DVR is connected to your router via Ethernet. Verify network settings on DVR. Check app settings and ensure device is added correctly. Consult your router's manual for firewall settings. |
| False motion alarms | Sensitive detection settings; Environmental factors. | Adjust motion detection sensitivity in DVR settings or app. Define specific motion detection zones to exclude irrelevant areas. |
| Night vision not working | Insufficient ambient light; IR LEDs obstructed or faulty. | Ensure there is enough ambient light for the camera to switch to night mode. Check if anything is blocking the IR LEDs on the camera. |
7. Specifications
Detailed technical specifications for the VORGUT Wired Security Camera System.
| Feature | Detail |
|---|---|
| Brand | VORGUT |
| Model Number | A6804-54BU-500 |
| Connectivity Technology | Wired |
| Video Capture Resolution | 5MP-N |
| Number of Channels | 4 |
| Memory Storage Capacity | 500 GB (Pre-installed HDD) |
| Color | White |
| Power Source | Corded Electric |
| Item Dimensions (L x W x H) | 8 x 5 x 10 inches |
| Compatible Devices | TV, Personal Computers, Smartphones, Tablets |
| Frame Rate | 30 FPS |
| Recording Mode | Continuous, Motion Detection |
| Lens Type | Fixed |
| Video Input | BNC |
| Special Features | App Control, Human Detection, Smart Playback, Weatherproof (IP66) |
| Item Weight | 8.34 pounds |

Image: Product Dimensions and Ports. This image provides a detailed view of the camera and DVR, including their dimensions and the various input/output ports.

Image: Day and Night Vision. This image shows the camera's capability to capture clear images in both daylight and low-light conditions using infrared night vision.
8. Warranty and Support
VORGUT is committed to providing excellent customer service and support for your security system.
8.1 Warranty Information
Please refer to the warranty card included in your product packaging for specific warranty terms and conditions. Generally, VORGUT products come with a standard manufacturer's warranty covering defects in materials and workmanship.
8.2 Customer Support
For technical assistance, troubleshooting, or any questions regarding your VORGUT security camera system, please contact our customer support team. We offer:
- After-Sale Support
- Fast Response
- Needs-Based Approach
- Lifetime Technical Assistance
Contact information can typically be found on the VORGUT official website or in the user guide provided with your product.

Image: Customer First. This image highlights VORGUT's commitment to customer support, including after-sale assistance, fast response, a needs-based approach, and lifetime technical assistance.


