
1. Introduction
Thank you for choosing the BSNANCA 96 Digital Egg Incubator. This device is designed to provide an optimal environment for hatching various poultry eggs, including chickens, ducks, geese, quails, parrots, and pigeons. It features precise temperature and humidity control, automatic egg turning, and an LED display for monitoring key parameters. Please read this manual thoroughly before operation to ensure proper setup, safe use, and successful hatching results.
2. Safety Instructions
- Always connect the incubator to a grounded power outlet.
- Do not immerse the incubator or its electrical components in water or other liquids.
- Keep the incubator away from children and pets.
- Ensure proper ventilation around the incubator to prevent overheating.
- Unplug the incubator from the power source before cleaning or performing any maintenance.
- Do not operate the incubator if the power cord or plug is damaged.
- Place the incubator on a stable, level surface to prevent tipping.
3. Package Contents
Please check the package contents upon receipt. If any items are missing or damaged, contact your retailer immediately.
- 1 x BSNANCA 96 Digital Egg Incubator Unit
- 1 x Egg Turning Tray (pre-installed)
- 1 x Power Cord
- 1 x Instruction Manual (this document)
- 1 x Water Bottle (for humidity control)
4. Setup
- Unpacking: Carefully remove all components from the packaging. Retain the packaging for future storage or transport.
- Placement: Place the incubator on a flat, stable, and level surface in a room with a consistent ambient temperature (ideally between 20°C and 25°C). Avoid direct sunlight, drafts, or areas with extreme temperature fluctuations.
- Humidity Control: Locate the water channels at the bottom of the incubator. Using the provided water bottle, carefully fill the channels with distilled or demineralized water. Do not overfill. Maintaining proper humidity is crucial for successful hatching.
- Power Connection: Connect the power cord to the incubator and then plug it into a suitable 110V/220V AC power outlet (depending on your model). The LED display will illuminate.
- Pre-heating: Allow the incubator to run for at least 2-3 hours before placing eggs inside. This allows the internal temperature and humidity to stabilize at the desired settings. Monitor the LED display to ensure stable readings.
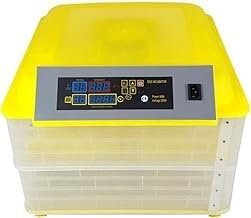
Figure 1: The BSNANCA 96 Digital Egg Incubator with its transparent lid, showing the internal egg tray. This image illustrates the overall design and key components of the incubator.
5. Operating Instructions
- Temperature Setting: The incubator is pre-set to an optimal temperature. If adjustment is needed, refer to the control panel buttons (usually 'Set', '+' and '-') to adjust the target temperature. The recommended hatching temperature range is 20°C ~ 40°C, with specific temperatures varying by species. Consult a reliable guide for your specific egg type.
- Humidity Monitoring: The LED display shows the current humidity level. Maintain appropriate humidity by adding water to the channels as needed. Higher humidity is often required during the last few days of incubation.
- Egg Placement: Once the incubator has stabilized, carefully place up to 96 fertilized eggs into the egg turning tray. Ensure eggs are clean and free from cracks.
- Automatic Egg Turning: The incubator features an automatic egg turning mechanism that rotates the eggs every 2 hours. This prevents the embryo from sticking to the shell and promotes even development. Do not manually turn the eggs once this feature is active.
- Monitoring: Regularly check the LED display for temperature, humidity, and incubation day count. The transparent wall allows for easy observation of the eggs without opening the lid, which helps maintain stable internal conditions.
- Hatching Period: The incubation period varies by species. Typically, stop the automatic egg turning 3 days before the expected hatch date. Increase humidity during this period to aid in hatching.

Figure 2: An internal view of the incubator, highlighting the egg turning mechanism and the heating/fan components. This shows how eggs are positioned and rotated for optimal development.
6. Maintenance
- Cleaning: After each hatch, unplug the incubator and allow it to cool. Clean all surfaces with a mild disinfectant solution and a soft cloth. Ensure all components are completely dry before storage or next use. Do not use abrasive cleaners.
- Water Refill: Regularly check and refill the water channels to maintain desired humidity levels throughout the incubation period.
- Storage: When not in use, store the incubator in a clean, dry place, away from direct sunlight and extreme temperatures.
7. Troubleshooting
| Problem | Possible Cause | Solution |
|---|---|---|
| Temperature fluctuations | Unstable room temperature, incubator lid not sealed properly, faulty sensor. | Move incubator to a stable environment. Ensure lid is securely closed. Contact support if sensor is suspected. |
| Low humidity | Insufficient water in channels, dry ambient air. | Refill water channels. Consider placing a damp sponge near the incubator (outside) in very dry conditions. |
| Eggs not turning automatically | Egg turning motor disconnected or faulty, eggs jammed. | Check connections. Ensure eggs are properly seated and not obstructing movement. Contact support if motor is faulty. |
| LED display not working | Power issue, display fault. | Check power connection. Try a different outlet. Contact support if display remains off. |
8. Specifications
- Model: 96 Digital Egg Incubator
- Egg Capacity: 96 eggs (chicken-sized)
- Color: Yellow and Transparent
- Weight: 7.6 kg
- Dimensions (L x W x H): (22.4 x 12 x 21.2) inches
- Egg Storage Temperature/Humidity Range: 20℃ ~ 40℃
- Voltage: 110V/220V (Single Power Supply)
- Frequency: 50~60Hz
- Power: 80W
- Features: LED Display, Automatic Egg Turning, Temperature Control, Transparent Wall
- Suitable For: Chickens, ducks, geese, quails, parrots, pigeons, and other birds.
9. Warranty and Support
This BSNANCA product is covered by a manufacturer's warranty against defects in materials and workmanship. For specific warranty terms, duration, and to register your product, please refer to the warranty card included with your purchase or visit the official BSNANCA website. For technical support, troubleshooting assistance, or to inquire about replacement parts, please contact BSNANCA customer service through the contact information provided on our website or your purchase documentation.