
1. Introduction
Thank you for choosing the SODSEA 52-inch Nickel Ceiling Fan. This modern ceiling fan is designed to provide efficient air circulation and versatile lighting for your indoor spaces. Featuring a quiet DC motor, reversible blades for year-round comfort, dimmable LED lighting with three color temperatures, and convenient remote control operation, this fan enhances both functionality and aesthetics in bedrooms, living rooms, and other suitable areas. Please read this manual thoroughly before installation and use to ensure safe and optimal performance.

Image 1: The SODSEA 52-inch Nickel Ceiling Fan, showcasing its modern design with five blades and integrated LED light.
2. Safety Information
To reduce the risk of electric shock, fire, or personal injury, always follow these basic safety precautions:
- Read all instructions: Familiarize yourself with the entire manual before beginning installation.
- Electrical Safety: Disconnect power at the main circuit breaker or fuse box before installation or servicing. Ensure all electrical connections comply with local codes and ordinances. If you are unfamiliar with electrical wiring, consult a qualified electrician.
- Mounting: The fan must be mounted to a structurally sound ceiling joist or outlet box capable of supporting the fan's weight (approximately 14.79 lbs). Ensure the mounting bracket is securely fastened.
- Blade Clearance: Ensure there is adequate clearance from the fan blades to any obstacles, walls, or furniture.
- Down Rod: Use only the down rod provided or specified by the manufacturer.
- Light Kit: Do not attempt to modify the integrated LED light kit.
- Remote Control: Keep the remote control away from water and extreme temperatures.
- Cleaning: Always turn off the fan and disconnect power before cleaning. Use a soft, damp cloth; avoid harsh chemicals.
3. Package Contents
Carefully unpack all components and ensure you have received all items listed below. If any parts are missing or damaged, contact customer service before proceeding with installation.
- Motor Assembly
- Light Kit
- Remote Control
- Receiver
- Canopy
- Coupling Cover
- Down Rod
- Hanging Ball
- Fan Blades (5)
- Blade Connectors (5)
- Mounting Bracket
- Installation Kit (screws, wire nuts, etc.)
4. Specifications
| Feature | Detail |
|---|---|
| Model Name | Sodsea-1240 |
| Size | 52 inches |
| Color | Nickel |
| Product Dimensions | 52"D x 52"W x 8.5"H |
| Power Source | DC |
| Voltage | 120 Volts |
| Wattage (Light) | 24 watts |
| Number of Blades | 5 |
| Air Flow Capacity | 3786 Cubic Feet Per Minute |
| Noise Level | 30 Decibels |
| Light Color Temperature | 3000K (Warm), 4000K (Daylight), 6500K (Cool) |
| Dimmable Light | 12% - 100% |
| Fan Speeds | 6 adjustable speeds |
| Motor Type | Reversible DC Motor |
| Control Method | Remote Control |
| Timer Function | 1, 3, or 6 hours |
| Installation Type | Flush Mount, supports up to 10° sloped ceiling |
| Indoor/Outdoor Usage | Indoor |

Image 2: Detailed product dimensions and key features, including airflow and recommended room size.
5. Setup and Installation
Follow these steps carefully for proper installation. It is recommended to have two people for installation. Ensure power is disconnected at the circuit breaker before starting.
- Prepare Components: Unpack all parts and lay them out. Identify the motor, light kit, blades, remote, receiver, and mounting hardware.
- Attach Blade Connectors: Securely attach the five blade connectors to the motor assembly using the provided screws.
- Install Light Kit: Remove the three pre-installed screws from the motor assembly. Connect the light kit wires and fix the light kit to the motor with screws. Rotate to fix the lampshade.
- Attach Blades: Align each fan blade with the mounting holes on the blade connectors and fix them securely with the provided screws. Note that the blades are reversible, offering two color options (walnut color and matte black) to match your decor.
- Assemble Down Rod: Decompose the down rod by removing the fixing pin and bolt. Route all wires through the down rod. Fix the down rod to the coupling with the bolt, and then insert the R-pin to secure it.
- Prepare for Ceiling Mounting: Assemble the canopy, coupling cover, and hanging ball through the down rod. Insert the fixing pin, push the hanging ball up, and fix it with screws.
- Install Mounting Bracket: Secure the mounting bracket to the ceiling joist or outlet box. Ensure it is firmly attached and can support the fan's weight. This fan supports installation on ceilings with up to a 10-degree slope.
- Wire Connections: Put the receiver into the bracket and arrange the wires. Make all wire connections (Live, Neutral, Ground, Light, Motor) in accordance with the wiring diagram provided in the video and your local electrical codes. Use wire nuts to secure connections.
- Hang the Fan: Snap the basically assembled fan into the installed bracket, ensuring the hanging ball is properly seated.
- Secure Canopy: Rotate the canopy clockwise until the screw heads engage the key slots fully. Tighten the screws to secure the canopy to the mounting bracket. Be careful not to damage or cut the wiring during this step.


Image 3: Left: Reversible fan blades offering two aesthetic options. Right: Example wiring diagram for connecting the receiver to house power, light, and motor.
Video 1: A detailed installation guide for the Viosn 52-inch Ceiling Fan, demonstrating the unpacking, assembly of components, and wiring process. This video provides a visual aid for the installation steps outlined above.
6. Operating Instructions
Your SODSEA ceiling fan is operated using the included remote control. Ensure the remote has working batteries installed.
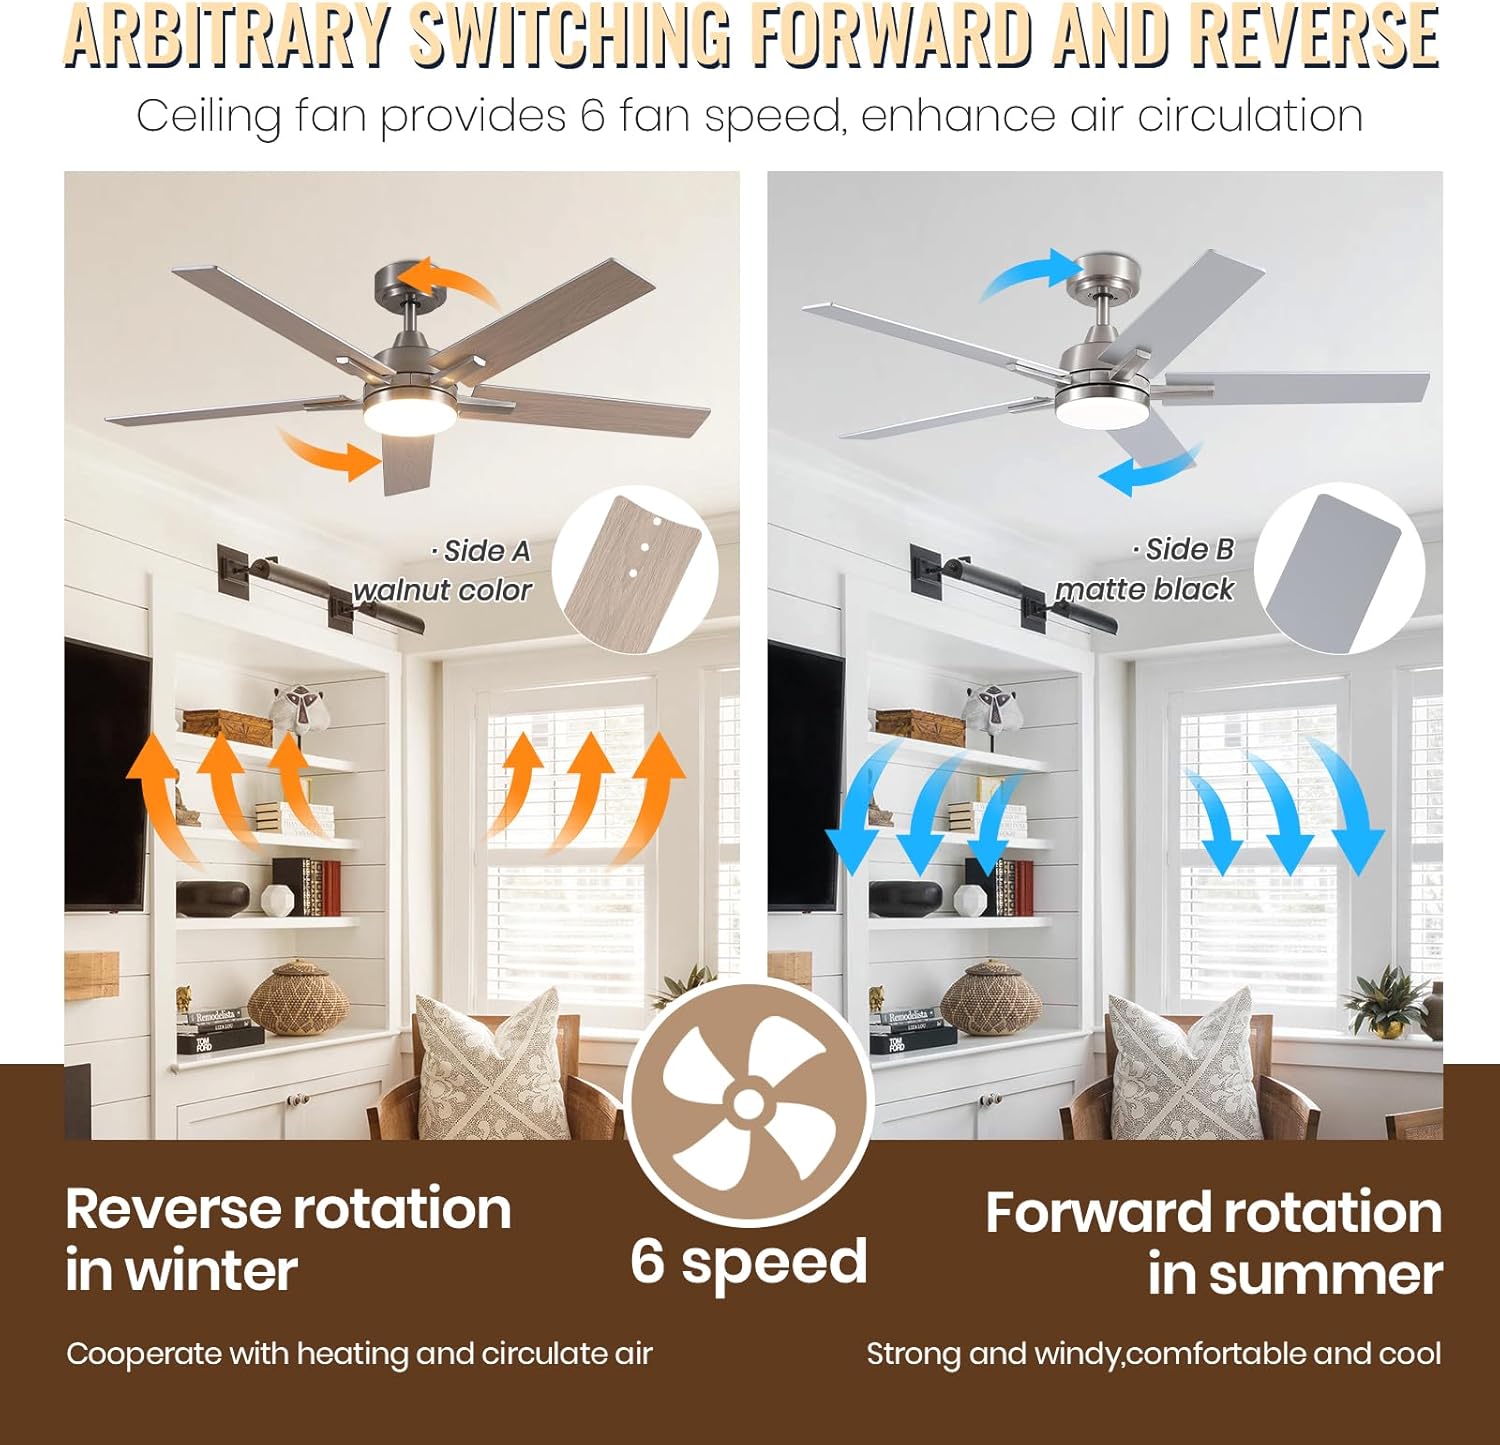
Image 4: The multi-functional remote control for operating the ceiling fan and light.
6.1 Fan Functions
- Fan On/Off: Press the 'Fan On' or 'Fan Off' button to start or stop the fan.
- Fan Speed: Use the '1' through '6' buttons to select your desired fan speed. '1' is the lowest speed, and '6' is the highest.
- Reversible Motor: Press the 'Forward/Reverse' button to change the direction of blade rotation.
- Summer Mode (Downward Airflow): Blades rotate counter-clockwise, pushing cool air down.
- Winter Mode (Upward Airflow): Blades rotate clockwise, drawing cool air up and circulating warm air trapped near the ceiling.
- Timer Function: Press the '1H', '3H', or '6H' button to set the fan to automatically turn off after 1, 3, or 6 hours, respectively.
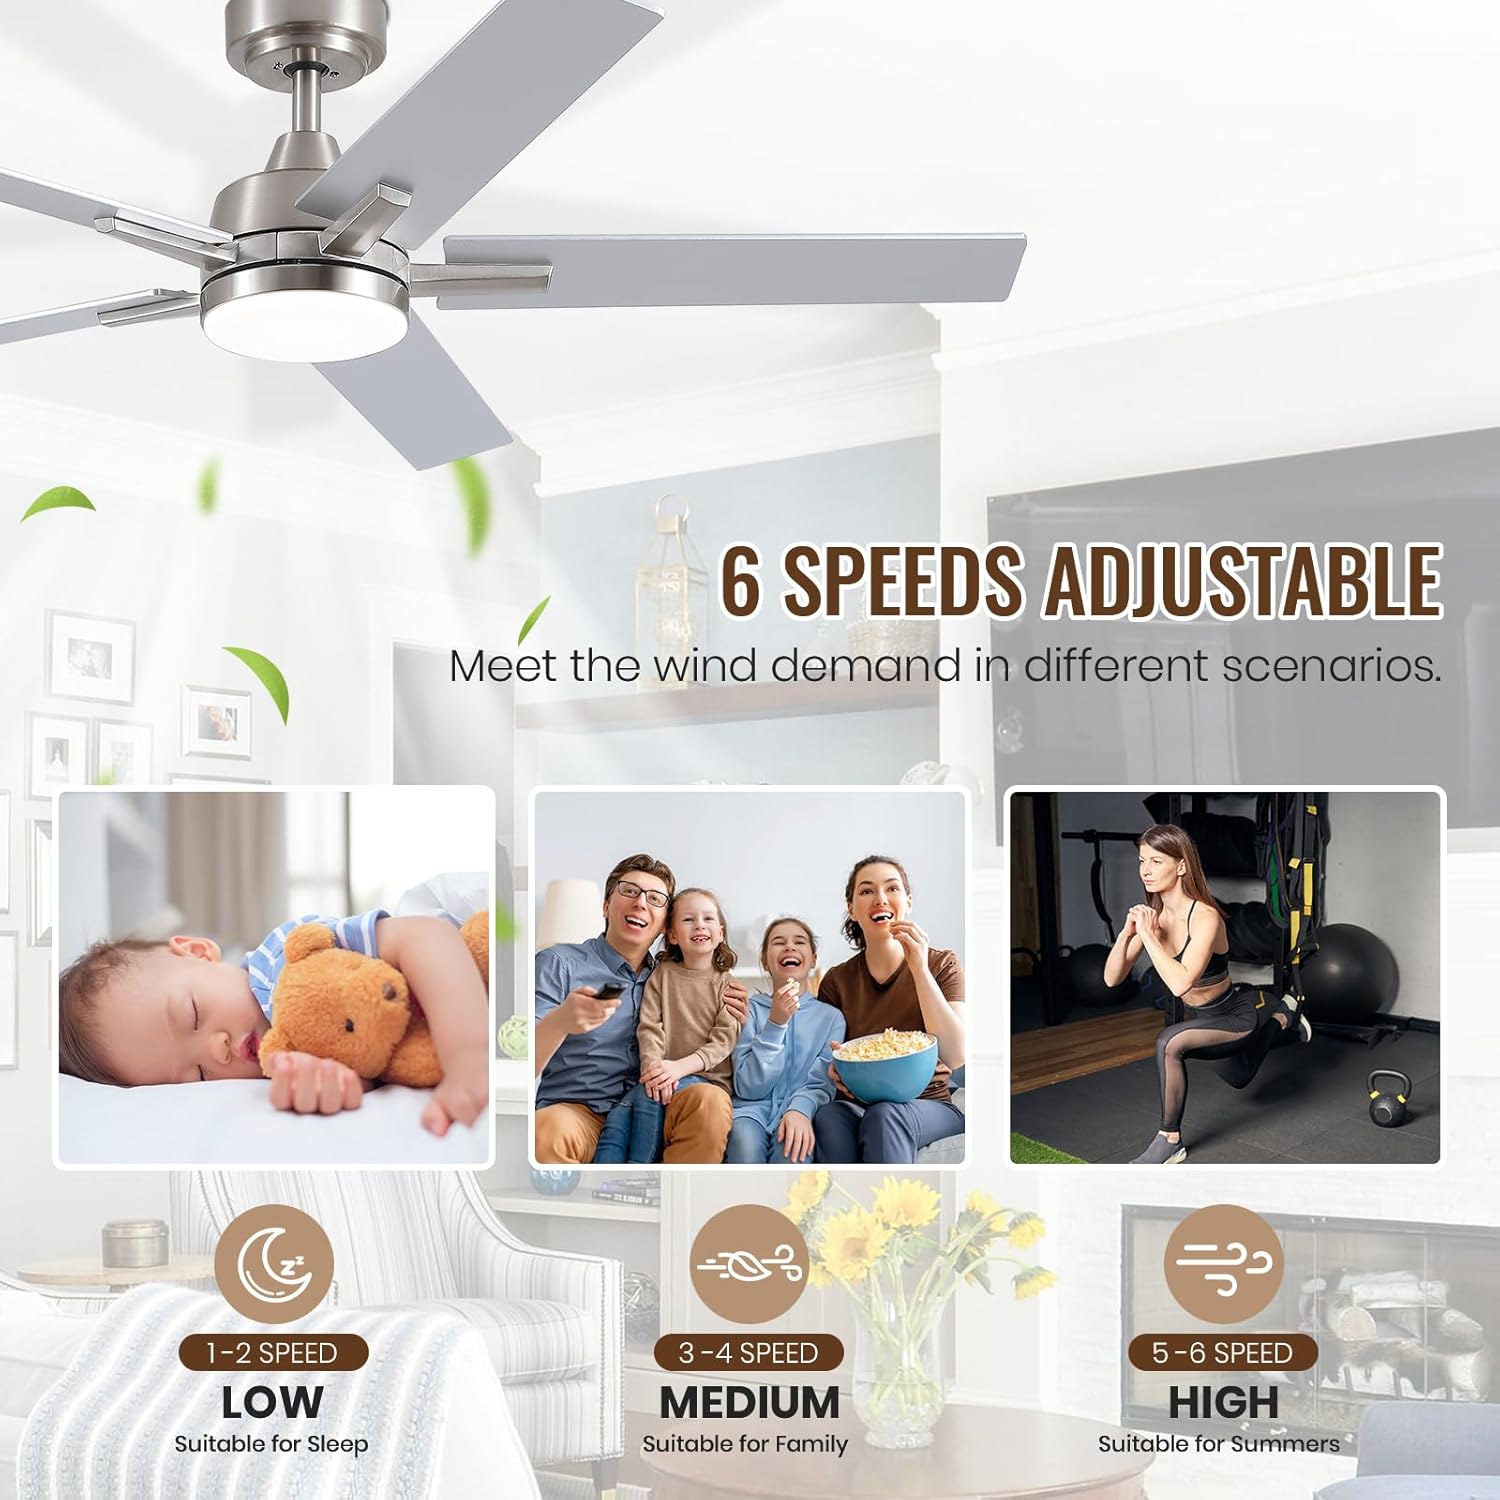
Image 5: Illustration of the fan's reversible rotation, showing downward airflow for summer and upward airflow for winter.

Image 6: Visual representation of the six adjustable fan speeds, suitable for various activities from sleeping to active use.
6.2 Light Functions
- Light On/Off: Press the 'Light On' or 'Light Off' button to turn the light on or off.
- Color Temperature Adjustment: Press the 'WW' (Warm White), 'NW' (Neutral White), or 'DW' (Daylight White) buttons to cycle through the three color temperatures: 3000K (Warm), 4000K (Daylight), and 6500K (Cool).
- Brightness Adjustment: Use the '+' and '-' buttons to adjust the light brightness from 12% to 100%.
- Memory Function: The light has a memory function. If the light is switched off for more than 10 seconds using the remote control and then switched on again, it will resume the last used color temperature and brightness setting. For quick color temperature changes, rapidly flip the wall light switch.
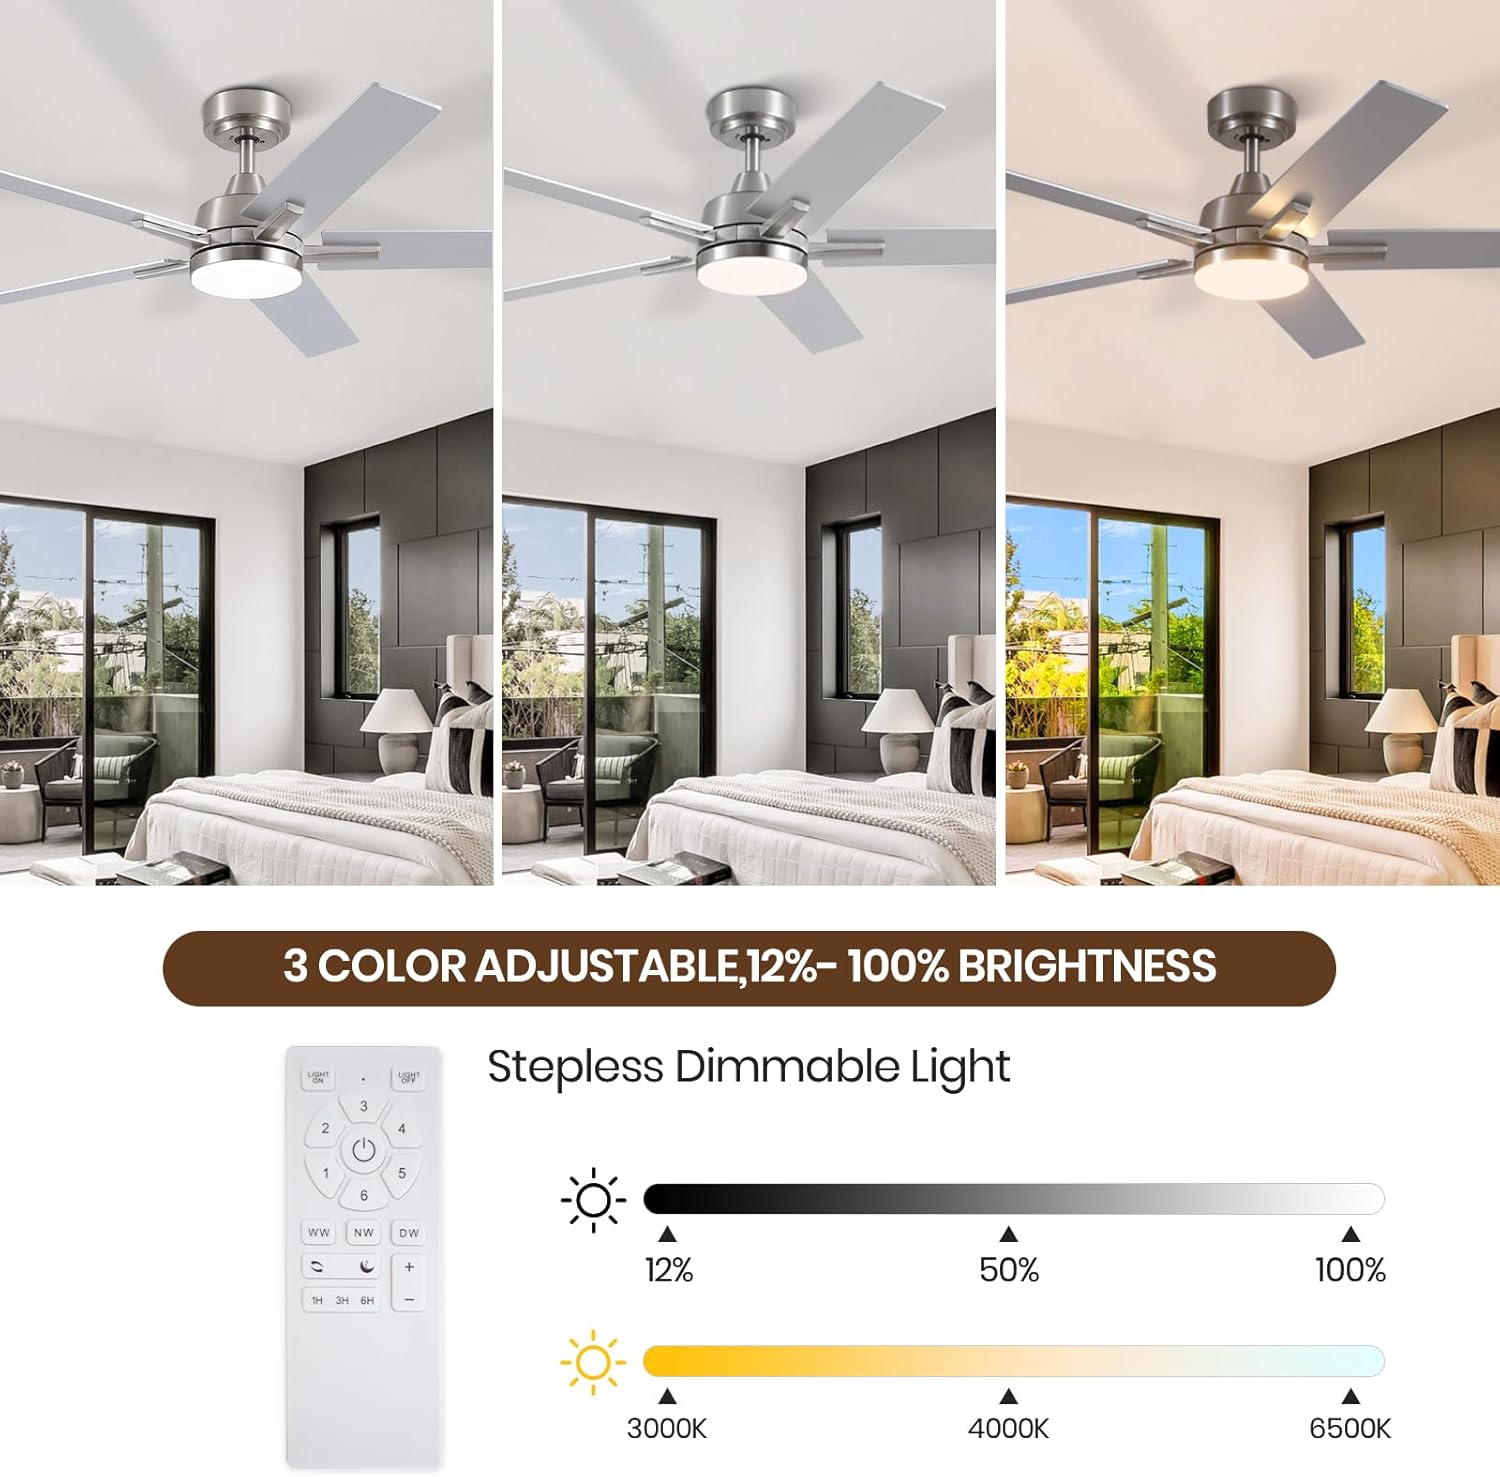
Image 7: Demonstrates the three adjustable color temperatures (Warm, Daylight, Cool) and the stepless dimming capability of the integrated LED light.
7. Maintenance
Regular maintenance helps prolong the life and performance of your ceiling fan.
- Cleaning: Periodically clean the fan blades and motor housing with a soft, lint-free cloth. For stubborn dirt, a slightly damp cloth can be used, followed by a dry cloth. Do not use abrasive cleaners or solvents, as these can damage the finish.
- Blade Care: Ensure the blades remain balanced. If the fan wobbles, check that all blade screws are tight.
- Light Kit: The LED light source is integrated and generally maintenance-free. Do not attempt to disassemble or replace individual LEDs.
- Annual Check: Annually, check all screws and connections for tightness.
Important: Always turn off the power to the fan at the circuit breaker before performing any cleaning or maintenance.
8. Troubleshooting
If you experience issues with your fan, refer to the following common problems and solutions:
| Problem | Possible Cause | Solution |
|---|---|---|
| Fan does not start | No power to the fan; Loose wire connections; Remote control battery dead. | Check circuit breaker/wall switch. Ensure all wire connections are secure. Replace remote control batteries. |
| Light does not work | Loose wire connection to light kit; Light kit failure. | Check light kit wiring connections. If issue persists, contact customer service. |
| Remote control not working | Dead batteries; Incorrect pairing; Obstruction. | Replace batteries. Ensure remote is within range and no obstructions. Refer to remote pairing instructions if available (not detailed in this manual). |
| Fan wobbles | Loose blade screws; Unbalanced blades; Loose mounting bracket. | Ensure all blade screws are tight. Check that the mounting bracket is securely fastened to the ceiling. |
| Noisy operation | Loose screws; Rubbing components; Incorrect installation. | Check all screws for tightness. Ensure no wires or components are touching the fan blades or motor housing. Re-verify installation steps. |
If you encounter a problem not listed here or if the suggested solutions do not resolve the issue, please contact customer service for further assistance.
9. Warranty and Support
SODSEA provides a 12-month free warranty for this product, covering manufacturing defects and malfunctions under normal use. This warranty does not cover damage caused by improper installation, misuse, accidents, or unauthorized modifications.
For warranty claims, technical support, or any questions you may have, please contact our customer service team. We offer 24/7 customer service to assist you.
Please have your model number (Sodsea-1240) and purchase information ready when contacting support.