1. Introduction
This instruction manual provides comprehensive guidance for the safe and effective use of your Generic 36-Egg Automatic Poultry Hatcher. This device is designed for incubating various poultry eggs, including chicken, duck, goose, pigeon, and quail eggs, featuring automatic egg turning and digital temperature/humidity control.
Please read this manual thoroughly before operating the incubator to ensure optimal performance and successful hatching results.
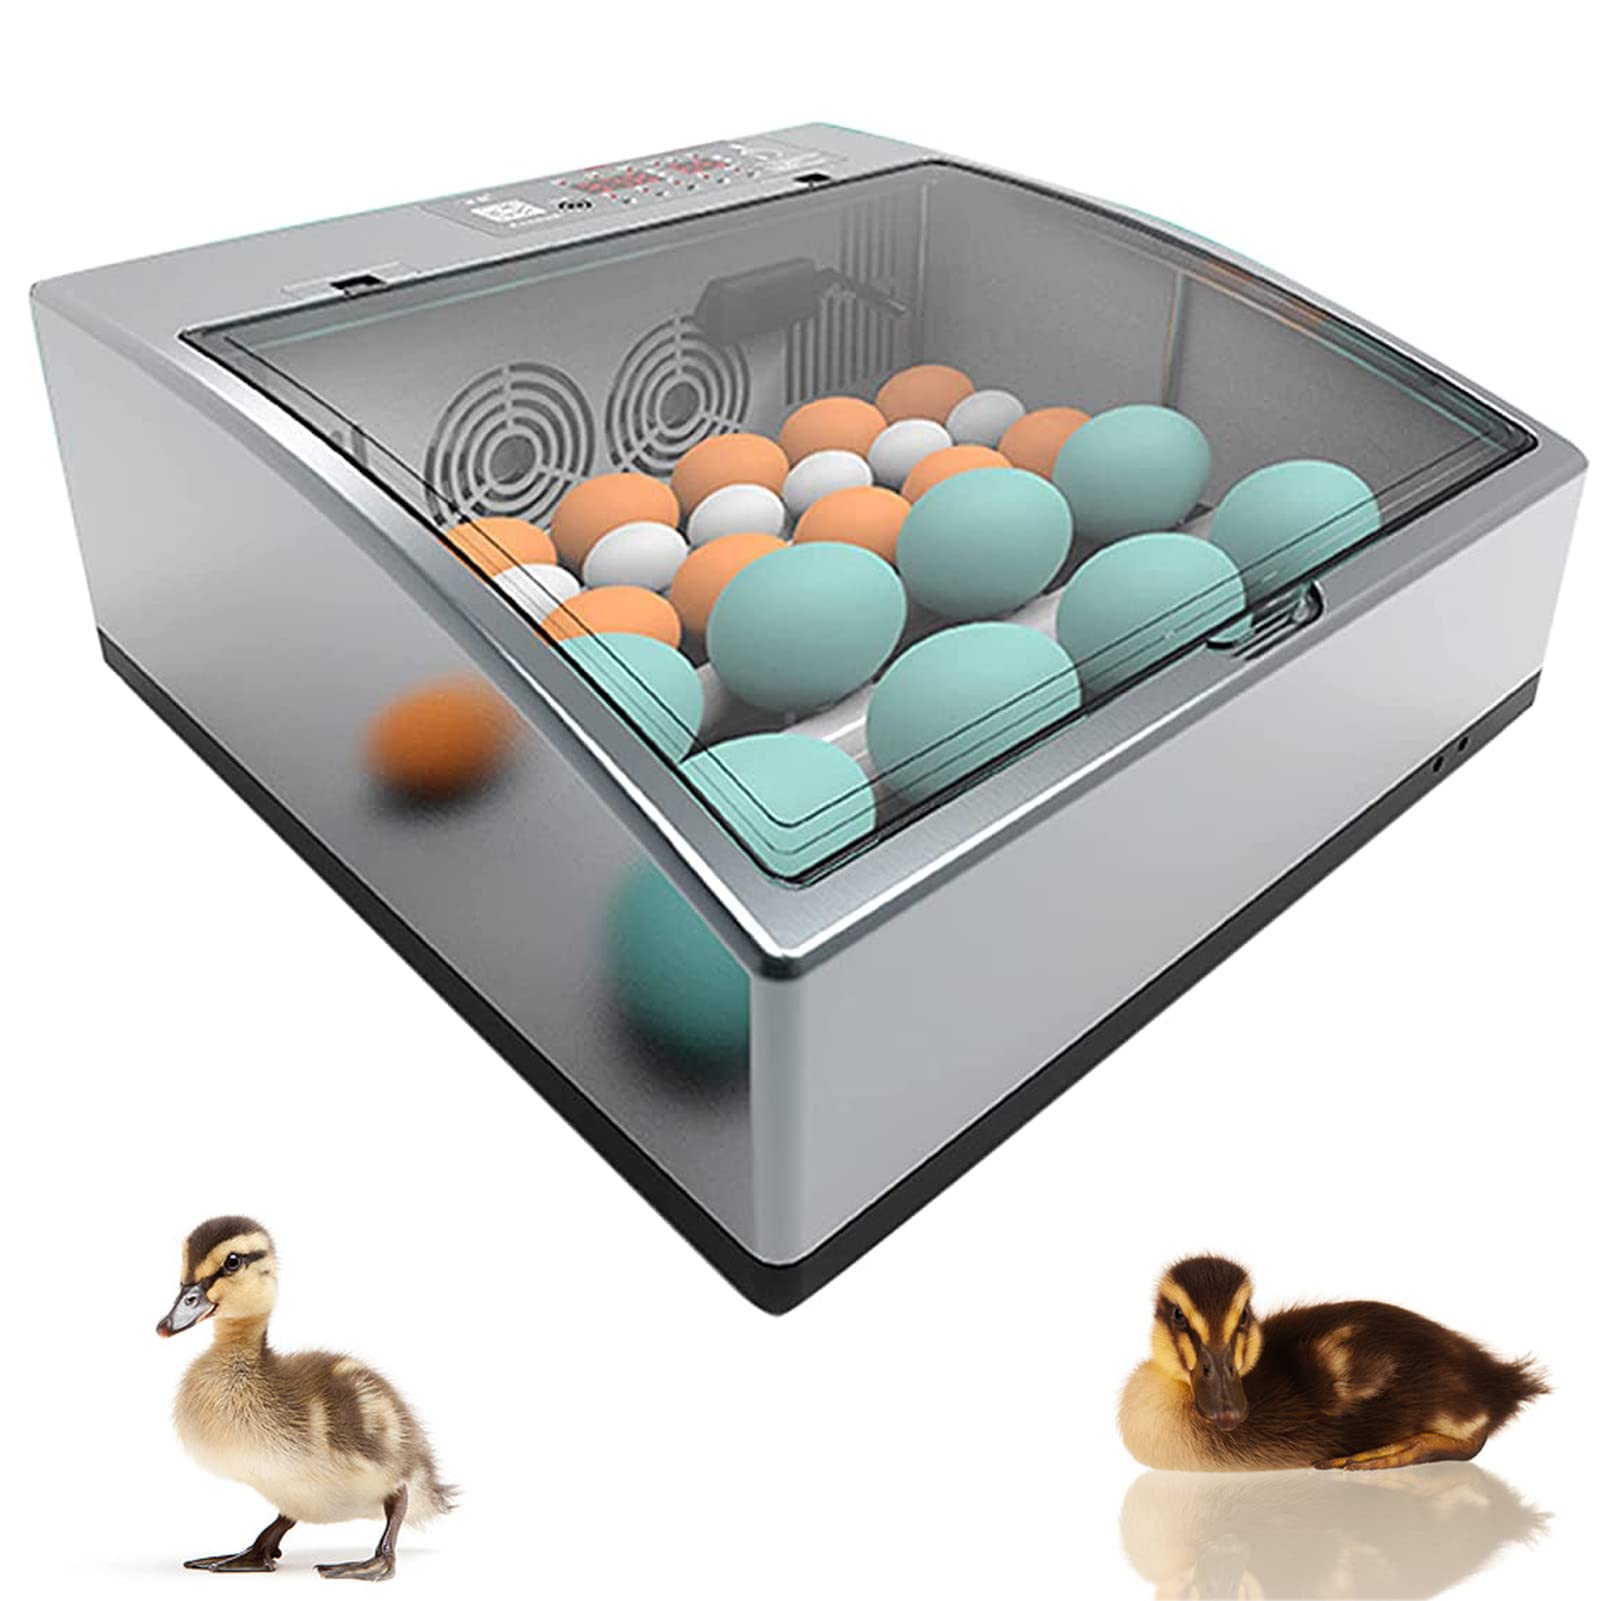
Image 1.1: Overview of the Generic 36-Egg Automatic Poultry Hatcher.
2. Package Contents
Verify that all items listed below are present in your package:
- Incubator Unit (1)
- Power Cord (1)
- Instruction Manual (1)
3. Product Components
Familiarize yourself with the main components of the incubator:
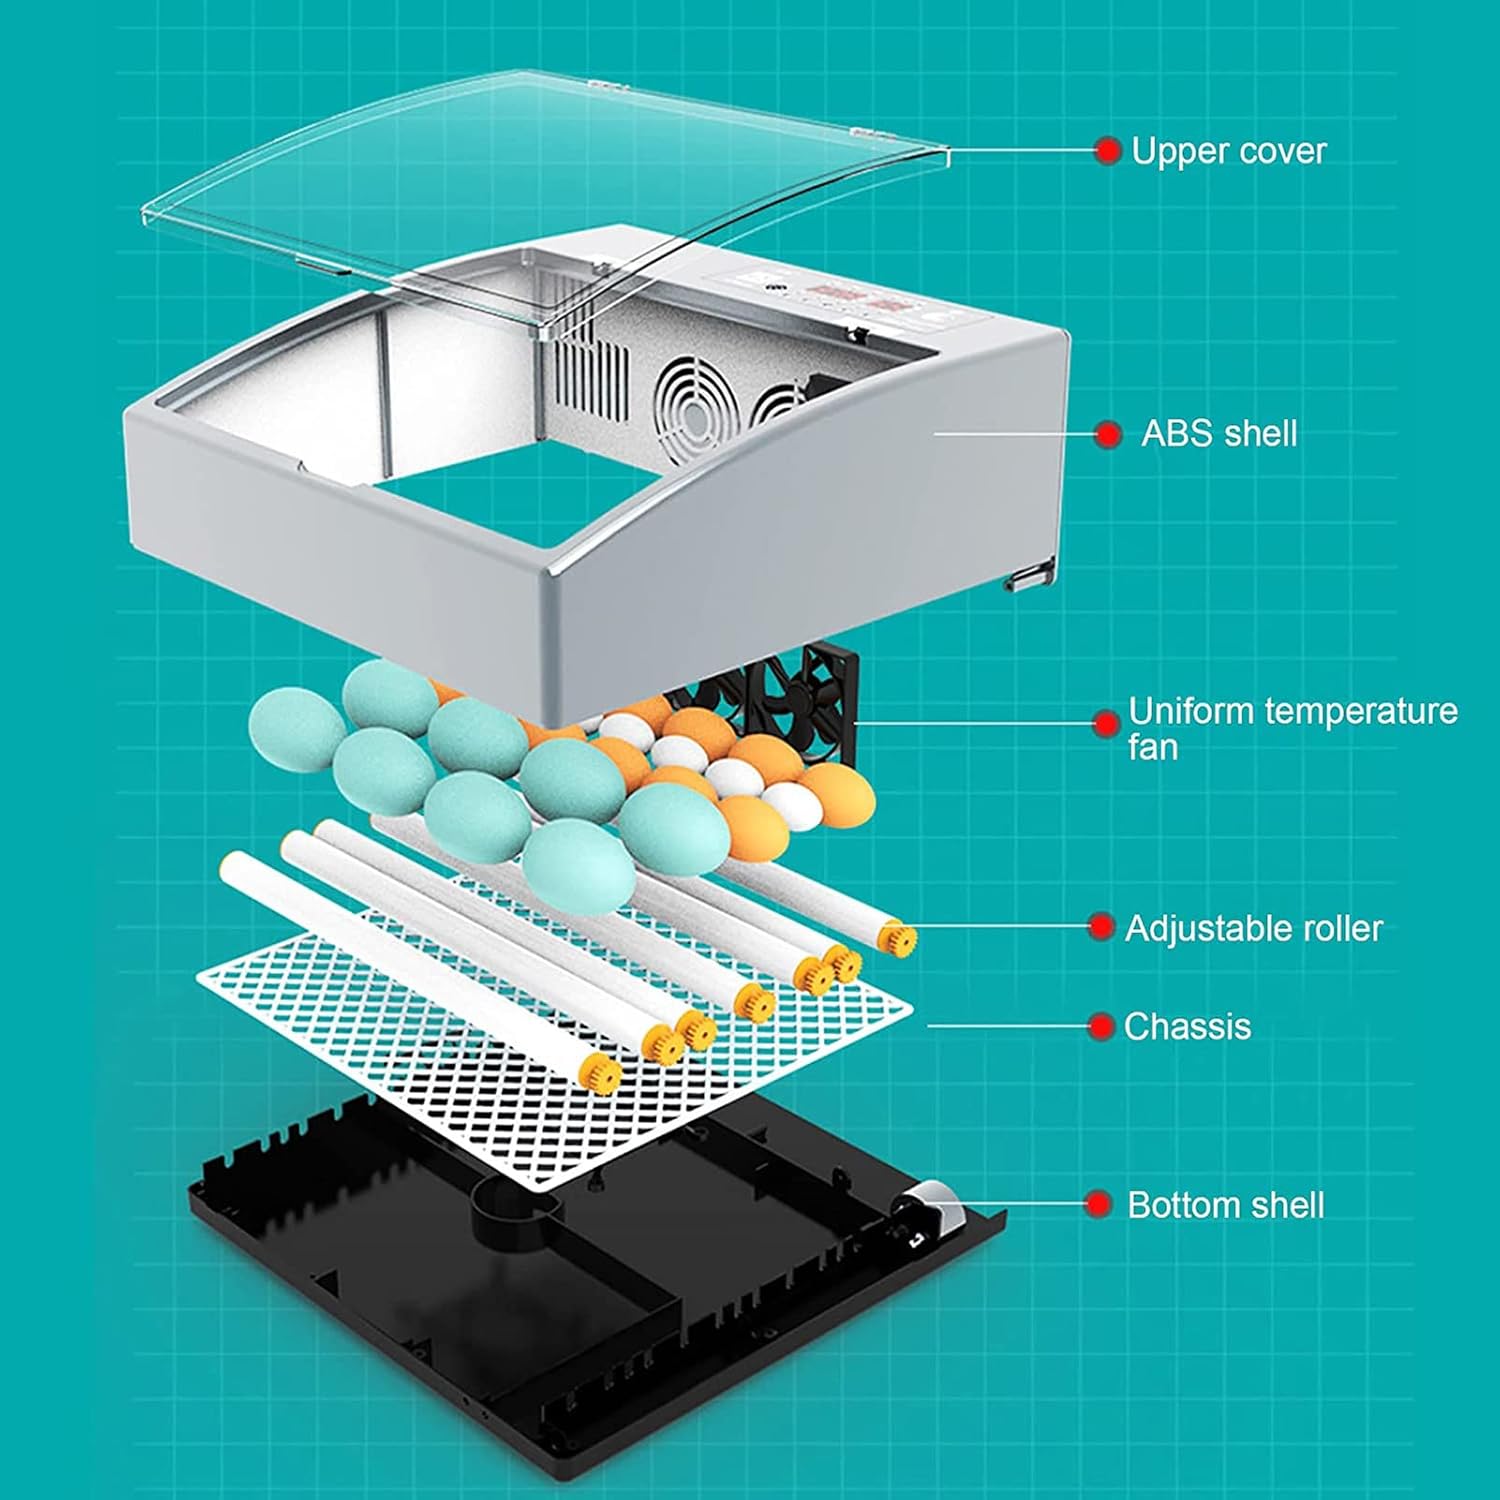
Image 3.1: Exploded view of incubator components. Key parts include the upper cover, ABS shell, uniform temperature fan, adjustable roller, chassis, and bottom shell.
- Upper Cover: Transparent lid for observation of eggs.
- ABS Shell: Durable outer casing providing insulation and protection.
- Uniform Temperature Fan: Circulates air within the incubator for even heat distribution.
- Adjustable Roller Egg Tray: Holds eggs and performs automatic turning.
- Chassis: The structural base supporting the internal components.
- Bottom Shell: The lower housing of the incubator unit.
4. Setup Instructions
4.1 Placement
Place the incubator on a stable, level surface in a room with a consistent ambient temperature, away from direct sunlight, drafts, or extreme temperature fluctuations. Ensure adequate ventilation around the unit to prevent overheating.
4.2 Power Connection
Connect the provided power cord to the incubator and then to a suitable electrical outlet (110V/220V home power supply). The incubator features a dual power supply system, allowing it to automatically switch to a 12V battery (user-provided) in case of a power outage. This ensures continuous operation and protects your incubation process.

Image 4.1: Power connection options, including 110/220V AC and 12V DC for backup.
4.3 Water Filling for Humidity Control
For models equipped with an automatic water supply system (typically double-layer models), fill the independent super large water tank. This system can provide water for up to 3 days, maintaining optimal humidity levels without frequent manual refills. Ensure the water tank is clean before filling with distilled or demineralized water to prevent mineral buildup.
5. Operating Instructions
5.1 Control Panel Overview
The digital LED display allows for easy monitoring and adjustment of incubation parameters. Familiarize yourself with the buttons and indicators on the control panel for temperature, humidity, and other settings.

Image 5.1: Control panel with digital display and incubation guidelines.
5.2 Temperature and Humidity Settings
Use the control panel to set the desired temperature and humidity. Refer to specific incubation requirements for the type of eggs you are hatching. The LED display will show current readings, allowing for precise adjustments.
- Typical Incubation Temperature: Approximately 37.5°C (99.5°F) for most poultry eggs.
- Typical Incubation Humidity: Varies by stage, generally 50-60% for the first 18 days, increasing to 65-75% for the last 3 days (hatching period).
5.3 Egg Placement and Automatic Turning
Carefully place the eggs onto the adjustable roller egg tray. The incubator's new generation roller design ensures 360° uniform rotation, automatically turning the eggs without manual intervention. This consistent turning is crucial for proper embryo development and prevents the embryo from sticking to the shell.
Image 5.2: Eggs positioned on the automatic roller egg tray.
5.4 Egg Candling and Observation
The incubator features internal lighting, allowing for easy observation of egg development without opening the lid. This LED egg machine function helps detect whether an egg is fertilized and monitor embryo growth. Regular observation is recommended, especially during the initial stages of incubation.
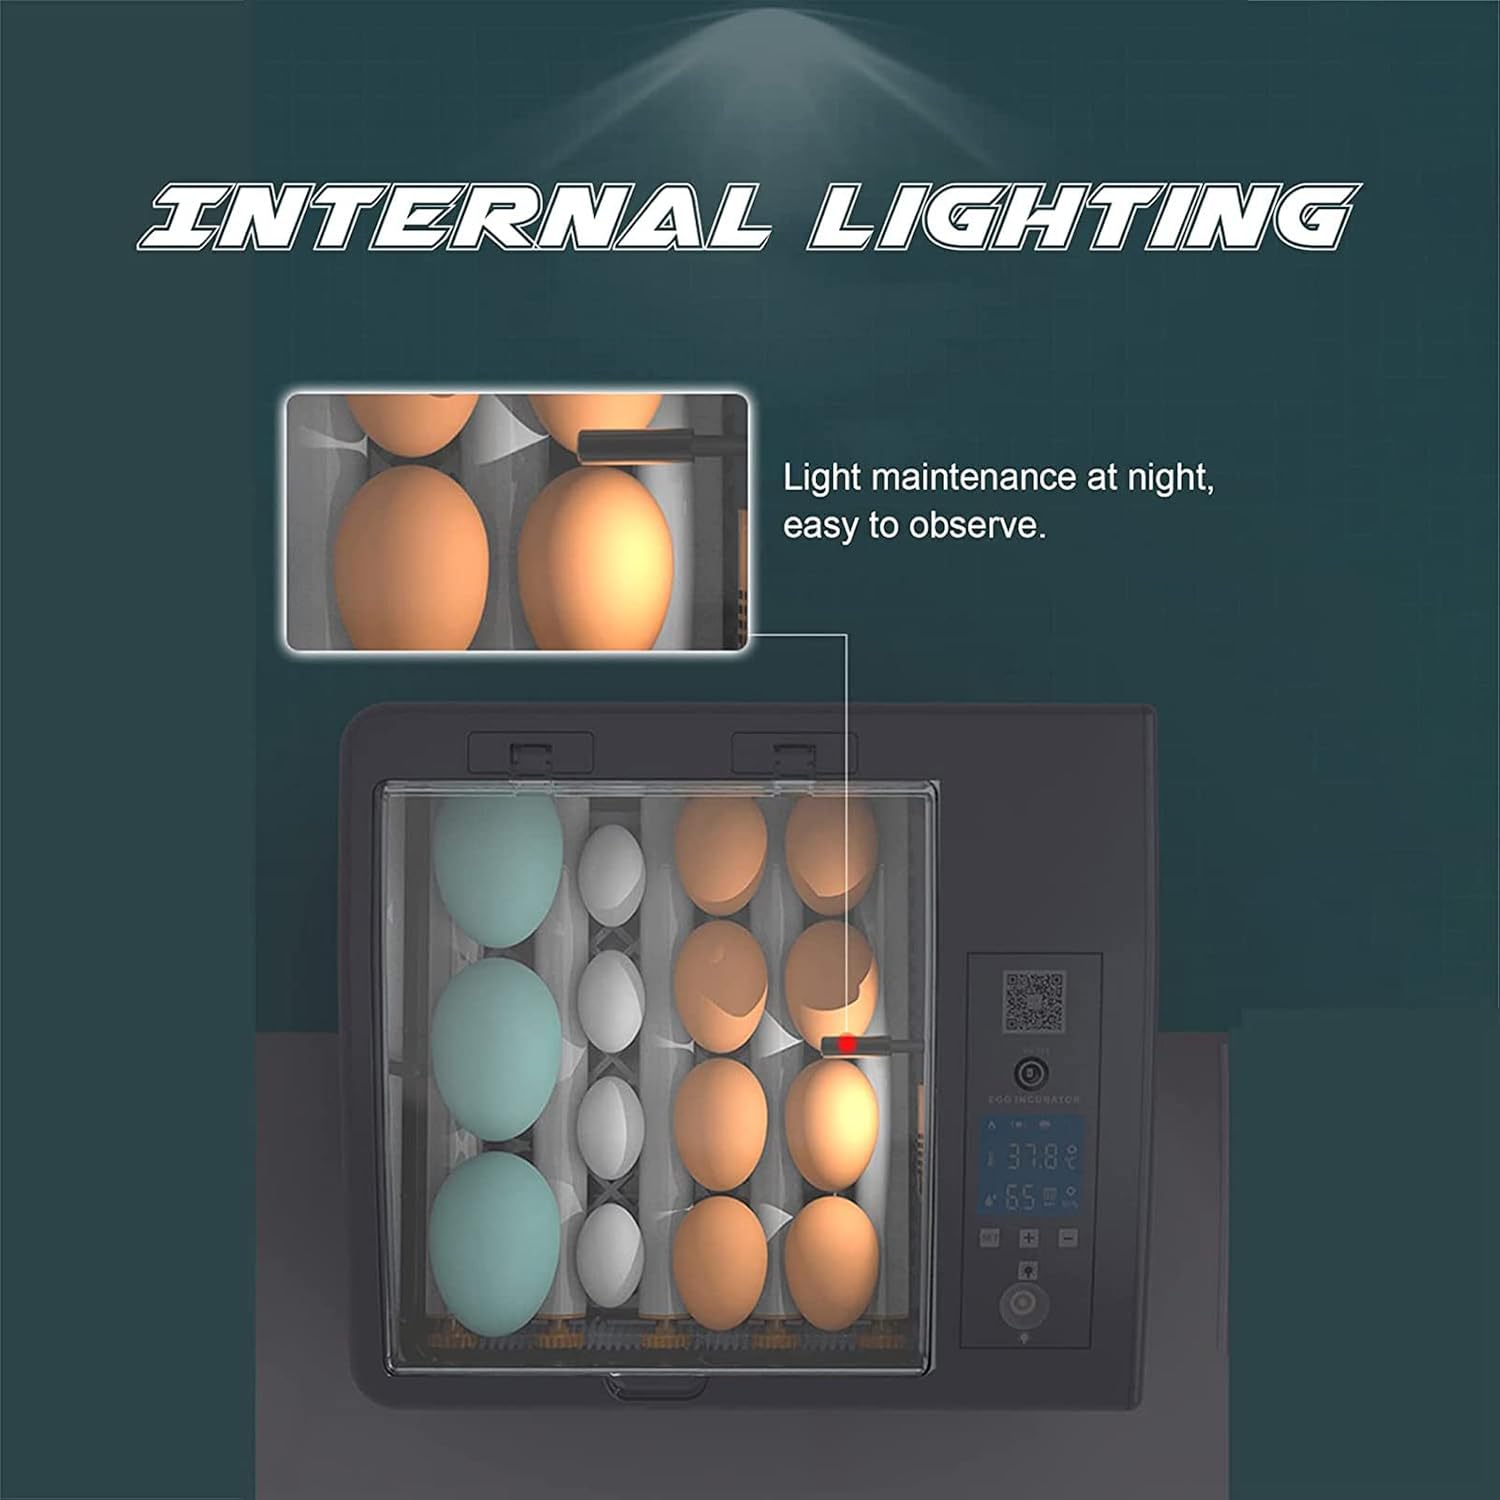
Image 5.3: Internal lighting for egg candling and observation.
5.5 Suitable Egg Types
This incubator is suitable for a variety of poultry eggs. The capacity is approximately 36 eggs for standard chicken eggs (single layer model), or up to 60 eggs for the double layer model, with capacity varying for smaller eggs like quail, and fewer for larger eggs like duck or goose.

Image 5.4: The incubator is suitable for various poultry eggs, including chicken, duck, swan, and quail.
6. Maintenance
6.1 Cleaning
After each incubation cycle, disconnect the power and allow the incubator to cool completely. Clean all internal surfaces, egg trays, and water channels with a mild disinfectant solution specifically designed for poultry equipment. Rinse thoroughly with clean water and dry all components completely before storage or next use. Do not immerse the main unit in water.
6.2 Storage
Store the incubator in a clean, dry place, away from direct sunlight, dust, and extreme temperatures. Ensure all components are dry to prevent mold or mildew growth and to maintain the longevity of the unit.
7. Troubleshooting
If you encounter issues with your incubator, refer to the following common problems and solutions:
- No Power: Check power cord connection and ensure the electrical outlet is functional. Verify if the 12V battery backup is connected and charged if operating in that mode.
- Incorrect Temperature Reading: Ensure the incubator is placed in a stable environment, free from drafts. Allow sufficient time (at least 30 minutes) for the temperature to stabilize after initial setup or adjustments.
- Humidity Too Low/High: Adjust the water level in the humidity channels or water tank. Ensure the room humidity is not excessively low or high, as this can affect internal humidity.
- Eggs Not Turning: Check if the egg turning mechanism is properly assembled and connected. Ensure no obstructions (e.g., egg debris, foreign objects) are preventing the rollers from moving freely.
- Poor Hatch Rate: This can be due to many factors including egg quality, incorrect temperature/humidity settings, improper ventilation, or issues with egg turning. Review all operating parameters and egg handling procedures carefully.
8. Specifications
Detailed specifications for the incubator models:

Image 8.1: Incubator dimensions (Single Layer Model).
| Feature | Single Layer Model | Double Layer Model |
|---|---|---|
| Capacity | Up to 36 Chicken Eggs | Up to 60 Chicken Eggs |
| Power | 35W | 80W |
| Material | ABS+PP | ABS+PP |
| Product Size (L x W x H) | 38cm x 37cm x 16cm (15in x 14.5in x 6.3in) | 42cm x 35cm x 35cm (approx. 16.5in x 13.8in x 13.8in) |
| Egg Turning | Automatic 360° Roller Turning | |
| Humidity Control | Manual water addition | Automatic Water Supply System |
| Power Supply | Dual (AC 110/220V & DC 12V backup) | |


