1. Introduction
Thank you for choosing the HOOBRO EBF240CBZ01 Narrow 2-Tier Side Table. This compact and functional piece of furniture is designed to fit into small spaces, offering convenient storage and an integrated charging station. This manual provides essential information for safe assembly, operation, and maintenance of your new side table.
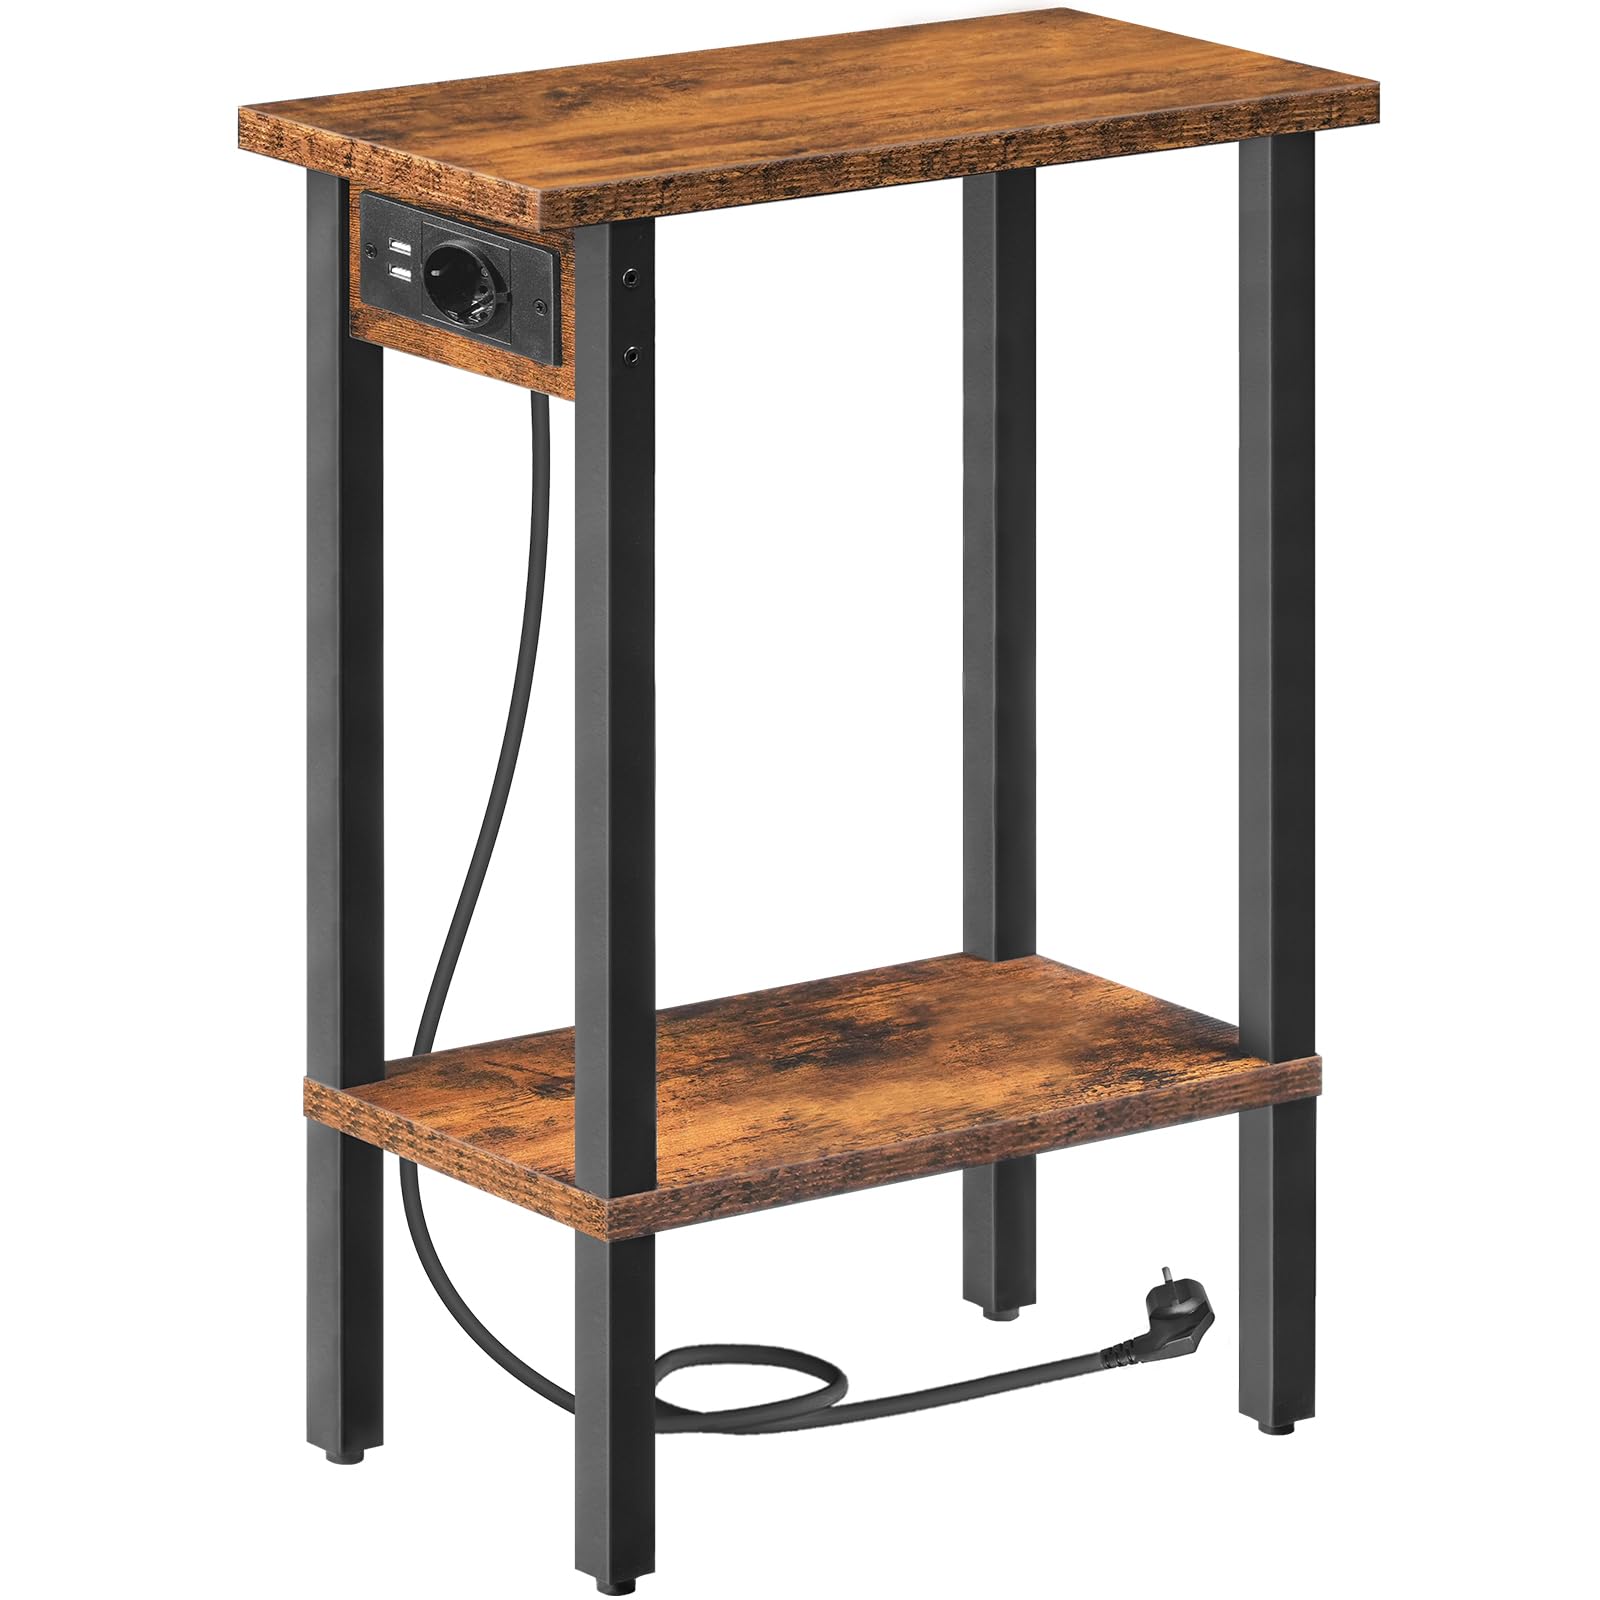
Figure 1: The HOOBRO EBF240CBZ01 Narrow 2-Tier Side Table with Charging Station.
2. Safety Information
Please read and understand all safety instructions before assembly and use. Failure to follow these instructions may result in injury or damage to the product.
- Always ensure that the power cord and charging station are kept away from water or other liquids to prevent electrical hazards.
- Do not overload the charging station. Refer to the specifications for maximum electrical load.
- Place the table on a flat, stable surface to prevent tipping.
- Do not exceed the maximum weight capacity of 10 kg per shelf.
- Keep small parts and packaging materials away from children to avoid choking hazards.
- Regularly check all screws and connections to ensure they remain tight.
3. Package Contents
Before assembly, verify that all components are present and undamaged. If any parts are missing or damaged, please contact customer support.
| Part | Description | Quantity |
|---|---|---|
| A | Top Shelf | 1 |
| B | Bottom Shelf | 1 |
| C | Metal Frame Legs | 4 |
| D | Charging Station Unit | 1 |
| E | Screws and Allen Key | 1 set |
4. Assembly Instructions
Follow these steps carefully to assemble your side table. It is recommended to assemble on a soft, clean surface to prevent scratches.
- Step 1: Attach the Charging Station. Secure the charging station unit (D) to the designated slot on the underside of the top shelf (A) using the provided screws. Ensure it is firmly in place.
- Step 2: Assemble the Frame. Attach the metal frame legs (C) to the top shelf (A) using the appropriate screws. Do not tighten completely yet.
- Step 3: Install the Bottom Shelf. Connect the bottom shelf (B) to the lower sections of the metal frame legs (C). Ensure the shelf is oriented correctly.
- Step 4: Tighten All Screws. Once all parts are aligned, gradually tighten all screws using the Allen key until the table is stable. Do not overtighten.
- Step 5: Position the Table. Carefully place the assembled table in your desired location.

Figure 2: Product dimensions and structural overview for assembly.
5. Operating Instructions (Charging Station)
The integrated charging station provides convenient power access for your devices.
- Connect to Power: Plug the table's power cord into a standard wall outlet.
- Use USB Ports: Insert your USB charging cables into the two available USB ports to charge smartphones, tablets, or other USB-powered devices.
- Use Standard Outlet: Plug any compatible electrical appliance (e.g., a lamp, alarm clock) into the standard power outlet.
Important: Do not exceed the maximum power output of the charging station. Refer to the 'Specifications' section for details.

Figure 3: Detail of the integrated charging station with USB ports and standard outlet.

Figure 4: Example of a device charging on the side table.
6. Maintenance
Proper care will extend the life and appearance of your side table.
- Cleaning: Wipe surfaces with a soft, damp cloth. Avoid harsh chemicals or abrasive cleaners that may damage the finish.
- Spills: Immediately wipe up any spills to prevent moisture damage to the particle board.
- Inspection: Periodically check all connections and screws for tightness. Retighten as necessary.
- Placement: Avoid placing the table in direct sunlight or near heat sources to prevent warping or discoloration.

Figure 5: Detail of the table's durable particle board surface.
7. Troubleshooting
If you encounter any issues with your side table, refer to the following common problems and solutions:
| Problem | Possible Cause | Solution |
|---|---|---|
| Table is wobbly/unstable | Screws are loose; uneven floor. | Tighten all assembly screws. Move the table to a level surface or use furniture pads to stabilize. |
| Charging station not working | Not plugged in; power outlet issue; device cable faulty; overloaded. | Ensure the power cord is securely plugged into a working wall outlet. Test the outlet with another device. Try a different charging cable. Reduce the number of devices connected. |
| Parts do not align during assembly | Incorrect orientation of parts; screws overtightened prematurely. | Review the assembly instructions and ensure all parts are oriented correctly. Loosen all screws, align parts, then retighten gradually. |
8. Specifications
| Feature | Detail |
|---|---|
| Model Number | EBF240CBZ01 |
| Dimensions (L x W x H) | 40 x 20 x 57.5 cm (15.7 x 7.9 x 22.6 inches) |
| Weight | 2.6 kg (5.7 lbs) |
| Max. Load Capacity per Shelf | 10 kg (22 lbs) |
| Material | Particle Board, Metal Frame |
| Charging Station | 1 Standard AC Outlet, 2 USB Ports |
| Power Cord Length | 150 cm (4.9 feet) |
9. Warranty and Support
HOOBRO products are designed for quality and durability. For warranty information or technical support, please refer to the contact details provided with your purchase or visit the official HOOBRO website. Please have your model number (EBF240CBZ01) ready when contacting support.


