
1. Important Safety Information
Read all instructions carefully before operating the pressure washer. Failure to follow these instructions may result in injury or property damage.
- Always wear appropriate personal protective equipment, including eye protection, hearing protection, and protective footwear.
- Never point the spray gun at people, pets, or electrical devices. The high-pressure spray can cause serious injury.
- Ensure all connections are secure before starting the unit. Leaking connections can reduce pressure and cause hazards.
- Do not operate the pressure washer in an enclosed space.
- Keep children and bystanders away from the operating area.
- Always disconnect the power supply before performing any maintenance or cleaning.
- This unit is equipped with a Total Stop System (TSS) which automatically shuts off the pump when the trigger is not engaged. This feature conserves energy and extends pump life.
- The spray gun includes a safety lock to prevent accidental triggering. Always engage the safety lock when the unit is not in use.

2. Product Overview
The Aceup Energy AWPE4200 Electric Pressure Washer is designed for efficient cleaning of various surfaces. It delivers 4200 PSI maximum pressure and a 2.6 GPM water flow, suitable for tasks such as washing cars, fences, patios, and driveways.

Key Features:
- High Performance: 4200 PSI maximum pressure and 2.6 GPM flow rate for effective cleaning.
- Portable Design: Equipped with wheels and a handle for easy transport.
- Accessory Storage: Integrated hooks for cord, hose, nozzles, and foam cannon.
- Total Stop System (TSS): Automatically shuts off the pump when the trigger is released.
- Quick-Connect Nozzles: Includes 0°, 15°, 25°, 40° spray tips and a foam nozzle for various applications.

3. Setup and Assembly
Follow these steps to assemble and prepare your pressure washer for use.
3.1 Unpacking and Component Check
Carefully remove all components from the packaging. Verify that all parts listed in the manual are present and undamaged. If any parts are missing or damaged, contact Aceup Energy customer support.
3.2 Attaching the Wheels and Handle
Attach the wheels to the base of the unit. Secure the handle to the main body of the pressure washer according to the diagrams provided in your physical manual.
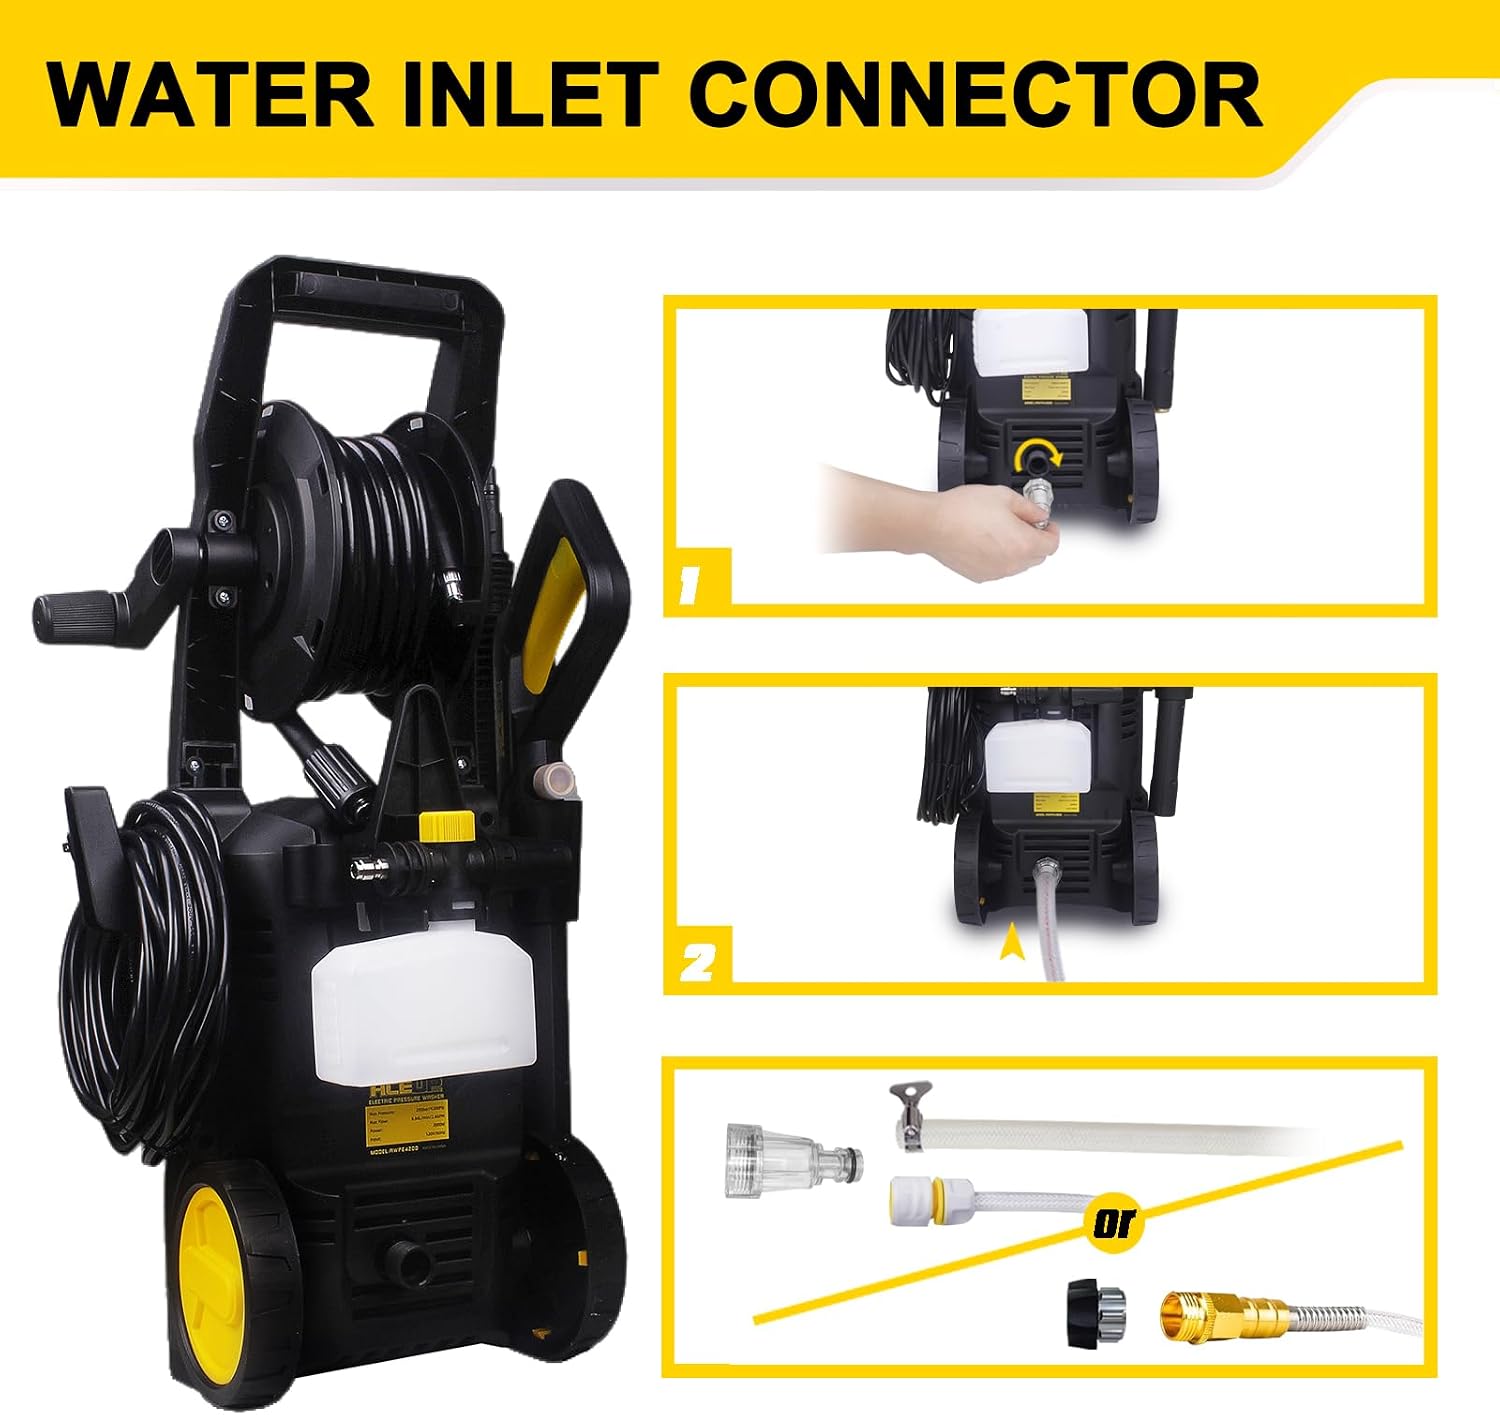
3.3 Connecting the Water Inlet
Connect your garden hose to the water inlet adapter on the pressure washer. Ensure the connection is tight to prevent leaks and air intake. The unit includes two water inlet adapters with filters.
3.4 Assembling the Spray Gun and High-Pressure Hose
Connect the high-pressure hose to the pressure washer outlet and to the spray gun. Ensure these connections are secure. Attach the desired quick-connect nozzle to the spray gun lance.

3.5 Priming the Pump
Before connecting to power, turn on the water supply to the pressure washer. Squeeze the trigger on the spray gun to allow water to flow through the system and expel any trapped air. Continue until a steady stream of water emerges from the nozzle. This primes the pump and prevents damage.
3.6 Setup Videos
Video 1: This video demonstrates the installation process for a pressure washer, including connecting hoses and accessories.
Video 2: A detailed installation guide for a pressure washer, showing step-by-step assembly.
4. Operating Instructions
Once the pressure washer is set up and primed, you can begin operation.
4.1 Power Connection
Connect the pressure washer's power cable to a grounded 120V, 60Hz electrical outlet. Ensure the outlet is protected by a Ground Fault Circuit Interrupter (GFCI).
4.2 Starting the Unit
Turn the power switch on. The motor may run for 1-2 seconds to build pressure, then the Total Stop System (TSS) will engage, and the motor will stop until the spray gun trigger is squeezed.
4.3 Selecting Nozzles
The pressure washer comes with 4 quick-connect nozzles (0°, 15°, 25°, 40°) and a foam nozzle. Choose the appropriate nozzle for your cleaning task:
- 0° (Red): Pin-point jet for intense cleaning of small, stubborn spots. Use with caution as it can damage surfaces.
- 15° (Yellow): Narrow spray for concentrated cleaning on hard surfaces.
- 25° (Green): Medium spray for general cleaning of most surfaces.
- 40° (White): Wide spray for gentle cleaning and rinsing.
- Foam Nozzle: For applying detergent or soap.

4.4 Applying Detergent (Optional)
If using the foam nozzle, fill the foam cannon with appropriate pressure washer detergent. Attach the foam nozzle to the spray gun. The pressure washer will draw detergent from the reservoir and mix it with water to create foam.
4.5 Cleaning Technique
Hold the spray gun firmly with both hands. Start spraying a few feet away from the surface and gradually move closer until the desired cleaning effect is achieved. Maintain a consistent distance and angle for even cleaning. Work in small sections, overlapping slightly.

4.6 Operation Videos
Video 3: This video demonstrates the high-pressure cleaning capability and the use of multiple spray tips for various tasks.
Video 4: A demonstration of a power washer in use, highlighting its effectiveness on various surfaces.
5. Maintenance
Regular maintenance ensures optimal performance and extends the life of your pressure washer.
5.1 After Each Use
- Turn off the power switch and disconnect the power cord.
- Turn off the water supply.
- Squeeze the spray gun trigger to release any remaining pressure in the system.
- Disconnect the garden hose and high-pressure hose.
- Drain all water from the pump and hoses to prevent freezing in cold weather.
- Clean the exterior of the unit with a damp cloth.
- Clean the nozzle tips and water inlet filter to remove any debris.
5.2 Storage
Store the pressure washer in a dry, frost-free environment. Ensure all hoses are properly coiled and accessories are stored in their designated places on the unit.
6. Troubleshooting
Refer to the table below for common issues and their solutions.

| Problem | Possible Cause | Correction |
|---|---|---|
| Unit will not turn on | Pressure washer is not connected to a power source or the power source isn't grounded | Connect the power cord to a grounded 120 Volt outlet |
| Water pressure is in the hose | Pull the trigger to release the water pressure | |
| Press the RESET button on the power cord | ||
| The unit is running but there is no water flow | Defective motor or power cord | Contact Aceup Energy Team |
| Improper water source | Connect the pressure washer to a water main. Do not use this device with water from a lake, pool, pond, etc. | |
| Clogged nozzle | Clean the nozzle | |
| Defective spray lance | Replace the lance | |
| Water is leaking where the hose connects to the spray gun | Defective or missing O-ring between the high pressure hose and the spray gun | Replace the O-ring |
| The pressure washer turns on for 2 seconds, shuts off, and will not turn back on | The auto-start feature is turning the unit off | When the pressure washer is turned on, the motor may run for 1-2 seconds to prime the pump. It will automatically shut off until the spray gun trigger is squeezed. This is normal and does not indicate a problem. |
7. Specifications
| Specification | Value |
|---|---|
| Model Number | AWPE4200 |
| Maximum Pressure | 4200 PSI |
| Maximum Flow Rate | 2.6 GPM |
| Power Source | Electrically powered (120V, 60Hz) |
| Maximum Water Temperature | 140°F (60°C) |
| Hose Length | 7 Meters (23 FT) |
| Power Cable Length | 35 FT |
| Item Weight | 7.39 kg (16.3 lbs) |
| Product Dimensions (L x W x H) | 34.04 x 25.91 x 67.31 cm (13.4 x 10.2 x 26.5 inches) |
| Certification | UL compliant |


8. Warranty and Support
The Aceup Energy AWPE4200 Electric Pressure Washer is backed by a 1-year limited warranty. This warranty covers defects in materials and workmanship under normal use.
For technical guidance, warranty claims, or any other inquiries, please contact Aceup Energy customer support. Refer to the contact information provided with your product packaging or visit the official Aceup Energy website for assistance.

