
1. Introduction
This manual provides essential information for the safe installation, operation, and maintenance of your WOODBRIDGE BS667-R-BG03 Alcove Whirlpool Heated Jetted Tub. Please read all instructions carefully before installation and use to ensure proper function and to prevent injury or damage.
2. Safety Information
WARNING: Risk of Electric Shock. Always disconnect power before servicing.
- Installation must be performed by a qualified electrician and plumber in accordance with all local codes and regulations.
- The tub requires two separate 110-120V, 15AMP GFCI (Ground-Fault Circuit Interrupter) protected circuits. One circuit is for the whirlpool pump, and the other is for the inline heater.
- Do not operate the tub without water. Ensure the water level is above the jets before activating the whirlpool function.
- Avoid using abrasive cleaners or harsh chemicals on the tub surface, as this can damage the acrylic.
- Children should be supervised when in or near the tub.
- Do not use electrical appliances near the tub.
3. Specifications
| Feature | Detail |
|---|---|
| Model Number | BS667-R-BG03 |
| Exterior Dimensions (L x W x H) | 60" x 32" x 21-5/8" |
| Interior Dimensions (L x W) | 54-1/2" x 26" |
| Water Depth | 14-1/2" (370mm) |
| Seating Area (L x W) | 41-3/4" x 19-3/4" |
| Drain Position | Right |
| Material | High gloss LUCITE acrylic, reinforced with ASHLAND resin & fiberglass |
| Water Capacity | 52 Gallons |
| Jet System | 3 small jets, 6 large jets (all adjustable) |
| Heater | Inline heater, maintains water temperature at 100°F/38°C |
| Lighting | 7-color LED Chromotherapy lights |
| Electrical Requirements | Two 110-120V, 15AMP GFCI breakers |
| Certifications | CSA B45.5-17/IAPMO Z124-2017 |
| Item Weight | 108 Pounds |
For detailed measurements, refer to the dimension diagram below:

This diagram illustrates the precise measurements for installation planning.
4. Setup and Installation
Professional installation by a licensed plumber and electrician is strongly recommended to ensure compliance with all local building and safety codes.
4.1 Electrical Connections
- Ensure two dedicated 110-120V, 15AMP GFCI protected circuits are available at the installation site.
- One circuit powers the whirlpool pump, and the other powers the inline heater.
- All wiring must conform to national and local electrical codes.
4.2 Plumbing Connections
- Connect the hot and cold water supply lines to the tub's faucet (faucet not included).
- Install the included solid brass drain and stainless steel overflow in brushed gold finish according to the provided installation manual.
- Ensure all connections are watertight to prevent leaks.
4.3 Tub Placement and Support
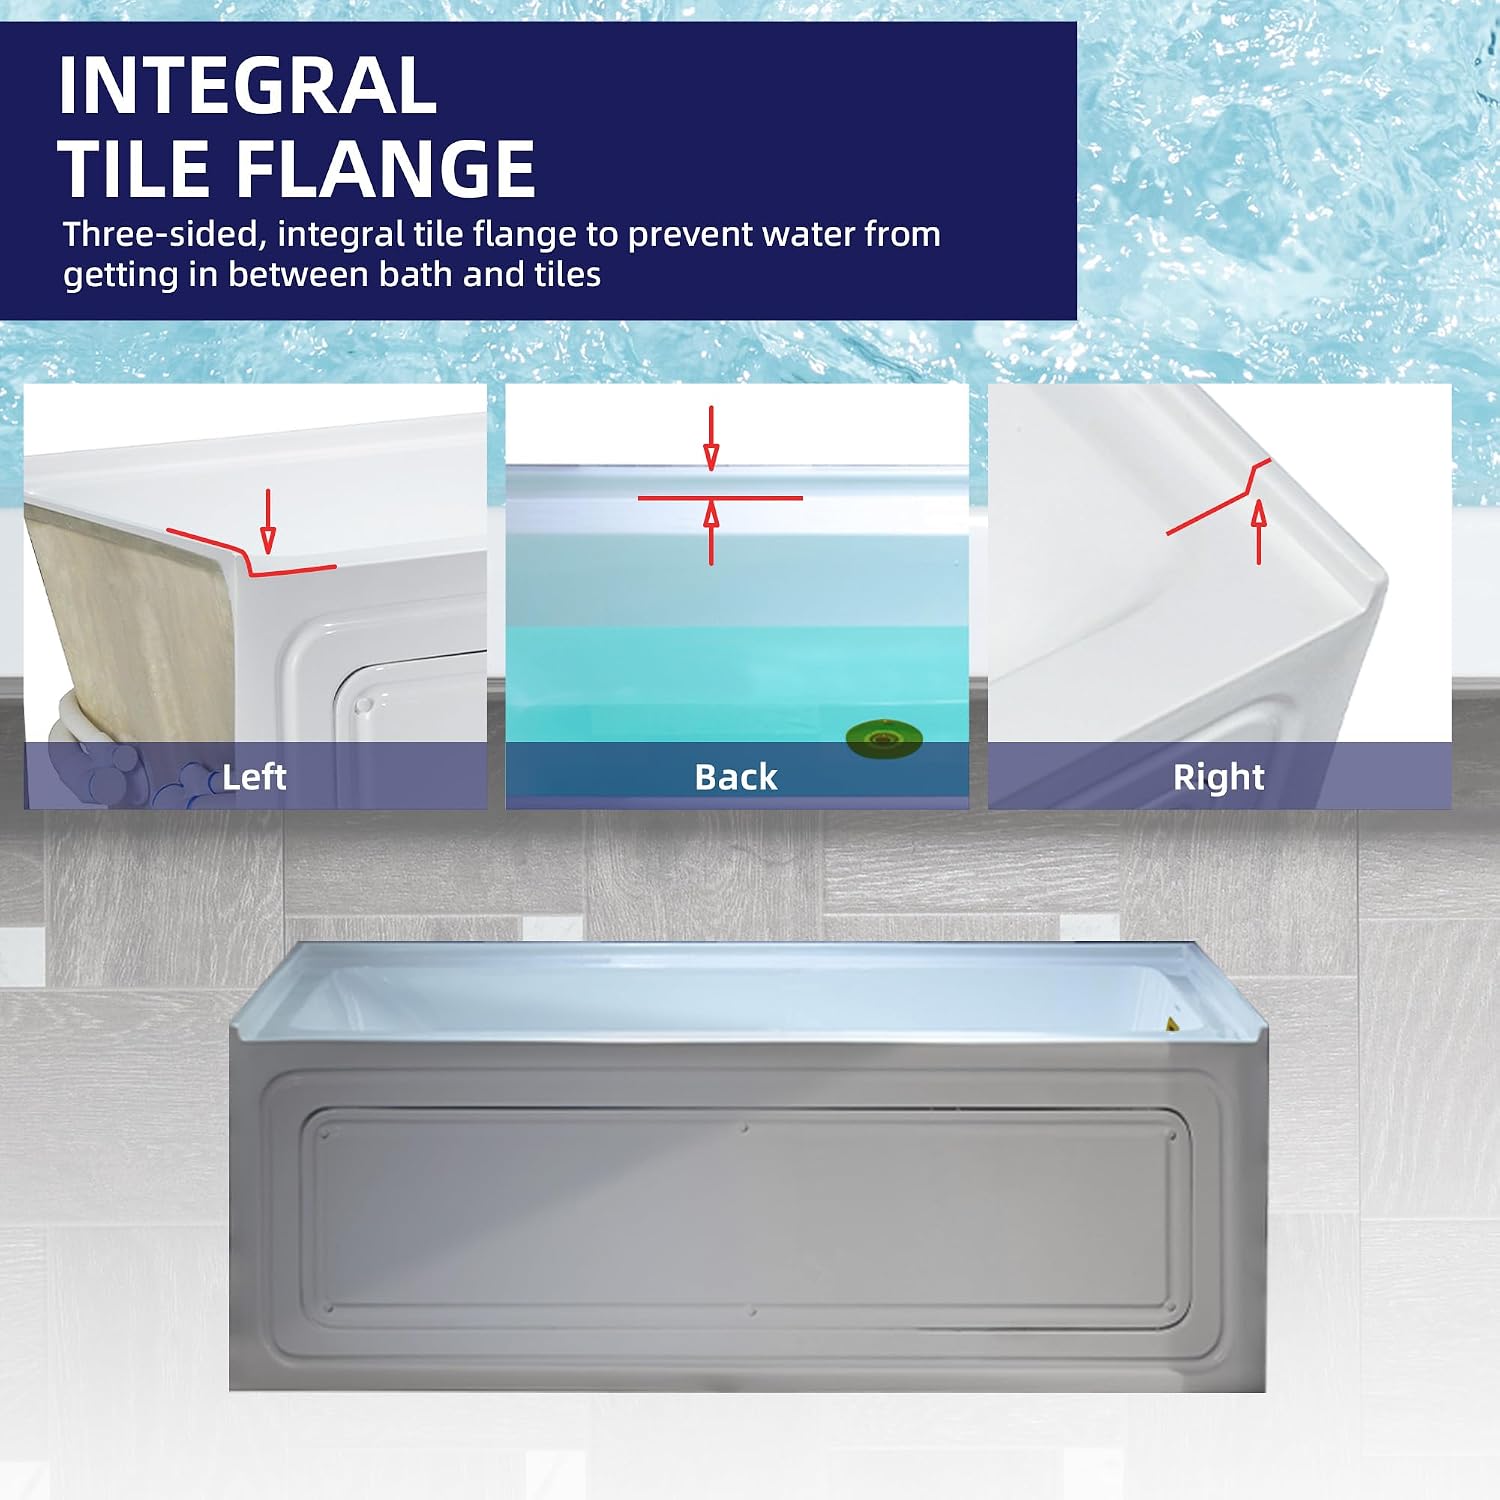
- The tub features a 3-sided integral tile flange designed to prevent water from seeping between the tub and surrounding tiles. Ensure proper sealing during installation.

This image shows how the integral tile flange is designed to integrate with wall tiles, providing a secure and waterproof seal.
- The tub is compatible with WOODBRIDGE 60" shower doors. Plan for shower door installation if desired.
5. Operating Instructions
Familiarize yourself with the control panel and functions before first use.
5.1 Filling the Tub
Ensure the drain is closed. Fill the tub with water to a level above the highest jets before activating the whirlpool function. This prevents damage to the pump and ensures proper jet operation.
5.2 Control Panel Functions
The tub is equipped with a user-friendly touchpad control panel.

The touchpad features the following buttons:
- Bathtub Power ON/OFF Button: Activates or deactivates the main power to the tub's functions.
- Wave Massage ON/OFF Button: Turns the whirlpool jets on or off. The 3 small and 6 large jets provide a customizable massage experience with adjustable angles.
- Chroma-Light ON/OFF Button: Activates or deactivates the 7-color LED chromotherapy lighting system.

This image demonstrates the powerful water jets in action, providing a relaxing massage.
The 7-color LED lights enhance your bathing experience with soothing illumination.
5.3 Inline Heater Operation
The built-in inline heater automatically activates with the pump to maintain the water temperature at approximately 100°F (38°C). It will stop heating once this temperature is reached, ensuring a consistently warm soak.

This diagram visually explains how the inline heater works to maintain your desired water temperature.
6. Maintenance
Regular cleaning and maintenance will prolong the life and appearance of your jetted tub.
6.1 Cleaning the Tub Surface
- Clean the high gloss LUCITE acrylic surface with a soft cloth and a non-abrasive, mild bathroom cleaner.
- Rinse thoroughly with clean water after cleaning to remove any residue.
- Avoid using abrasive sponges, brushes, or harsh chemical cleaners (e.g., acetone, paint thinner, strong acids/alkalis) as these can scratch or damage the acrylic finish.
6.2 Non-Slip Bottom
The tub features a non-slip bottom that meets ASTM standards for safety. Clean this area regularly with a soft brush and mild cleaner to maintain its effectiveness and appearance.

This image highlights the textured non-slip surface at the bottom of the tub for enhanced safety.
6.3 Jet and Plumbing System Cleaning
- Periodically fill the tub with warm water and add a small amount of a jetted tub cleaner or a mild disinfectant.
- Run the jets for 10-15 minutes, then drain the tub.
- Refill with clean water and run the jets for a few minutes to rinse the system.
6.4 Access Panel
The tub is designed with a removable apron panel for easy access to internal components for maintenance or servicing by qualified personnel.

This image shows the front of the tub with the easily removable panel, facilitating access to internal plumbing and electrical components.
7. Troubleshooting
If you encounter issues with your jetted tub, refer to the following common troubleshooting steps. For problems not listed here, contact customer support.
- No Power: Check both GFCI breakers. Reset if tripped. Ensure the power button on the touchpad is activated.
- Jets Not Working: Ensure the tub is filled with water above the jets. Verify the wave massage button is pressed. Check for any obstructions in the jet nozzles.
- Heater Not Maintaining Temperature: Confirm the tub is powered on and the jets are running (the heater activates with the pump). Allow sufficient time for the heater to reach and maintain 100°F (38°C).
- Water Leaks: Immediately turn off the water supply and power to the tub. Inspect all plumbing connections for tightness. If leaks persist, contact a qualified plumber or customer support.
- Sensitive Controls: Some users report controls can be sensitive to water contact. Ensure the control panel area is dry when operating.
8. Warranty and Support
8.1 Warranty Information
WOODBRIDGE warrants this product to be free of defects in material and workmanship for a period of 1 Year from the date of purchase. An additional 1 Year Warranty can be obtained by registering your product on the official WOODBRIDGE website.
This warranty covers manufacturing defects and does not cover damage resulting from improper installation, misuse, abuse, accident, or normal wear and tear.
8.2 Customer Support
For technical assistance, warranty claims, or any questions regarding your WOODBRIDGE jetted tub, please contact our support team:
- Email: help@woodbridgebath.com
- Please have your model number (BS667-R-BG03) and date of purchase ready when contacting support.


