
1. Introduction
Thank you for purchasing the Demon FX RDW Reverb Delay Workstation. This pedal combines high-quality reverb and delay effects into a single, versatile unit, offering a wide range of sonic possibilities for guitarists and other musicians. Please read this manual carefully to ensure proper operation and to get the most out of your new effect pedal.
2. Safety Information
- Power Supply: Use only a regulated 9V DC power adapter with a center-negative plug. Using an incorrect power supply may damage the unit and void the warranty.
- Environment: Do not expose the unit to water, moisture, excessive heat, or direct sunlight. Operate in a clean, dry environment.
- Handling: Avoid dropping or subjecting the unit to strong impacts. Do not attempt to open or service the unit yourself; refer all servicing to qualified personnel.
- Cleaning: Clean the unit with a soft, dry cloth. Do not use liquid cleaners or solvents.
3. Product Overview
The Demon FX RDW is a dual-engine effect pedal featuring independent reverb and delay sections, each with its own set of controls for extensive sound shaping. It offers both mono and stereo output options, an expression pedal input, and tap tempo functionality.
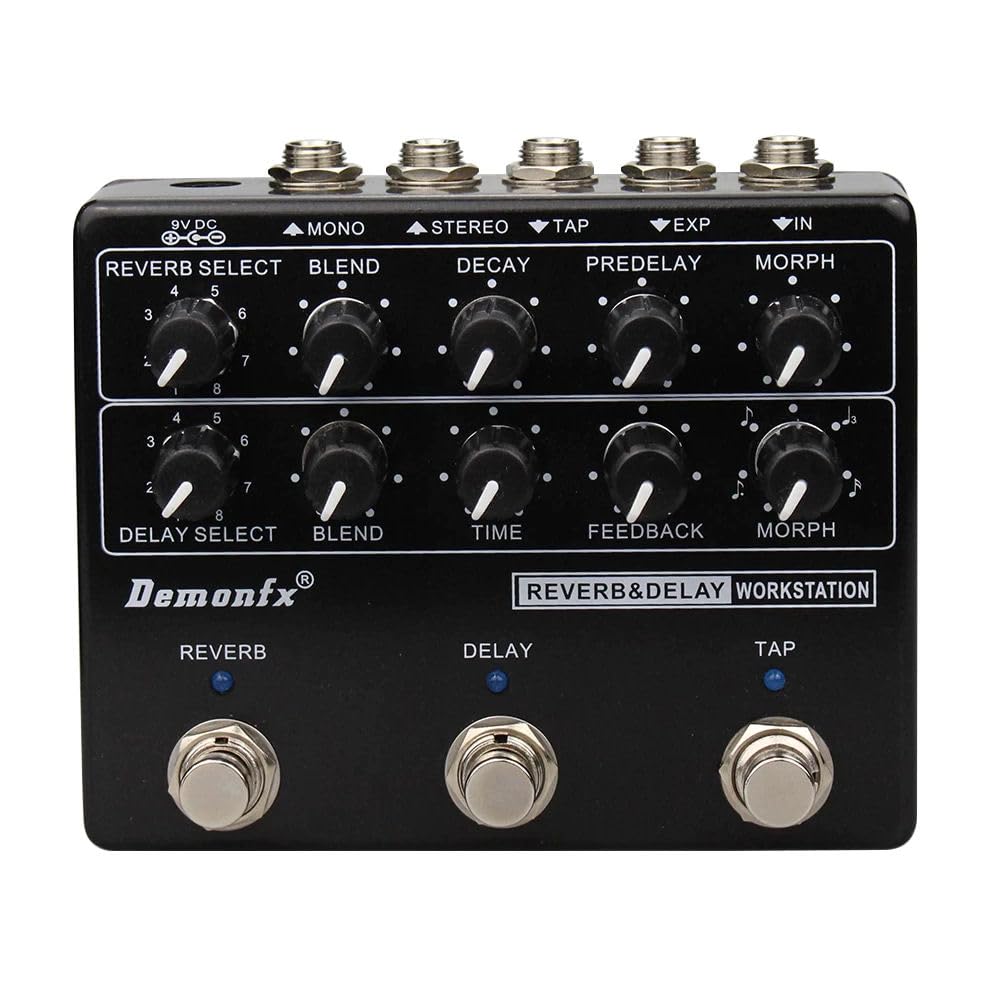
Figure 1: Front view of the Demon FX RDW Reverb Delay Workstation, showing all knobs, jacks, and footswitches.
4. Controls and Functions
4.1. Top Panel Controls (Reverb Section)
- REVERB SELECT (Knob 1-5): Selects one of five different reverb algorithms. Turn the knob to cycle through the available reverb types.
- BLEND (Reverb): Adjusts the mix between the dry (unaffected) signal and the wet (reverb) signal. Turn clockwise for more reverb.
- DECAY (Reverb): Controls the length of the reverb tail. Higher settings result in longer, more sustained reverb.
- PREDELAY (Reverb): Sets the time before the reverb effect begins after the initial signal. Useful for maintaining clarity of the dry signal.
- MORPH (Reverb): This control's function varies depending on the selected reverb type. It typically adjusts a specific parameter unique to each reverb algorithm, such as modulation, density, or tone.
4.2. Middle Panel Controls (Delay Section)
- DELAY SELECT (Knob 1-5): Selects one of five different delay algorithms. Turn the knob to cycle through the available delay types.
- BLEND (Delay): Adjusts the mix between the dry signal and the wet (delay) signal. Turn clockwise for more delay.
- TIME (Delay): Controls the delay time, or the interval between repeats.
- FEEDBACK (Delay): Determines the number of delay repeats. Higher settings create more repeats, potentially leading to self-oscillation.
- MORPH (Delay): This control's function varies depending on the selected delay type. It typically adjusts a specific parameter unique to each delay algorithm, such as modulation, filtering, or tape age.
4.3. Footswitches
- REVERB: Toggles the reverb effect on or off. The associated LED indicates the effect status.
- DELAY: Toggles the delay effect on or off. The associated LED indicates the effect status.
- TAP: Used for tap tempo functionality. Tap this footswitch two or more times in rhythm to set the delay time.
4.4. Input/Output Jacks
- 9V DC: Power input jack. Connect a regulated 9V DC center-negative power adapter here.
- IN: Mono audio input jack. Connect your instrument or the output of another effect pedal here.
- MONO: Mono audio output jack. Connect to your amplifier or the next pedal in your signal chain for mono operation.
- STEREO: Stereo audio output jack. Use in conjunction with the MONO output for stereo effects.
- TAP: External tap tempo input/output. Can be used to sync with an external tap tempo switch or to output tap tempo.
- EXP: Expression pedal input. Connect an expression pedal to control assignable parameters (refer to advanced settings for assignment).
5. Setup
- Power Connection: Connect a regulated 9V DC center-negative power adapter to the 9V DC jack.
- Input Connection: Connect your instrument (e.g., guitar) or the output of a preceding effect pedal to the IN jack using a standard 1/4-inch instrument cable.
- Output Connection (Mono): For mono operation, connect the MONO output jack to your amplifier's input or the next effect pedal in your chain.
- Output Connection (Stereo): For stereo operation, connect the MONO output to one amplifier/input and the STEREO output to a second amplifier/input.
- Optional Connections: If desired, connect an expression pedal to the EXP jack or an external tap tempo switch to the TAP jack.
6. Operating Instructions
6.1. Basic Operation
Once connected, press the REVERB or DELAY footswitches to activate the respective effects. The corresponding LED will illuminate. Adjust the BLEND, DECAY, PREDELAY, MORPH (for Reverb) and BLEND, TIME, FEEDBACK, MORPH (for Delay) knobs to sculpt your desired sound.
6.2. Selecting Reverb/Delay Types
Turn the REVERB SELECT or DELAY SELECT knobs to choose from the five available algorithms for each effect. Experiment with each type to find the sound that best suits your needs.
6.3. Tap Tempo
To set the delay time using tap tempo, simply press the TAP footswitch two or more times in rhythm. The delay time will synchronize to your tapping speed. The TAP LED will flash to indicate the current tempo.
6.4. Expression Pedal (Optional)
If an expression pedal is connected to the EXP jack, it can be assigned to control various parameters within the reverb or delay sections. Refer to the advanced settings section (if available in a separate document or online) for specific parameter assignments.
7. Maintenance
- Cleaning: Keep the pedal clean by wiping it with a soft, dry cloth. Avoid abrasive materials or chemical cleaners.
- Storage: When not in use for extended periods, disconnect the power supply and store the pedal in a cool, dry place away from direct sunlight.
- Cable Care: Ensure all cables are in good condition and properly connected to prevent signal loss or damage.
8. Troubleshooting
- No Sound:
- Check all cable connections (input, output, power).
- Ensure the power adapter is correctly connected and providing 9V DC center-negative power.
- Verify that the effect is engaged (LEDs illuminated).
- Test with different cables or a different power supply.
- Weak or Distorted Sound:
- Check the BLEND knobs for both reverb and delay; ensure they are not set too low or too high.
- Ensure your instrument's output and amplifier's input levels are appropriate.
- Effect Not Working:
- Confirm the effect is activated by pressing the corresponding footswitch.
- Adjust the effect-specific knobs (DECAY, TIME, FEEDBACK, etc.) to ensure they are not set to minimum.
- Unwanted Noise:
- Ensure you are using a high-quality, regulated power supply.
- Check for ground loops in your signal chain.
- Keep the pedal away from sources of electromagnetic interference.
9. Specifications
| Model Name | RDW |
| Model Number | FX RDW |
| Manufacturer | Demonfx |
| Effects Type | Reverb, Delay |
| Controls | Knobs, Footswitches |
| Power Requirement | 9V DC, Center-Negative (appropriate current supply) |
| Signal Format | Analog |
| Color | Black |
| Dimensions (L x W x H) | 22.86 x 10.16 x 5.08 cm (approximate parcel dimensions) |
10. Warranty and Support
Demonfx products are designed for reliability and performance. For warranty information, please refer to the documentation provided at the time of purchase or contact your retailer. For technical support or service inquiries, please reach out to your authorized Demonfx dealer or distributor.