1. Introduction
This manual provides comprehensive instructions for the STEREN 10-inch Wi-Fi Digital Photo Frame, model DFR-101. This device allows you to display photos and videos, share memories with family and friends via Wi-Fi, and enjoy a dynamic visual experience. Please read this manual thoroughly before operating the device to ensure proper use and optimal performance.

Image 1.1: Front view of the STEREN 10-inch Wi-Fi Digital Photo Frame displaying a family photo.
2. Package Contents
Verify that all items are present in the package:
- STEREN 10-inch Wi-Fi Digital Photo Frame (DFR-101)
- Power Adapter (5 Vcc 2 A)
- User Manual (this document)
3. Product Features
The STEREN DFR-101 Digital Photo Frame offers a range of features designed for ease of use and enhanced media sharing:
- 10-inch Touchscreen Display: Enjoy a clear and vibrant visual experience with intuitive navigation.
- Wi-Fi Connectivity: Connect to your home network for seamless photo and video sharing.
- Frameo App Integration: Easily send photos and videos directly from your smartphone to the frame using the Frameo app (available on Play Store and App Store).
- Multi-User Sharing: Share control of the photo frame with friends and family, allowing multiple users to send media.
- Instant Notifications: Receive real-time notifications when new content is shared to the frame.
- Versatile Media Transfer: Import and export photos and videos via microSD card (up to 128 GB) or by connecting to a computer via the micro USB port.
- Integrated Gyroscope: Automatic image orientation adjustment for both vertical and horizontal display.
- Built-in Speakers: Enjoy video playback with accompanying audio.
- Additional Display Information: View date, time, and current weather on screen.
- Security Slot: Compatible with a security lock for added protection in public or office environments.
- Flexible Mounting: Can be placed on a desk or mounted on a wall.

Image 3.1: Visual representation of the digital photo frame's main features.
4. Setup
4.1 Power Connection
- Connect the power adapter to the DC IN port on the back of the photo frame.
- Plug the power adapter into a standard electrical outlet.
- The frame will automatically power on.
4.2 Initial Setup and Wi-Fi Connection
- Upon first power-on, follow the on-screen prompts to select your language and time zone.
- The frame will then guide you through connecting to a Wi-Fi network. Select your network from the list and enter the password.
- Ensure a stable Wi-Fi connection for optimal performance and content sharing.
4.3 Frameo App Installation and Pairing
- Download the 'Frameo' app from the Google Play Store (for Android) or Apple App Store (for iOS) on your smartphone or tablet.
- Open the Frameo app and create an account if you don't have one.
- On your digital photo frame, navigate to the 'Add Friend' or 'Connect' section to generate a unique code.
- In the Frameo app on your smartphone, enter this code to pair your device with the photo frame.

Image 4.1: Sharing photos and videos to the frame using the Frameo app.
5. Operating Instructions
5.1 Using the Touchscreen
The frame features a responsive touchscreen for easy navigation. Tap icons to select options, swipe to browse photos, and pinch to zoom (if supported by the software).

Image 5.1: The 10-inch touchscreen display with high-definition resolution.
5.2 Sending Photos and Videos via Frameo App
- Open the Frameo app on your paired smartphone.
- Select the photos or videos you wish to send.
- Choose your digital photo frame as the recipient.
- The selected media will be transferred to the frame via Wi-Fi and displayed.
5.3 Sharing Control with Family and Friends
You can invite others to send photos and videos to your frame:
- On the photo frame, go to the 'Settings' menu and find the 'Manage Friends' or 'Add User' option.
- Generate a unique sharing code.
- Share this code with family or friends. They can enter it into their Frameo app to connect to your frame and send content.

Image 5.2: Multiple users can share content to the digital photo frame.
5.4 Transferring Media via microSD Card or Micro USB
For offline transfer or larger media collections:
- microSD Card: Insert a formatted microSD card (up to 128 GB, Fat32 / exFAT) into the designated slot on the back of the frame. You can then import or export media using the frame's menu.
- Micro USB: Connect the frame to a computer using a micro USB cable. The frame will appear as a removable storage device, allowing you to drag and drop files.
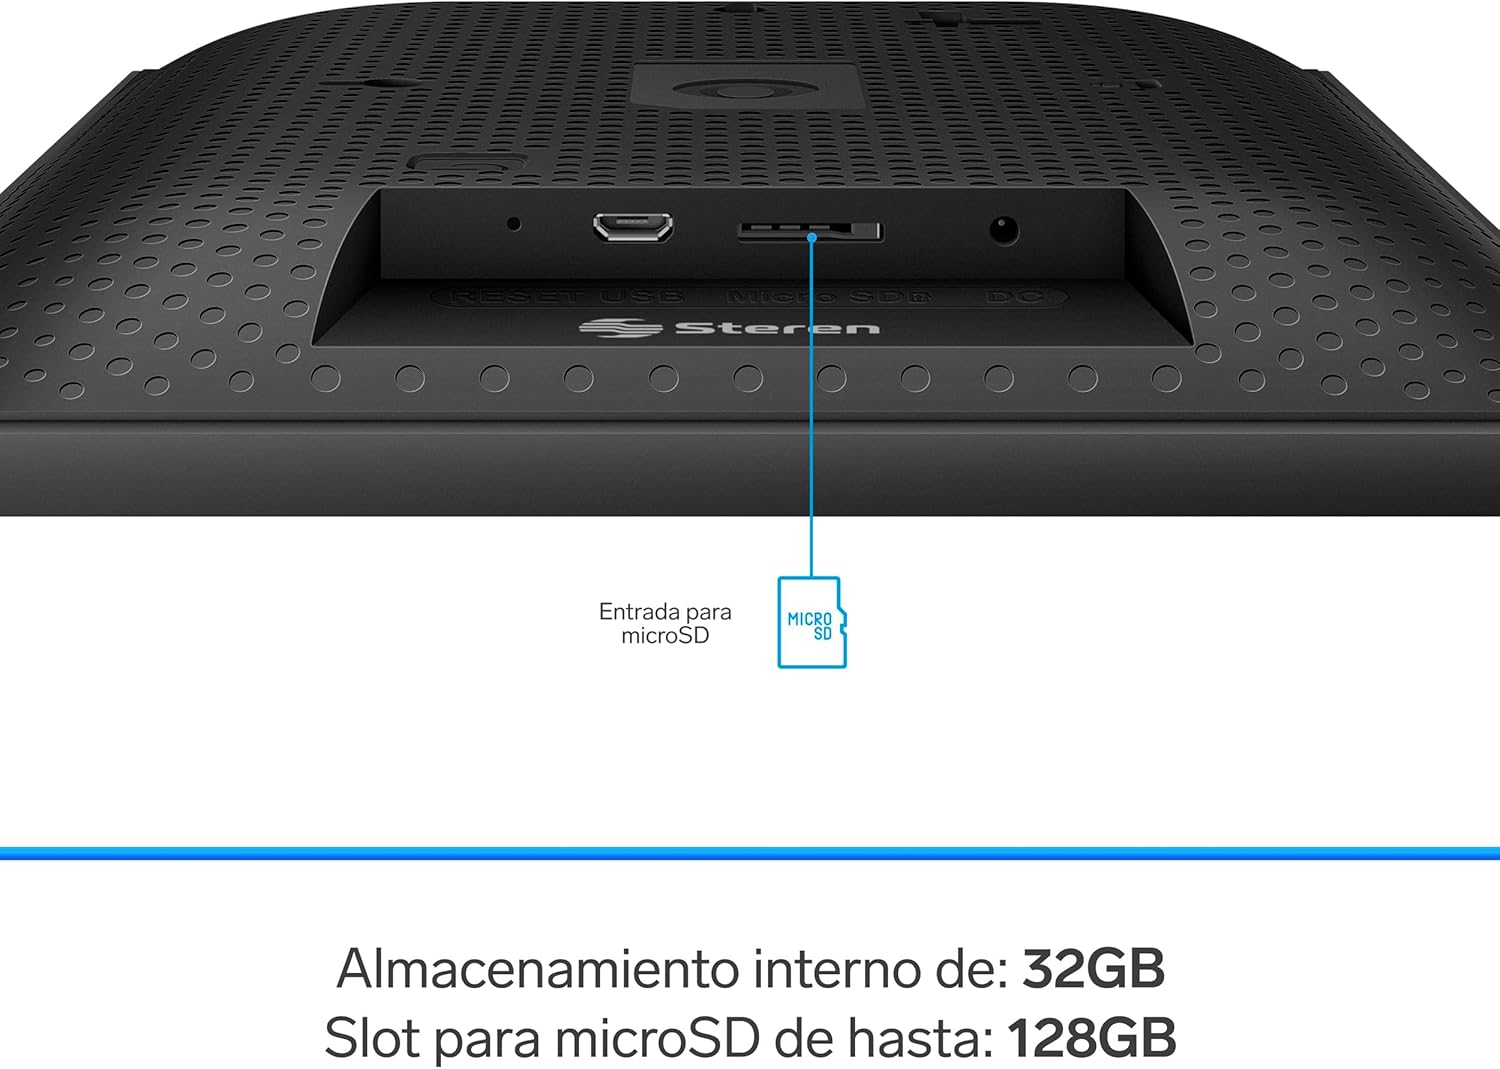
Image 5.3: Rear ports including microSD slot, micro USB, and DC IN.
5.5 Automatic Orientation
The integrated gyroscope automatically adjusts the display orientation of your photos and videos, ensuring they are always shown correctly whether the frame is positioned vertically or horizontally.

Image 5.4: Automatic image rotation for vertical or horizontal display.
5.6 Audio Playback
The built-in speakers allow for audio playback when displaying videos, providing a complete multimedia experience.
5.7 Date, Time, and Weather Display
The frame can display the current date, time, and local weather information. This feature can be enabled or disabled in the settings menu.
5.8 Mounting Options
The digital photo frame offers versatile placement options:
- Desk Placement: Use the integrated stand to place the frame on any flat surface.
- Wall Mounting: The frame includes mounting points on the back for secure wall installation.

Image 5.5: The frame can be placed on a table or mounted on a wall.
6. Maintenance
- Cleaning: Use a soft, dry cloth to clean the screen and frame. Do not use liquid cleaners or abrasive materials.
- Software Updates: Periodically check for software updates through the frame's settings menu to ensure optimal performance and access to new features.
- Storage: When not in use for extended periods, store the frame in a cool, dry place away from direct sunlight.
7. Troubleshooting
If you encounter issues with your digital photo frame, refer to the following common problems and solutions:
| Problem | Possible Cause | Solution |
|---|---|---|
| Frame does not power on. | Power adapter not connected or faulty. | Ensure the power adapter is securely connected to the frame and a working electrical outlet. Try a different outlet. |
| Cannot connect to Wi-Fi. | Incorrect password, weak signal, or router issue. | Verify the Wi-Fi password. Move the frame closer to the router. Restart your router. |
| Photos/videos not appearing from Frameo app. | Frame not paired, app not connected, or network issue. | Ensure the frame is correctly paired with the app. Check Wi-Fi connection on both devices. Restart the app. |
| Images are blurry or low quality. | Low resolution source images. | Ensure you are uploading high-resolution images to the frame. |
| Frame is unresponsive. | Temporary software glitch. | Unplug the power adapter, wait 10 seconds, then plug it back in to restart the frame. |
8. Specifications
Detailed technical specifications for the STEREN DFR-101 Digital Photo Frame:
- Power Input: 5 Vcc 2 A
- Screen Size: 254 mm (10 inches)
- Screen Resolution: 1280 x 800 pixels
- Internal Storage: 32 GB
- microSD Slot: Supports up to 128 GB (Fat32 / exFAT)
- Image Formats: PNG, JPG
- Video Formats: MP4
- Wi-Fi Frequency: 2.4 GHz
- Wi-Fi Standard: IEEE 802.11 b/g/n
- Power Adapter Input: 100 – 240 Vca 50/60 Hz 0.35 A
- Power Adapter Output: 5 Vcc 2 A
- Product Dimensions: 26.5 x 0.9 x 2.51 cm
- Product Weight: 800 g

Image 8.1: Physical dimensions of the digital photo frame.
9. Safety Information
- Do not expose the device to water or excessive moisture.
- Avoid placing the device near heat sources or in direct sunlight.
- Do not attempt to disassemble or repair the device yourself. Refer to qualified service personnel.
- Use only the provided power adapter.
- Keep out of reach of children.
10. Warranty and Support
For warranty information, please refer to the warranty card included with your product or visit the official STEREN website. For technical support or further assistance, please contact STEREN customer service through their official channels.


