
1. Introduction
This manual provides instructions for the safe and efficient use of your Kitchen in the box KBM18 Bread Maker. This appliance is designed to simplify the bread-making process, offering various programs for different bread types, including gluten-free options. Please read this manual thoroughly before operating the appliance and retain it for future reference.

Image: The Kitchen in the box KBM18 Bread Maker, a compact appliance for home bread baking.
2. Important Safety Instructions
When using electrical appliances, basic safety precautions should always be followed to reduce the risk of fire, electric shock, and injury to persons, including the following:
- Read all instructions before use.
- Do not touch hot surfaces. Use handles or knobs.
- To protect against electric shock, do not immerse cord, plugs, or the appliance in water or other liquid.
- Close supervision is necessary when any appliance is used by or near children.
- Unplug from outlet when not in use and before cleaning. Allow to cool before putting on or taking off parts.
- Do not operate any appliance with a damaged cord or plug, or after the appliance malfunctions or has been damaged in any manner.
- The use of accessory attachments not recommended by the appliance manufacturer may cause injuries.
- Do not use outdoors.
- Do not let the cord hang over the edge of a table or counter, or touch hot surfaces.
- Do not place on or near a hot gas or electric burner, or in a heated oven.
- Extreme caution must be used when moving an appliance containing hot oil or other hot liquids.
- To disconnect, turn any control to "off," then remove plug from wall outlet.
- Do not use appliance for other than intended use.
- Avoid contact with moving parts.
- This appliance has a polarized plug (one blade is wider than the other). To reduce the risk of electric shock, this plug is intended to fit into a polarized outlet only one way. If the plug does not fit fully into the outlet, reverse the plug. If it still does not fit, contact a qualified electrician. Do not attempt to modify the plug in any way.
3. Product Components
Familiarize yourself with the parts of your bread maker:

Image: Diagram showing the included components of the bread maker.
- Bread Maker Unit
- Non-stick Bread Pan
- Operating Instructions Manual
- Measuring Spoon
- Hook (for removing kneading paddle)
- Kneading Paddle
- Automatic Fruit and Nut Dispenser
- Measuring Cup
4. Control Panel Overview
The control panel allows you to select programs, adjust settings, and monitor the baking process.

Image: Detailed view of the bread maker's control panel and key features.
- Automatic Fruit and Nut Dispenser: Automatically adds ingredients like nuts and fruits at the optimal time during the kneading cycle.
- Viewing Window: Allows you to monitor the baking progress without opening the lid.
- 12 Programs: Pre-set automatic programs for various bread types and functions.
- LED Display: Shows program number, time remaining, and other settings.
- Control Panel: Intuitive buttons for menu selection, crust color, loaf size, delay timer, and start/stop.
5. Setup and First Use
5.1 Unpacking
Carefully remove the bread maker and all accessories from the packaging. Remove any protective films or stickers.
5.2 Initial Cleaning
- Wash the bread pan, kneading paddle, measuring cup, and measuring spoon with warm, soapy water. Rinse thoroughly and dry.
- Wipe the exterior of the bread maker with a damp cloth. Do not immerse the main unit in water.
- Ensure all parts are completely dry before assembly.
5.3 Assembly
- Place the kneading paddle onto the shaft inside the bread pan.
- Insert the bread pan into the bread maker unit, pressing down firmly until it clicks into place.
- Place the automatic fruit and nut dispenser onto its designated slot on the lid.
6. Operating Instructions
Follow these steps for baking bread:

Image: Visual guide to the simple four-step bread making process.
6.1 Adding Ingredients
Add ingredients to the bread pan in the order specified by your recipe, typically liquids first, then dry ingredients, and finally yeast. Ensure yeast does not come into direct contact with liquids or salt initially.
6.2 Selecting a Program
Press the "MENU" button to cycle through the 12 available programs. The selected program number will appear on the LED display.
| Program No. | Program Name | Description |
|---|---|---|
| 1 | Basic | For white and mixed breads, mainly using wheat flour. |
| 2 | French | For light breads made from fine flour. |
| 3 | Whole Wheat | For breads containing a high percentage of whole wheat flour. |
| 4 | Quick | For quick preparation of basic bread. |
| 5 | Sweet | For breads with high sugar, fats, and protein content. |
| 6 | Gluten-Free | For gluten-free bread recipes. |
| 7 | Ultra-Fast | For very quick bread baking. |
| 8 | Dough | Prepares dough for rolls, pizza, or other baked goods. Does not bake. |
| 9 | Jam | For making homemade jams. |
| 10 | Knead | Only kneads the dough. |
| 11 | Sandwich | For light and fluffy sandwich bread. |
| 12 | Bake | For additional baking of light or under-baked bread. |
6.3 Crust Color and Loaf Size
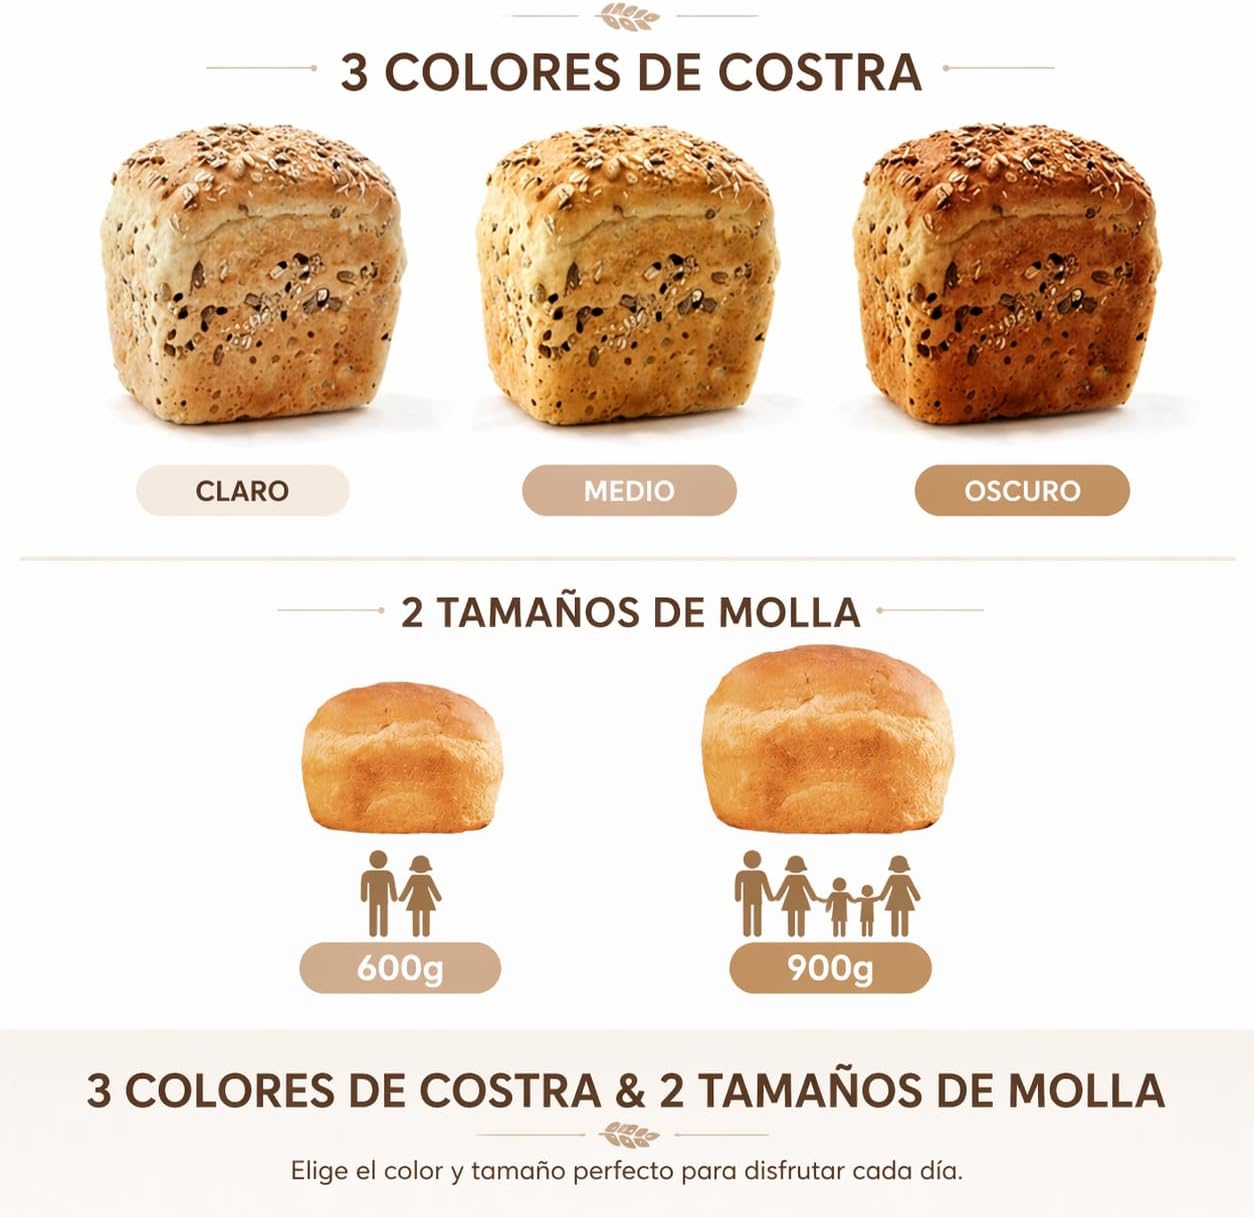
Image: Options for selecting crust color (Light, Medium, Dark) and loaf size (600g, 900g).
- Crust Color: Press the "COLOR" button to select your preferred crust color: Light, Medium, or Dark.
- Loaf Size: Press the "LOAF" button to choose between 600g or 900g loaf sizes, depending on your recipe and needs.
6.4 Delay Timer
The delay timer allows you to program the bread maker to finish baking at a later time, up to 13 hours. Use the "TIME +" and "TIME -" buttons to set the desired delay time. The displayed time includes the baking cycle duration.

Image: The 13-hour delay timer feature allows for fresh bread at a programmed time.
6.5 Automatic Dispenser
The integrated automatic dispenser releases nuts, seeds, or dried fruits into the dough at the optimal mixing stage. Fill the dispenser with your desired additions before starting the program.

Image: The automatic dispenser adding ingredients to the bread pan during the cycle.
6.6 Starting and Stopping
- Press the "START/STOP" button once to begin the selected program. The indicator light will illuminate.
- To pause the program, press "START/STOP" once. To cancel the program, press and hold "START/STOP" for a few seconds until the indicator light turns off.
6.7 Keep Warm Function
After baking is complete, the bread maker will automatically switch to a 1-hour keep warm function to maintain the bread's temperature. The display will show "0:00" and then count up for 1 hour. After this, the appliance will beep and turn off.
7. Care and Maintenance
Proper cleaning and maintenance ensure the longevity and optimal performance of your bread maker.

Image: The removable non-stick bread pan is designed for easy cleaning.
- Always unplug the appliance and allow it to cool completely before cleaning.
- Bread Pan and Kneading Paddle: Remove the bread pan from the unit. Detach the kneading paddle. Wash both with warm, soapy water. The non-stick coating is BPA-free. Hand washing is recommended to preserve the non-stick surface. Do not use abrasive cleaners or metal utensils.
- Automatic Dispenser: Remove and wash the dispenser with warm, soapy water.
- Exterior: Wipe the exterior of the bread maker with a soft, damp cloth. Do not use harsh chemicals or immerse the unit in water.
- Interior: Wipe the interior of the baking chamber with a damp cloth to remove any crumbs.
- Ensure all parts are thoroughly dry before reassembling or storing the appliance.
8. Troubleshooting
If you encounter issues with your bread maker, refer to the following common problems and solutions:
| Problem | Possible Cause | Solution |
|---|---|---|
| Bread does not rise | Expired yeast, incorrect water temperature, too much salt/sugar, incorrect ingredient ratio. | Check yeast expiration date. Use lukewarm water (35-40°C). Ensure correct measurements and order of ingredients. |
| Bread is too dense | Too much flour, not enough liquid, insufficient kneading. | Measure ingredients precisely. Adjust liquid amount if dough appears too dry during kneading. Ensure kneading paddle is correctly installed. |
| Bread is too sticky/wet | Too much liquid, not enough flour. | Measure ingredients precisely. Adjust flour amount if dough appears too wet during kneading. |
| Uneven crust color | Lid not closed properly, uneven heat distribution. | Ensure the lid is fully closed. Select a different crust color setting if consistently too light or dark. |
| Kneading paddle stuck in bread | Common occurrence. | After removing bread, use the provided hook to carefully extract the paddle. If difficult, soak the bread in water for a few minutes. |
| Appliance does not start | Not plugged in, power outage, program not selected, START/STOP not pressed. | Check power connection. Select a program and press START/STOP. |
9. Technical Specifications
- Model Number: KBM18
- Brand: Kitchen in the box
- Voltage: 120V
- Wattage: 550W
- Capacity: 900 Grams
- Product Dimensions (DxWxH): 32.7 cm x 27.7 cm x 29.4 cm
- Material: BPA-FREE (Pan)
- Number of Programs: 12
- Crust Levels: 3 (Light, Medium, Dark)
- Delay Timer: Up to 13 hours
- Keep Warm Function: 1 hour
- Care Instructions: Hand Wash Recommended (for bread pan and paddle)
- Country of Origin: China
10. Warranty and Support
Your Kitchen in the box KBM18 Bread Maker comes with a standard manufacturer's warranty. Please refer to the warranty card included in your product packaging for specific terms and conditions, including the warranty period and coverage details.
For technical support, service, or questions regarding your product, please contact the manufacturer or your retailer. Contact information can typically be found on the product packaging, the manufacturer's official website, or the purchase receipt.


