
1. Introduction
The KCEVE KVM Switch (Model KC-201DP) allows you to control two computers using a single set of keyboard, mouse, and a DisplayPort monitor. It also enables sharing of up to four USB 3.0 devices between the connected computers. This device is designed to streamline your workspace, making it ideal for office, business seminars, multimedia teaching, home theater, and gaming environments.

Image: The KVM switch connected to two desktop computers and a single monitor, demonstrating a tidy workspace setup.
2. Safety Information
- Ensure all cables are securely connected before powering on the device.
- Use only the provided power adapter (DC 5V) to prevent damage.
- Avoid exposing the device to moisture, extreme temperatures, or direct sunlight.
- Do not attempt to disassemble or repair the device yourself. Refer to qualified personnel for service.
- Keep the device away from strong electromagnetic fields.
3. Package Contents
Please verify that all items are present in your package:
- 1 x KCEVE DP KVM Switch
- 2 x USB 3.0 Cables (1.5m)
- 1 x Wired Remote Control (1.5m)
- 1 x User Manual

Image: Contents of the KVM switch package, including the main unit, cables, remote, and manual.
4. Product Overview
The KVM switch features multiple ports for connecting your computers, monitor, and USB peripherals. Familiarize yourself with the port layout:

Image: A detailed view of the KVM switch unit, highlighting its various ports and indicators.
Front Panel:
- USB 3.0 Ports (4x): For connecting USB devices such as keyboard, mouse, printer, scanner, or USB drive.
- SELECT Button: Press to switch between connected computers.
- LED Indicators: Show which computer is currently active.
Rear Panel:
- DC 5V Power Input: For connecting the power adapter.
- MONITOR DP Output: Connects to your DisplayPort monitor.
- PC1 DP Input: Connects to DisplayPort output of Computer 1.
- PC1 USB 3.0 Input: Connects to a USB 3.0 port on Computer 1.
- PC2 DP Input: Connects to DisplayPort output of Computer 2.
- PC2 USB 3.0 Input: Connects to a USB 3.0 port on Computer 2.
- Remote Port: For connecting the wired remote control.
5. Setup Instructions
Follow these steps to set up your KVM switch:
- Power Off: Ensure both computers and the monitor are powered off before making any connections.
- Connect Monitor: Connect your DisplayPort monitor to the MONITOR DP Output port on the KVM switch.
- Connect Computer 1:
- Connect a DisplayPort cable from the DisplayPort output of Computer 1 to the PC1 DP Input port on the KVM switch.
- Connect one of the provided USB 3.0 cables from a USB 3.0 port on Computer 1 to the PC1 USB 3.0 Input port on the KVM switch.
- Connect Computer 2:
- Connect a DisplayPort cable from the DisplayPort output of Computer 2 to the PC2 DP Input port on the KVM switch.
- Connect the second provided USB 3.0 cable from a USB 3.0 port on Computer 2 to the PC2 USB 3.0 Input port on the KVM switch.
- Connect USB Peripherals: Connect your keyboard, mouse, printer, or other USB devices to the USB 3.0 Ports on the front panel of the KVM switch. (Note: Bluetooth mice are not supported.)
- Connect Wired Remote (Optional): Plug the wired remote control into the Remote Port on the KVM switch.
- Power On: Connect the DC 5V power adapter to the KVM switch. Then, power on your monitor and both computers.
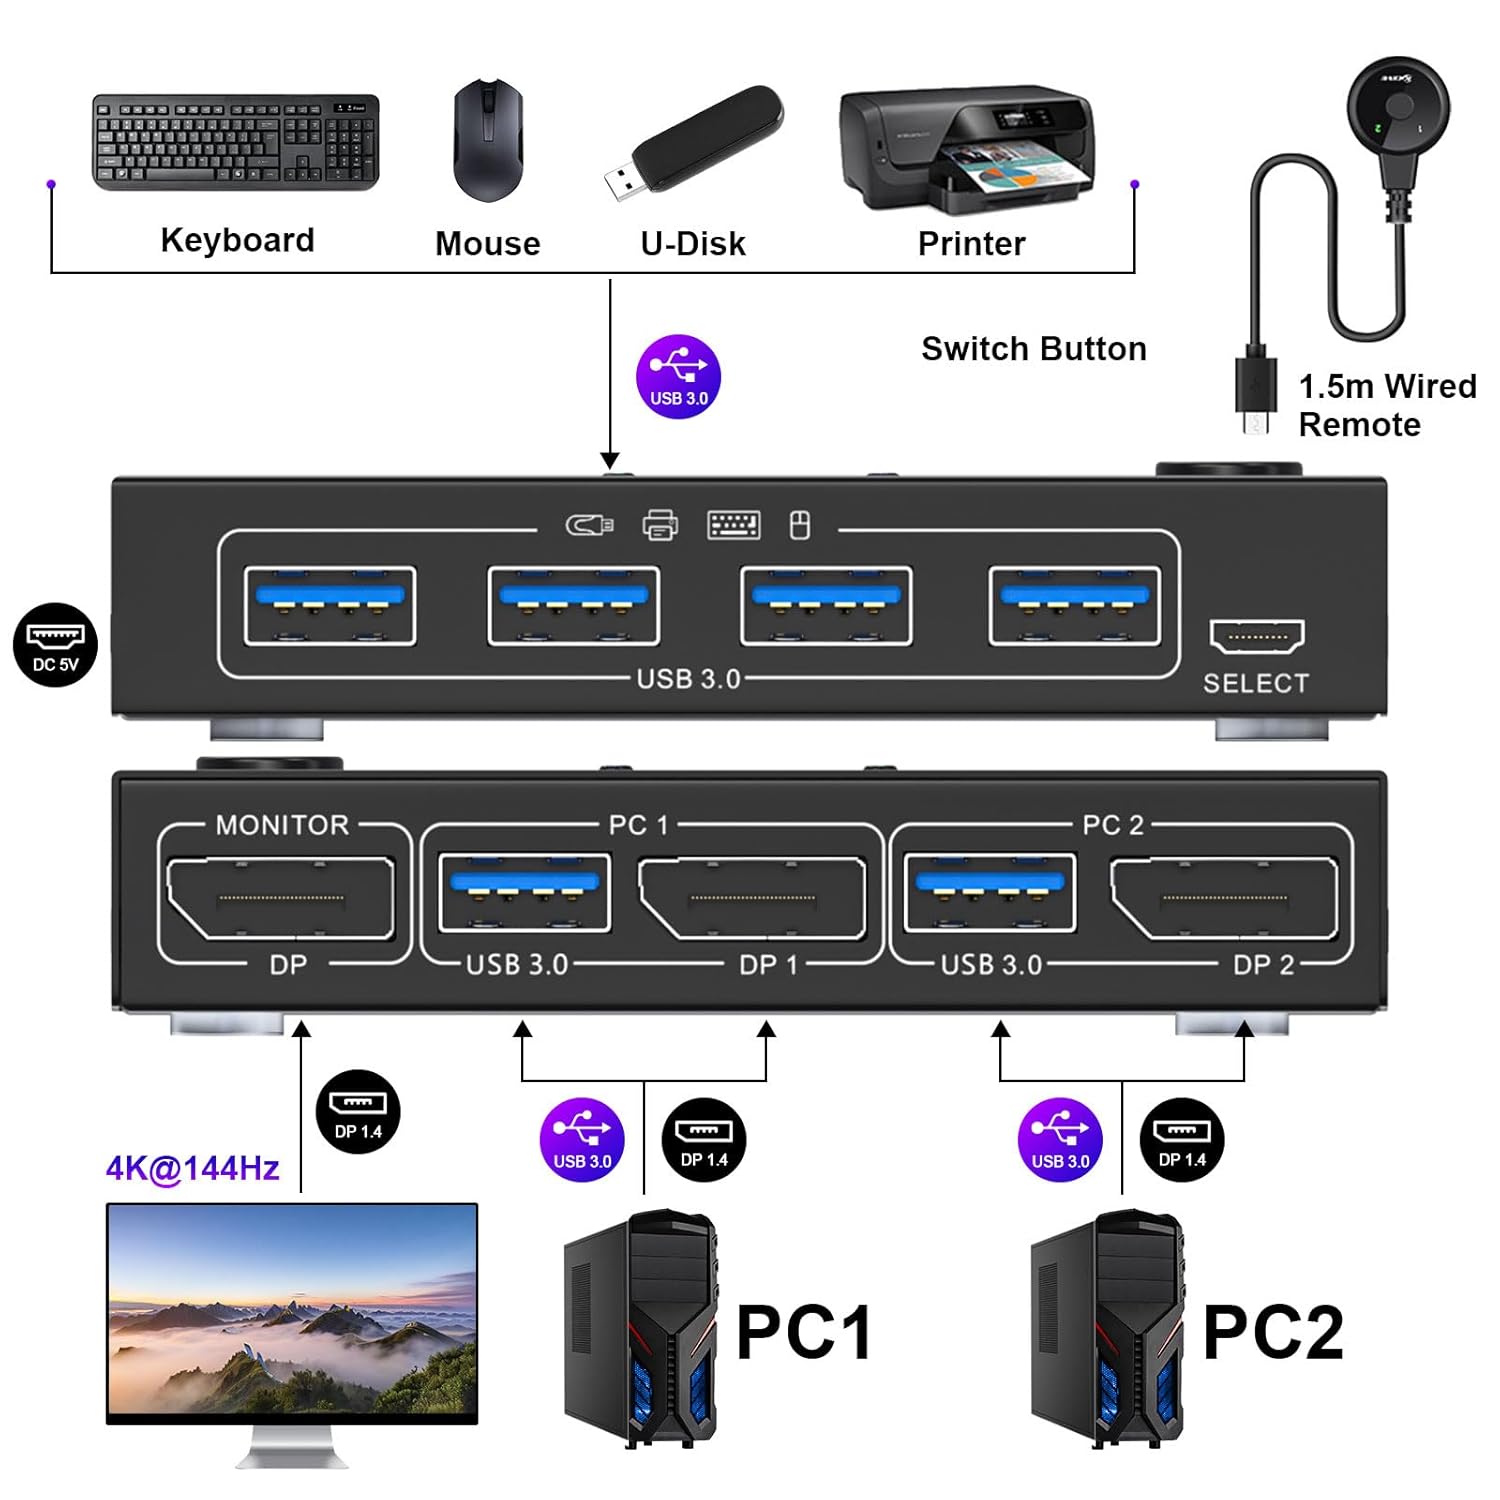
Image: A visual guide illustrating the complete connection setup for the KVM switch.
6. Operating Instructions
The KVM switch offers two convenient methods for switching between connected computers:
6.1. Button Switch
Press the SELECT button on the front panel of the KVM switch to toggle between Computer 1 and Computer 2. The LED indicator will illuminate to show which computer is currently active.
6.2. Wired Remote Control
If connected, press the button on the wired remote control to switch between Computer 1 and Computer 2. This provides flexibility for placing the KVM switch out of direct reach.

Image: Demonstrates both the manual button switch on the KVM unit and the use of the wired remote control for switching.
7. Compatibility
The KCEVE KVM Switch is designed for broad compatibility:
- Operating Systems: Compatible with Windows 11/10/8/8.1/7/XP/Vista, Mac OS, Linux, and Chrome OS systems.
- DP Input Devices: Supports various DisplayPort input devices such as PCs, laptops, TV Boxes, PS3, PS4, PS5, Xbox One, and Apple TV.
- USB Devices: Supports keyboard, mouse, printer, scanner, U-disk, and other standard USB devices. (Note: Bluetooth mice are not supported.)

Image: Visual representation of the KVM switch's compatibility with various operating systems and USB peripherals.
8. Resolution and Data Transfer
This KVM switch supports high-resolution video and fast data transfer speeds:
- DisplayPort 1.4 Compliant: Supports resolutions up to 4K@144Hz, 4K@60Hz, and 1920x1080@165Hz.
- Important Note on Resolution: For 4K resolutions, ensure your computers, monitor, and DisplayPort cables all support 4K. Using 8K certified DisplayPort cables is recommended to prevent flickering or black screen issues, especially at higher refresh rates.
- USB 3.0 Data Transfer: Provides data transfer speeds of up to 5Gbps, which is 10 times faster than USB 2.0.

Image: Illustrates the high-resolution capabilities of the KVM switch, supporting up to 4K@144Hz.

Image: Highlights the 5Gbps data transfer speed of the USB 3.0 ports on the KVM switch.
9. Troubleshooting
If you encounter issues, please refer to the following common problems and solutions:
- No Display/Flickering Screen:
- Ensure all DisplayPort cables are securely connected and are of high quality (preferably 8K certified for optimal performance).
- Verify that your graphics card and monitor support the selected resolution and refresh rate.
- Try reducing the resolution or refresh rate on your computer.
- Ensure the KVM switch is powered by the DC 5V supply.
- Keyboard/Mouse Not Working:
- Ensure the USB 3.0 cables from each computer are securely connected to the KVM switch.
- Try connecting the keyboard/mouse to different USB 3.0 ports on the KVM switch.
- Restart the KVM switch and the connected computers.
- Note that Bluetooth mice are not supported.
- Other USB Devices Not Detected:
- Ensure the device is properly connected to a USB 3.0 port on the KVM switch.
- Some high-power USB devices may require an external power source.
- Check if the device works when connected directly to the computer.
- Switching Delay:
- A slight delay during switching is normal as the system re-establishes connections.
10. Specifications
| Feature | Detail |
|---|---|
| Model Number | KC-201DP |
| Product Dimensions | 3.9 x 2.55 x 0.78 inches (10 x 6.5 x 2 cm) |
| Item Weight | 4.8 ounces |
| DisplayPort Standard | DisplayPort 1.4 |
| Supported Resolutions | Up to 4K@144Hz, 4K@60Hz, 1920x1080@165Hz |
| USB Standard | USB 3.0 |
| USB Data Transfer Speed | Up to 5Gbps |
| Power Supply | DC 5V |
| Switching Methods | Button Switch, Wired Remote Control |
| Operating Voltage | 5 Volts |
| Current Rating | 1 Amps |
11. Maintenance
To ensure the longevity and optimal performance of your KVM switch:
- Keep the device clean by wiping it with a soft, dry cloth.
- Avoid using liquid cleaners or aerosols.
- Ensure proper ventilation around the device to prevent overheating.
- Store the device in a cool, dry place when not in use for extended periods.
12. Warranty and Support
KCEVE provides comprehensive after-sales support for its products. If you encounter any problems or have questions regarding your KVM switch, please contact our customer service team. Our company has been in the field of KVM Switches for more than ten years, ensuring reliable assistance.
For support, please refer to the contact information provided on the product packaging or the official KCEVE website.