
1. Introduction
Thank you for purchasing the CHEFESS Gooseneck Electric Kettle. This manual provides essential information for the safe and efficient operation of your new kettle. Please read these instructions thoroughly before first use and retain for future reference.
2. Important Safety Instructions
- Read all instructions before use.
- Do not touch hot surfaces. Use handles or knobs.
- To protect against fire, electric shock, and injury to persons, do not immerse cord, plugs, or the kettle base in water or other liquid.
- Close supervision is necessary when any appliance is used by or near children.
- Unplug from outlet when not in use and before cleaning. Allow to cool before putting on or taking off parts, and before cleaning the appliance.
- Do not operate any appliance with a damaged cord or plug, or after the appliance malfunctions or has been damaged in any manner. Contact customer service for examination, repair, or adjustment.
- The use of accessory attachments not recommended by the appliance manufacturer may result in fire, electric shock, or injury to persons.
- Do not use outdoors.
- Do not let cord hang over edge of table or counter, or touch hot surfaces.
- Do not place on or near a hot gas or electric burner, or in a heated oven.
- Always attach plug to appliance first, then plug cord into the wall outlet. To disconnect, turn any control to "off," then remove plug from wall outlet.
- Do not use appliance for other than intended use.
- Always ensure the lid is securely closed during operation.
- This appliance is equipped with automatic shut-off and boil-dry protection for safety.

Figure 2.1: Safety Features Overview
This image illustrates the kettle's integrated safety mechanisms, including automatic shutdown upon reaching temperature or boiling dry, a system to prevent air combustion, and general overheat protection. These features ensure safe operation and prevent damage to the appliance.
3. Package Contents
Please check the package for the following items:
- Gooseneck Electric Kettle (1.0L)
- Power Base with Temperature Control
- User Manual
4. Product Overview
Familiarize yourself with the components of your CHEFESS Gooseneck Electric Kettle.

Figure 4.1: Kettle Components
This image displays the complete kettle assembly, including the main kettle body, the precision gooseneck spout, the ergonomic handle, the removable lid, and the power base which houses the digital control panel.

Figure 4.2: Gooseneck Spout Detail
A detailed view of the gooseneck spout, emphasizing its slender design for precise water flow control, essential for pour-over coffee and delicate tea brewing.
5. Setup
- Unpack: Carefully remove all packaging materials and ensure all components are present.
- Initial Cleaning: Before first use, fill the kettle with water to the MAX fill line. Boil the water, then discard it. Repeat this process 2-3 times to remove any manufacturing residues.
- Placement: Place the power base on a dry, flat, stable, and heat-resistant surface. Ensure it is away from the edge of the counter and out of reach of children.
- Power Connection: Plug the power cord into a grounded 120V AC electrical outlet.
6. Operating Instructions
6.1 Filling the Kettle
- Remove the kettle from the power base.
- Open the lid and fill the kettle with fresh, cold water. Do not fill below the MIN mark or above the MAX mark (1.0L).
- Close the lid securely.
- Place the kettle back onto the power base.
6.2 Temperature Control
The kettle allows for precise temperature selection from 104°F (40°C) to 212°F (100°C) in 1°F increments.
- With the kettle on the base, press the power button (U) to turn it on. The current water temperature will display.
- Use the rotary adjustment button to select your desired temperature. Rotate clockwise to increase, counter-clockwise to decrease.
- The kettle will begin heating to the set temperature. The display will show the rising temperature.
- Once the desired temperature is reached, the kettle will beep and automatically shut off the heating element.
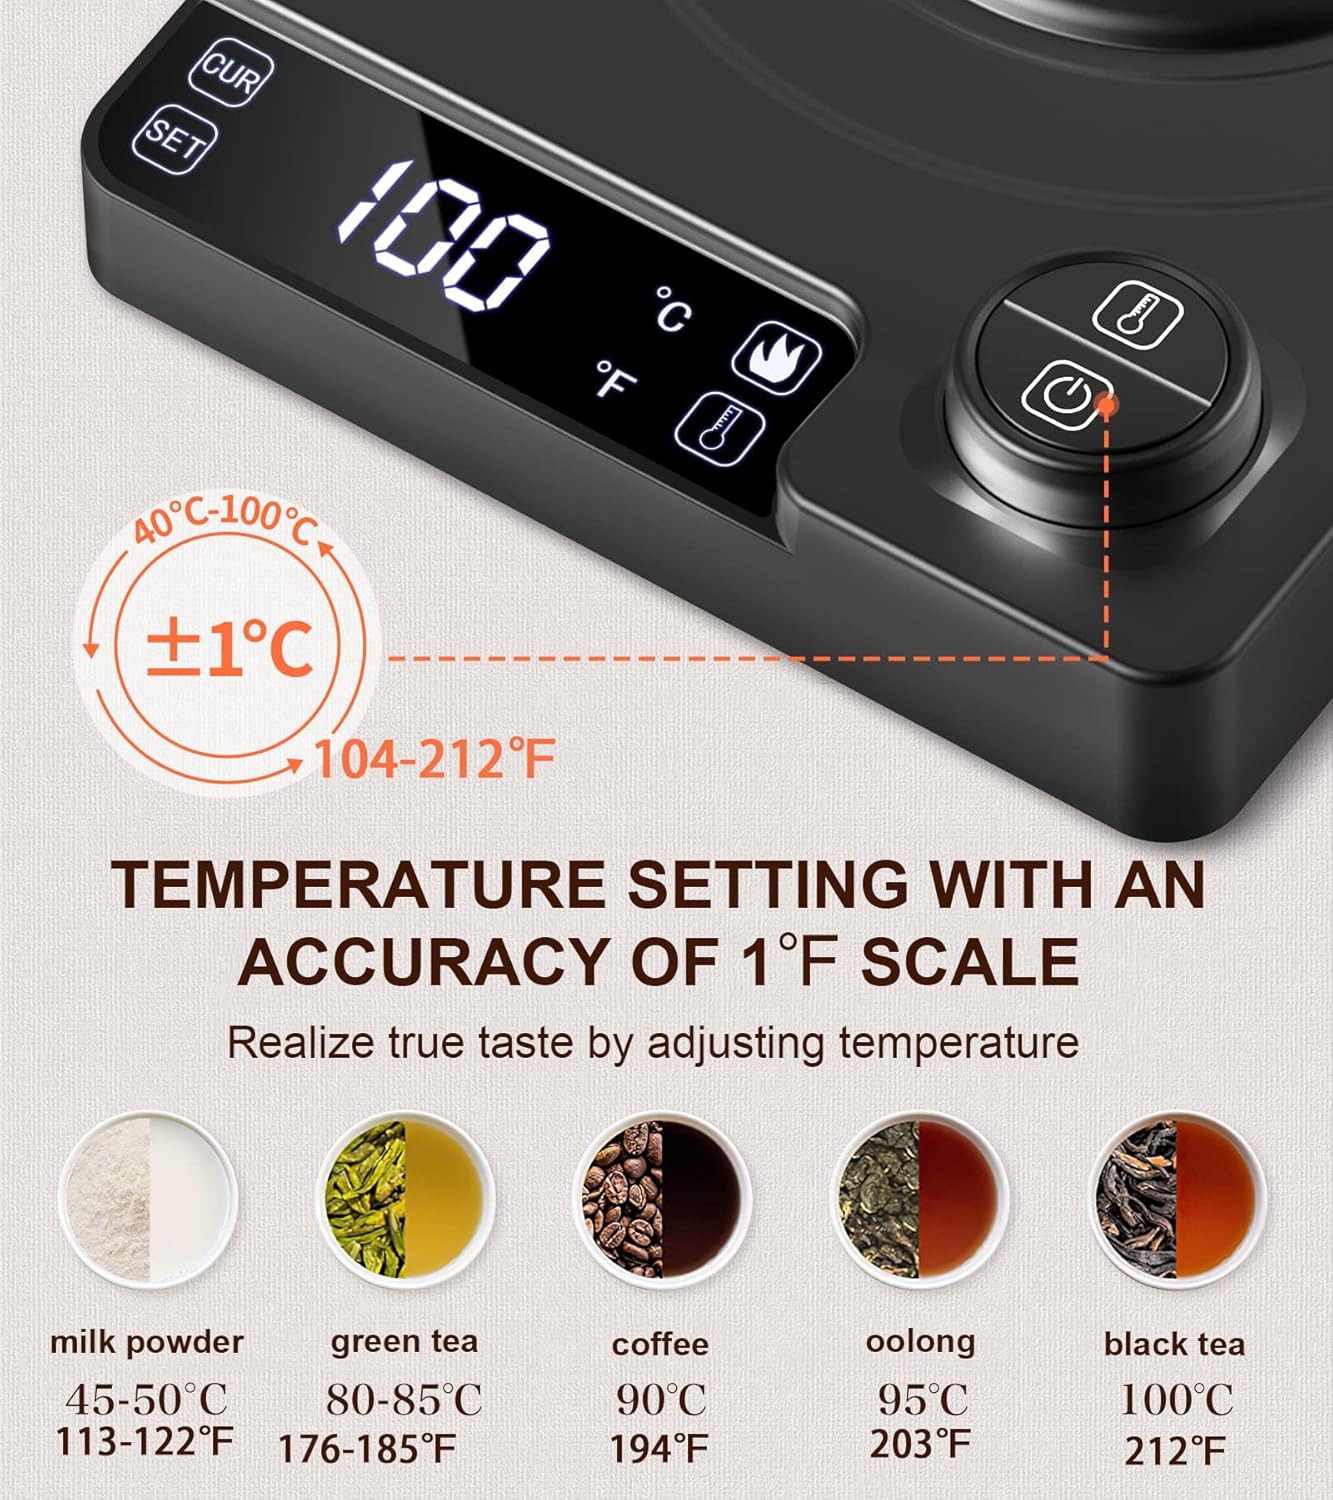
Figure 6.1: Precise Temperature Setting
This image displays the kettle's control panel with a digital temperature readout and recommended temperature ranges for various beverages such as milk powder (45-50°C / 113-122°F), green tea (80-85°C / 176-185°F), coffee (90°C / 194°F), oolong (95°C / 203°F), and black tea (100°C / 212°F). The kettle offers a temperature accuracy of ±1°C (±1.8°F).

Figure 6.2: Digital Control Panel
A close-up view of the digital display and control buttons on the kettle's base. It shows the temperature readout, indicators for Celsius and Fahrenheit, and buttons for setting and current functions, allowing for precise control over heating.
6.3 Keep Warm Function
The kettle can maintain a set temperature for up to 24 hours.
- After setting your desired temperature (as per 6.2), press the "KEEP WARM" button (M).
- Use the rotary adjustment button to set the desired duration for the keep warm function (1 to 24 hours).
- The kettle will maintain the set temperature for the specified duration.

Figure 6.3: Keep Warm Function Settings
This image illustrates the kettle's long-term heat insulation function, allowing users to set a desired temperature and maintain it for up to 24 hours. The display shows options for setting the keep warm duration, with minimum and maximum temperature settings of 104°F and 212°F respectively.
6.4 Brew Timer Function
The built-in brew timer automatically starts when the kettle is lifted from the base, allowing you to time your pour-over process.
- Heat water to your desired temperature.
- Lift the kettle from the base. The timer on the base will automatically start counting up.
- Use this timer to monitor your pour-over coffee or tea extraction time.
- Return the kettle to the base to stop the timer.

Figure 6.4: Drip Timer in Use
This image shows the kettle in action, pouring hot water over a coffee dripper. The digital display on the base clearly shows a countdown timer, indicating the precise extraction time for pour-over coffee. This feature helps users achieve consistent brewing results.
6.5 Pouring
The gooseneck spout is designed for controlled and steady pouring.
- Hold the kettle by the ergonomic handle.
- Tilt the kettle to pour water slowly and steadily, directing the flow precisely where needed.

Figure 6.5: Controlled Pouring
This image demonstrates the precise pouring capability of the gooseneck spout. Water is shown flowing from the spout at a controlled 90-degree angle into a pour-over coffee filter, illustrating how the design allows for accurate and steady water delivery.
6.6 Official Product Video
Video 6.6: Electric Gooseneck Kettle Overview
This video provides a concise overview of the CHEFESS Electric Gooseneck Kettle, demonstrating its key features and functionality, including temperature control and pouring precision. It offers a visual guide to the product's operation.
7. Maintenance and Cleaning
Regular cleaning helps maintain the kettle's performance and longevity.
7.1 Daily Cleaning
- Always unplug the kettle and allow it to cool completely before cleaning.
- Wipe the exterior of the kettle and power base with a soft, damp cloth. Do not use abrasive cleaners or scouring pads.
- Do not immerse the kettle or power base in water or any other liquid.
- Rinse the interior of the kettle with clean water.
7.2 Descaling (Removing Limescale)
Limescale can build up inside the kettle, especially in areas with hard water. Descaling regularly is important for optimal performance.
- Fill the kettle with a mixture of water and white vinegar (or citric acid solution) in a 2:1 ratio. Ensure the solution covers the bottom of the kettle.
- Boil the solution, then let it soak for approximately 30 minutes.
- Discard the solution and rinse the kettle thoroughly with fresh water several times to remove any vinegar residue.
- Wipe the interior with a soft cloth.
The frequency of descaling depends on water hardness and usage. Limescale will form if tap water is used and not completely filtered of calcium and magnesium metal ions. Pure or distilled water will prevent scale formation.

Figure 7.1: Limescale Removal Guide
This graphic provides a visual guide and instructions for removing limescale from the kettle. It shows the appearance of the kettle's interior after different periods of use (once, a week, more than a month) and a clear comparison of the kettle bottom before and after descaling, demonstrating the effectiveness of the cleaning process.
8. Troubleshooting
| Problem | Possible Cause | Solution |
|---|---|---|
| Kettle does not turn on. | No power supply. Kettle not properly seated on base. | Check power outlet and plug. Ensure kettle is correctly placed on the power base. |
| Water not heating. | Kettle not turned on. Temperature not set. | Press the power button. Set the desired temperature using the rotary knob. |
| Kettle shuts off prematurely. | Boil-dry protection activated (insufficient water). | Ensure water level is above MIN mark. Allow kettle to cool before refilling. |
| Limescale buildup. | Hard water usage. | Perform descaling as per Section 7.2. |
| Inaccurate temperature reading. | Sensor issue or extreme environmental conditions. | Ensure kettle is used in a stable environment. If problem persists, contact customer support. |
9. Specifications
| Feature | Specification |
|---|---|
| Model Number | KT10R |
| Brand | chefess |
| Capacity | 1.0 Liters |
| Material | 304 Stainless Steel |
| Color | Black |
| Voltage | 120 Volts |
| Wattage | 1200 Watts |
| Temperature Range | 104°F - 212°F (40°C - 100°C) |
| Special Features | Removable Lid, Precise Temperature Control, Keep Warm Function, Built-in Brew Timer, Automatic Shut-off, Boil-Dry Protection |
| Dimensions (L x W x H) | 7.4" x 5.9" x 8.3" |
| Product Care | Hand Wash |
10. Warranty and Support
Your CHEFESS Gooseneck Electric Kettle is covered by a manufacturer's warranty. For specific warranty details, please refer to the warranty card included in your product packaging or contact our customer support.
If you encounter any issues or have questions regarding your product, please contact CHEFESS customer support through the retailer where you purchased the item or visit our official website for assistance.
Please have your model number (KT10R) and purchase information ready when contacting support.