Introduction
Thank you for choosing LETMY Solar Spot Lights. This manual provides detailed instructions for the installation, operation, and maintenance of your new outdoor solar lights. Designed for durability and efficiency, these lights feature advanced solar panels, two brightness modes, and a waterproof design, making them ideal for illuminating gardens, pathways, and yards.

Product Components
Each package contains the following items:
- Solar Spot Lights (6 units)
- Ground Stakes (6 units)
- User Manual (1 unit)
- Mounting Screws and Wall Plugs (for wall installation, quantity sufficient for 6 units)
Features
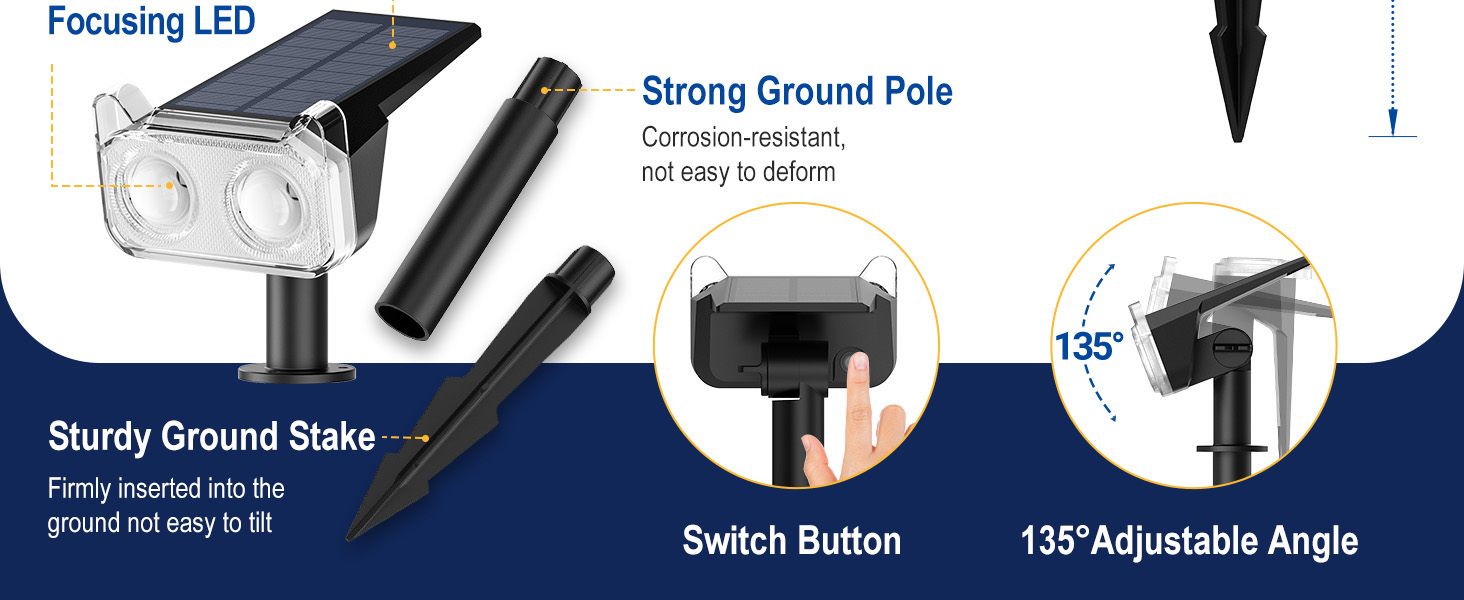
- Brighter Focusing LED: Equipped with two high-power LEDs and upgraded optical convex lenses for concentrated, brighter light.
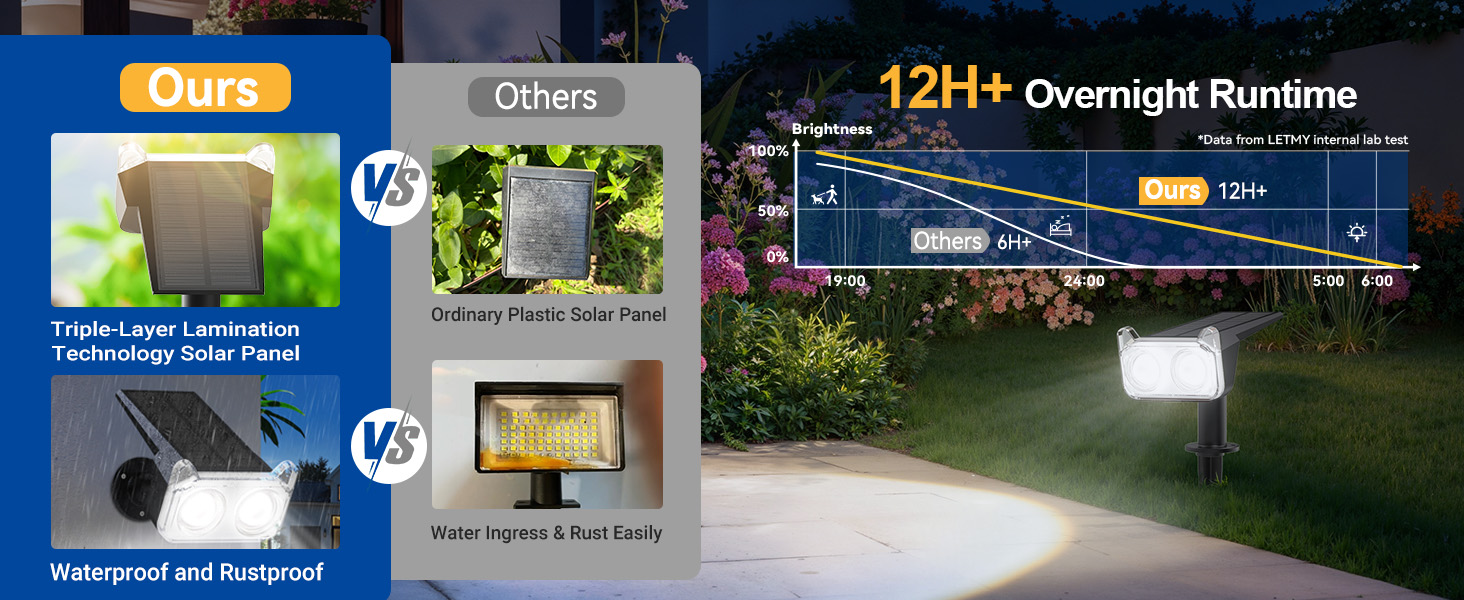
- Long-Lasting Performance: Features a 1200mAh high-capacity battery, providing up to 12 hours of illumination in high light mode and 20 hours in low light mode.
- High Efficiency Solar Panel: Advanced laminated solar panel with up to 30% conversion rate for superior charging efficiency.
- Automatic Operation: Lights automatically charge during the day and illuminate at night.
- Two Brightness Modes: Select between high light (10-12 hours) and low light (18-20 hours) settings.
- 135° Adjustable Angle: The light head can be rotated to direct illumination precisely where needed.
- IP65 Waterproof Rating: Designed to withstand various weather conditions, including rain, heat, and frost, with a working temperature range of -20°C to 60°C.
- 2-in-1 Installation: Can be installed using ground stakes or wall-mounted with included hardware.
Setup
Initial Charging
Before first use, ensure the solar lights are placed in direct sunlight for 6-8 hours to allow the battery to fully charge. The lights will automatically begin charging when exposed to sunlight.
Installation Options
Your LETMY Solar Spot Lights offer two installation methods:
- Ground Inserted:
- Turn on the light by pressing the switch button and select your desired mode (High or Low).
- Assemble the ground stake to the light unit.
- Insert the assembled light firmly into soft ground in a location that receives ample direct sunlight.
- Adjust the light angle (up to 135°) to illuminate your desired area.
- Wall Mounted:
- Turn on the light by pressing the switch button and select your desired mode.
- Mark the desired mounting location on a wall. Drill holes and insert the provided wall anchors.
- Attach the light unit to the wall using the provided screws, ensuring the solar panel faces an area with direct sunlight.
- Adjust the light angle (up to 135°) to illuminate your desired area.

Operating Instructions
Power On/Off and Mode Selection
Locate the power button on the back of the light unit. Press the button to cycle through the operating modes:
- First Press: Activates High Light Mode (10-12 hours illumination).
- Second Press: Activates Low Light Mode (18-20 hours illumination).
- Third Press: Turns the light OFF.
Automatic Operation
Once a mode is selected, the lights will automatically turn on at dusk and turn off at dawn, provided they have received sufficient sunlight for charging during the day.
Adjusting Light Angle
The light head can be manually adjusted up to 135 degrees. Gently pivot the light head to direct the beam to your desired area, such as a tree, wall, or pathway.


Maintenance
To ensure optimal performance and longevity of your solar spot lights, follow these maintenance guidelines:
- Clean Solar Panels: Regularly wipe the solar panel with a soft, damp cloth to remove dust, dirt, leaves, or snow. A clean panel ensures maximum sunlight absorption and charging efficiency.
- Optimal Placement: Periodically check that the lights are still positioned in an area that receives at least 6-8 hours of direct sunlight daily. Obstructions like growing foliage or new structures can reduce charging effectiveness.
- Inspect for Damage: Occasionally inspect the light units and stakes for any physical damage. While designed to be IP65 waterproof, extreme weather or impacts can affect integrity.
- Battery Longevity: The integrated battery is designed for long-term use. If you notice a significant decrease in illumination time after several years, it may indicate the battery is nearing the end of its lifespan.
Troubleshooting
If your LETMY Solar Spot Lights are not functioning as expected, please refer to the following common issues and solutions:
| Problem | Possible Cause | Solution |
|---|---|---|
| Light does not turn on at night. | 1. Power switch is OFF. 2. Insufficient sunlight for charging. 3. Solar panel is dirty or obstructed. | 1. Press the power button to select a light mode (High or Low). 2. Relocate the light to an area with 6-8 hours of direct sunlight. 3. Clean the solar panel surface. |
| Light illuminates for a short duration. | 1. Insufficient charging. 2. Battery capacity reduced due to age or extreme temperatures. | 1. Ensure optimal solar panel exposure. Allow for a full day's charge. 2. Consider replacing the unit if it's significantly old and performance has degraded. |
| Light appears dim. | 1. Solar panel is dirty. 2. Light is in Low Light Mode. 3. Battery is not fully charged. | 1. Clean the solar panel. 2. Press the power button to switch to High Light Mode. 3. Ensure the light receives adequate direct sunlight for charging. |
Specifications
| Feature | Detail |
|---|---|
| Brand | LETMY |
| Model Name | TSL003 |
| Light Color | Warm White |
| Material | Plastic |
| Power Source | Solar Powered |
| Battery Capacity | 1200mAh (High-capacity) |
| Solar Panel Efficiency | Up to 30% conversion rate |
| Illumination Modes | High Light (10-12 hours), Low Light (18-20 hours) |
| Adjustable Angle | 135° |
| Water Resistance Level | IP65 Waterproof |
| Working Temperature | -20°C to 60°C |
| Installation Type | Wall Mount, Ground Stake |
| Product Dimensions | 3.94"L x 5.12"W x 13.77"H |
| Item Weight | Approximately 3.19 pounds (for 6-pack) |

Warranty Information
LETMY provides a limited warranty for this product. Please retain your proof of purchase for any warranty claims. For specific details regarding the warranty period and coverage, refer to the documentation included with your purchase or contact customer support.
Customer Support
Should you encounter any issues not covered in this manual or require further assistance, please contact LETMY customer support through the retailer's platform or the official brand website. Our support team is available to help with product inquiries, technical assistance, and warranty services.