1. Introduction
This manual provides detailed instructions for the installation, operation, and maintenance of your AINAVI 8-inch Android 12 Car Stereo Radio. This advanced multimedia system features an 8-inch QLED touch screen, Android 12 operating system, Octo-Core processor, built-in GPS navigation, 5G WiFi, Bluetooth 5.0, and support for both wireless/wired CarPlay and USB Android Auto. Please read this manual thoroughly before use to ensure proper functionality and to maximize your experience.
2. Package Contents
Verify that all items listed below are included in your package:
- 1 x Android Car Stereo
- 1 x Rear View Camera
- 1 x Microphone
- 1 x User Manual
- 1 x Radio Antenna Adaptor
- 1 x RCA Cable
- 1 x USB Cable
- 1 x GPS Antenna
- 1 x Wiring Harness Power Cable
- 1 x CANbus Decoder
- 1 x Frame Removal Tool
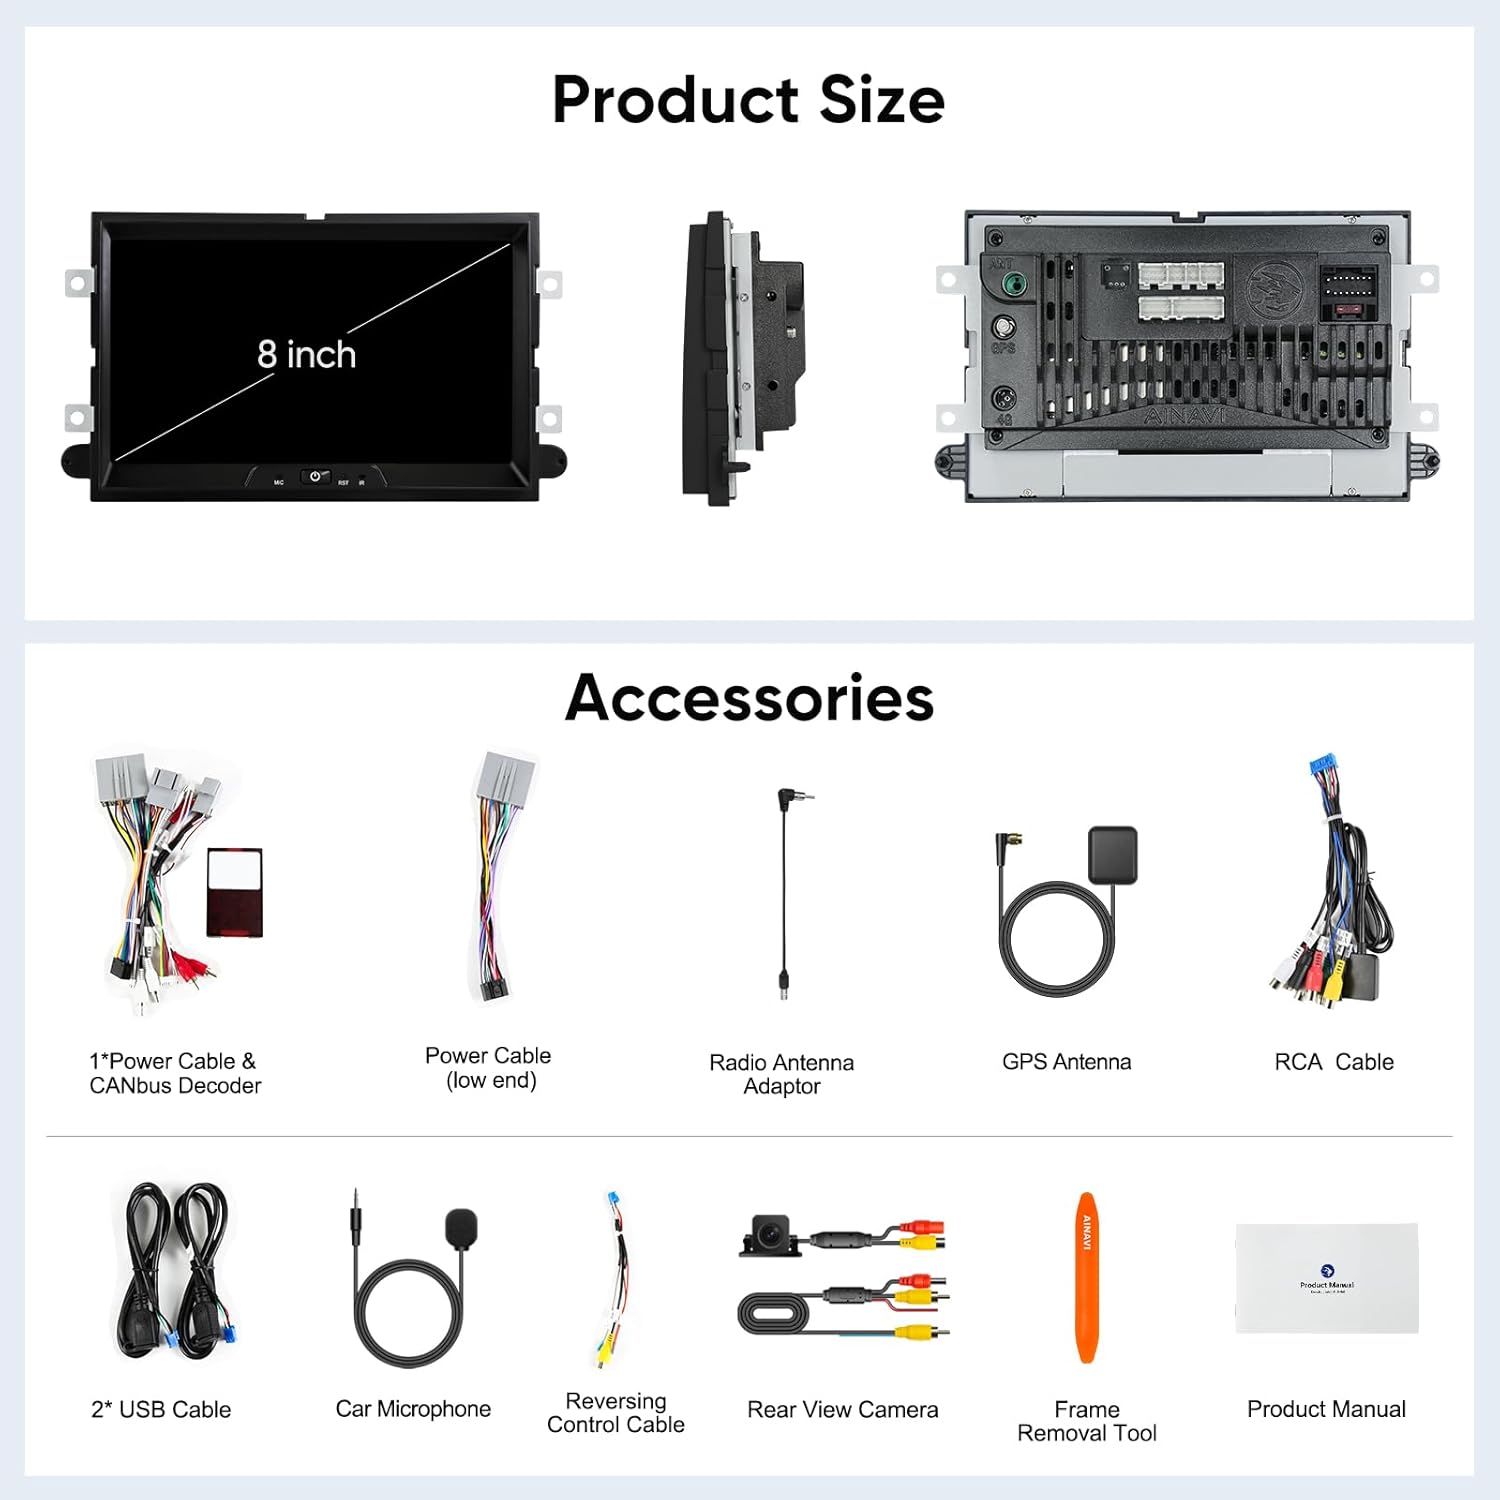
Figure 2.1: Product and Included Accessories. This image displays the main 8-inch car stereo unit along with all the cables, antennas, camera, microphone, and tools provided in the package.
3. Vehicle Compatibility
This AINAVI car stereo is designed for specific Ford models and years. Please ensure your vehicle is listed below for proper fitment and functionality:
| Model | Years | Model | Years |
|---|---|---|---|
| E250/E350 | 2009–2010 | Freestyle | 2005–2007 |
| Edge | 2007–2010 | Fusion | 2006–2009 |
| Escape | 2008–2012 | Mark LT | 2006–2008 |
| Expedition | 2007–2010 | Milan | 2006–2009 |
| Expedition EL/MAX(U354) | 2007–2014 | MKX | 2007–2009 |
| Explorer(U251) | 2006–2010 | Montego | 2005–2007 |
| F150 | 2004–2008 | Mountaineer | 2007–2010 |
| F250/F350 | 2006–2010 | Mustang | 2005–2009 |
| Five Hundred | 2005–2007 | Sable | 2008–2009 |
| Focus | 2005–2007 | Shelby GT500 | 2007–2009 |
| Freestar | 2004–2007 | Taurus | 2008–2009 |

Figure 3.1: Compatible Ford Models and Years. This image provides a visual reference for the vehicle compatibility list.
4. Setup & Installation
The AINAVI car stereo is designed for a plug-and-play installation in compatible Ford vehicles. It includes a dedicated wiring harness and CANbus decoder, eliminating the need for cable modifications in most cases. Professional installation is recommended if you are unfamiliar with car audio systems.
4.1 Pre-Installation Checklist
- Ensure your vehicle is compatible (refer to Section 3).
- Gather necessary tools (e.g., screwdriver set, trim removal tools).
- Disconnect the vehicle's negative battery terminal before starting any electrical work.
4.2 Installation Steps (General)
- Carefully remove the factory radio and trim panels using appropriate trim removal tools to avoid damage.
- Connect the provided wiring harness to the vehicle's factory harness. Ensure all connections are secure.
- Connect the CANbus decoder, GPS antenna, radio antenna adapter, and any other accessories (e.g., rear view camera, microphone) to the new head unit.
- Temporarily connect the new head unit and reconnect the vehicle's battery. Test basic functions like power on, radio, and steering wheel controls.
- If all functions work correctly, disconnect the battery again, secure all wiring, and mount the new head unit into the dashboard.
- Reinstall all trim panels and reconnect the battery.

Figure 4.1: Car Stereo Installed. This image illustrates the appearance of the AINAVI car stereo after installation in a compatible vehicle dashboard.
Figure 4.2: Before and After Modification. This image demonstrates the visual change in the car's interior after replacing the original radio with the AINAVI unit.
5. Operating Instructions
5.1 Basic Operation
- Power On/Off: Press and hold the power button (if available) or turn on your vehicle's ignition.
- Touch Screen: Navigate the interface by tapping, swiping, and pinching on the 8-inch QLED display.
- Volume Control: Adjust volume using the on-screen controls or your vehicle's steering wheel controls.
- Steering Wheel Controls: The unit supports your vehicle's existing steering wheel control buttons for convenience.
5.2 GPS Navigation
The unit features built-in GPS navigation. You can use pre-installed maps or download additional navigation applications from the Google Play Store.
- Online Navigation: Connect the head unit to a network via 5G WiFi to receive real-time traffic information and online map updates.
- Offline Navigation: Download offline maps to use the GPS function without an internet connection.

Figure 5.1: GPS Navigation and Multimedia. This image illustrates the display showing GPS navigation alongside options for multimedia playback.
5.3 Connectivity
- 5G WiFi: Connect to a WiFi hotspot (e.g., from your smartphone) to access the internet for app downloads, streaming, and online services. Supports dual-band 2.4GHz and 5GHz WiFi for stable and high-speed connections.
- Bluetooth 5.0: Pair your smartphone via Bluetooth for hands-free calling, audio streaming, and phonebook synchronization.
5.4 CarPlay & Android Auto
The unit supports both wireless and wired CarPlay, and USB connection Android Auto, allowing seamless integration with your smartphone.
- Wireless/Wired CarPlay: Connect your iPhone to access navigation, make calls, send/receive messages, and listen to music directly from the stereo interface.
- USB Android Auto: Connect your Android phone via USB to use Google Maps, make calls, send messages, and play music.
- Voice Control: Activate voice commands by saying "Hey Siri" (for CarPlay) or "Hey Google" (for Android Auto) to control functions hands-free.

Figure 5.2: CarPlay and Android Auto Interface. This image displays the user interface when CarPlay or Android Auto is active, showing various app functionalities.

Figure 5.3: Smart Voice Control. This image highlights the voice command capabilities of the stereo when using CarPlay or Android Auto.
5.5 Audio Settings (DSP)
The built-in Digital Sound Processor (DSP) provides advanced audio customization options.
- 48-band EQ: Fine-tune the audio output across 48 frequency bands to match your preferences.
- Time Correction: Adjust the sound delay for individual speakers to optimize the sound field position, creating a more immersive listening experience.
- Amplifier: The unit features a 4*45W amplifier for clear and powerful sound output.

Figure 5.4: Intelligent Tone Adjustment System. This image displays the DSP settings screen, allowing users to customize sound characteristics.

Figure 5.5: DSP 48 EQ Band & Time Correction. This image provides a closer look at the advanced DSP settings, including the graphical equalizer and time correction controls.

Figure 5.6: Built-in DSP Function Sound Control System. This image visually explains how the DSP enhances audio quality by allowing precise control over speaker output.
6. Maintenance
To ensure the longevity and optimal performance of your AINAVI car stereo, follow these maintenance guidelines:
- Screen Cleaning: Use a soft, lint-free cloth to gently wipe the screen. For stubborn smudges, slightly dampen the cloth with water or a screen-safe cleaner. Avoid harsh chemicals or abrasive materials.
- Temperature: Avoid exposing the unit to extreme temperatures, both hot and cold, for extended periods.
- Software Updates: Periodically check for available software updates through the system settings to ensure you have the latest features and performance enhancements.
- Connections: Ensure all cables and connections remain secure to prevent intermittent issues.
7. Troubleshooting
If you encounter issues with your car stereo, refer to the following common troubleshooting steps. If the problem persists, please contact customer support.
- No Power: Check all power connections. Ensure the vehicle's battery is properly connected and charged. Verify the fuse for the stereo is intact.
- No Sound: Check speaker connections. Ensure the volume is not muted or set too low. Verify audio settings (EQ, balance, fader).
- GPS Signal Loss: Ensure the GPS antenna is properly installed and has a clear view of the sky. Try restarting the navigation application.
- Bluetooth Connection Issues: Ensure Bluetooth is enabled on both the stereo and your phone. Delete previous pairings and try pairing again.
- Touch Screen Unresponsive: Try restarting the unit. If the issue continues, a factory reset might be necessary (note: this will erase all user data and settings).
- Steering Wheel Controls Not Working: Verify the CANbus decoder and wiring harness connections are correct. Check the steering wheel control settings in the unit's menu.
8. Specifications
Below are the technical specifications for the AINAVI 8-inch Android 12 Car Stereo Radio:
| Feature | Specification |
|---|---|
| Operating System | Android 12 |
| Processor | Octo-Core (ARM Cortex A55) |
| RAM | 2GB |
| Internal Storage (ROM) | 32GB |
| Screen Size | 8 Inches |
| Display Type | QLED, G+G Full Lamination |
| Resolution | 1280x720 |
| Viewing Angle | 178° |
| Connectivity | 5G WiFi (2.4Ghz & 5Ghz), Bluetooth 5.0 |
| Navigation | Built-in GPS (supports offline maps) |
| Smartphone Integration | Wireless/Wired CarPlay, USB Android Auto |
| Audio Output | 4*45W (Max. Output) |
| DSP Features | Time Correction, 48-band EQ |
| Item Weight | 3.72 pounds |
| Package Dimensions | 13.89 x 9.76 x 5.28 inches |
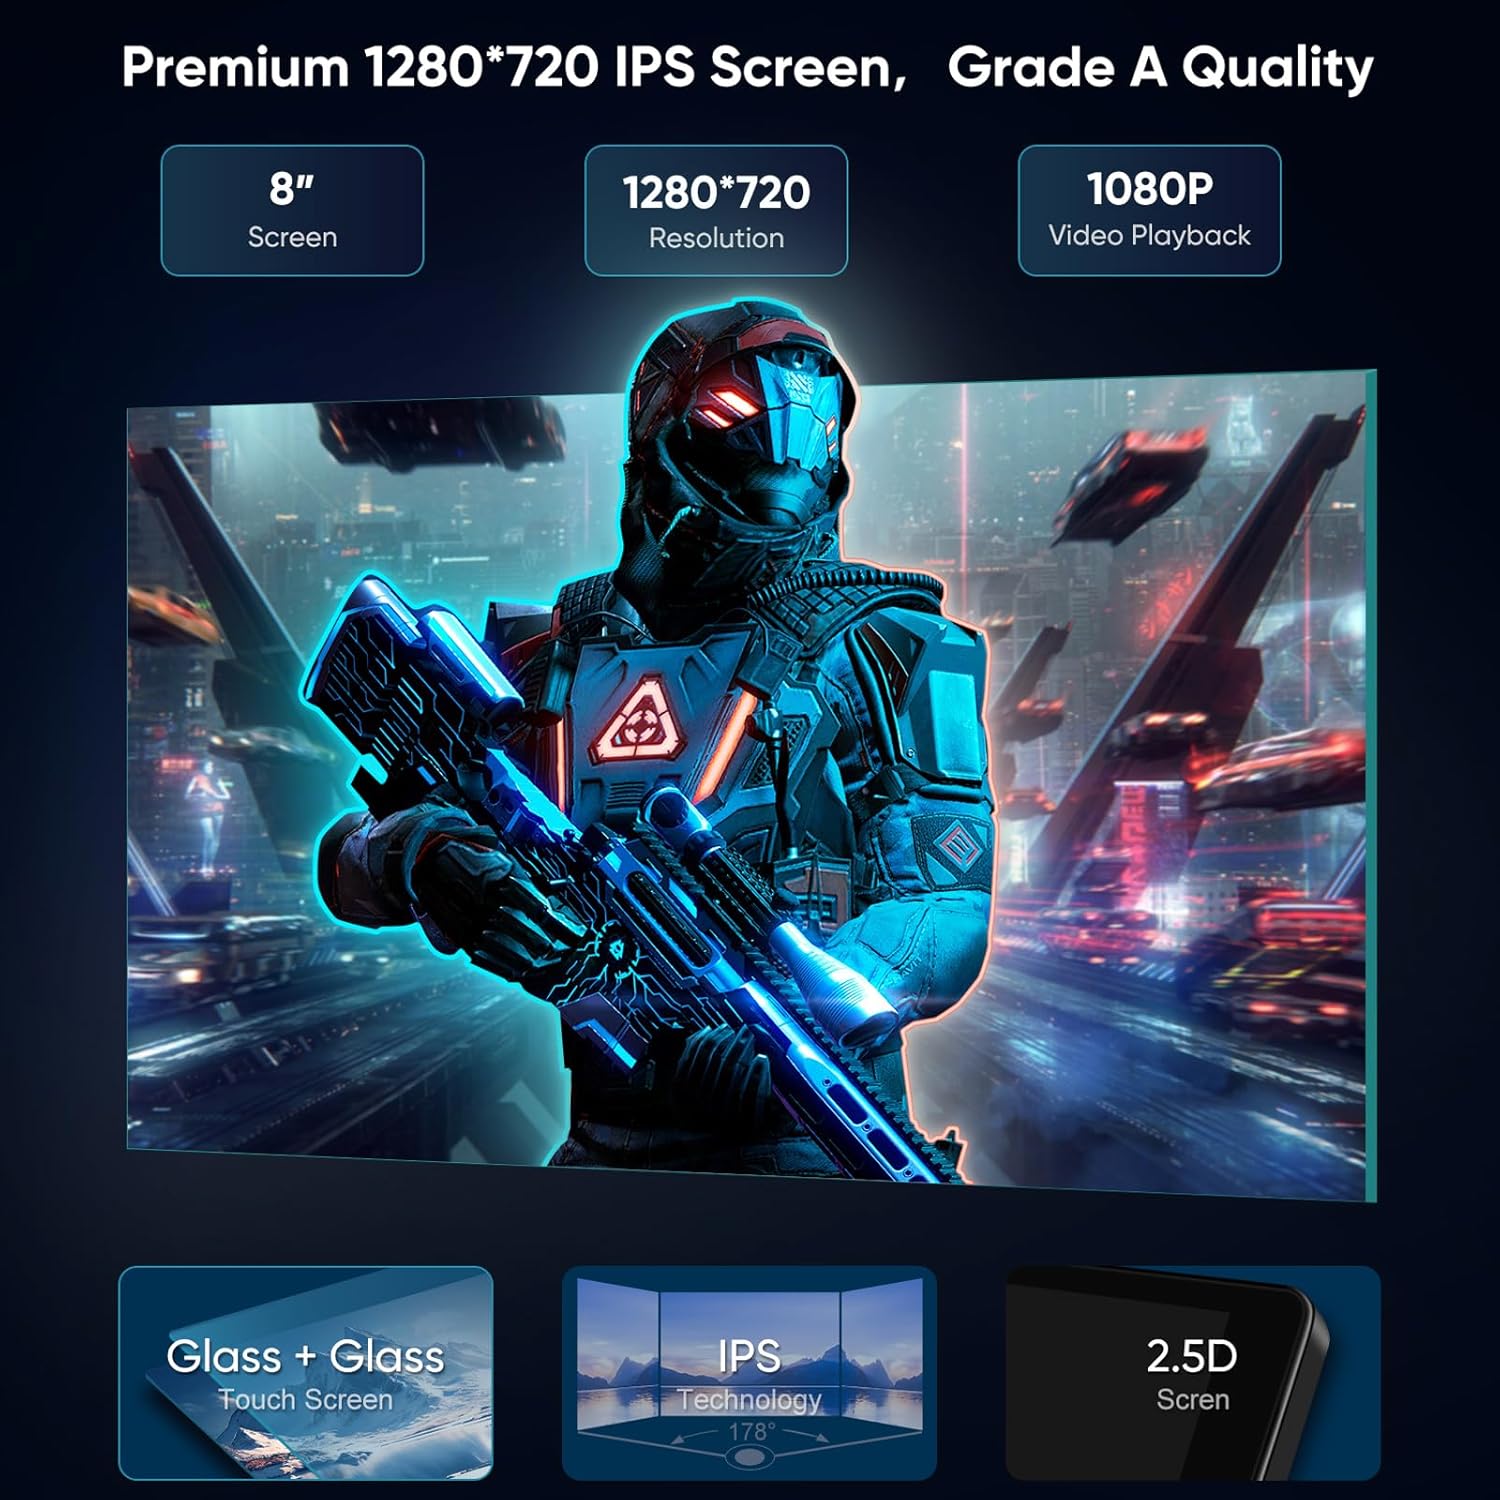
Figure 8.1: Premium Screen Specifications. This image details the display technology and resolution of the car stereo.
9. Warranty Information
The AINAVI 8-inch Android 12 Car Stereo Radio comes with a one-year product warranty from the date of purchase. This warranty covers manufacturing defects and malfunctions under normal use. Please retain your proof of purchase for warranty claims. The warranty does not cover damage caused by improper installation, misuse, accidents, or unauthorized modifications.
10. Customer Support
For any technical assistance, installation questions, or warranty inquiries, please contact our professional technical support team:
- Via Amazon: Navigate to your order details on Amazon and click on the seller's name (HomeCar), then select "Ask a question." Please provide pictures or videos if your query relates to installation or technical issues.
- Hotline: +1 (833) 858-5016
- Email: info@ainavi.com
- Working Hours: 01:00 PM to 00:00 AM PST

Figure 10.1: How to Reach Us for Installation & Technical Support. This image provides a visual guide on contacting support through Amazon.

Figure 10.2: Customer Support Representative. This image represents the availability of customer support for assistance.


