1. Introduction
This manual provides detailed instructions for the installation, operation, and maintenance of your GIGABYTE GA-B760M D3HP WIFI6 motherboard. Designed for optimal performance and reliability, this motherboard supports Intel Core 14th, 13th, and 12th generation CPUs and features DDR5 memory support, PCIe 4.0 M.2 connectors, and Wi-Fi 6 connectivity. Please read this manual thoroughly before beginning installation to ensure proper setup and to maximize the lifespan of your product.
2. Key Features
- CPU Support: Compatible with Intel Core 14th, 13th, and 12th generation processors.
- Power Design: Features a 4+1+1 phase hybrid digital VRM solution for stable power delivery.
- Memory: Supports Dual Channel DDR5 memory with 4 DIMM slots and XMP memory module support.
- Storage: Equipped with 2 PCIe 4.0 x4 M.2 connectors for high-speed storage.
- Networking: Includes GbE LAN and Wi-Fi 6 802.11ax for fast and reliable network connectivity.
3. Setup and Installation
Before installing the motherboard, ensure your system is powered off and disconnected from the power source. Handle the motherboard by its edges to avoid static discharge.
3.1 Motherboard Layout
Familiarize yourself with the layout of the motherboard components before proceeding with installation.

Figure 1: Top-down view of the GIGABYTE GA-B760M D3HP WIFI6 motherboard, showing the CPU socket, DIMM slots, PCIe slots, and various headers.
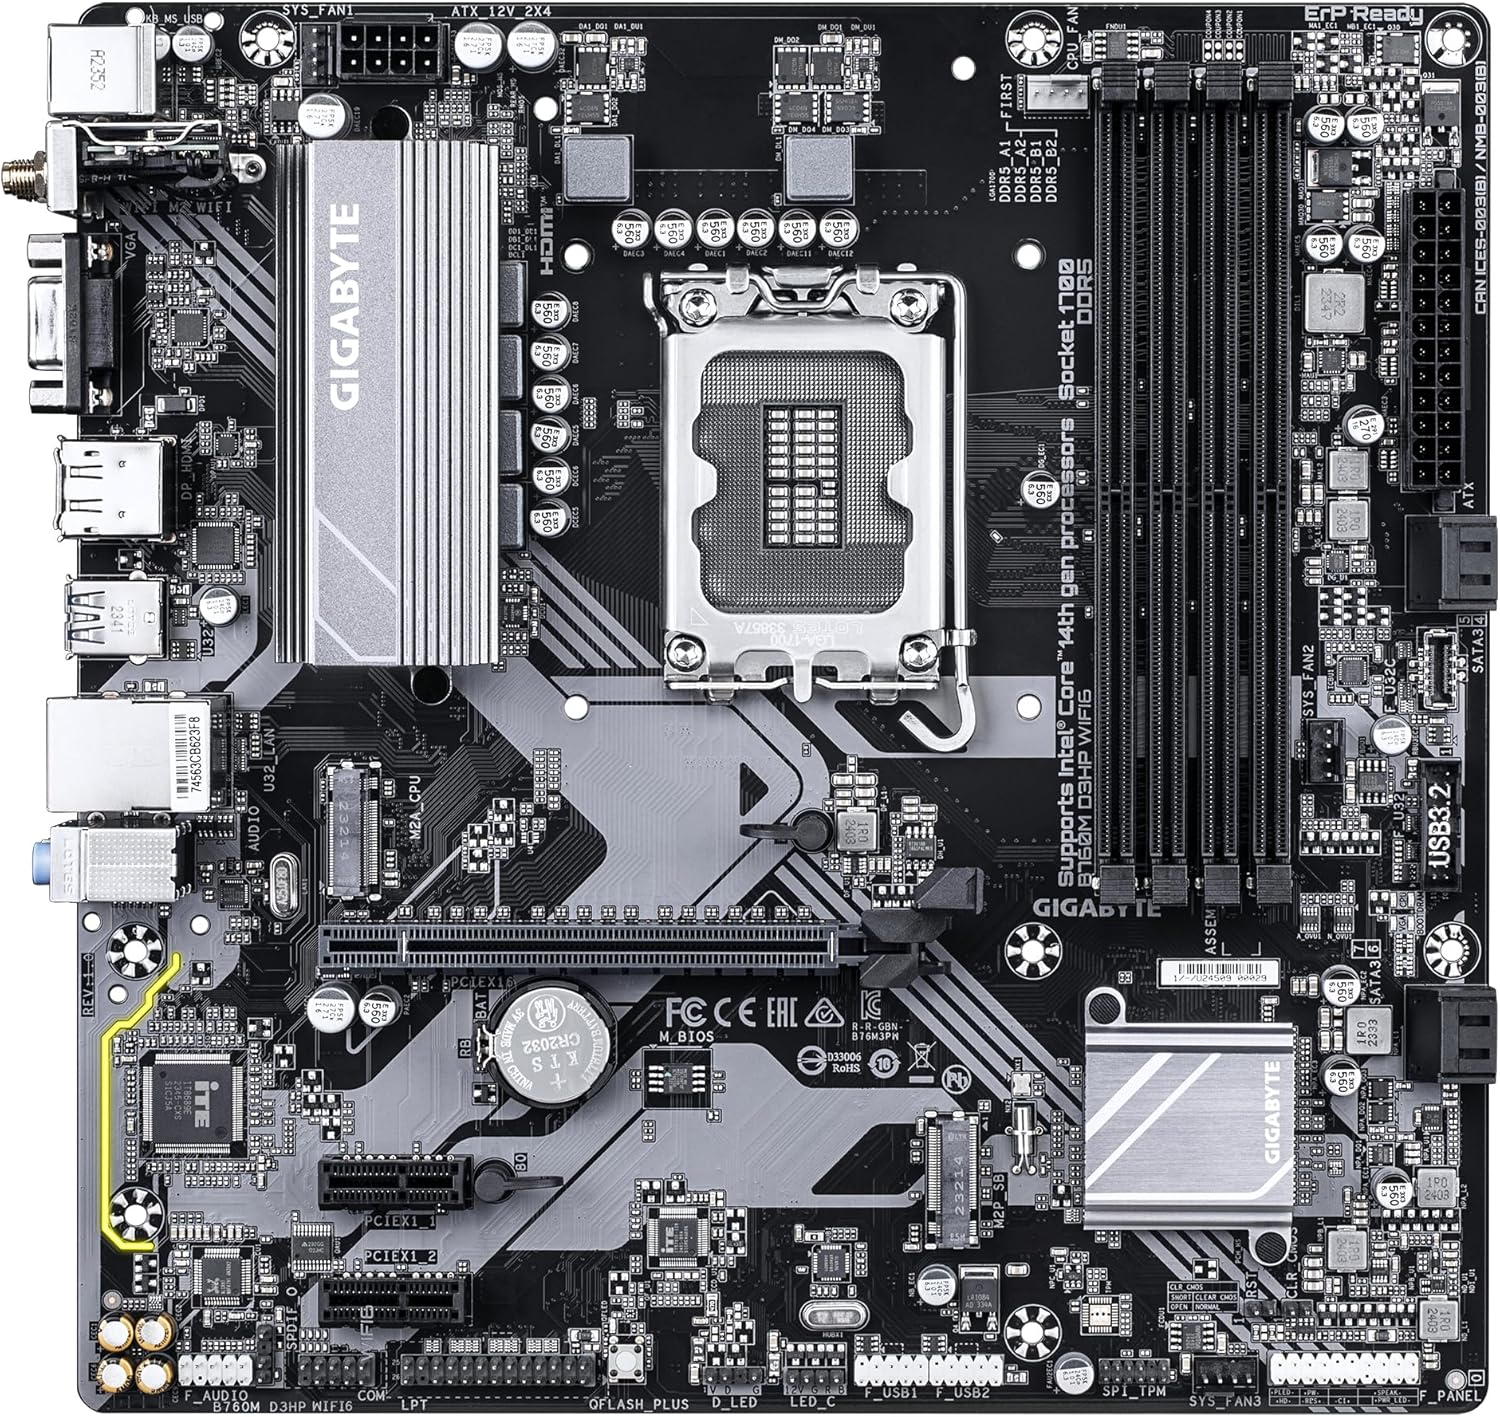
Figure 2: Angled view of the GIGABYTE GA-B760M D3HP WIFI6 motherboard, highlighting the heatsinks and overall component placement.
3.2 CPU Installation
- Locate the LGA 1700 CPU socket on the motherboard.
- Open the CPU socket lever and lift the load plate.
- Carefully align the CPU with the socket, ensuring the triangular mark on the CPU matches the mark on the socket. Do not force the CPU into the socket.
- Lower the load plate and secure it with the lever.
- Apply thermal paste to the CPU and install the CPU cooler according to its manufacturer's instructions.
3.3 Memory (RAM) Installation
- Locate the four DDR5 DIMM slots.
- Open the clips at both ends of the DIMM slot.
- Align the notch on the DDR5 memory module with the key in the DIMM slot.
- Insert the memory module firmly into the slot until the clips snap into place. Ensure both clips are closed.
- For dual-channel configuration, refer to the motherboard's specific manual for recommended slot pairing.
3.4 Storage Device Installation (M.2 SSDs and SATA Drives)
- M.2 SSD: Locate the M.2 connectors. Remove the M.2 screw/standoff. Insert the M.2 SSD into the slot at a 30-degree angle. Push down the SSD and secure it with the screw/standoff.
- SATA Drives: Connect SATA data cables from your storage drives (HDDs/SSDs) to the SATA ports on the motherboard. Connect power cables from your power supply to the drives.
3.5 Power Connections
- Connect the 24-pin ATX main power connector from your power supply to the corresponding port on the motherboard.
- Connect the 8-pin ATX 12V CPU power connector to the port near the CPU socket.
3.6 Front Panel and Peripheral Connections
Connect your case's front panel connectors (power button, reset button, USB ports, audio jacks, LED indicators) to the corresponding headers on the motherboard. Refer to the motherboard's detailed manual for exact pin layouts.

Figure 3: Rear I/O panel of the GIGABYTE GA-B760M D3HP WIFI6 motherboard, showing USB ports, display outputs, audio jacks, Ethernet, and Wi-Fi antenna connectors.
4. Operating Instructions
4.1 BIOS Setup
Upon first boot, you may need to enter the BIOS (Basic Input/Output System) to configure settings such as boot order, date/time, and enable specific features. To enter BIOS, press the DEL key repeatedly during startup. The GIGABYTE UEFI BIOS provides an intuitive graphical interface for configuration.
4.2 Driver Installation
After installing your operating system, install the necessary drivers for the motherboard's components (chipset, audio, LAN, Wi-Fi, etc.). These drivers are typically provided on a support DVD or can be downloaded from the official GIGABYTE website for your specific motherboard model.
5. Maintenance
- Cleaning: Regularly clean dust from the motherboard and case fans using compressed air. Ensure the system is powered off and unplugged before cleaning.
- BIOS Updates: Periodically check the GIGABYTE website for BIOS updates. BIOS updates can improve system stability, compatibility, and performance. Follow the instructions provided by GIGABYTE carefully when updating the BIOS.
- Driver Updates: Keep your drivers updated to ensure optimal performance and compatibility with new software and hardware.
6. Troubleshooting
- No Power:
- Check all power connections (24-pin ATX, 8-pin CPU).
- Ensure the power supply is switched on.
- Test the power supply with another system or a power supply tester.
- No Display:
- Ensure the monitor is connected to the graphics card (or integrated graphics port if no discrete GPU is used).
- Reseat the graphics card and memory modules.
- Try booting with only one RAM stick.
- System Instability/Crashes:
- Check CPU and GPU temperatures.
- Ensure all components are properly seated.
- Run memory diagnostic tools to check for RAM errors.
- Update BIOS and drivers.
- Network Connectivity Issues:
- For wired LAN, check the Ethernet cable and router connection.
- For Wi-Fi, ensure antennas are securely attached and drivers are installed.
- Verify network settings in the operating system.
7. Specifications
| Feature | Detail |
|---|---|
| Brand | GIGABYTE |
| Model Name | B760M D3HP WIFI6 |
| CPU Socket | LGA 1700 |
| Compatible Processors | Intel Core 14th Gen, Intel Core 13th Gen, Intel Core 12th Gen |
| Chipset Type | Intel B760 |
| RAM Memory Technology | DDR5 |
| Memory Clock Speed | 5600 MHz |
| Compatible Devices | Personal Computer, Desktop Computer |
| Platform | Windows 10, Windows 11 |
| Product Dimensions | 9.61 x 9.61 x 1.38 inches |
| Item Weight | 2.2 pounds |
8. Warranty and Support
For warranty information and technical support, please refer to the official GIGABYTE website or contact GIGABYTE customer service. Keep your proof of purchase for warranty claims.
GIGABYTE Official Website: www.gigabyte.com


