1. Introduction
Thank you for choosing the Acekool 12000 BTUs Portable Air Conditioner. This appliance is designed to provide powerful cooling, efficient dehumidification, and effective air circulation through its fan function, creating a comfortable indoor environment. This manual provides detailed instructions for safe operation, installation, maintenance, and troubleshooting to ensure optimal performance and longevity of your unit. Please read this manual thoroughly before operating the appliance and retain it for future reference.
2. Safety Information
To prevent injury to the user or other people and property damage, the following instructions must be followed. Incorrect operation due to ignoring instructions may cause harm or damage.
- Always operate the unit on a stable, flat surface.
- Do not block the air inlets or outlets. Maintain at least 20 cm (8 inches) clearance from walls or other objects.
- Ensure the power supply matches the voltage specified on the rating label.
- Do not operate the unit with a damaged power cord or plug.
- Unplug the unit before cleaning or servicing.
- Keep the unit away from heat sources, direct sunlight, and flammable materials.
- This appliance is not intended for use by persons (including children) with reduced physical, sensory or mental capabilities, or lack of experience and knowledge, unless they have been given supervision or instruction concerning use of the appliance by a person responsible for their safety.
- Do not use chemical solvents (e.g., benzene, alcohol, gasoline) to clean the unit.
3. Product Overview
3.1. Components
The Acekool Portable Air Conditioner comes with the main unit and several accessories for installation and operation.

Figure 3.1: The Acekool Portable Air Conditioner unit shown with its included accessories, which consist of a remote control, exhaust hose, window slider kit, and a user manual.
- Portable Air Conditioner Unit
- Remote Control
- Exhaust Hose
- Window Slider Kit (includes slider bracket, inlet and outlet hoses, locking screws)
- Drain Hose
- User Manual
3.2. Control Panel and Remote Control
The unit can be operated via the LED display on top of the air conditioner or through the included remote control. Both offer intuitive access to all functions.
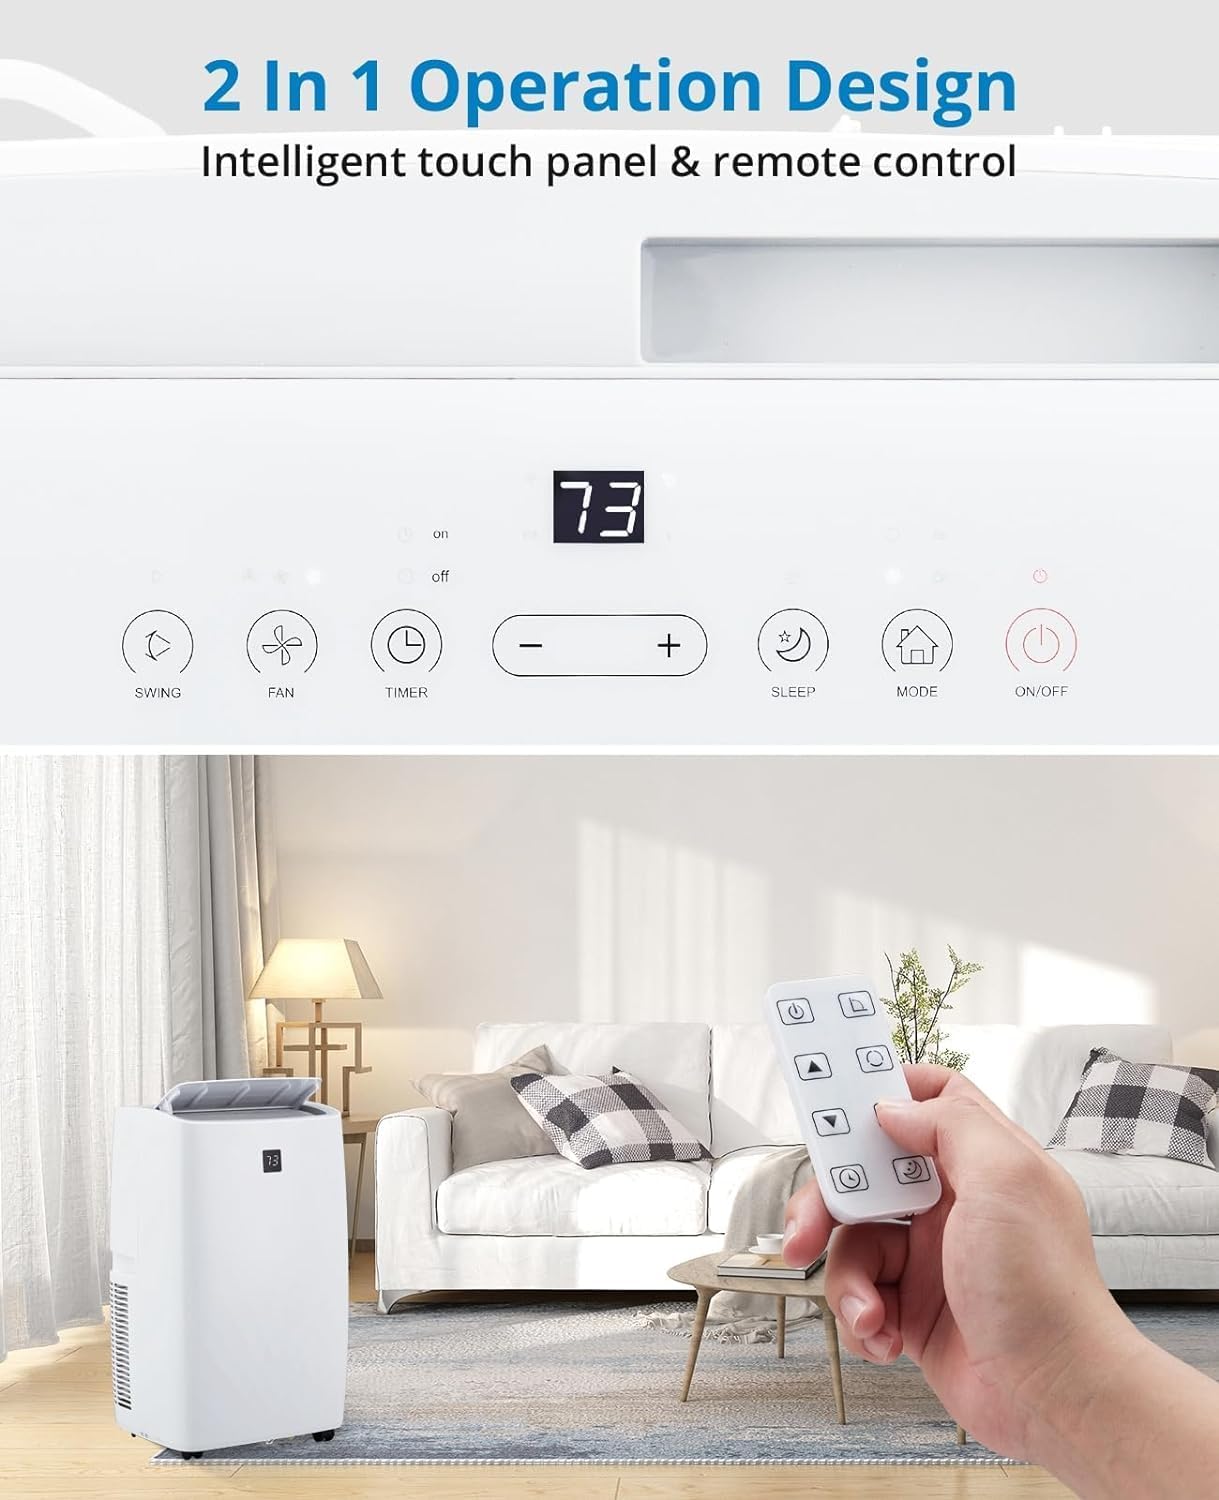
Figure 3.2: A detailed view of the unit's intelligent touch control panel and the remote control. The control panel features buttons for Swing, Fan, Timer, Sleep, Mode, and On/Off, along with temperature adjustment buttons and a digital display.
Key functions include:
- ON/OFF Button: Powers the unit on or off.
- MODE Button: Cycles through Cooling, Dehumidifier, and Fan modes.
- +/- Buttons: Adjusts temperature settings or timer duration.
- FAN Button: Selects fan speed (Low, Medium, High, Auto).
- SLEEP Button: Activates Sleep Mode for quiet, energy-efficient operation.
- TIMER Button: Sets the auto-on or auto-off timer.
- SWING Button: Controls the oscillation of the air outlet louvers.
4. Setup
4.1. Unpacking
Carefully remove the air conditioner and all accessories from the packaging. Inspect the unit for any shipping damage. Keep the original packaging for future storage or transport.
4.2. Window Installation Kit
The unit includes a window kit designed for easy installation in various window types, including double/single-hung windows and sliding sash windows. No screws or nails are typically required for standard installation.

Figure 4.2: This image illustrates the compatibility of the window kit with double/single-hung windows and sliding sash windows, showing an adjustable range of 20.47 to 39.9 inches. The portable AC unit's dimensions are also provided: 17.2 inches (width), 13.1 inches (depth), and 27.7 inches (height).
4.3. Installation Steps
- Prepare the Window: Open the window to the desired width.
- Assemble Window Slider Kit: Adjust the window slider bracket to fit your window opening. Secure the sections if necessary.
- Attach Exhaust Hose: Connect one end of the exhaust hose to the exhaust outlet on the back of the air conditioner unit.
- Connect to Window Kit: Attach the other end of the exhaust hose to the adapter on the window slider kit.
- Install Window Kit: Place the assembled window kit into the window opening and close the window securely against it to seal.
- Position the Unit: Place the portable air conditioner unit near the window, ensuring the exhaust hose is not kinked or bent sharply.
- Plug In: Plug the power cord into a grounded electrical outlet.
5. Operating
5.1. Powering On/Off
Press the ON/OFF button on the control panel or remote control to turn the unit on or off.
5.2. Operating Modes
Press the MODE button to cycle through the available operating modes: Cool, Dry (Dehumidifier), and Fan.

Figure 5.2: This image displays three portable AC units, each representing one of the three operational modes: Cooling (64°F-90°F), Dry (dehumidification up to 75 pints/day), and Fan (High, Low, Auto speeds). The visual emphasizes the unit's ability to make living spaces cool, clean, dry, and comfortable.
- Cooling Mode: Provides powerful cooling for rooms up to 550 sq.ft. Use the +/- buttons to set the desired temperature (typically 64°F - 90°F). The compressor operation adjusts automatically based on the current temperature.
- Dehumidifier Mode (Dry): Efficiently removes moisture from the air, with a capacity of up to 75 pints per day. This mode helps create a healthier and more comfortable indoor environment.
- Fan Mode: Circulates air without cooling. Press the FAN button to select fan speed: High, Low, or Auto.
5.3. Smart Mode
In Smart Mode, the portable air conditioner automatically adjusts between cooling and fan modes based on the room temperature, optimizing comfort and energy efficiency.
5.4. Sleep Mode
Sleep Mode maintains optimal temperatures at low fan speeds, reducing noise levels to as low as 48dB. This mode is designed to improve energy efficiency and minimize energy costs while providing a quiet and comfortable sleeping environment.

Figure 5.4: This image highlights the quiet operation of the Acekool portable air conditioner in Sleep Mode, with noise levels as low as 48dB. It also shows features like a 24-hour smart timer, auto shut-off, and ultra-quiet operation, ideal for nighttime use.
5.5. Timer Function
The 24-hour timer allows you to program the unit to automatically turn on or off at a specified time, enhancing convenience and energy savings.
5.6. Remote Control Operation
The remote control provides full functionality from a distance, allowing you to adjust settings without needing to approach the unit. Ensure batteries are correctly inserted.
6. Maintenance
6.1. Filter Cleaning
The unit is equipped with a removable and washable double-layer filter. Regular cleaning of the filter is essential to maintain air quality and unit efficiency. Clean the filter every two weeks or more frequently depending on usage and air quality.
- Unplug the air conditioner from the power outlet.
- Locate and remove the filter from the back or side of the unit.
- Wash the filter under running water (warm, not hot) or use a vacuum cleaner to remove dust.
- Allow the filter to air dry completely before reinserting it into the unit. Do not expose to direct sunlight.
6.2. Water Drainage
The Acekool portable air conditioner features a self-evaporation system, which significantly reduces the need for manual water drainage. Most condensed water is evaporated and expelled through the exhaust hose.

Figure 6.2: This image provides a close-up view of the rear of the portable air conditioner, highlighting the self-evaporation system and the internal components that manage water drainage, effectively reducing the need for manual emptying.
In high humidity conditions, the internal water tank may fill up. If this occurs, the unit will stop operating and display an error code (refer to troubleshooting). Connect the provided drain hose to the drainage port and place the other end into a suitable container or floor drain to empty the water.
6.3. Storage
When storing the unit for an extended period:
- Drain any remaining water from the unit.
- Clean the air filter.
- Unplug the power cord and coil it neatly.
- Store the unit in a cool, dry place, preferably in its original packaging, away from direct sunlight and extreme temperatures.
7. Troubleshooting
Before contacting customer support, please refer to the following table for common issues and their solutions.
| Problem | Possible Cause | Solution |
|---|---|---|
| Unit does not turn on. | No power supply; Power cord damaged; Water tank full. | Check power outlet and plug; Inspect power cord; Drain water tank. |
| Unit cools insufficiently. | Air filter clogged; Room too large; Doors/windows open; Exhaust hose blocked/leaking. | Clean air filter; Ensure room size is within capacity (550 sq.ft.); Close all openings; Check exhaust hose for kinks or leaks. |
| Unit is noisy. | Unit not on a level surface; Fan speed too high. | Place unit on a flat, stable surface; Reduce fan speed. |
| Water leakage. | Drain plug not properly sealed; Unit tilted. | Ensure drain plug is securely closed; Place unit on a level surface. |
| Remote control not working. | Batteries dead or incorrectly inserted; Obstruction between remote and unit. | Replace batteries; Ensure clear line of sight to unit's receiver. |
8. Specifications
Detailed technical specifications for the Acekool 12000 BTUs Portable Air Conditioner.
| Feature | Specification |
|---|---|
| Brand | Acekool |
| Model Name | FDP35-3034R3 |
| Cooling Power | 12000 BTUs |
| Coverage Area | Up to 550 sq.ft. |
| Functions | Cooling, Dehumidifier, Fan |
| Dehumidification Capacity | 60 Pints (approx. 7.5 gallons) |
| Noise Level | 51 dB (as low as 48dB in Sleep Mode) |
| Voltage | 115V |
| Wattage | 1200 watts |
| Item Weight | 76.8 pounds |
| Product Dimensions (D x W x H) | 18.5 x 15.35 x 35.24 inches |
| Included Components | Remote Control, Window Kit, Exhaust Hose, Drain Hose |
| Special Features | Fast Cooling, Smart/Sleep Mode, 24H Timer, Self-Evaporation |
9. Warranty and Support
For warranty information and customer support, please refer to the warranty card included with your product or visit the official Acekool website. If you encounter any issues not covered in this manual, please contact Acekool customer service for assistance. Please have your model number (FDP35-3034R3) and purchase details ready when contacting support.


