
Yomile AD001
Yomile 2-in-1 Cordless Air Duster & Mini Car Vacuum User Manual
Model: AD001
Introduction
This manual provides detailed instructions for the Yomile 2-in-1 Cordless Air Duster and Mini Car Vacuum. This versatile device combines powerful air blowing for dust removal with efficient vacuum suction for cleaning various surfaces, making it ideal for electronics, vehicles, and general household use. Please read this manual thoroughly before operating the device to ensure safe and effective use.
Safety Information
Always observe the following safety precautions:
- Read all instructions carefully before using the device.
- Keep the device out of reach of children and pets.
- Do not expose the device to water, excessive moisture, or extreme temperatures.
- Use only the provided USB-C charging cable. Do not use damaged cables or chargers.
- Do not operate the device if it appears damaged or is not functioning correctly.
- Avoid pointing the air outlet directly at eyes, ears, or other sensitive body parts.
- Do not block the air inlet or outlet during operation.
- Do not attempt to disassemble or repair the device yourself. Contact customer support for assistance.
Package Contents

The package includes the Yomile 2-in-1 Cordless Air Duster and Mini Car Vacuum unit along with various attachments and a charging cable. Please verify all items are present:
- Yomile 2-in-1 Cordless Air Duster Unit
- Vacuum Nozzle
- Vacuum Brush
- Multiple Air Blowing Nozzles (e.g., long flat nozzle, brush nozzle)
- USB-C Charging Cable
Product Overview

Familiarize yourself with the main parts of your Yomile 2-in-1 device:
- Air Outlet/Inlet: Used for both blowing and suction functions, depending on the attached nozzle and mode.
- Power Button: Press and hold to turn the device on or off.
- Speed Control Button: Press to cycle through different air duster speeds.
- Dust Collection Cup: Detachable component for collecting debris during vacuuming.
- Charging Port: USB-C port for recharging the internal battery.
- LED Light: Illuminates the cleaning area for better visibility.
Setup
Charging the Device

Before initial use, ensure the device is fully charged to maximize performance and battery life.
- Connect the provided USB-C charging cable to the device's charging port.
- Connect the other end of the cable to a USB power adapter (5V/2A recommended, not included) or a computer USB port.
- The charging indicator light will illuminate to show charging status. A full charge typically takes approximately 3-4 hours.
- Once fully charged, disconnect the charging cable.
Operating Instructions
Attaching Nozzles
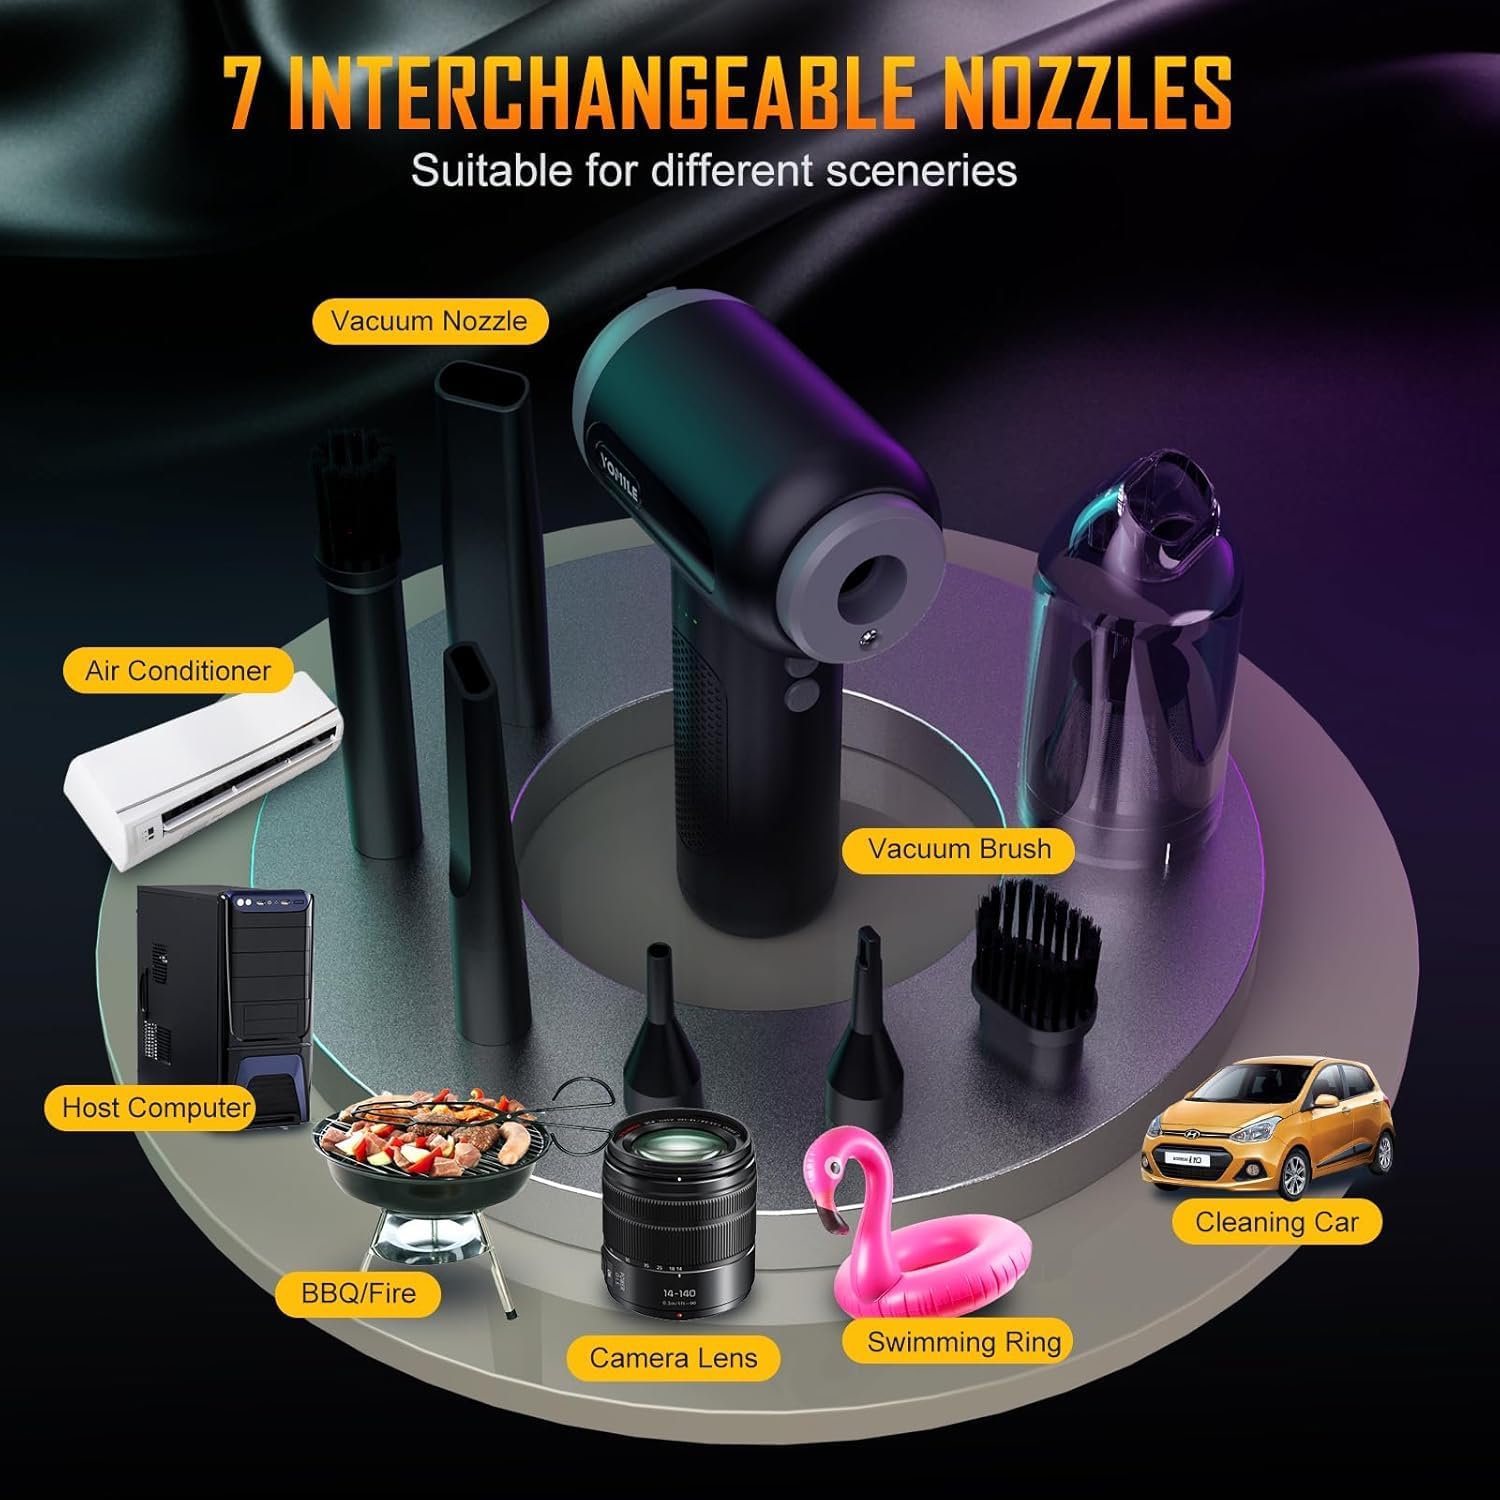
Select the appropriate nozzle for your specific cleaning task and firmly attach it to the designated air outlet for blowing or the vacuum inlet for suction.
Using as an Air Duster

The air duster function is ideal for removing dust, crumbs, and debris from electronics, keyboards, car interiors, and other hard-to-reach areas.
- Attach the desired blowing nozzle to the air outlet.
- Press and hold the power button to turn on the device.
- Press the speed control button to cycle through the 3 available wind speeds:
- 1st Gear: 90,000 RPM
- 2nd Gear: 120,000 RPM
- 3rd Gear: 180,000 RPM
- Direct the powerful airflow towards the area to be cleaned.
- Release the power button to turn off the device.
Using as a Mini Car Vacuum

The vacuum function is suitable for cleaning small debris, pet hair, dust, and crumbs from car seats, sofas, desk surfaces, and other confined spaces.
- Ensure the dust collection cup is securely attached and empty.
- Attach the vacuum nozzle or vacuum brush to the vacuum inlet.
- Press and hold the power button to turn on the device. The device will automatically operate in vacuum mode.
- Move the nozzle over the surface to be cleaned to suction up debris.
- Release the power button to turn off the device.
Maintenance
Emptying the Dust Collection Cup
Regularly empty the dust collection cup to maintain optimal suction performance and prevent clogging.
- Ensure the device is turned off.
- Twist and detach the dust collection cup from the main unit.
- Empty the collected debris into a waste bin.
- Clean the filter inside the cup if necessary by gently tapping out dust or rinsing with water (ensure it is completely dry before reattaching).
- Reattach the dust collection cup securely to the main unit.
Cleaning the Device
Wipe the exterior of the device with a soft, dry cloth. Do not use harsh chemicals, abrasive cleaners, or immerse the device in water.
Troubleshooting
| Problem | Possible Cause | Solution |
|---|---|---|
| Device does not turn on | Low battery | Charge the device fully. |
| Device does not turn on | Power button not pressed correctly | Press and hold the power button firmly for 2-3 seconds. |
| Weak airflow/suction | Low battery | Charge the device. |
| Weak airflow/suction | Dust cup full or filter clogged | Empty the dust cup and clean the filter. |
| Weak airflow/suction | Nozzle not properly attached | Ensure the nozzle is securely attached to the correct port. |
| Device overheats | Prolonged continuous use | Turn off the device and allow it to cool down for at least 15 minutes before resuming use. |
Specifications

- Model: AD001
- Brand: Yomile
- Max Air Duster Speed: 180,000 RPM (3 adjustable gears)
- Vacuum Suction Power: Up to 15,000 Pa (15Kpa)
- Battery Capacity: 9000mAh Lithium Ion
- Charging Time: Approximately 3-4 hours
- Continuous Working Time: Up to 40 minutes (Air Duster), Up to 30 minutes (Vacuum)
- Dimensions: 6.3 x 3.9 x 2.6 inches
- Weight: 1.1 lbs (0.66 kg)
- Input: 5V/2A (USB-C)
- UPC: 607609064664
Warranty and Support

Yomile is committed to providing high-quality products and excellent customer service. This product comes with a 24-month after-sale service.
For any inquiries, technical support, or warranty claims, please do not hesitate to contact Yomile customer service. Our support team is available 7 days a week, 24 hours a day to assist you.
For further assistance, please visit the official Yomile website or contact their customer support team directly through the platform where you purchased the product.
Ask a question about this manual
Ask about setup, troubleshooting, compatibility, parts, safety, or missing instructions. Manuals+ will review the question and use this page’s manual context to help answer it.