1. Introduction
This manual provides essential information for the safe and effective operation of your GROVIEW Native 1080P Bluetooth Projector. Please read it thoroughly before use and retain it for future reference. This projector is designed to deliver a high-quality visual experience for home theater, gaming, and presentations.
2. Safety Information
- Power Supply: Use only the specified power adapter. Ensure the voltage matches your local power supply.
- Ventilation: Do not block ventilation openings. Ensure adequate airflow around the projector to prevent overheating.
- Heat: The projector lamp generates heat. Avoid touching the lens or vents during operation.
- Moisture: Do not expose the projector to rain, moisture, or immerse it in water.
- Cleaning: Disconnect power before cleaning. Use a soft, dry cloth. Do not use liquid or aerosol cleaners.
- Placement: Place the projector on a stable, flat surface. Avoid placing it in direct sunlight or near heat sources.
- Eye Protection: Do not look directly into the projector lens when the lamp is on, as the bright light can cause eye strain or damage.
3. Package Contents
Verify that all items are present in your package:
- GROVIEW Mini Projector
- User Manual
- Remote Control
- HDMI Cable
- Cleaning Kit
4. Product Overview
4.1 Projector Components
Familiarize yourself with the main parts of your projector.

4.2 Input/Output Ports
The projector features various ports for connecting external devices.

- HDMI Port: Connects to devices such as laptops, gaming consoles (PS5, Xbox), TV sticks, and Blu-ray players.
- USB Ports (USB1, USB2): For connecting USB drives to play media files.
- Audio Out (3.5mm): Connects to external speakers or headphones.
- Power Input: Connects the power adapter.
5. Setup
5.1 Initial Placement
Place the projector on a stable surface. Ensure the projector lens is facing the projection surface (wall or screen). For optimal image quality, position the projector perpendicular to the screen.
5.2 Power Connection
- Connect the power adapter to the projector's power input port.
- Plug the power adapter into a power outlet.
- The power indicator light on the projector will illuminate.
6. Operating Instructions
6.1 Power On/Off
- Power On: Press the power button on the projector or the remote control. The projector will start up, and the lamp will turn on.
- Power Off: Press the power button again. Confirm shutdown if prompted. Allow the fan to run briefly to cool down the lamp before completely disconnecting power.
6.2 Menu Navigation
Use the arrow buttons on the projector or remote control to navigate through the on-screen menu. The 'OK' or 'Enter' button confirms selections, and the 'Back' or 'Exit' button returns to the previous menu.
7. Connectivity
7.1 HDMI Connection
Connect your HDMI-enabled device (e.g., laptop, game console, streaming stick) to the projector's HDMI port using the provided HDMI cable. Select the corresponding HDMI input source from the projector's input menu.
7.2 USB Media Playback
Insert a USB flash drive into one of the projector's USB ports. Navigate to the media player function in the projector's menu to browse and play supported video, audio, or image files.
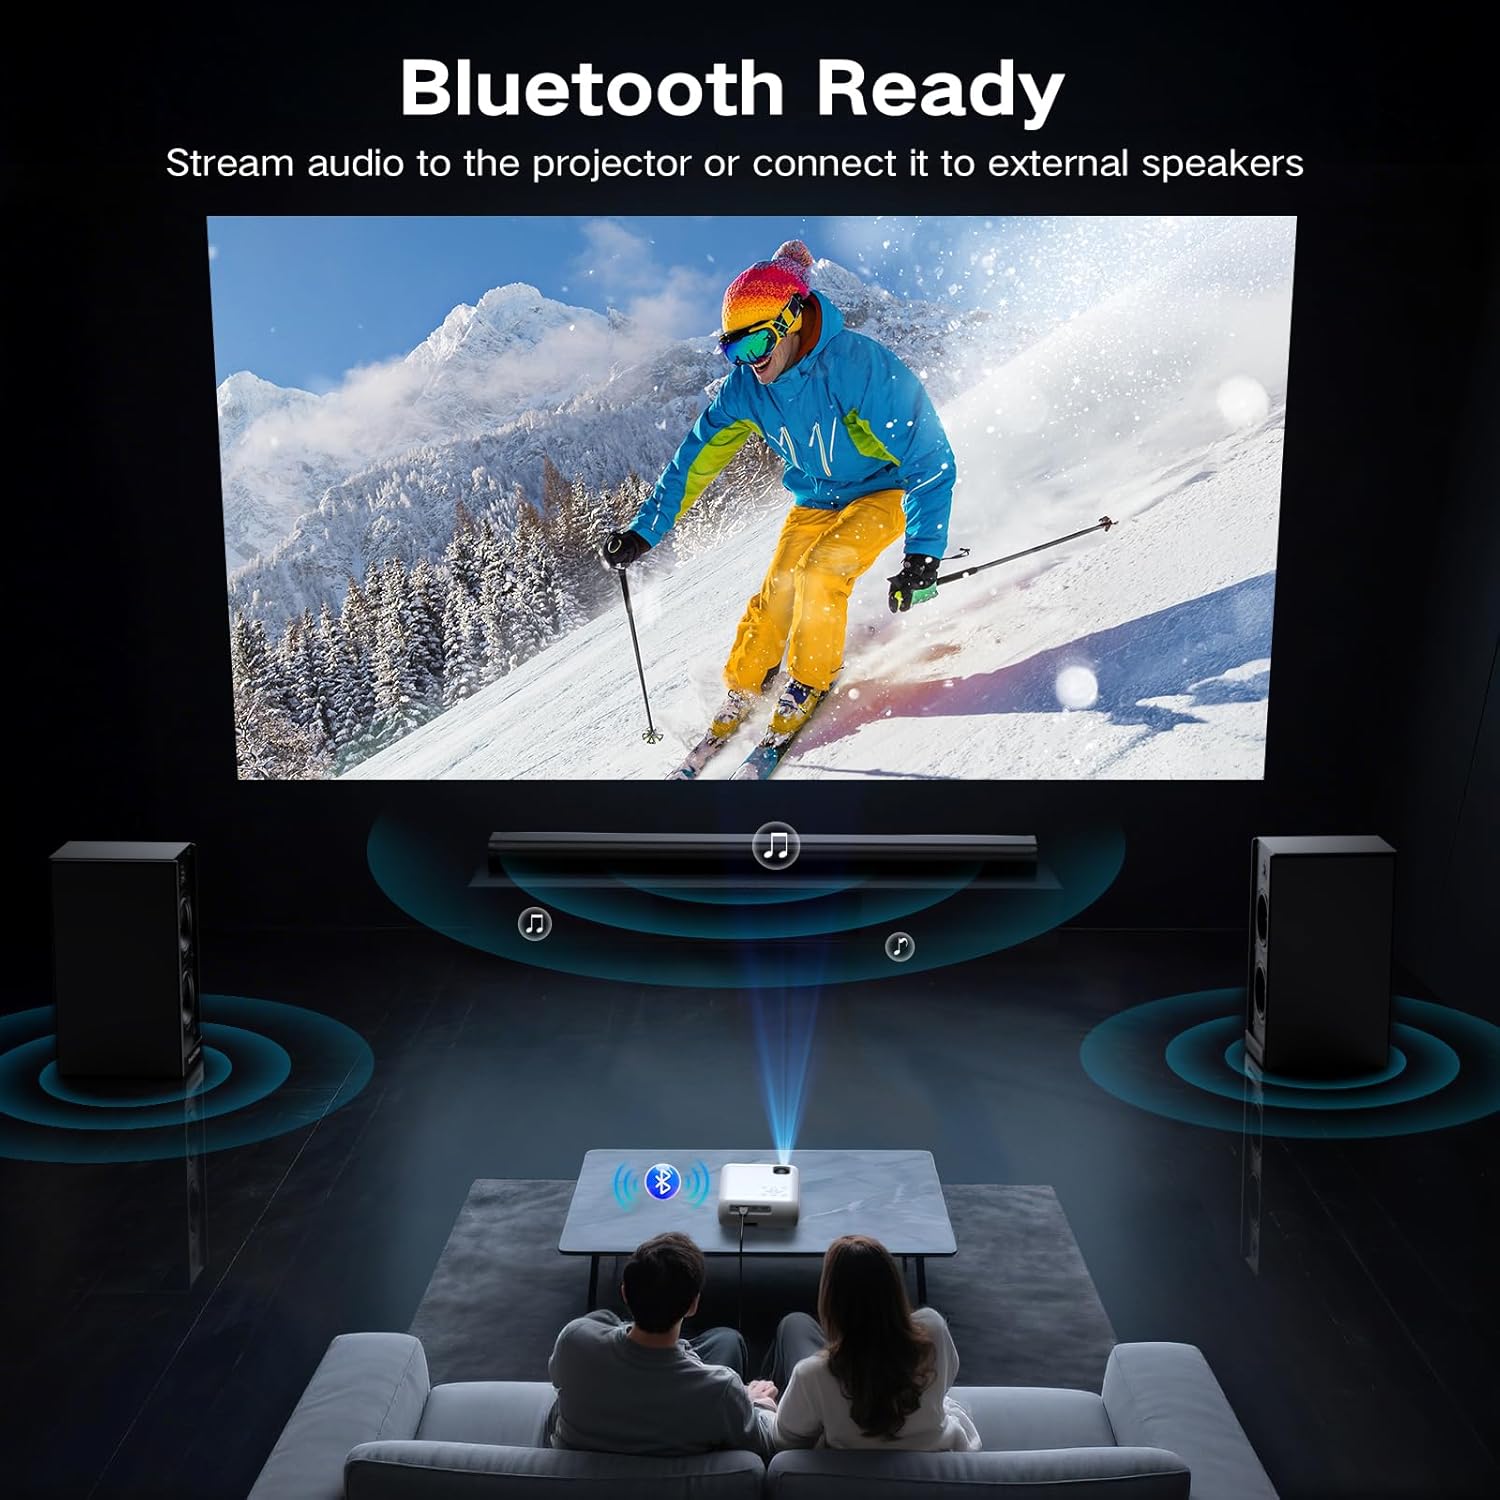
7.3 Bluetooth Connection (Audio)
The projector supports Bluetooth 5.0 for connecting to external Bluetooth speakers or headphones. This allows for enhanced audio output.

- Enable Bluetooth on your external audio device and set it to pairing mode.
- On the projector, navigate to the Bluetooth settings menu.
- Select your audio device from the list of available devices to pair.
7.4 Smartphone Connection
To connect a smartphone, an additional adapter (not included) is required:

- For Android Phones: Use a Micro USB/Type C to HDMI cable.
- For iPhones: Use a Lightning to HDMI cable.
Connect the adapter to your phone and then to the projector's HDMI port. Select the HDMI input source.
8. Image Adjustment
8.1 Focus Adjustment
Rotate the focus ring on the projector lens until the projected image appears sharp and clear. This is a manual adjustment.
8.2 Digital Vertical Keystone Correction
The projector features digital vertical keystone correction to adjust image distortion when the projector is not perfectly perpendicular to the screen. This helps achieve a rectangular image.
Access the keystone settings in the projector's menu and use the arrow buttons to adjust the vertical angle until the image is properly aligned.
8.3 Zoom Function
The projector includes a digital zoom function, allowing you to reduce the size of the projected image without moving the projector. Access this feature in the display settings menu.
9. Audio Settings
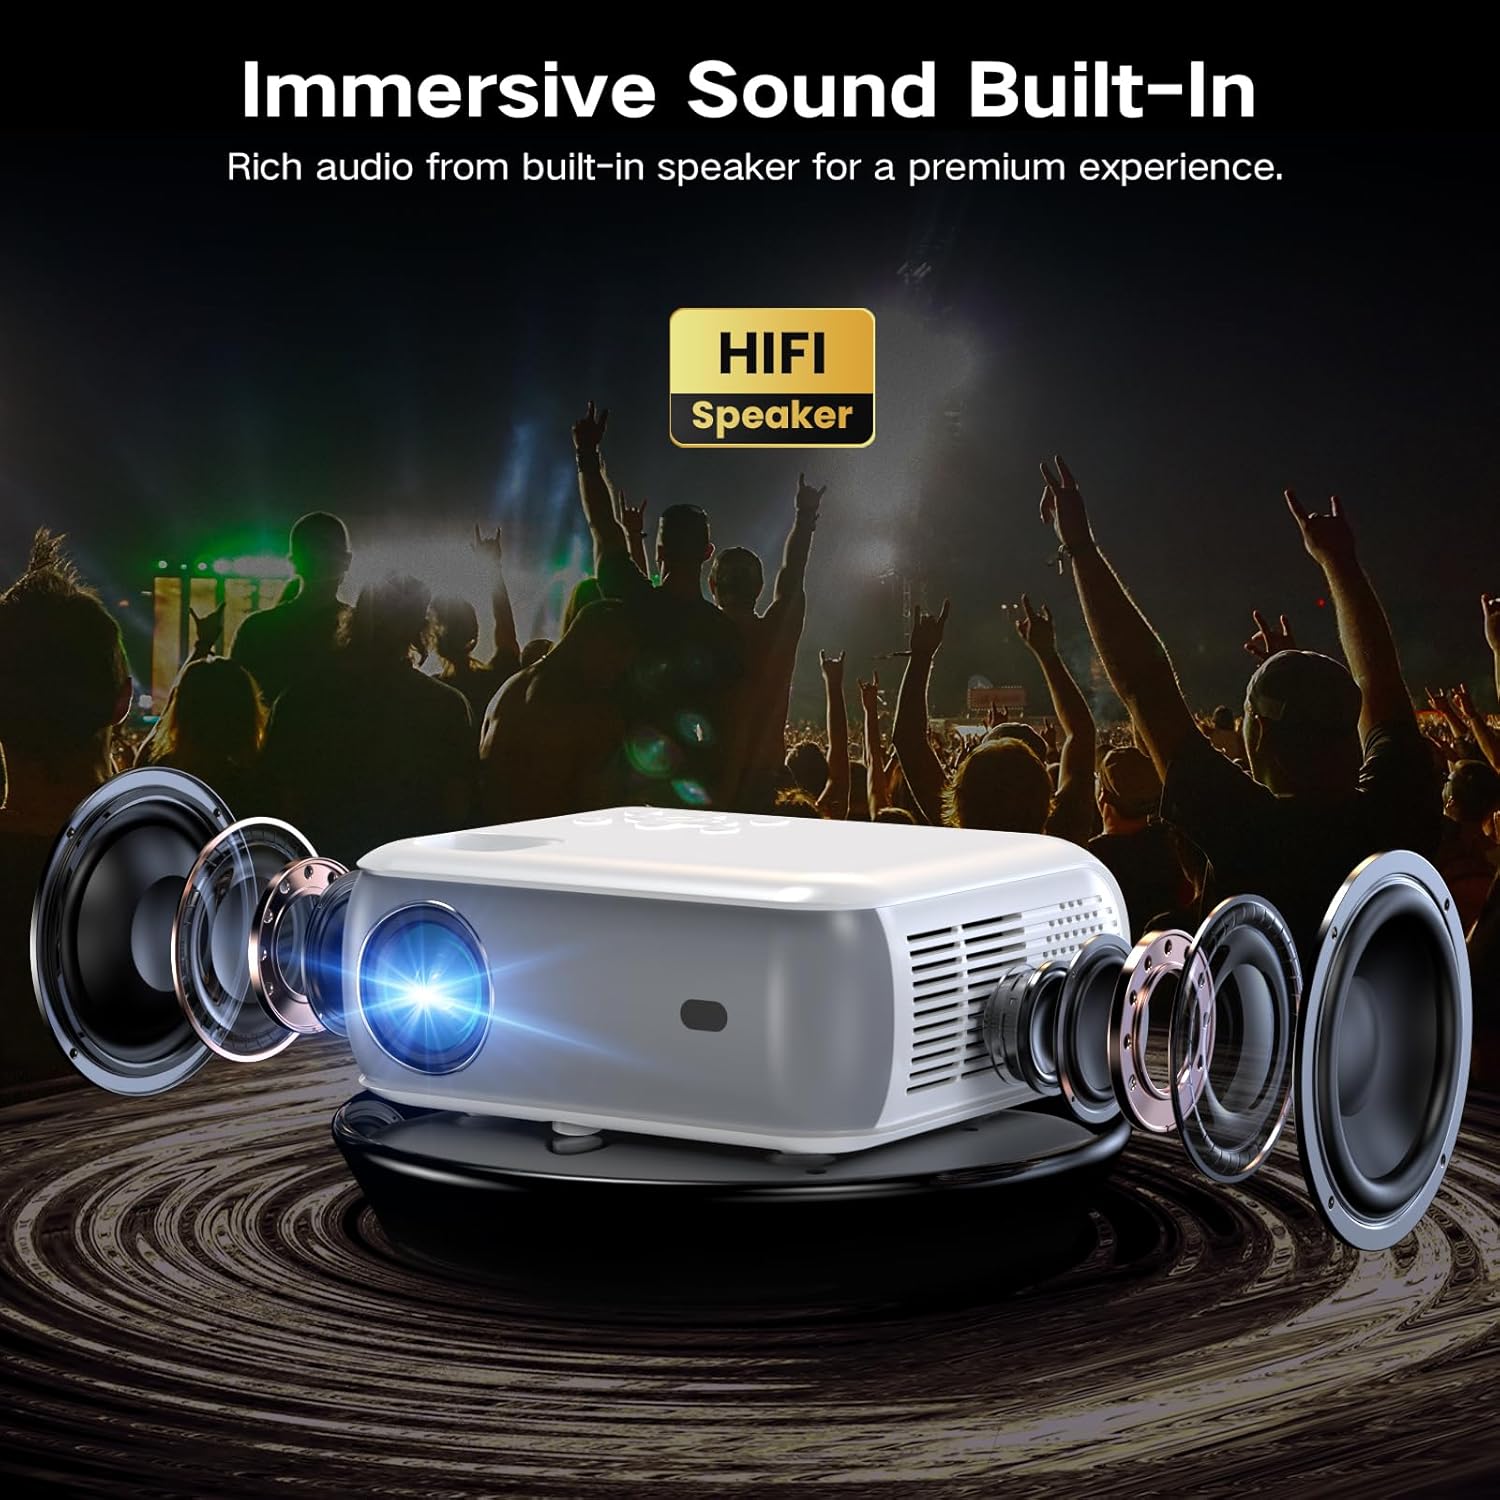
The projector has built-in HiFi stereo speakers for direct audio output. You can adjust the volume using the remote control or the projector's control panel. For a more immersive experience, connect external speakers via the 3.5mm audio out port or Bluetooth (see Section 7.3).
10. Maintenance
10.1 Cleaning the Lens
Use a soft, lint-free cloth specifically designed for optical lenses. Gently wipe the lens in a circular motion. Avoid using abrasive materials or harsh chemicals.
10.2 Cleaning the Projector Body
Wipe the exterior of the projector with a soft, dry cloth. For stubborn marks, a slightly damp cloth can be used, followed by a dry cloth. Ensure no liquid enters the ventilation openings.
10.3 Air Filter Cleaning (if applicable)
Refer to the specific model's design for air filter maintenance. If an accessible air filter is present, clean it regularly to ensure proper ventilation and prevent dust buildup.
10.4 Storage
When not in use for extended periods, store the projector in a cool, dry, dust-free environment. Use the original packaging or a protective case to prevent damage.
11. Troubleshooting
| Problem | Possible Cause | Solution |
|---|---|---|
| No image projected | Power not connected; Incorrect input source; Device not connected properly | Check power cable; Select correct HDMI/USB input; Ensure source device is on and connected. |
| Image is blurry | Focus not adjusted; Projector too far/close; Lens dirty | Adjust the focus ring; Reposition projector; Clean the lens. |
| Image is distorted (trapezoid shape) | Projector not perpendicular to screen; Keystone not adjusted | Adjust Digital Vertical Keystone Correction in settings. Try to position the projector as straight as possible. |
| No sound | Volume too low; Muted; Incorrect audio output selected; Bluetooth not paired | Increase volume; Unmute; Check audio settings; Re-pair Bluetooth device. |
| Fan noise is loud | Normal operation; Blocked vents | Ensure proper ventilation; Fan noise is typical for projectors. |
| Remote control not working | Batteries low/dead; Obstruction between remote and projector | Replace batteries; Ensure clear line of sight to the IR receiver. |
12. Specifications
| Feature | Specification |
|---|---|
| Brand | Groview |
| Model | Native 1080P Bluetooth Projector |
| Display Resolution | 1920 x 1080 (Native 1080P) |
| Brightness | 400 ANSI Lumens |
| Connectivity Technology | HDMI, USB, Bluetooth 5.0 |
| Special Features | Digital Keystone Correction, Two-way Bluetooth, Zoom |
| Recommended Uses | Home Cinema, Gaming, Business, Education |
| Product Dimensions | 7.13 x 6.33 x 3.15 inches |
| Item Weight | 1.9 pounds |
| Built-in Speaker | Yes (HiFi Stereo) |
| Max Display Size | Up to 200 inches |
13. Warranty and Support
The GROVIEW Native 1080P Bluetooth Projector comes with a 2-year customer service and replacement policy. For any technical assistance, warranty claims, or support inquiries, please contact GROVIEW customer service through the retailer where the product was purchased or visit the official GROVIEW website for contact information.
Please retain your proof of purchase for warranty validation.


