1. Introduction
This manual provides detailed instructions for the setup, operation, maintenance, and troubleshooting of your BOSGAME P3 Mini PC. Please read this manual thoroughly before using the device to ensure optimal performance and longevity.

Image 1.1: The BOSGAME P3 Mini PC, a compact desktop computer.
2. What's in the Box
Verify that all items are present in the package:
- 1 × BOSGAME P3 Mini PC
- 1 × HDMI Cable
- 1 × Power Adapter
- 1 × VESA Mount & Screws
- 1 × User Manual (this document)

Image 2.1: Contents of the BOSGAME P3 Mini PC package, including the mini PC, HDMI cable, power adapter, VESA mount, and user manual.
3. Product Overview
3.1. Key Features
- Processor: AMD Ryzen 7 6800H (8 Cores, 16 Threads, up to 4.7GHz)
- Graphics: AMD Radeon 680M GPU (1900MHz)
- Memory: 32GB (16GB x2) Dual-channel DDR5 4800MHz RAM (expandable to 64GB)
- Storage: 1TB M.2 2280 PCIe 4.0 SSD (expandable to 4TB)
- Display Output: Triple display support via 1x HDMI 2.0, 1x DisplayPort, and 1x USB4 (8K@60Hz)
- Network: Dual 2.5G LAN, WiFi 6E
- Wireless: Bluetooth 5.2
- USB Ports: USB4 port with PD 3.0 (up to 100W), USB 3.2 Gen2 10Gbps, USB 2.0 480Mbps

Image 3.1: Front view of the BOSGAME P3 Mini PC highlighting its compact size and key specifications like AMD Ryzen 7 6800H, DDR5 RAM, NVMe SSD, triple screen support, Radeon Graphics, Wi-Fi 6E, Bluetooth 5.2, and 2.5G RJ45 LAN.
3.2. Ports and Interfaces
The BOSGAME P3 Mini PC features a variety of ports for connectivity:
- Front Panel: Power button, Audio Jack, USB4 (Full-featured, PD 3.0), 2x USB 3.2 Gen2 10Gbps
- Rear Panel: DC power input, 2x RJ45 2.5G LAN, HDMI 2.0, DisplayPort, 2x USB 2.0

Image 3.2: Detailed view of the front and rear interfaces of the BOSGAME P3 Mini PC, showing USB ports, audio jack, power button, DC input, LAN ports, HDMI, and DisplayPort.
3.3. Internal Components
The Mini PC is equipped with high-performance components for efficient operation:
- Memory: Two SODIMM slots for DDR5 4800MHz RAM.
- Storage: One M.2 2280 NVMe PCIe 4.0 SSD slot.

Image 3.3: Internal view showing the SODIMM DDR5 4800MHz memory modules and the M.2 2280 NVMe PCIe 4.0 SSD slot.
3.4. Heat Dissipation and Noise
The BOSGAME P3 Mini PC incorporates an efficient cooling system to maintain optimal operating temperatures and minimize noise.

Image 3.4: Diagram illustrating the highly efficient heat dissipation system with a cooling fan and heat conduits.
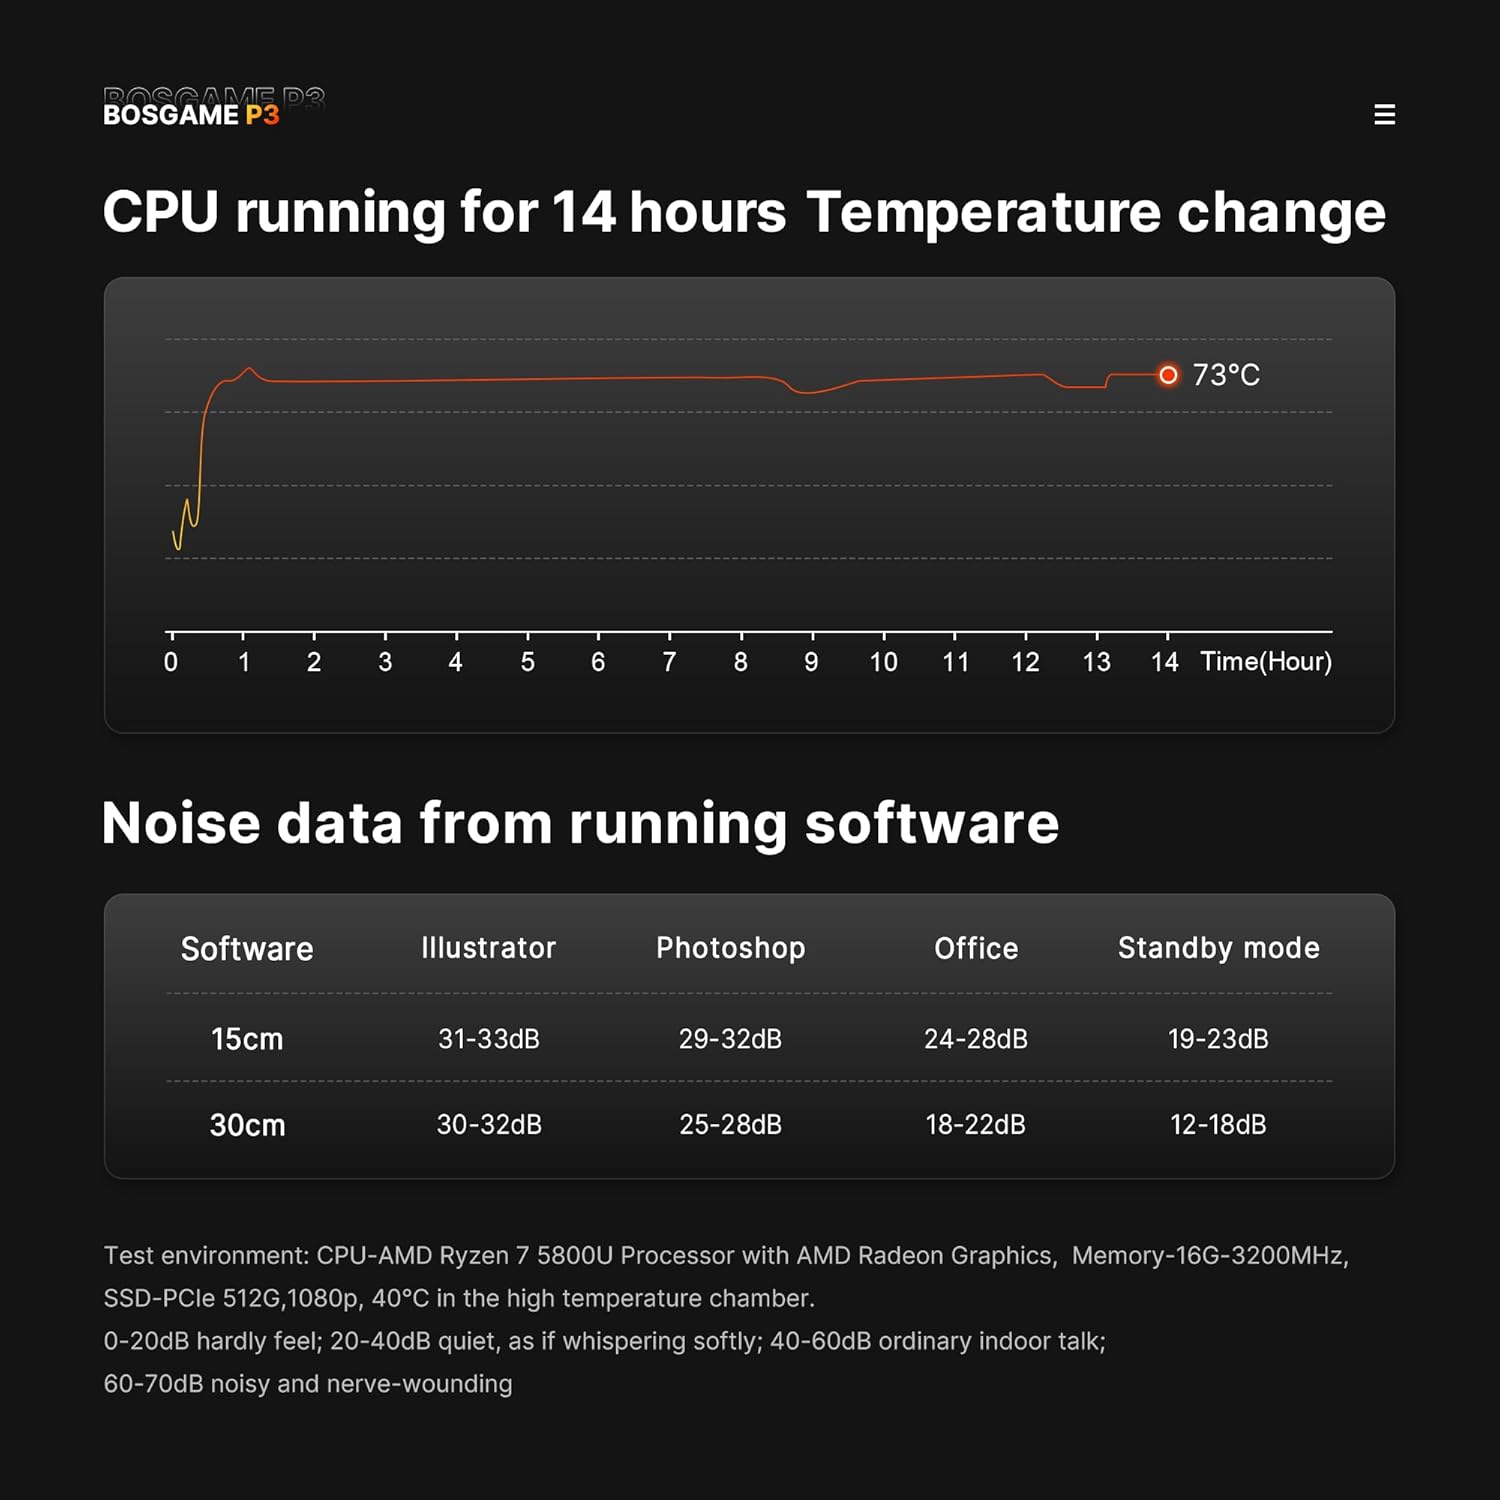
Image 3.5: Graphs showing CPU temperature change over 14 hours and noise levels (dB) during various software operations, indicating quiet performance.
4. Setup Guide
4.1. Connecting Peripherals
- Connect Display: Connect your monitor(s) to the HDMI, DisplayPort, or USB4 port using appropriate cables. The device supports up to three displays simultaneously.
- Connect Keyboard and Mouse: Plug your USB keyboard and mouse into the available USB ports.
- Connect Network (Optional): For a wired internet connection, connect an Ethernet cable from your router or modem to one of the 2.5G LAN ports.
- Connect Power: Plug the power adapter into the DC input port on the rear of the Mini PC, then plug the adapter into a power outlet. Alternatively, use a compatible USB-C PD 3.0 power source (up to 100W) with the front USB4 port for power.
4.2. Initial Power On
- Press the power button on the front panel of the Mini PC. The power indicator light will illuminate.
- Follow the on-screen instructions to complete the operating system setup (e.g., Windows 11 Pro).
Video 4.1: An overview of the BOSGAME P3 Mini PC, demonstrating its compact size, internal components, connectivity options, and multi-display capabilities. This video provides a visual guide to the product's features and potential uses.
5. Operating Instructions
5.1. Power On/Off
- To Power On: Press the power button once.
- To Shut Down: Click the Start menu in your operating system and select 'Power' > 'Shut down'.
- To Force Shut Down: Press and hold the power button for approximately 5-7 seconds until the device powers off. Use this only if the system is unresponsive.
5.2. Display Configuration
The Mini PC supports triple display output. To configure multiple displays:
- Connect all desired monitors to the available HDMI, DisplayPort, and USB4 ports.
- In Windows, right-click on the desktop and select 'Display settings'.
- Arrange your displays, set resolutions, and choose display modes (e.g., Extend, Duplicate) as needed.
5.3. Network Connectivity
- Wired Connection: Ensure an Ethernet cable is connected to a 2.5G LAN port. The system should automatically detect the connection.
- Wireless Connection (Wi-Fi 6E): In Windows, click the network icon in the taskbar, select your Wi-Fi network, enter the password, and connect.
- Bluetooth 5.2: To pair Bluetooth devices, go to Windows Settings > Devices > Bluetooth & other devices, and follow the instructions to add a new device.
6. Maintenance
6.1. Cleaning
- Regularly clean the exterior of the Mini PC with a soft, dry cloth.
- Use compressed air to gently clear dust from the ventilation grilles to ensure proper airflow and heat dissipation. Do not insert objects into the vents.
6.2. Software Updates
Keep your operating system and drivers updated to ensure optimal performance and security. Check for updates regularly through your operating system's settings.
6.3. Storage Management
Periodically check your SSD storage usage and delete unnecessary files to maintain system speed. Consider external storage solutions for large data archives.
7. Troubleshooting
7.1. No Power
- Ensure the power adapter is securely connected to both the Mini PC and a working power outlet.
- Test the power outlet with another device to confirm it is functional.
- If using a USB-C PD power source, ensure it meets the 100W requirement and is connected to the correct USB4 port.
7.2. No Display Output
- Verify that the monitor is powered on and set to the correct input source (HDMI, DisplayPort, or USB-C).
- Check that the display cables are securely connected to both the Mini PC and the monitor.
- Try connecting to a different display port or using a different cable to rule out faulty components.
7.3. Network Connectivity Issues
- Wired: Ensure the Ethernet cable is properly connected and your router/modem is working. Check network adapter settings in the operating system.
- Wireless: Verify Wi-Fi is enabled and you are connecting to the correct network with the correct password. Restart your router/modem.
7.4. System Performance Issues
- Close unnecessary applications running in the background.
- Ensure the system has adequate ventilation and is not overheating.
- Run a disk cleanup and defragmentation (if applicable) or check SSD health.
- Update drivers and operating system.
8. Specifications
| Feature | Specification |
|---|---|
| Processor | AMD Ryzen 7 6800H (8 Cores, 16 Threads, up to 4.7GHz) |
| Graphics | AMD Radeon 680M (Integrated Graphics) |
| RAM | 32GB DDR5 4800MHz (2x16GB, expandable to 64GB) |
| Storage | 1TB M.2 2280 PCIe 4.0 SSD (expandable to 4TB) |
| Operating System | Windows 11 Pro |
| Display Output | 1x HDMI 2.0 (4K@60Hz), 1x DisplayPort (4K@60Hz), 1x USB4 (8K@60Hz) |
| Network | Dual 2.5G RJ45 LAN, WiFi 6E |
| Wireless | Bluetooth 5.2 |
| USB Ports | 1x USB4 (Full-featured, PD 3.0), 2x USB 3.2 Gen2 10Gbps, 2x USB 2.0 |
| Item Weight | 2.6 pounds |
| Package Dimensions | 6.5 x 4.92 x 4.17 inches |
9. Warranty and Support
BOSGAME provides a 1-year professional factory support warranty for this product. Additionally, free and reliable lifetime after-sales service is available, along with 24/7 online customer service.
For technical assistance, warranty claims, or any inquiries, please contact BOSGAME customer support through the official channels provided at the time of purchase or visit the BOSGAME Store on Amazon.
All products have FCC, ROHS, and CE certifications.


