1. Introduction
Thank you for choosing the BEGWVDJTP T3 Plus Mini Vacuum Tube Preamplifier. This device is designed to enhance your audio experience by providing both MM/MC phono preamplification and a desktop headphone amplifier. This manual provides essential information for safe operation, setup, and maintenance of your T3 Plus.
2. Safety Information
- Always ensure the power supply is disconnected before making any connections or disconnections.
- Do not expose the unit to water, moisture, or extreme temperatures.
- Avoid placing the unit in direct sunlight or near heat sources.
- Handle vacuum tubes with care. They can become hot during operation.
- Do not attempt to open the casing or modify the unit. Refer all servicing to qualified personnel.
- Use only the provided power adapter or a compatible replacement with the correct voltage (DC 12V).
3. Package Contents
Please check the package for the following items:
- 1x T3-PLUS Preamplifier
- 1x 3.5mm to RCA Cable
- 1x DC 12V Power Adapter (not explicitly listed but implied by 'Working voltage: DC12V' and standard practice)
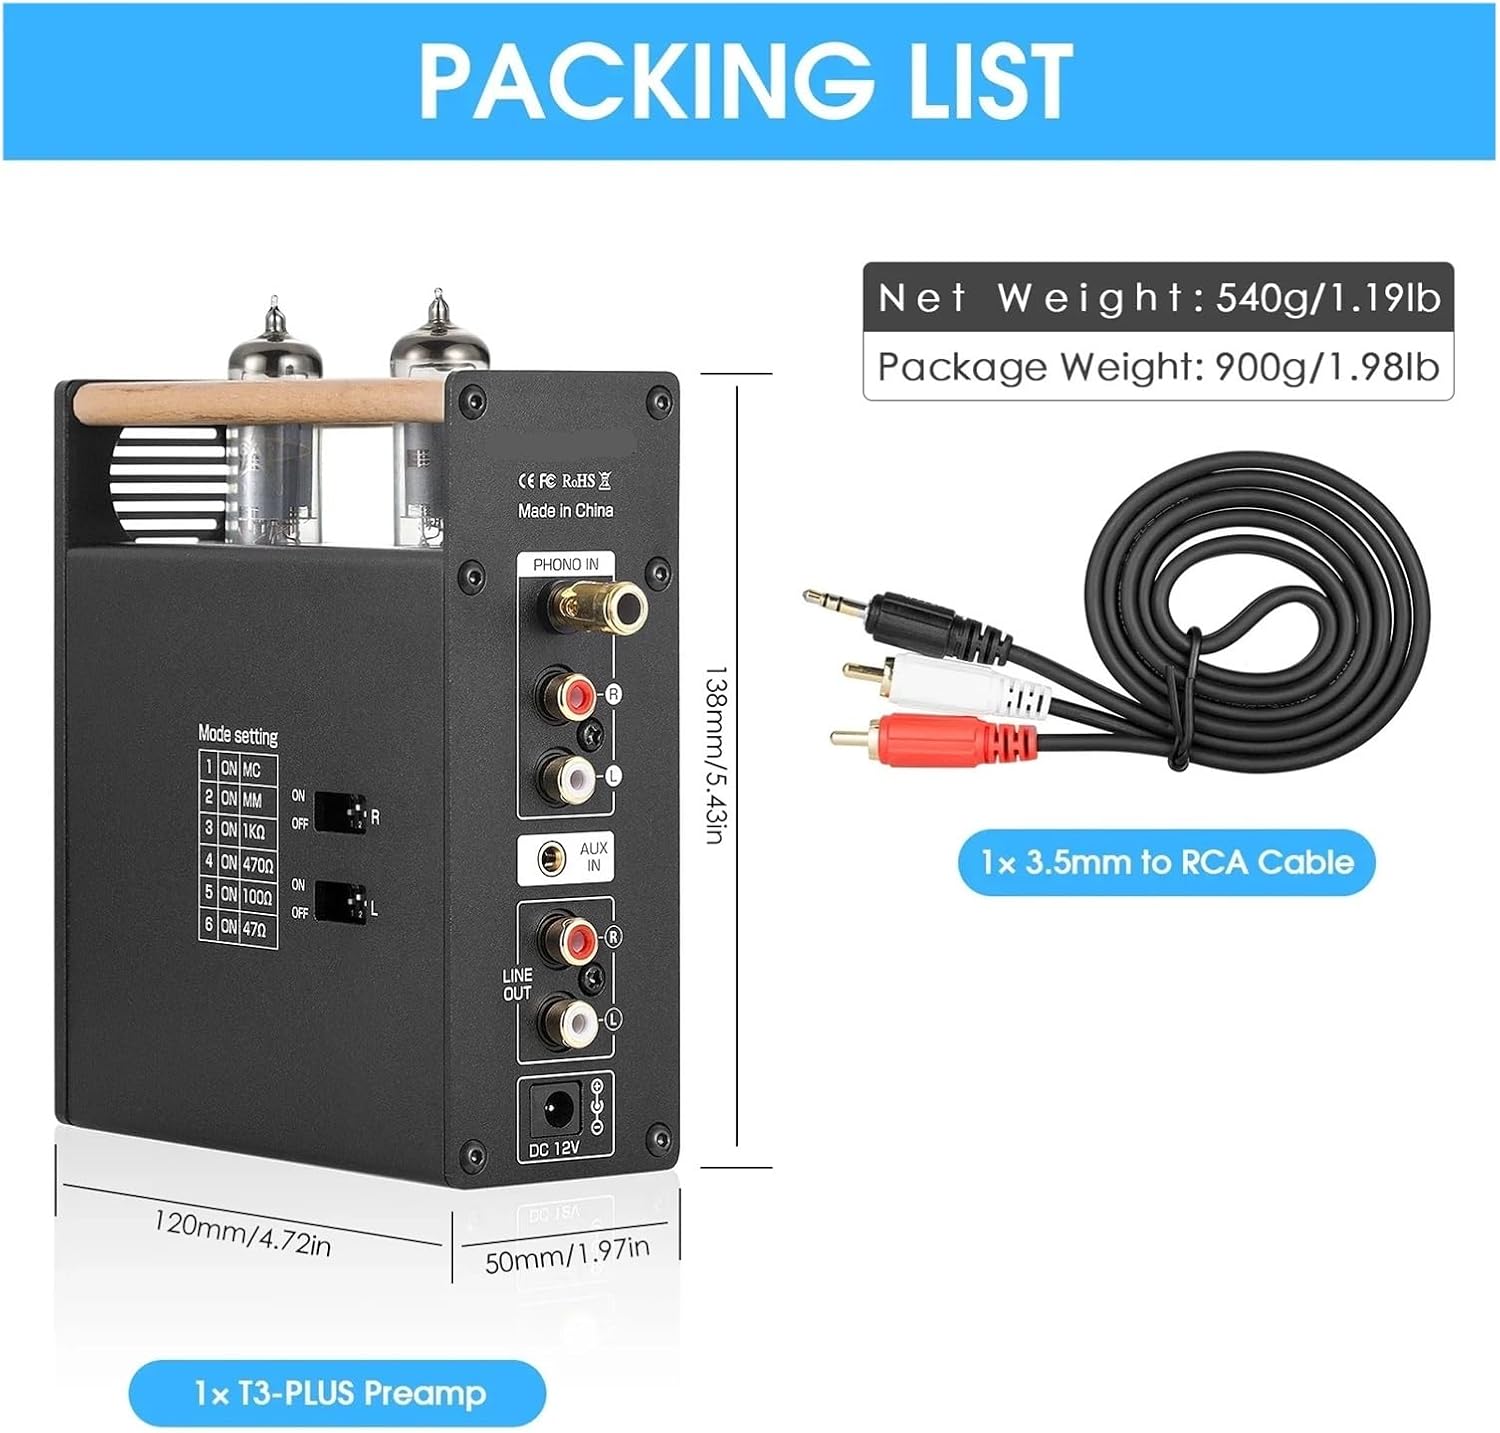
Image 3.1: Contents of the T3 Plus package, including the preamplifier and a 3.5mm to RCA cable. The image also shows the dimensions of the unit.
4. Product Overview
4.1 Front Panel

Image 4.1: Front panel of the T3 Plus, showing the volume knob with integrated power switch and the 3.5mm headphone output jack.
- Volume Knob / Power Switch: Rotates to adjust volume. Press to power on/off.
- 3.5mm Headphone Jack: Connects to headphones for audio output.
4.2 Rear Panel

Image 4.2: Rear panel of the T3 Plus, detailing the Phono Input, AUX Input, Line Out, and DC 12V power input.
- PHONO IN (RCA): Connects to a turntable for MM/MC phono input. Includes a ground terminal.
- AUX IN (3.5mm): Connects to external audio sources like smartphones or computers.
- LINE OUT (RCA): Connects to an amplifier or active speakers.
- DC 12V IN: Power input for the unit.
4.3 Side Panel (Mode Settings)

Image 4.3: Side panel of the T3 Plus, showing the DIP switches for configuring MM/MC mode and impedance settings.
- Mode Setting DIP Switches: Configures the input type (MM/MC) and impedance for the phono input.
5. Setup and Connections
5.1 Power Connection
- Connect the DC 12V power adapter to the 'DC 12V IN' port on the rear panel.
- Plug the power adapter into a wall outlet.
5.2 Audio Input Connection
The T3 Plus supports two types of audio input: 3.5mm AUX and Phono (MM/MC). Note: 3.5mm AUX input is preferred. If you need phono input, please ensure the AUX cable is unplugged.
5.2.1 3.5mm AUX Input
- Connect a 3.5mm audio cable from your audio source (e.g., smartphone, computer) to the 'AUX IN' port on the rear panel.
5.2.2 Phono Input (Turntable)
- Connect the RCA cables from your turntable to the 'PHONO IN' (RCA L/R) ports on the rear panel.
- Connect the ground wire from your turntable to the ground terminal next to the 'PHONO IN' ports.
- Configure Phono Mode Settings: Use the DIP switches on the side panel to match your turntable's cartridge type (MM or MC) and impedance. Refer to Image 4.3 and the table below for settings.
| Switch No. | Function | ON Position | OFF Position |
|---|---|---|---|
| 1 | MC Mode | MC Enabled | MC Disabled |
| 2 | MM Mode | MM Enabled | MM Disabled |
| 3 | 1kΩ Impedance | Enabled | Disabled |
| 4 | 470Ω Impedance | Enabled | Disabled |
| 5 | 100Ω Impedance | Enabled | Disabled |
| 6 | 47Ω Impedance | Enabled | Disabled |
Consult your turntable's manual for the recommended cartridge type (MM/MC) and impedance settings.
5.3 Audio Output Connection
The T3 Plus offers two simultaneous audio outputs: Stereo RCA Line Out and 3.5mm Headphone Jack.
5.3.1 Line Out (RCA)
- Connect RCA cables from the 'LINE OUT' (RCA L/R) ports on the rear panel to your amplifier, active speakers, or other audio receiving device.
5.3.2 Headphone Output
- Connect your headphones to the 3.5mm headphone jack on the front panel.
6. Operating Instructions
6.1 Powering On/Off
- To power on the unit, press the volume knob on the front panel. The vacuum tubes will begin to glow.
- To power off, press the volume knob again.
6.2 Volume Control
- Rotate the volume knob clockwise to increase the output volume.
- Rotate the volume knob counter-clockwise to decrease the output volume.
6.3 Input Selection
The T3 Plus automatically prioritizes the 3.5mm AUX input. If an AUX cable is connected, it will override the Phono input. To use the Phono input, ensure no cable is connected to the 3.5mm AUX IN port.
7. Maintenance
7.1 Cleaning
- Wipe the unit with a soft, dry cloth. Do not use liquid cleaners or abrasive materials.
- Ensure the unit is powered off and unplugged before cleaning.
7.2 Vacuum Tube Replacement
The vacuum tubes are user-replaceable. If you experience degraded sound quality or tube failure, you may replace them. The product description mentions an option to upgrade to GE5654 tubes. Ensure the unit is powered off and cooled down before attempting to replace tubes. Gently pull the old tubes straight up and carefully insert new ones, aligning the pins correctly.
8. Troubleshooting
- No Power: Ensure the power adapter is securely connected to both the unit and the wall outlet. Try a different outlet.
- No Sound:
- Check all audio cable connections.
- Verify the correct input is selected (AUX cable unplugged for Phono input).
- Increase the volume on the T3 Plus and your connected amplifier/headphones.
- Ensure your source device is playing audio.
- Distorted Sound:
- Reduce the volume from the source or the T3 Plus.
- For Phono input, verify the MM/MC and impedance settings match your cartridge.
- Check for damaged cables.
- Humming/Noise:
- Ensure the turntable's ground wire is properly connected to the T3 Plus.
- Try moving the unit away from other electronic devices that may cause interference.
- Check for loose connections.
9. Specifications
| Parameter | Value |
|---|---|
| Audio Input | Phono/Record player, 3.5mm AUX |
| Audio Output | Stereo RCA, 3.5mm Headphone Jack |
| Working Voltage | DC 12V |
| Dimensions (W*D*H) | 50*120*138 mm / 1.97*4.72*5.43 in |
| Item Weight | 1.76 ounces (unit only) |
| Package Dimensions | 1.18 x 0.79 x 0.39 inches (Note: This seems incorrect for the full package, likely product dimensions) |
| Parameter | Value |
|---|---|
| AUX Input Level | 1V |
| Maximum Output Level | 2V |
| Frequency Response | -1dB (20Hz-20KHz) |
| Total Harmonic Distortion | 0.01% |
| Signal-to-Noise Ratio | 100dB |
| Parameter | Value |
|---|---|
| Phono Input Level | 0.005V |
| Maximum Output Level | 530mW (MM) / 5V (MC) |
| Total Harmonic Distortion | 0.2% |
| Signal-to-Noise Ratio | 89dB |
| Parameter | Value |
|---|---|
| Headphone Output Power | 130mW@32Ω |
| Matching Headphone Impedance | 32-300Ω |
10. Warranty and Support
Specific warranty and support information for the BEGWVDJTP T3 Plus is not provided in the available product data. Please refer to the seller or manufacturer's website for details regarding warranty coverage, technical support, and service options.


