1. Introduction
This manual provides detailed instructions for the installation, operation, and maintenance of your DASAN AT249W-ORB Wall Mount Shower System. Please read this manual thoroughly before installation and retain it for future reference. Proper installation and care will ensure optimal performance and longevity of your shower system.
2. Safety Information
- Always turn off the main water supply before beginning any plumbing work.
- Wear appropriate personal protective equipment, such as safety glasses and gloves.
- If you are unsure about any part of the installation process, consult a qualified plumber.
- Ensure all connections are secure to prevent leaks.
- Do not overtighten components, as this may cause damage.
3. Package Contents
Verify that all components are present and undamaged before installation. If any parts are missing or damaged, please contact customer support.

Image: Exploded view of the DASAN AT249W-ORB shower system components.
- Shower Head
- Face Plate
- Rough-in Valve
- Shower Arm
- Handheld Wand
- Wall Supply Elbow
- Body Jets (4 units)
- Shower Handle
- Mounting Hardware
- Diverter Knob
- Flange for Handheld
- Shower Hose (59 inches)
- Flange for Shower Arm
4. Specifications
| Feature | Specification |
|---|---|
| Brand | Dasan |
| Model Number | AT249W-ORB |
| Color | Oil Rubbed Bronze |
| Material | Brass, Stainless Steel |
| Finish Type | Matte |
| Number of Handles | 1 |
| Mounting Type | Wall-Mounted |
| Flow Rate | 1.8 GPM |
| Shower Head Size | 9 Inch |
| Shower Hose Length | 59 Inches |
| In-Wall Depth (Min-Max) | 2-3/16" (55 mm) to 3-1/16" (78 mm) |
| Connections | 1/2" Male NPT |
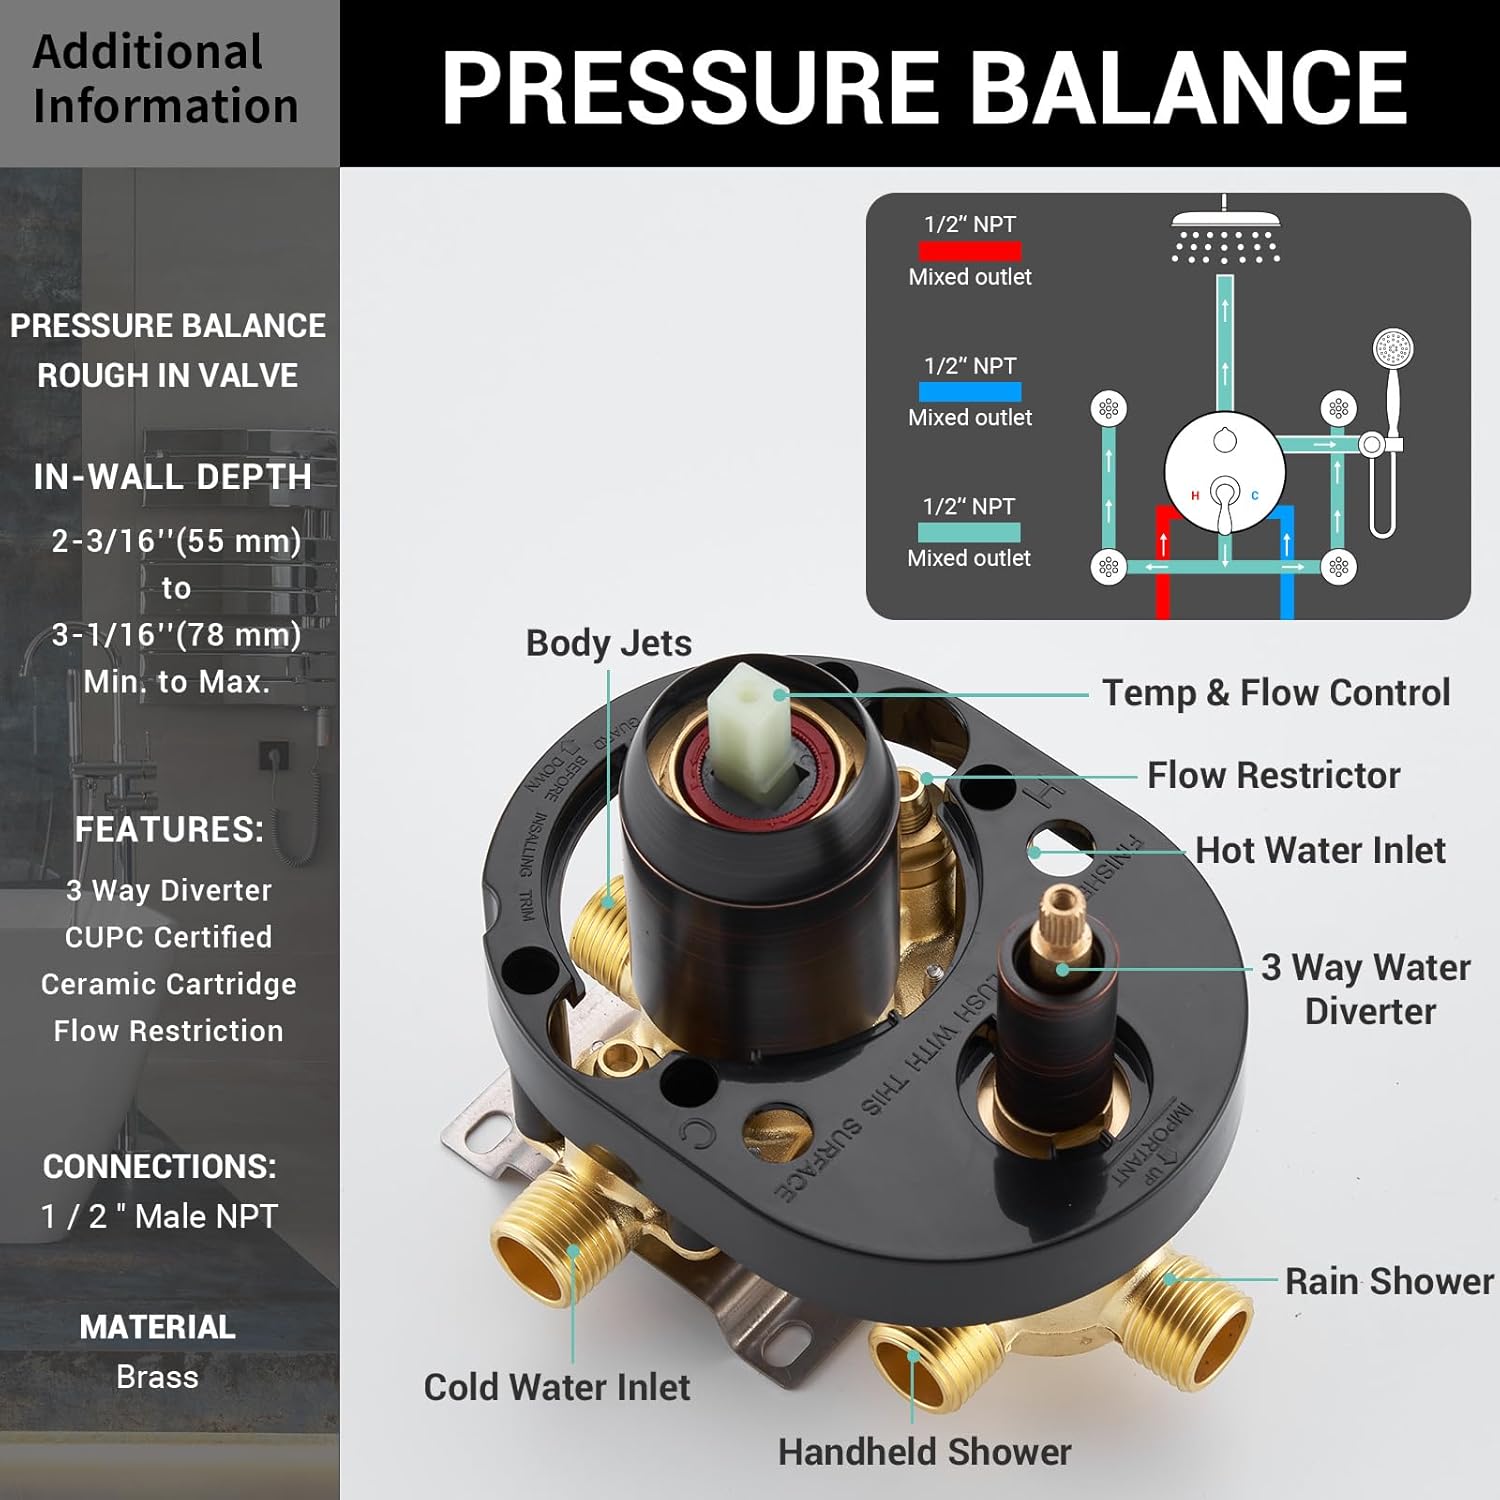
Image: Pressure balance rough-in valve details, including in-wall depth and connections.
5. Installation Instructions
It is recommended to have this product installed by a professional plumber. Ensure the main water supply is turned off before proceeding.
5.1 Pre-Installation Steps
- Confirm all package contents are present and undamaged.
- Prepare the wall opening according to the rough-in valve dimensions, ensuring the in-wall depth is between 2-3/16" (55 mm) and 3-1/16" (78 mm).
- Flush the water lines to remove any debris before connecting the valve.
5.2 Rough-in Valve Installation
- Mount the rough-in valve (3) securely within the wall, ensuring it is level and at the correct depth.
- Connect the hot and cold water supply lines to the designated inlets on the valve (1/2" NPT connections).
- Connect the mixed outlets from the valve to the rain shower, handheld shower, and body jet supply lines.
- Perform a leak test by turning on the main water supply and checking all connections.
5.3 Component Installation
- Shower Arm and Head: Install the shower arm (4) into the wall outlet, ensuring it is securely tightened. Attach the shower head (1) to the shower arm.
- Handheld Shower: Install the wall supply elbow (6) for the handheld shower. Connect the shower hose (12) to the wall supply elbow and the handheld wand (5). Mount the flange (11) for the handheld.
- Body Jets: Install the body jets (7) into their respective wall outlets. Ensure they are securely tightened and oriented as desired.
- Face Plate and Handle: Install the face plate (2) over the rough-in valve. Attach the shower handle (8) and diverter knob (10) according to the valve's instructions, securing them with the provided mounting hardware (9).

Image: Overview of the assembled DASAN AT249W-ORB shower system.
6. Operation Instructions
Your DASAN shower system offers multiple functions for a customized showering experience.

Image: Control functions for the shower system.
6.1 Temperature and Flow Control
- The main handle controls both water temperature and flow.
- Rotate the handle to adjust the temperature from cold to hot.
- Pull the handle outwards to increase water flow and push inwards to decrease it.
6.2 Function Selection (Diverter Knob)
The diverter knob allows you to switch between the rain shower, handheld shower, and body jets.
- Rain Shower: Rotate the diverter knob to activate the overhead rain shower. The 9-inch shower head provides broad coverage.
- Handheld Shower: Rotate the diverter knob to activate the handheld shower. The 59-inch hose allows for flexible use.
- Body Jets: Rotate the diverter knob to activate the body spray jets. These jets feature a 360-degree adjustable angle for targeted water flow.

Image: Rain shower head with adjustable angle feature.
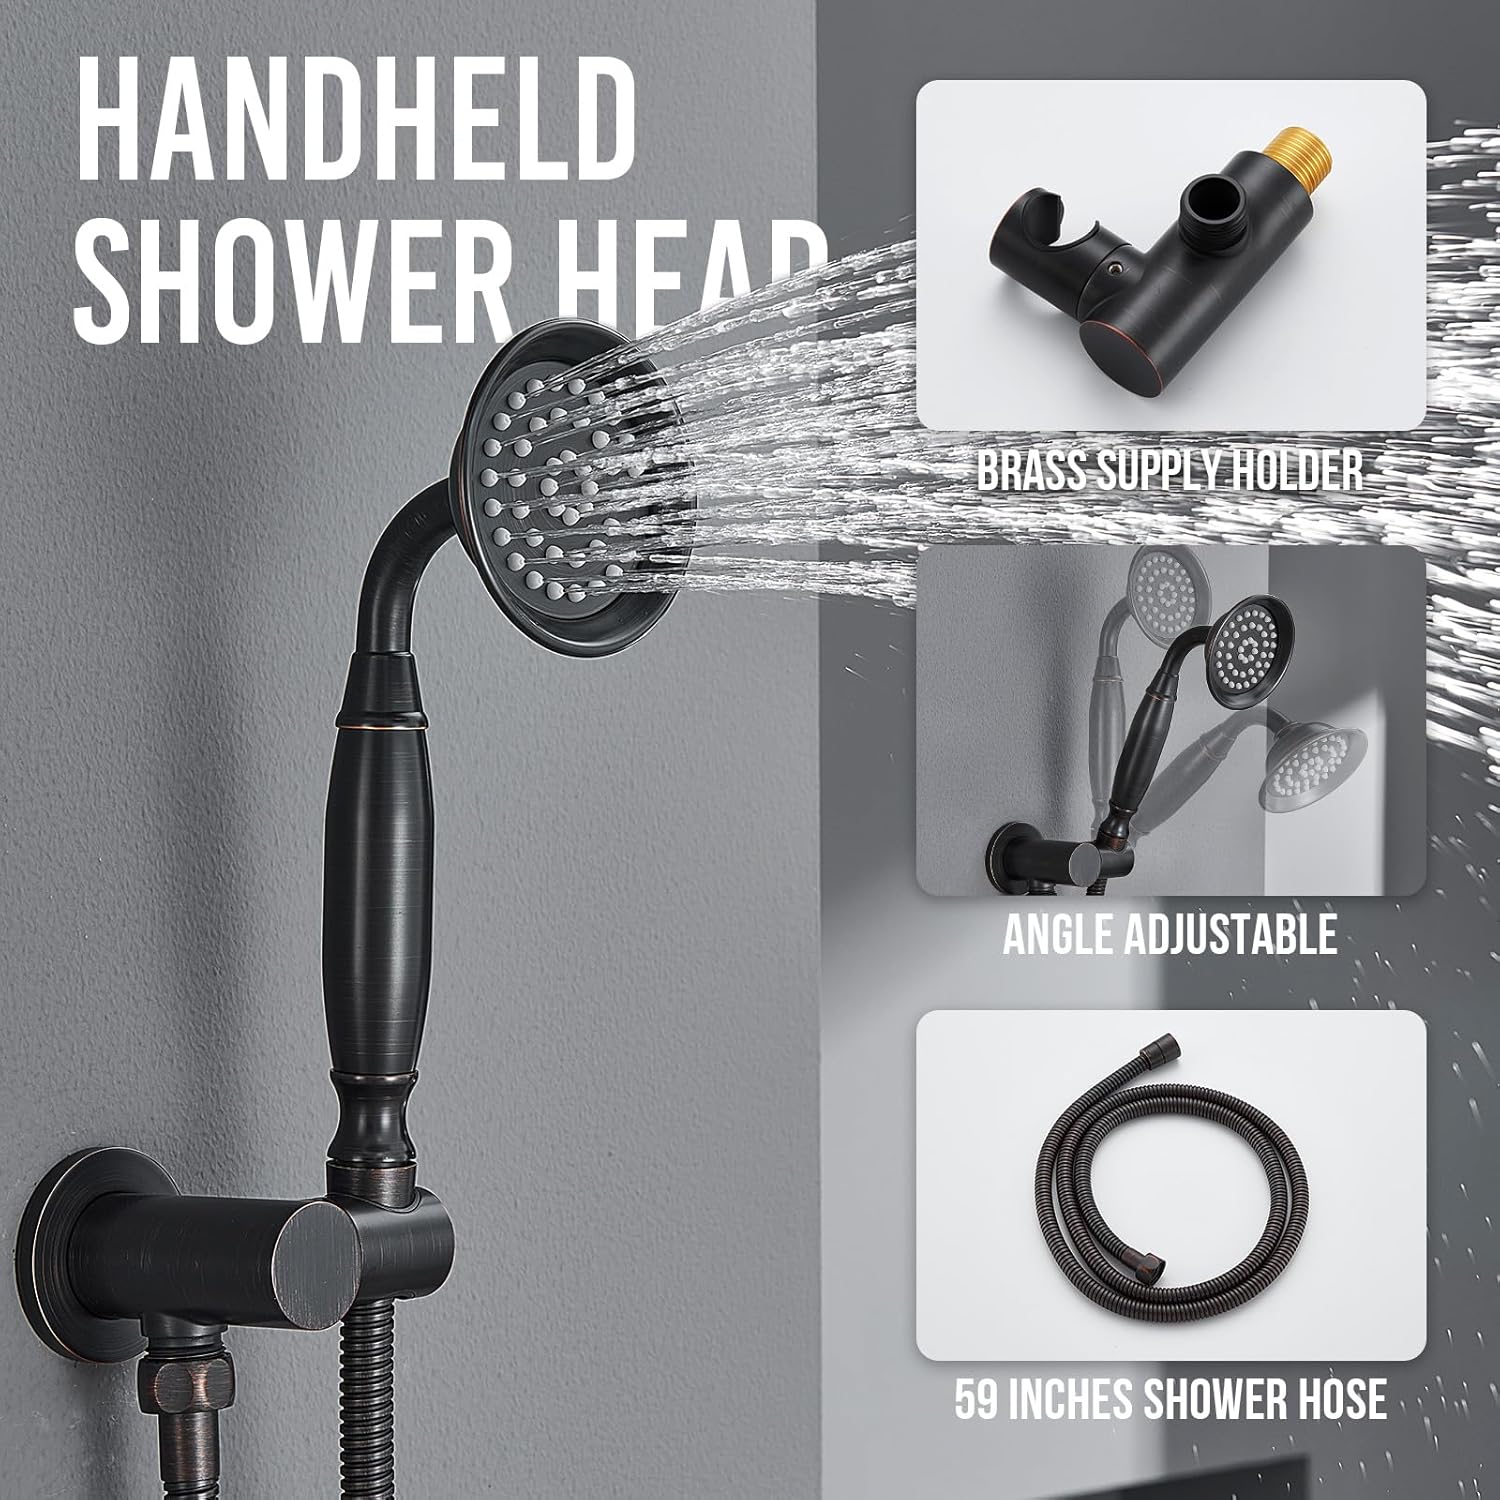
Image: Handheld shower head with 59-inch hose and brass supply holder.

Image: Body jets with easy-clean nozzles and 360-degree adjustable angle.
7. Maintenance
Regular cleaning and maintenance will help preserve the finish and functionality of your shower system.
- Cleaning the Finish: Clean the oil rubbed bronze finish with a soft, damp cloth. Avoid abrasive cleaners, harsh chemicals, or scouring pads, as these can damage the finish.
- Cleaning Nozzles: The rain shower head, handheld shower, and body jets feature silicone nozzles. To remove mineral buildup (limescale), gently rub the nozzles with your finger or a soft brush. This helps maintain consistent water flow.
- Periodic Checks: Periodically check all connections for tightness and signs of leaks.
8. Troubleshooting
If you encounter issues with your shower system, refer to the following common problems and solutions:
| Problem | Possible Cause | Solution |
|---|---|---|
| Low Water Flow | Clogged nozzles, partially closed shut-off valves, debris in lines. | Clean silicone nozzles. Ensure shut-off valves are fully open. Flush water lines if debris is suspected. |
| Water Leaks | Loose connections, damaged O-rings/washers. | Tighten all connections. Inspect and replace any damaged O-rings or washers. Do not overtighten. |
| Inconsistent Water Temperature | Pressure balance valve issue, hot/cold water supply imbalance. | Ensure hot and cold water supplies are balanced. If the problem persists, consult a plumber to inspect the pressure balance valve. |
| Diverter Not Switching Functions | Debris in diverter mechanism, worn diverter cartridge. | Flush the system. If the issue continues, the diverter cartridge may need inspection or replacement by a professional. |
If these solutions do not resolve the issue, please contact Dasan customer support.
9. Warranty Information
The DASAN AT249W-ORB Wall Mount Shower System comes with the following warranty:
- Residential Use: 10-Year Limited Warranty
- Commercial Use: 5-Year Limited Warranty
Please retain your proof of purchase for warranty claims. The warranty covers manufacturing defects under normal use and service. For full warranty terms and conditions, please refer to the official Dasan website or contact customer support.
10. Support
For further assistance, technical support, or to inquire about replacement parts, please visit the official Dasan store or contact their customer service department.
Visit the Dasan Store: Dasan Official Store


