1. Introduction
This manual provides detailed instructions for the setup, operation, and maintenance of your FoMaKo KC602 4K HDMI Video Mixer Switcher. Please read this manual thoroughly before using the device to ensure proper functionality and to maximize its capabilities.
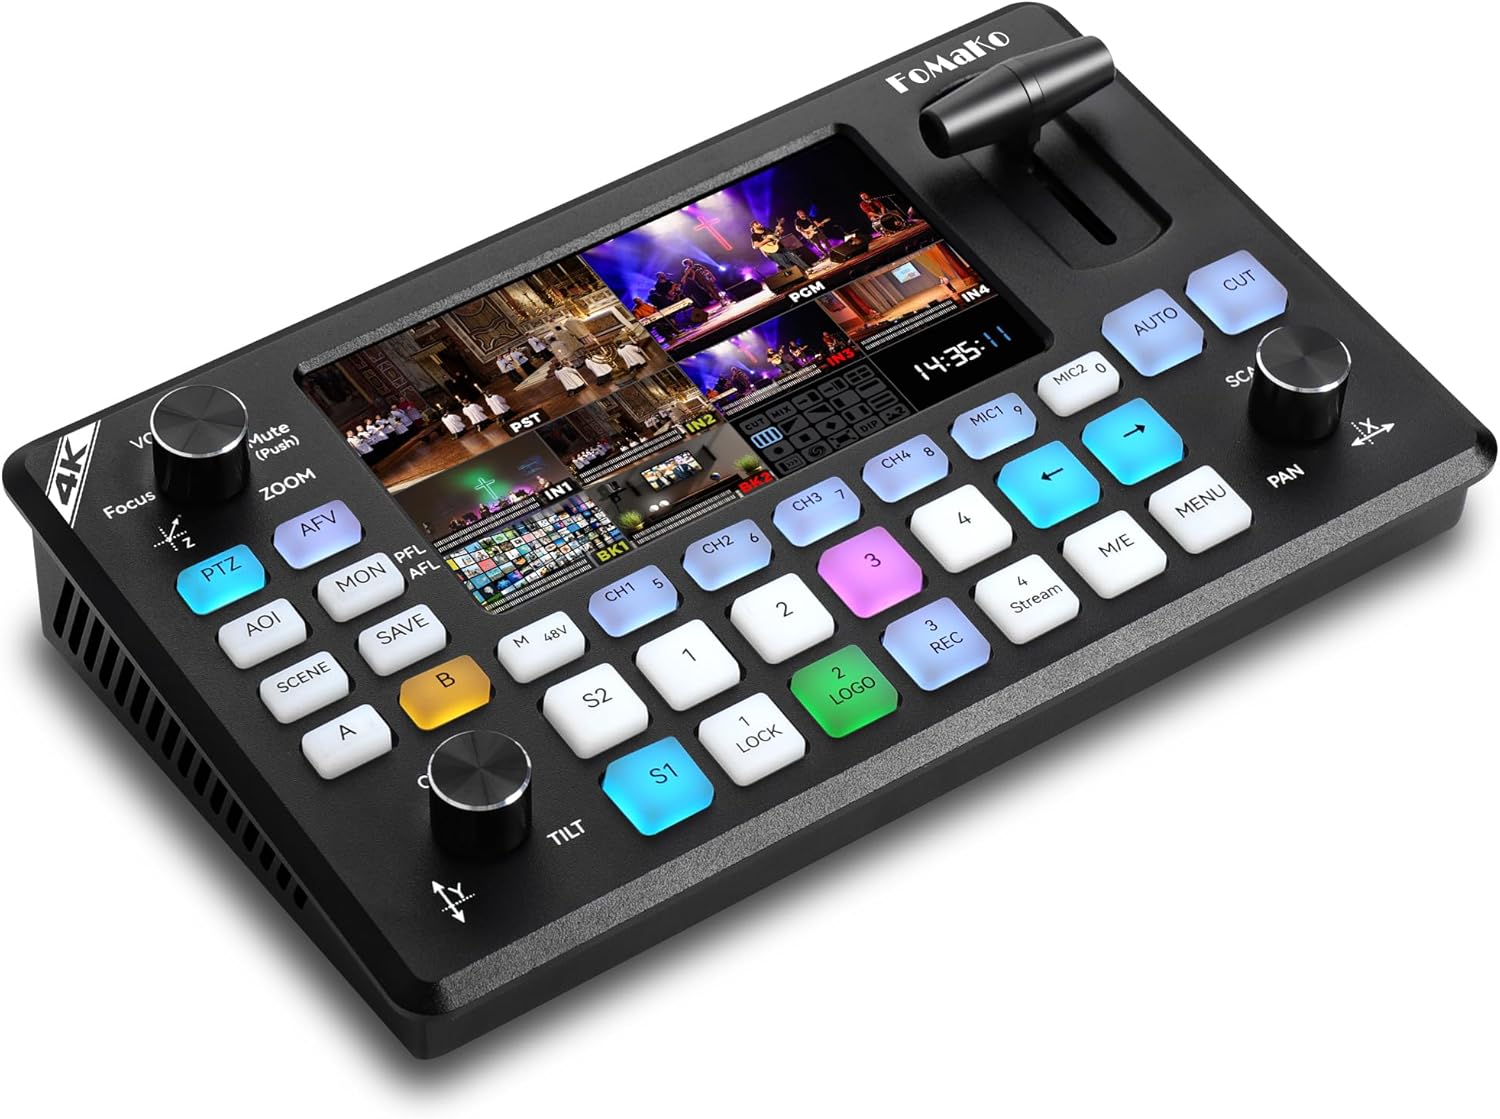
Figure 1: FoMaKo KC602 4K HDMI Video Mixer Switcher. This image displays the top-down view of the KC602 switcher, highlighting its 5.5-inch FHD LCD screen and control buttons.
Key Features:
- 4K60FPS input and 4K loop-through output with 1080P60FPS output.
- 5.5-inch FHD LCD screen for multi-view monitoring.
- Extensive input/output interfaces including HDMI, USB 3.0 Type-C, USB 2.0 Type-A, XLR, and 3.5mm audio jacks.
- Professional-grade 8-channel audio processing with 5-band EQ.
- Multi-camera PTZ control for up to 4 cameras with 9 preset positions.
- Simultaneous streaming to up to 3 platforms via RTMP/RTMPS and UVC streaming.
- 1080P 60FPS recording to USB drives.
- Special effects and transitions including Luma key, Chroma key, Logo insertion, PIP, and DSK.
- User-friendly control panel with T-bar.
2. Setup
2.1 Unboxing the KC602
Carefully remove all components from the packaging. Verify that all items listed in the packing list are present and undamaged.
Video 1: FoMaKo 4K KC602 Video Switcher Unboxing. This video demonstrates the unboxing process of the KC602 switcher and its included accessories.
2.2 Physical Connections
Connect all necessary devices to the KC602 switcher using appropriate cables. Ensure secure connections for optimal performance.
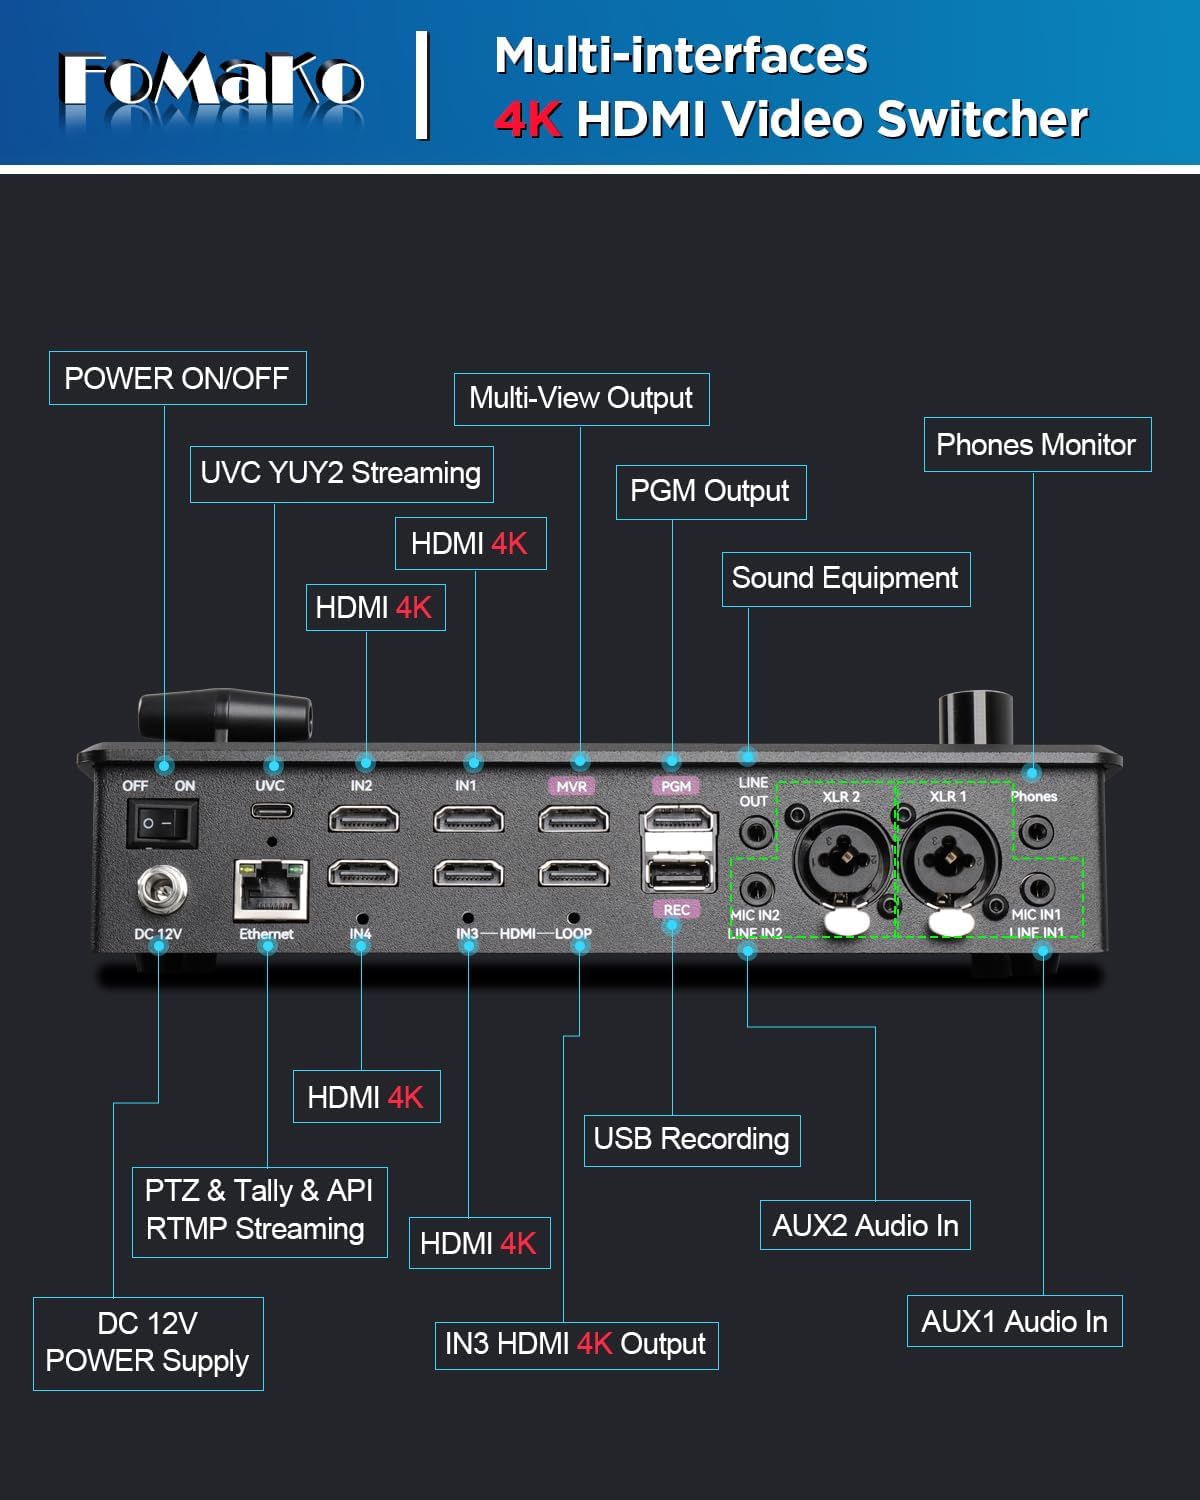
Figure 2: Multi-interfaces of the FoMaKo KC602. This diagram illustrates the various input and output ports on the rear panel of the KC602 switcher, including HDMI, USB, Ethernet, XLR, and 3.5mm audio jacks.
- Power: Connect the DC 12V power supply to the unit.
- Video Input: Connect up to four HDMI sources (e.g., cameras, computers) to the HDMI Type A x 4 inputs.
- Video Output:
- PGM OUT: Connect to a display or recording device for the program output.
- MULT-VIEW OUT: Connect to a monitor for multi-view display.
- IN3 HDMI LOOP: Provides a 4K loop-through output from HDMI IN3.
- Audio Input: Connect microphones or line-level audio sources to the XLR x 2 (Mic In / Line In) and 3.5mm phone type x 2 inputs.
- Audio Output: Connect headphones or external audio systems to the 3.5mm phone type x 2 (Phones / Line Out) outputs.
- USB Streaming: Connect to a computer via USB 3.0 Type-C for UVC streaming.
- USB Recording: Connect a USB 2.0 Type-A storage device for recording.
- Ethernet: Connect for IP streaming, PTZ control, and API communication.
2.3 Network Connection for PTZ Cameras
For controlling PTZ cameras and IP streaming, establish a network connection. A PoE switch is recommended for simplified power and data management.
Video 2: FoMaKo PTZ Camera Live Streaming System Connection. This video illustrates the network connection process for PTZ cameras, a PTZ controller, and the video mixer switcher using a PoE switch and router.
- Connect the PoE switch to your router using an Ethernet cable. The router assigns IP addresses to connected devices.
- Connect the PTZ controller to the PoE switch using an Ethernet cable.
- Connect each PTZ camera to the PoE switch using Ethernet cables.
- Connect the PTZ cameras to the KC602 switcher via HDMI cables for video input.
2.4 Importing Custom Images and Logos
The KC602 allows for custom background images and logos. This process involves connecting the switcher to a computer and using a conversion tool.
Video 3: Demo of importing LOGO and Background to KC602 Switcher. This video demonstrates how to import custom logos and background images onto the KC602 switcher.
- Connect the KC602 video switcher to your computer via a USB cable. The switcher's storage card will appear as an external drive.
- Open the provided image and logo converter software on your computer.
- Import your pre-prepared images and logos into the converter software and convert them to the required format.
- Locate the "ExportFiles" folder generated by the converter.
- Copy the converted background images and logos from the "ExportFiles" folder to the storage card inside the video switcher.
- Access the menu on the KC602 to find and apply the recently imported background images and logos.
3. Operating Instructions
3.1 Multi-View Display and Switching
The KC602 features a 5.5-inch FHD LCD screen that displays up to 10 screens simultaneously, including all input sources, preview (PST), and program (PGM) outputs.
Figure 3: KC602 Multi-view Display. The integrated 5.5-inch screen shows multiple video inputs, preview, and program output simultaneously.
Use the dedicated buttons for each input (CH1-CH4) to select sources for preview (PST) and program (PGM). The T-bar or AUTO/CUT buttons can be used for transitions.
3.2 Video Recording
The KC602 supports recording 1080P 60FPS footage directly to a USB drive.

Figure 4: KC602 Recording Capabilities. This image highlights the USB recording port and features like rate adjustment, live+record sync, and capacity monitoring.
- Connect a USB storage device to the USB 2.0 Type-A port labeled 'REC'.
- Press the 'REC' button on the control panel to start/stop recording.
- Adjust recording bitrates (low/medium/high) via the menu to balance quality and storage needs.
3.3 Special Effects and Transitions
The switcher offers various effects and transitions for dynamic live production.

Figure 5: Chroma Key and Luma Key on KC602. This image demonstrates the use of Chroma Key for background removal and Luma Key for isolating light and shadows.
- Chroma Key & Luma Key: Use these features to remove backgrounds or isolate elements. Shortcut keys CTRL + 1-4 can be used for chroma key.
- PIP (Picture-in-Picture) & DSK (Downstream Key): Integrate multiple video layers.
- Transitions: Utilize the T-bar or dedicated buttons for various transitions including Mix, Dip, and Wipe.
3.4 Multi-Camera PTZ Control
Control up to 4 PTZ cameras directly from the KC602 control panel.

Figure 6: KC602 PTZ Controller Interface. This image shows the PTZ control section of the switcher, including the joystick and preset buttons.
- Use the PTZ control section (joystick and buttons) to pan, tilt, and zoom connected PTZ cameras.
- Save and recall up to 9 preset positions for instant camera angle switching.
- The 'AOI' button allows for Area of Interest selection, which can be zoomed and positioned using the X/Y/Z knobs.
3.5 Streaming Capabilities
Broadcast your content to multiple platforms simultaneously.
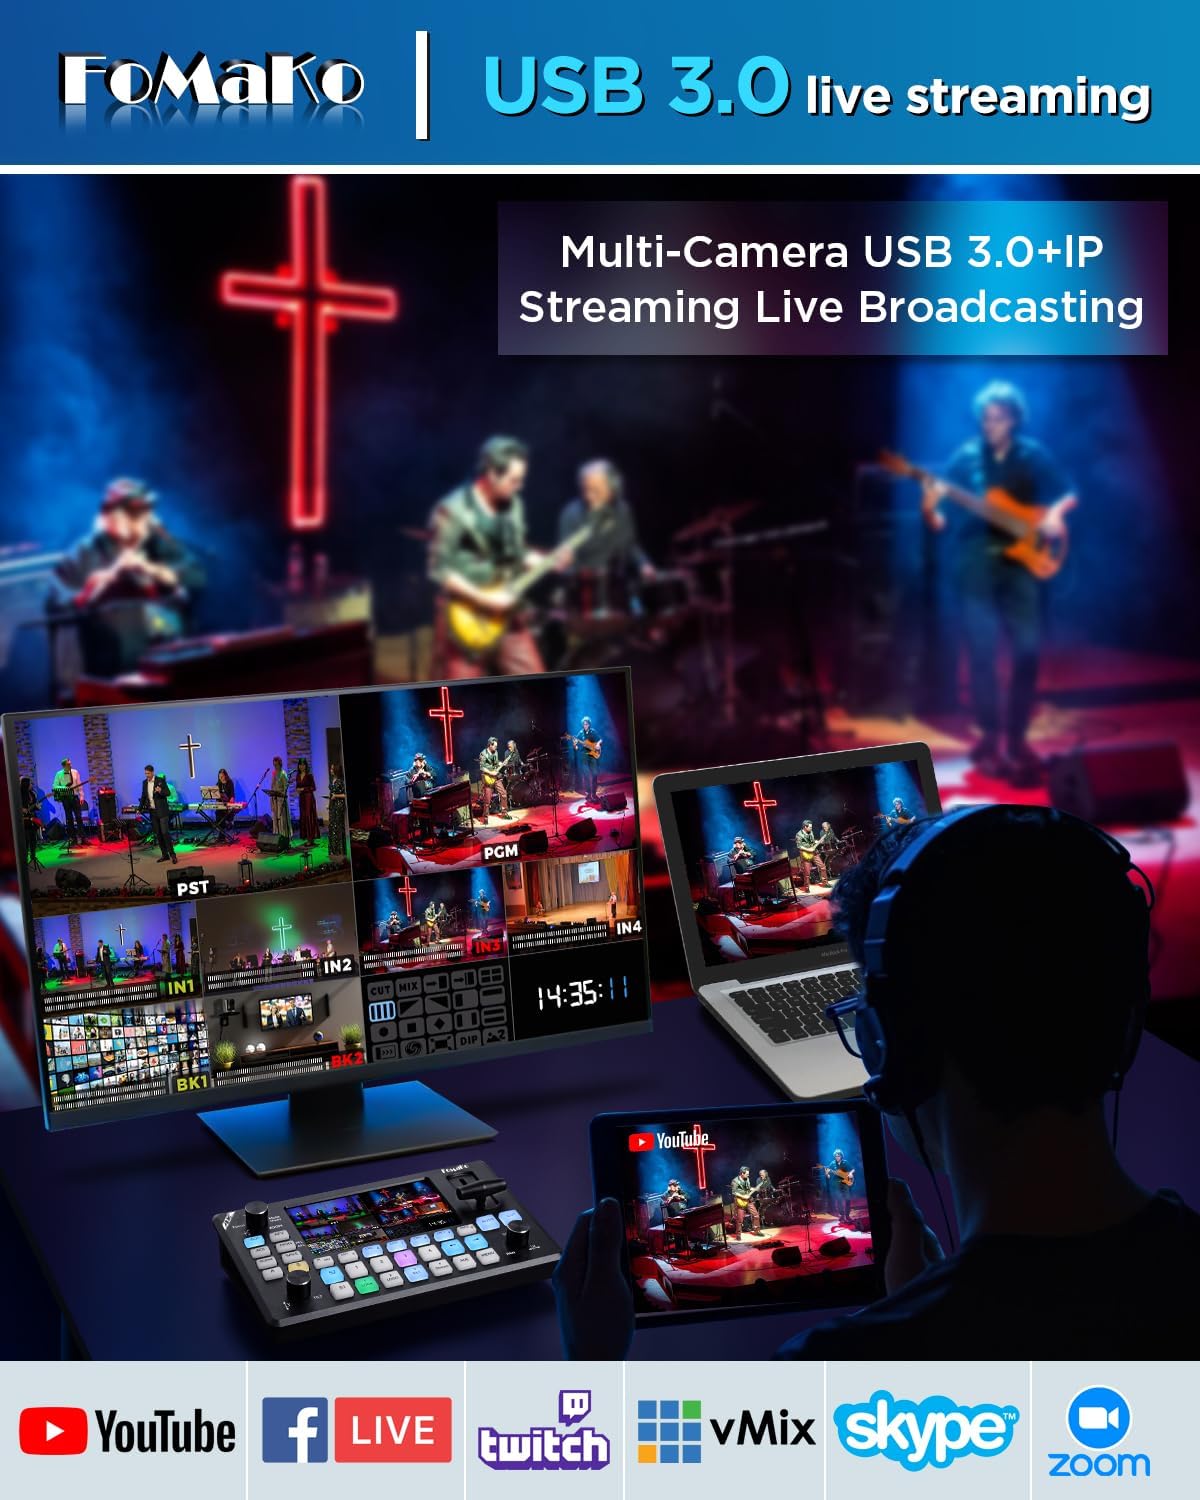
Figure 7: KC602 Multi-Camera USB 3.0 Live Streaming. This image illustrates the KC602 connected to multiple displays and streaming platforms, demonstrating its multi-platform streaming capabilities.
- UVC Streaming: Connect the USB 3.0 Type-C port to a computer for direct streaming via software like OBS or vMix.
- IP Streaming: Use the Ethernet port for RTMP/RTMPS streaming to platforms like YouTube, Facebook, and Twitch.
- The KC602 supports simultaneous streaming to up to 3 platforms.
3.6 Audio Processing
Manage and mix audio from various sources.

Figure 8: KC602 Multi-Channel Audio Mixing. This image shows the audio mixing interface on the KC602, illustrating control over multiple audio channels.
- The KC602 combines 4 HDMI digital and 4 analog inputs, processing 8 simultaneous audio streams.
- Utilize the built-in 5-band EQ for precise sound quality control.
- Adjust volume and mute individual audio channels using the dedicated controls.
4. Maintenance
To ensure the longevity and optimal performance of your FoMaKo KC602, follow these maintenance guidelines:
- Cleaning: Use a soft, dry cloth to clean the exterior of the device. Avoid using liquid cleaners or aerosols, which may damage the unit.
- Ventilation: Ensure the device is placed in a well-ventilated area to prevent overheating. Do not block ventilation openings.
- Storage: When not in use for extended periods, store the device in a cool, dry place, away from direct sunlight and extreme temperatures.
- Cable Management: Keep cables organized and free from kinks or excessive bending to prevent damage to connectors and wires.
5. Troubleshooting
If you encounter issues with your KC602, refer to the following general troubleshooting steps. For more specific problems, consult the FoMaKo support resources.
- No Power: Ensure the power adapter is securely connected to both the device and a working power outlet. Verify the power switch is in the 'ON' position.
- No Video Output: Check all HDMI cable connections. Ensure the correct input source is selected on the KC602 and the connected display. Verify the display is set to the correct input.
- No Audio: Confirm audio cables are correctly connected. Check audio input levels on the KC602 and ensure microphones are powered on if required. Verify the audio output device (e.g., headphones, speakers) is functioning and correctly connected.
- PTZ Camera Not Responding: Verify network connections for PTZ cameras and the PTZ controller. Ensure the correct IP addresses are configured and the cameras are added to the controller. Check PTZ speed settings.
- Streaming Issues: Confirm a stable internet connection. Verify RTMP/RTMPS settings and streaming platform configurations. For UVC streaming, ensure the computer recognizes the KC602 as a webcam.
- Overheating: Ensure adequate ventilation around the device. Avoid placing it in enclosed spaces or near heat sources. If overheating persists, discontinue use and contact support.
6. Specifications
| Feature | Specification |
|---|---|
| Product Dimensions | 7 x 11 x 5 inches |
| Item Weight | 4.4 pounds |
| Item Model Number | KC602 |
| Brand | FoMaKo |
| Color | 4K60FPS KC602 |
| Connector Type | HDMI, USB Type-C |
| Compatible Devices | Camera, Monitor, Personal Computer, Television |
| Cable Type | HDMI |
7. Warranty and Support
FoMaKo provides comprehensive support for the KC602 Video Mixer Switcher:
- 3-Year Limited Warranty: The product is covered by a 3-year limited warranty.
- 30-Day Money-Back Guarantee: Enjoy a risk-free purchase with a 30-day no-questions-asked money-back guarantee.
- Free Online Training: Access free online training to get started easily.
- 24/7 Expert Assistance: Receive responses within 24 hours for any technical inquiries. Please include your Order ID for faster service.
- Lifetime Customer Technical Support: Benefit from lifetime technical support for your product.


