1. Introduction
Thank you for choosing the HOOBRO Multiple Guitar Rack Holder. This manual provides essential information for the safe assembly, operation, and maintenance of your new guitar stand. Please read these instructions carefully before assembly and retain them for future reference.
This guitar stand is designed to organize and store multiple musical instruments, including acoustic guitars, electric guitars, basses, and ukuleles, while also offering convenient storage shelves for accessories.
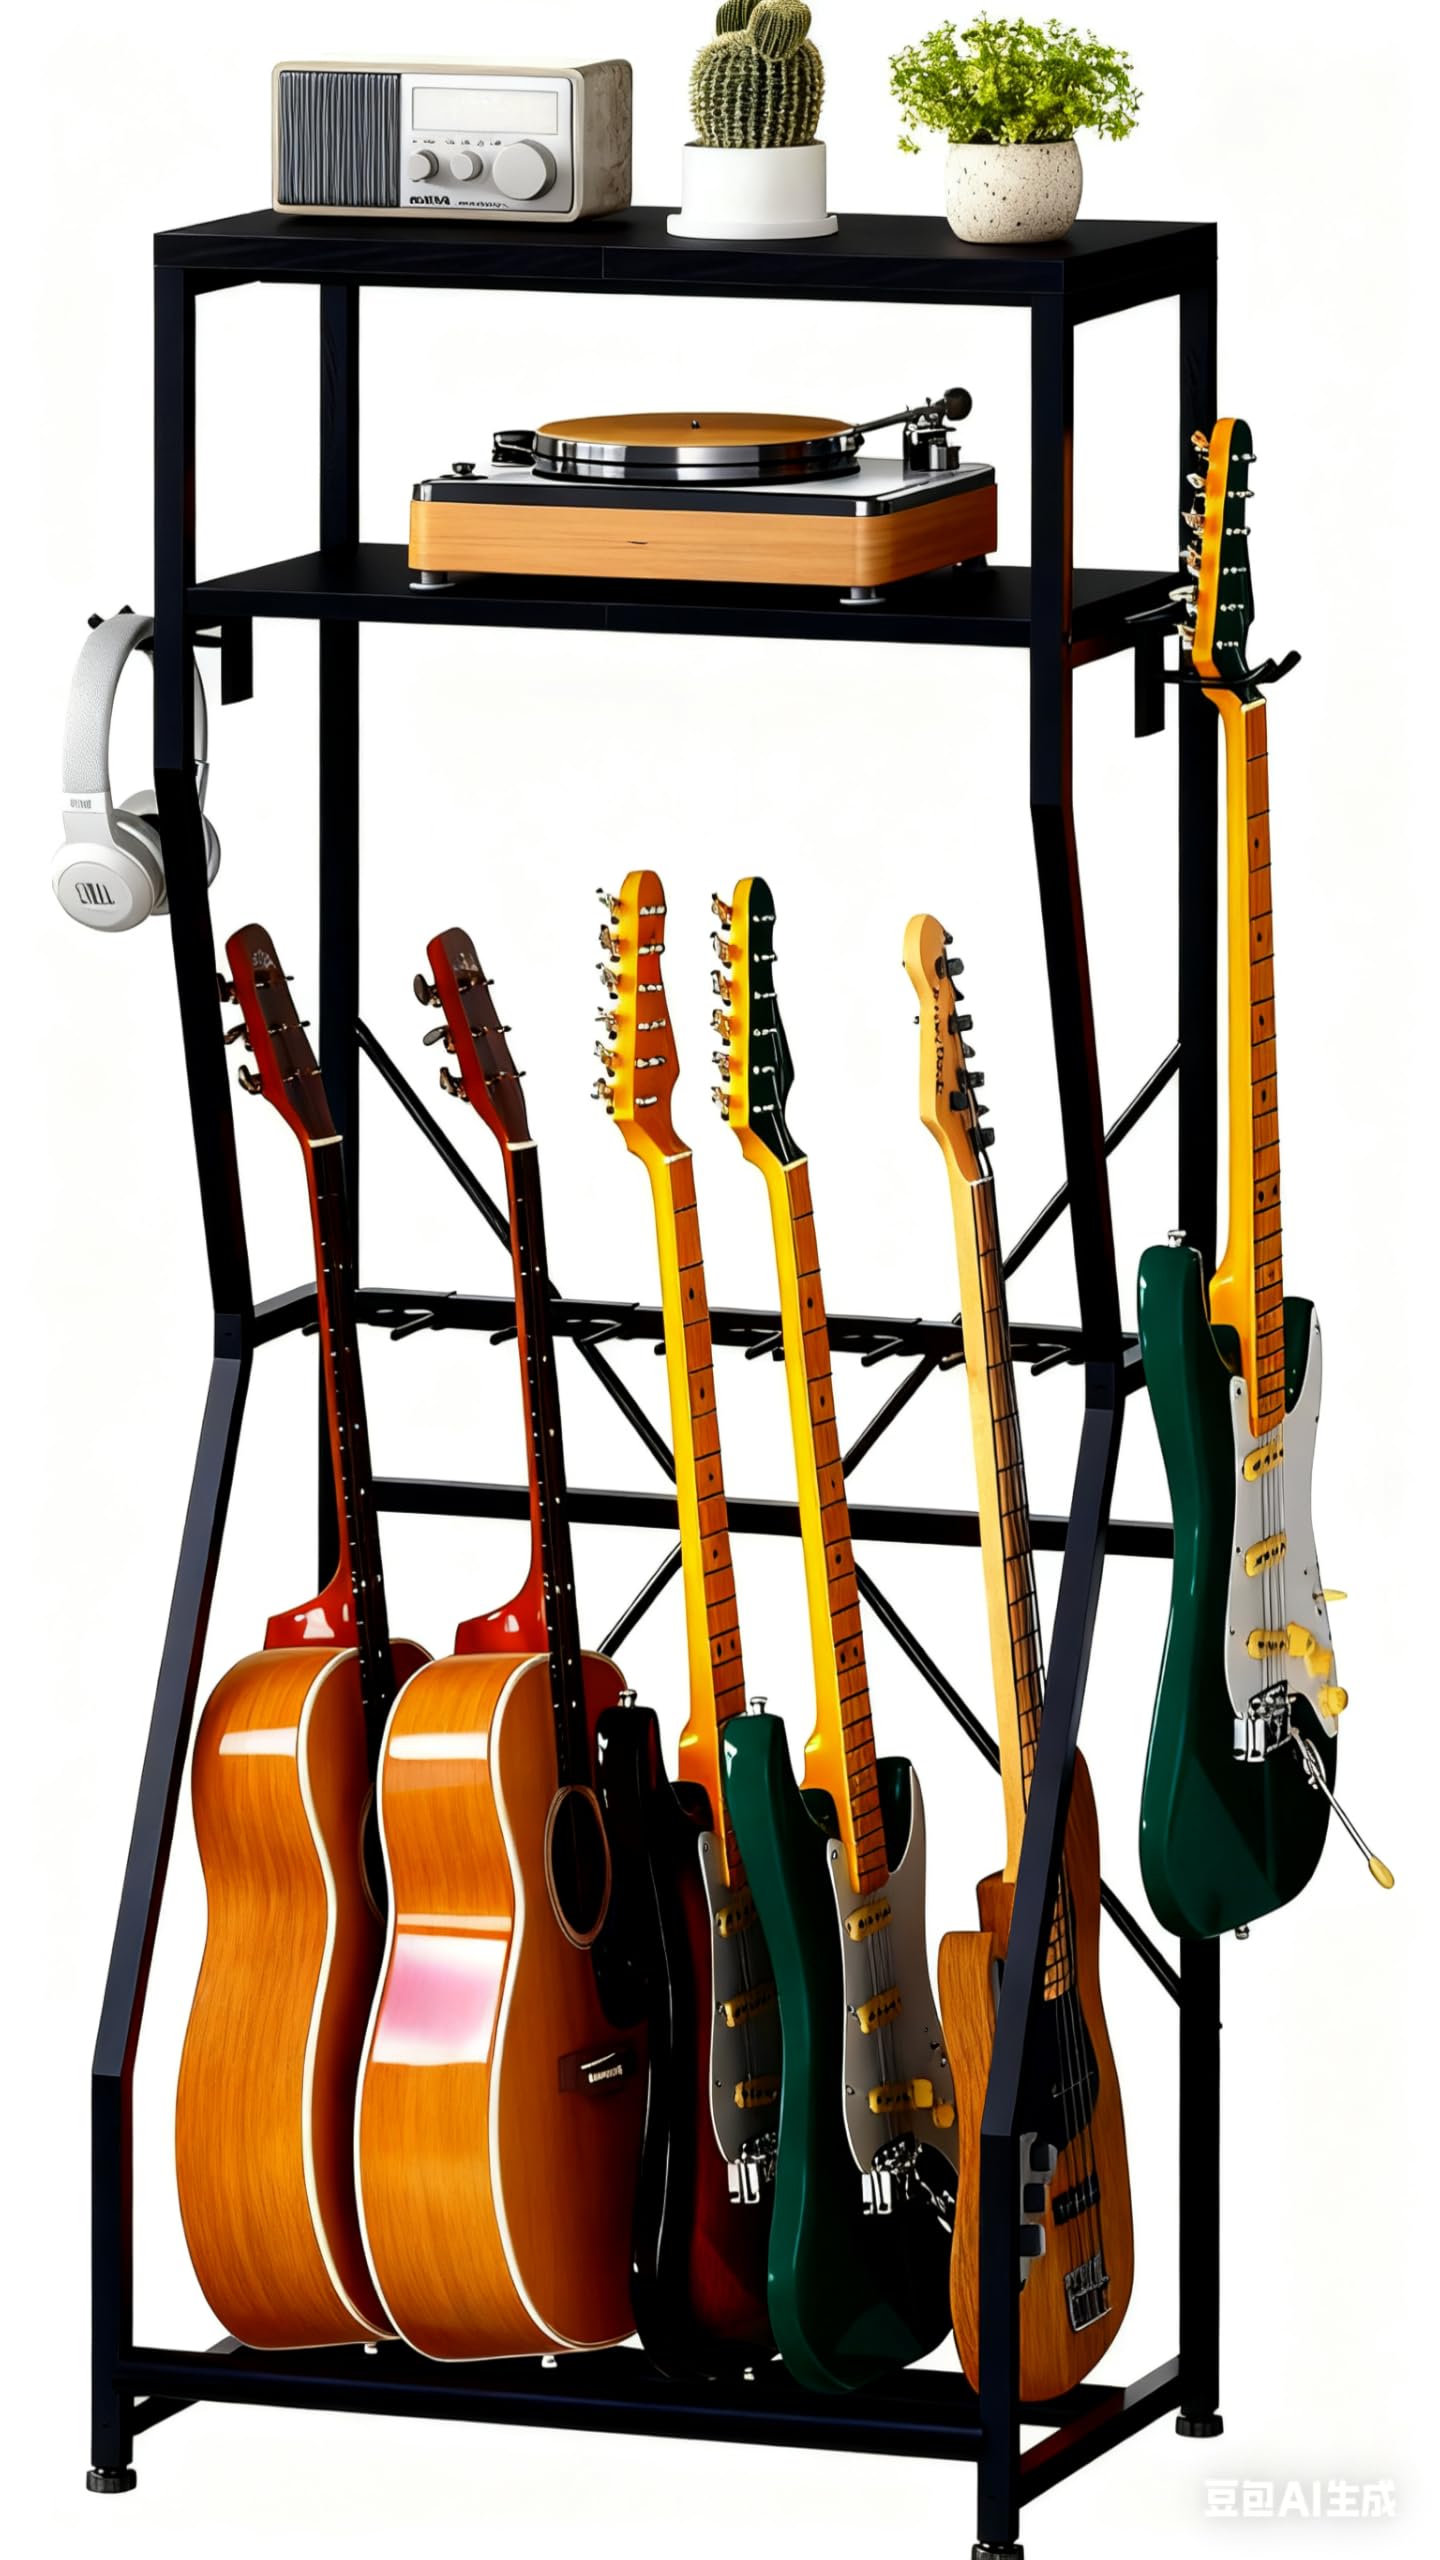
Image 1.1: The HOOBRO Multiple Guitar Rack Holder, showcasing its capacity for several guitars and two storage shelves.
2. Safety Information
- Read All Instructions: Ensure you understand all assembly steps and safety warnings before proceeding.
- Proper Assembly: Assemble the stand strictly according to the instructions. Incorrect assembly can lead to instability and potential damage to instruments or injury.
- Use Anti-Tip Devices: Always install the provided anti-tip devices to secure the stand to a wall, especially in households with children or pets.
- Weight Capacity: Do not exceed the stand's intended weight capacity. Overloading can compromise stability.
- Stable Surface: Place the stand on a flat, level, and stable surface to prevent wobbling or tipping. Adjust the feet as necessary.
- Instrument Placement: Ensure instruments are securely seated in the holders and do not protrude excessively, which could cause imbalance.
- Keep Away from Heat/Moisture: Avoid placing the stand in direct sunlight, near heat sources, or in excessively humid environments to prevent material degradation.
3. Package Contents
Please verify that all components are present before beginning assembly. If any parts are missing or damaged, contact customer support.
- Metal Frame Components (various bars and supports)
- Particleboard Shelves (2 tiers)
- Adjustable Guitar Support Holders (5 units)
- Side Hooks (2 units)
- Rubber Protective Covers (for holders and bottom bars)
- Adjustable Feet (4 units)
- Anti-Tip Devices (wall anchors and screws)
- Assembly Hardware (screws, Allen wrench)
4. Assembly Instructions
Follow these steps carefully for proper assembly. It is recommended to have a helper for certain steps.
- Unpack and Identify Parts: Lay out all components on a clean, soft surface to prevent scratches. Refer to the parts list to ensure everything is present.
- Assemble the Main Frame: Connect the vertical and horizontal metal frame components using the provided screws and Allen wrench. Ensure all connections are snug but do not overtighten initially.
- Attach Shelves: Secure the two particleboard shelves to the designated positions on the metal frame. The upper shelf is for larger items, and the lower shelf is for smaller accessories.
- Install Guitar Support Holders: Slide the 5 adjustable guitar support holders onto the horizontal bar. These holders can be repositioned to accommodate different instrument widths. Ensure the rubber protective covers are properly seated on these holders to prevent instrument scratches.
- Attach Side Hooks: Mount the two side hooks to the outer vertical frames at your desired height. These are suitable for headphones, cables, or lighter instruments like ukuleles. Ensure the rubber protective covers are on the hooks.
- Install Adjustable Feet: Screw the 4 adjustable feet into the bottom of the stand's frame. Adjust them to level the stand on uneven floors.
- Secure Anti-Tip Devices: For safety, attach the anti-tip devices to the top rear of the stand and secure them to a sturdy wall using appropriate wall anchors and screws.
- Final Tightening: Once fully assembled and positioned, carefully tighten all screws to ensure maximum stability.

Image 4.1: Dimensional diagram of the guitar stand, indicating overall height, width, and shelf depths.

Image 4.2: Detailed view of key assembly components: premium particleboard shelves, adjustable feet for leveling, anti-tip devices for wall mounting, and the X-brace back support for structural integrity.
5. Operating Instructions
This guitar stand is designed for versatile storage and easy access to your instruments and accessories.
- Placing Instruments: Gently place your guitars, basses, or ukuleles into the main support holders. The rubber protective covers on the holders and bottom bars are designed to prevent scratches and provide a secure grip.
- Adjusting Holders: The 5 main guitar support holders can be slid along the horizontal bar to adjust the spacing, accommodating instruments of various body widths.

Image 5.1: The adjustable guitar holders can be moved to fit different instrument sizes.
- Using Storage Shelves: The two-tier storage area provides space for musical equipment. The upper shelf is suitable for items like turntables or radios, while the lower shelf can hold smaller accessories such as tuners, picks, strings, or cables.
- Utilizing Side Hooks: The two side hooks offer additional hanging space for headphones, straps, or other lightweight accessories.

Image 5.2: The stand configured with multiple instruments and accessories on its shelves, demonstrating versatile storage.

Image 5.3: Illustration of the stand's compatibility with different instrument types, including bass, ukulele, violin, and guitar.
6. Maintenance
Regular maintenance will help prolong the life and appearance of your guitar stand.
- Cleaning: Wipe down the metal frame and particleboard shelves with a soft, damp cloth. Avoid abrasive cleaners or harsh chemicals that could damage the finish.
- Check Stability: Periodically check all screws and connections to ensure they remain tight. Retighten if necessary.
- Rubber Covers: Inspect the rubber protective covers on the instrument holders and bottom bars for wear or damage. Replace if they become compromised to ensure continued instrument protection.
7. Troubleshooting
Here are solutions to common issues you might encounter:
- Stand is Wobbly:
- Ensure all assembly screws are fully tightened.
- Adjust the 4 leveling feet at the bottom of the stand to compensate for uneven floor surfaces.
- Verify that the anti-tip devices are securely installed if applicable.
- Instruments Not Fitting Properly:
- Adjust the position of the 5 main guitar support holders along the horizontal bar to create appropriate spacing for your instruments.
- For larger instruments like bass guitars, ensure they are placed in positions that allow for easy retrieval without hitting other parts of the stand.
- Sticky Residue on Rubber Parts:
- Some users have reported a sticky residue from packaging on the U-shaped rubber parts. This can often be carefully removed with a fingernail or a soft cloth and mild soap.
- If the residue is persistent or the rubber is damaged, consider applying fabric tape over the affected areas for additional protection.
8. Specifications
| Manufacturer | HOOBRO |
| Model Number | BB02JT01 |
| Product Dimensions (L x W x H) | 23.6 x 11.8 x 56.9 inches (60 x 30 x 144.5 cm) |
| Item Weight | 18.57 pounds |
| Material | Metal, Particleboard, Rubber |
| Color | Black |
9. Product Overview Video
Watch this video for a visual overview of the HOOBRO Guitar Stand and its features.
Video 9.1: An official HOOBRO video demonstrating the guitar stand's design, capacity, and overall functionality in a home studio setting.


