
Introduction
Thank you for choosing the Besiost AV Media Stand. This 4-tier stand is designed to organize your audio and visual equipment, including turntables, amplifiers, and record collections. It features integrated power outlets and LED lighting to enhance your entertainment space. This manual provides essential information for assembly, operation, maintenance, and troubleshooting to ensure safe and optimal use of your product.
Setup and Assembly
Before beginning assembly, please ensure all parts are present and undamaged. Refer to the included assembly instructions for detailed diagrams and a complete parts list. It is recommended to assemble the stand on a soft, clean surface to prevent scratches.
Components Overview
The package includes engineered wood panels, a metal frame, hardware (screws, bolts), a power strip with a power cord, and an LED light strip with a remote control. Familiarize yourself with these components before starting.
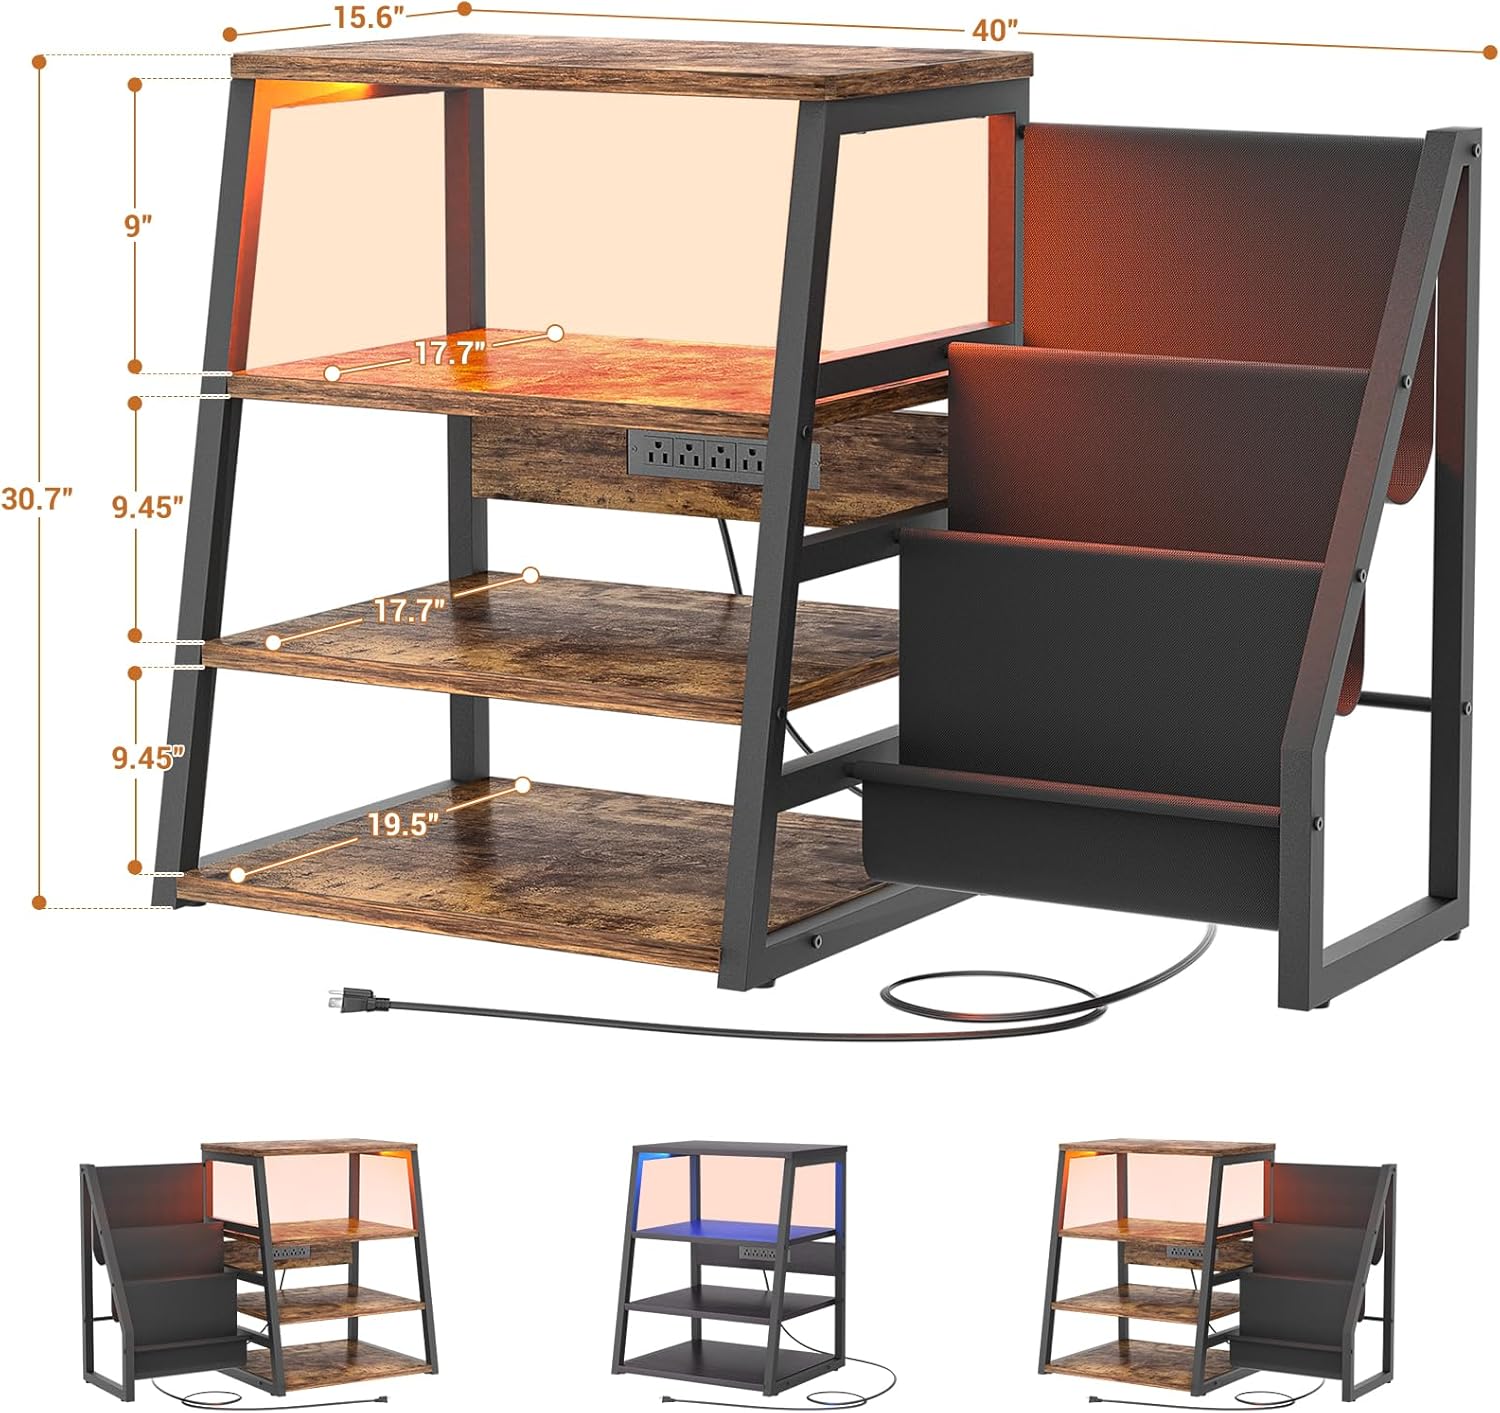
Figure 1: Exploded view of the media stand showing all parts and dimensions.
Assembly Steps
- Unpack and Identify: Carefully unpack all components and verify against the parts list in your separate assembly guide.
- Assemble Frame: Attach the metal frame pieces together using the provided screws and an Allen wrench. Do not overtighten screws initially.
- Install Shelves: Secure the engineered wood shelves to the metal frame. Ensure they are oriented correctly as per the diagrams.
- Attach Power Strip: Mount the power strip to the designated location on the stand using the provided screws.
- Install LED Lights: Adhere the LED light strip to the underside of the top shelf or other desired location. Connect it to the power strip.
- Final Tightening: Once all components are in place, gently tighten all screws for stability.
- Leveling: Adjust the feet at the bottom of the stand to ensure it is level on your floor.

Figure 2: The assembled media stand ready for use.
Operating Instructions
Power Strip Usage
The media stand is equipped with a built-in power strip featuring 4 standard 120V AC outlets and 2 USB charging ports (5V/2A). This allows for convenient power access for your audio equipment and mobile devices.
- Plug the stand's main power cord into a wall outlet.
- Connect your turntable, amplifier, CD player, or other devices to the AC outlets.
- Use the USB ports to charge smartphones, tablets, or other USB-powered accessories.
Safety Note: Do not exceed the maximum power rating of the power strip. Avoid plugging in high-power appliances that may overload the circuit.

Figure 3: Detail of the integrated power strip.
LED Light Operation
The integrated LED light strip provides ambient lighting. It is controlled by a remote control, allowing you to select various colors and lighting effects.
- Ensure the LED light strip is properly connected to the power strip.
- Use the provided remote control to turn the lights on/off, change colors, adjust brightness, and select different modes.

Figure 4: Media stand with LED lights activated.
Care and Maintenance
Proper care will extend the life and appearance of your Besiost AV Media Stand.
- Cleaning: Wipe surfaces with a soft, damp cloth. Avoid using harsh chemicals, abrasive cleaners, or polishes that may damage the finish.
- Dusting: Regularly dust the stand and equipment to prevent buildup.
- Stability Check: Periodically check all screws and connections to ensure they remain tight. Retighten if necessary.
- Avoid Moisture: Keep the stand away from excessive moisture or direct sunlight to prevent warping or fading.
- Weight Distribution: Distribute weight evenly across the shelves to maintain stability and prevent damage.
Troubleshooting Guide
If you encounter issues with your media stand, refer to the following common problems and solutions:
| Problem | Possible Cause | Solution |
|---|---|---|
| Stand is wobbly or unstable. | Loose screws; uneven floor. | Tighten all assembly screws. Adjust the leveling feet at the bottom of the stand. |
| Power outlets are not working. | Power cord not plugged in; tripped circuit breaker; faulty device. | Ensure the main power cord is securely plugged into a functional wall outlet. Check your home's circuit breaker. Test the device in another outlet. |
| LED lights are not turning on. | LED strip not connected; remote control battery low; faulty LED strip. | Verify the LED strip is securely connected to the power strip. Replace the remote control battery. Contact customer support if the issue persists. |
Product Specifications
| Feature | Detail |
|---|---|
| Brand | Besiost |
| Model | B0F3HVNMQX |
| Material | Engineered Wood, Metal Frame |
| Color | Rustic Brown |
| Product Dimensions (D x W x H) | 19.5" x 40" x 30.7" |
| Number of Shelves | 4 |
| Special Features | Integrated Power Strip (4 AC outlets, 2 USB ports), LED Lights, Side Vinyl Record Storage |
| Mounting Type | Freestanding |
| Item Weight | 16.78 Kilograms |
| Required Assembly | Yes |
Warranty and Customer Support
Besiost stands behind the quality of its products. For any questions, concerns, or to report missing or damaged parts, please contact Besiost customer support. Details on warranty coverage are typically provided with your purchase documentation or can be found on the official Besiost website.
Please retain your proof of purchase for warranty claims.