
LUXOAK CCT123
Contents
LUXOAK Farmhouse Bar Cabinet with Built-in Fridge (Model CCT123) - Instruction Manual
Introduction
Thank you for purchasing the LUXOAK Farmhouse Bar Cabinet with Built-in Fridge, Model CCT123. This manual provides essential information for the safe assembly, operation, and maintenance of your new bar cabinet. Please read these instructions thoroughly before assembly and use, and retain them for future reference.

Image: The LUXOAK Farmhouse Bar Cabinet with Built-in Fridge, showcasing its design and integrated beverage cooler.
Important Safety Information
For your safety and to prevent damage to the product, please observe the following precautions:
- Always follow the assembly instructions carefully to avoid injury.
- Keep the area around the cabinet clear to prevent tripping hazards.
- Do not operate the refrigerator if the cabinet is not properly assembled or if the power cord is damaged.
- Always unplug the refrigerator before cleaning or performing maintenance.
- Keep the cabinet away from heat sources and do not place heavy objects on top of it.
- Ensure the cabinet is placed on a stable, level surface to prevent tipping.
- Do not allow children to climb on or play with the cabinet.
Setup and Assembly
This bar cabinet requires assembly. It comes with straightforward instructions, labeled parts, and included tools for a smooth setup. It is recommended that two people assemble this unit.
Package Contents:
- All cabinet components (labeled)
- Hardware kit (screws, dowels, cam locks, etc.)
- Assembly tools (e.g., Allen wrench)
- Beverage Refrigerator Cooler
Note: This item ships in two separate packages, which may arrive at different times.
Assembly Steps:
- Unpack Components: Carefully remove all parts from the packaging. Verify all components are present against the parts list in your included assembly guide.
- Prepare Area: Choose a clean, flat, and spacious area for assembly.
- Follow Instructions: Refer to the detailed step-by-step assembly instructions provided in the separate assembly manual. Ensure all connections are secure before proceeding to the next step.
- Install Refrigerator: Once the cabinet structure is complete, carefully slide the beverage refrigerator cooler into its designated compartment. Ensure proper ventilation space around the unit as specified in the refrigerator's manual.
- Secure Cabinet: For added stability, consider using the included anti-tip hardware to secure the cabinet to a wall, especially if children or pets are present.
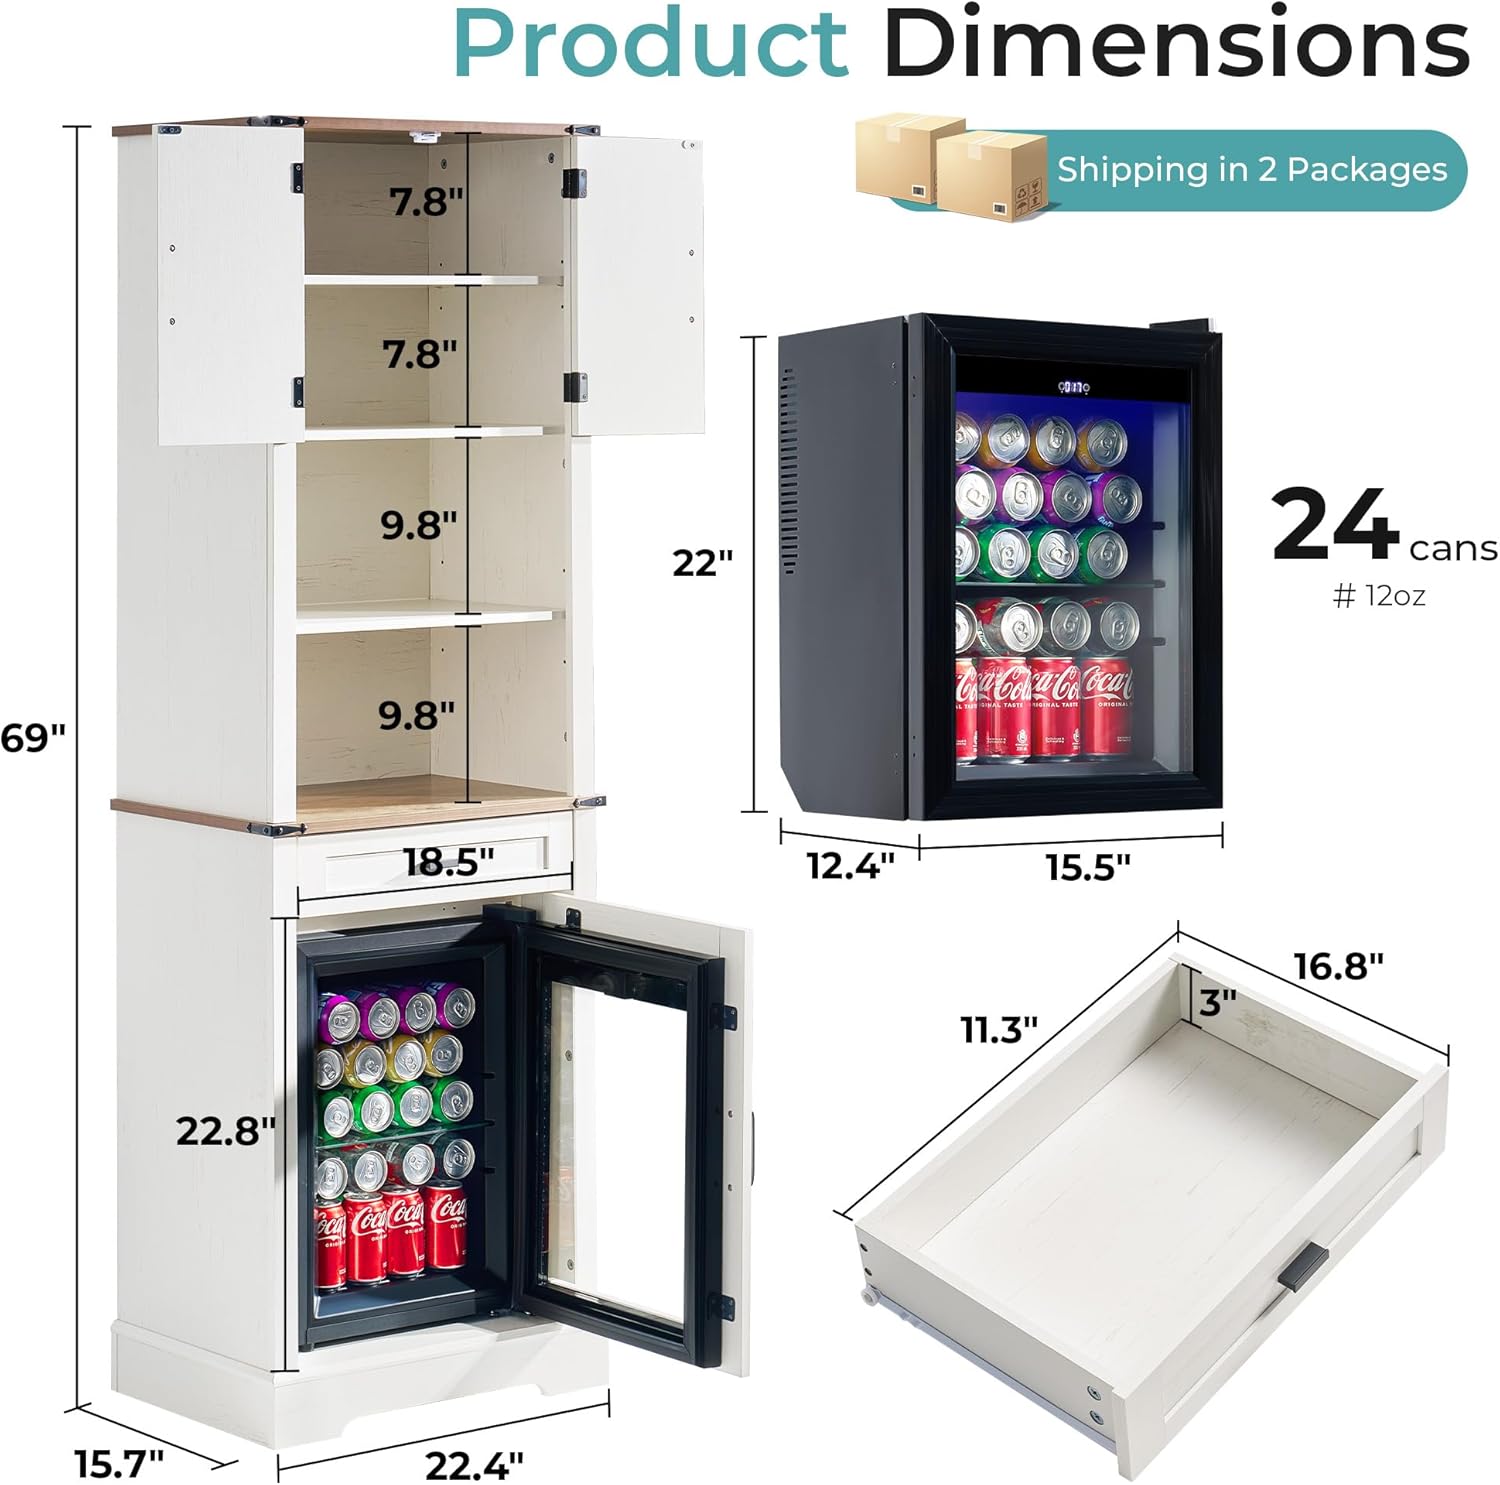
Image: Diagram illustrating the overall dimensions of the bar cabinet (69" H x 22.4" W x 15.7" D) and the beverage cooler, along with a note about shipping in two packages.

Image: Visual reminder that assembly takes approximately 1 hour with 2 people recommended, and the item ships in two separate packages.
Operating Instructions
Beverage Refrigerator Cooler Operation:
- Power Connection: Plug the refrigerator into a grounded electrical outlet.
- Temperature Control: Use the digital touch panel to adjust the temperature. The temperature can be set in 1°F increments, ranging from 41°F to 68°F. Note that the minimum temperature achievable is 27°F below room temperature.
- Loading: The 35L capacity cooler holds up to 25 standard 12oz cans. The removable shelf allows for flexible arrangement of bottles and cans of various sizes.
- Initial Cooling: Allow the refrigerator to cool for at least 2-4 hours before loading beverages.

Image: Close-up of the beverage cooler showing its 24-can capacity (12oz cans) and the digital touch control panel for temperature adjustment (41°F - 68°F).
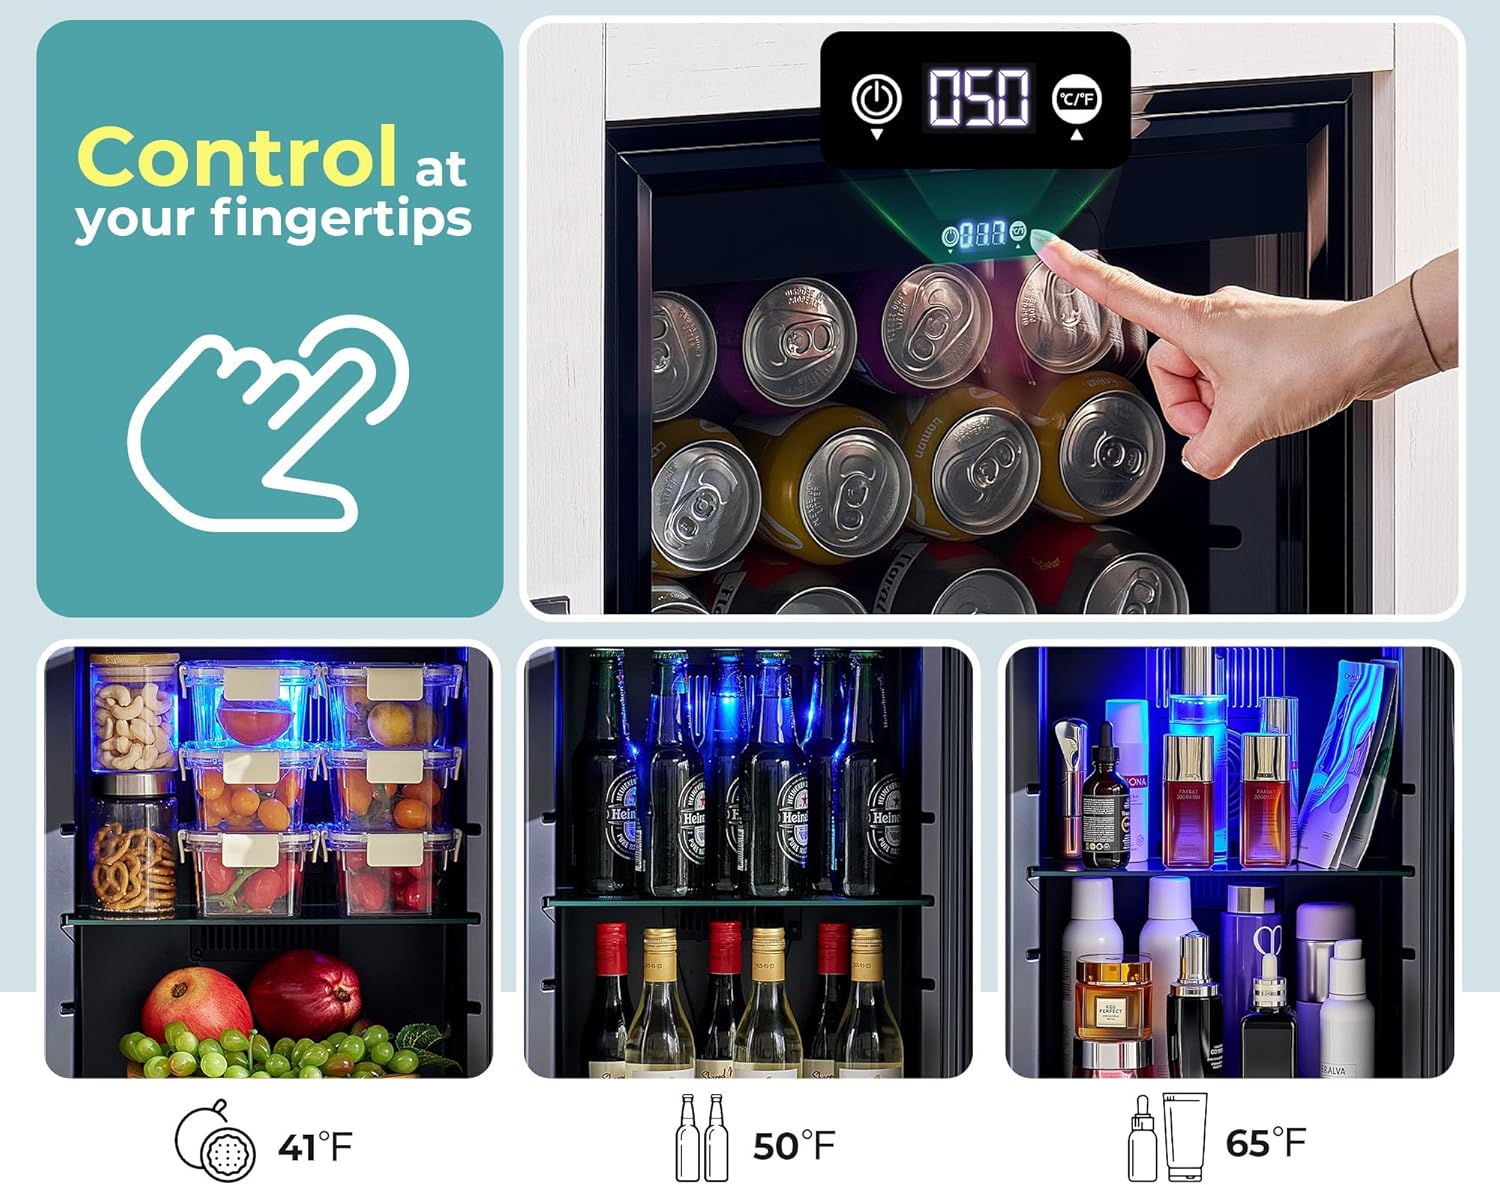
Image: Illustrates the digital touch panel for precise temperature control and examples of various items stored at different temperatures (41°F for fruits, 50°F for beer/wine, 65°F for cosmetics).
Cabinet Storage Utilization:
- Adjustable Shelves: The cabinet features adjustable shelves in the upper enclosed storage and open compartment. Adjust their height to accommodate bottles, glassware, and other bar tools as needed.
- Storage Drawer: Utilize the spacious drawer for smaller accessories like corkscrews, bottle openers, or coasters.
- Enclosed Storage: The top section with barn-style doors provides enclosed storage for items you wish to keep out of sight or protect from dust.

Image: An overview of the cabinet's large capacity, highlighting the top storage shelf, enclosed storage, adjustable shelves, open compartment, and beverage refrigerator cooler.

Image: Detailed view of the enclosed storage with magnetic doors, the storage drawer for utensils, and the adjustable shelves with height indicators.
Care and Maintenance
- Cleaning the Cabinet: Wipe the cabinet surfaces with a soft, damp cloth. Avoid harsh chemicals or abrasive cleaners that could damage the finish.
- Cleaning the Refrigerator:
- Unplug the refrigerator from the power outlet before cleaning.
- Clean the interior with a mild detergent and warm water. Rinse thoroughly and dry completely.
- Wipe the exterior with a soft, damp cloth.
- Ensure the circulation fan and vents are free from dust and debris for optimal performance.
- Spills: Clean up spills immediately to prevent staining or damage to the wood finish.
- Hardware: Periodically check all screws and fasteners to ensure they remain tight. Tighten if necessary.
- Placement: Avoid placing the cabinet in direct sunlight or near heat sources to prevent warping or fading.
Troubleshooting
| Problem | Possible Cause | Solution |
|---|---|---|
| Refrigerator not cooling |
|
|
| Cabinet doors are misaligned |
|
|
| Cabinet feels unstable |
|
|
If you encounter issues not listed here or require further assistance, please contact LUXOAK customer support.
Product Specifications
- Brand: LUXOAK
- Model Name: CCT123
- ASIN: B0F3HT261T
- Color: Antique White
- Product Dimensions: 15.7"D x 22.4"W x 69"H
- Item Weight: 97 Pounds
- Material: Wood (Frame Material), Wood (Top Material Type)
- Special Features: Adjustable Shelf, Built-in Fridge
- Mounting Type: Floor Mount
- Room Type: Dining Room, Home Office, Kitchen, Living Room
- Door Style: Swing Door (Cabinet), Glass Door (Fridge)
- Number of Shelves: 3 (Cabinet)
- Assembly Required: Yes
- Refrigerator Capacity: 35L (holds up to 25 standard 12oz cans)
- Refrigerator Temperature Range: 41°F to 68°F (Minimum 27°F below room temperature)
Warranty and Support
For warranty information or technical support, please refer to the documentation included with your purchase or contact LUXOAK customer service directly. Please have your model number (CCT123) and ASIN (B0F3HT261T) ready when contacting support.
You can visit the official LUXOAK store for more information: LUXOAK Store
Ask a question about this manual
Ask about setup, troubleshooting, compatibility, parts, safety, or missing instructions. Manuals+ will review the question and use this page’s manual context to help answer it.