1. Introduction
This manual provides essential instructions for the safe operation, maintenance, and troubleshooting of your Liectroux XR500 Pro Robot Vacuum Cleaner. Please read this manual thoroughly before using the product and retain it for future reference.
The Liectroux XR500 Pro is an advanced robotic vacuum cleaner designed for efficient floor cleaning, featuring simultaneous vacuuming and mopping, smart mapping capabilities, and app control.
2. Important Safety Instructions
To reduce the risk of injury or damage, observe the following safety precautions:
- Do not leave the appliance charging in mop function (with water tank) to prevent potential water leakage or damage.
- Use only original branded battery, charger, and charging base provided by LIECTROUX. Use of unauthorized components may cause damage or fire.
- If the robot is not used daily, fully charge it after its last use and then turn it off to preserve battery life.
- Exercise caution in homes or apartments with multiple floors or stairs. The anti-fall sensor detects steps up to approximately 3 1/4 inches (8 cm). Ensure adequate barriers are in place for drops exceeding this height.
- Keep hair, loose clothing, fingers, and all parts of the body away from openings and moving parts.
- Do not operate the robot in areas with open flames or explosive materials.
- Do not allow the robot to pick up large objects, sharp objects, or liquids.
3. Product Overview
Familiarize yourself with the main components of your Liectroux XR500 Pro robot vacuum cleaner.

Image 3.1: Top view of the Liectroux XR500 Pro Robot Vacuum Cleaner, showing the main body, navigation sensor, and control buttons.
Main Components:
- Main Unit: The robotic cleaner housing the motor, battery, and control systems.
- Dustbin: For collecting dry debris (400ml capacity).
- Water Tank: For wet mopping (250ml capacity).
- Integrated Dustbin & Water Tank: Allows for simultaneous vacuuming and mopping.
- Side Brushes: Two rotating brushes to sweep debris from edges and corners into the main brush path.
- Main Brush: A central rolling brush for deep cleaning and agitation of dirt.
- Charging Dock: The base station where the robot returns to recharge.
- Sensors: Anti-collision, anti-drop, and wall-following sensors for navigation.

Image 3.2: Diagram illustrating the separate dustbin (400ml), water tank (250ml), and the integrated dustbin and water tank for simultaneous vacuuming and mopping.
4. Setup
4.1 Unpacking
Carefully remove all components from the packaging. Ensure all packing materials are removed from the robot and its accessories.
4.2 Charging Dock Placement
Place the charging dock against a wall in an open, uncluttered area. Ensure there is at least 0.5 meters (1.6 feet) of clear space on either side and 1.5 meters (5 feet) in front of the dock for optimal navigation.
4.3 Initial Charging
Connect the power adapter to the charging dock and plug it into a wall outlet. Place the robot onto the charging dock, ensuring the charging contacts align. Allow the robot to fully charge before its first use. This may take several hours.
4.4 App Installation and Connection
- Download the official LIECTROUX app from your smartphone's app store (iOS or Android).
- Register an account and log in.
- Follow the in-app instructions to add your XR500 Pro robot vacuum cleaner. This typically involves connecting to the robot's Wi-Fi or Bluetooth signal.
- Once connected, you can control the robot, schedule cleanings, view maps, and access advanced features.
5. Operating Instructions
5.1 Starting a Cleaning Cycle
You can start a cleaning cycle in several ways:
- On the Robot: Press the power button on the robot's top panel.
- Via App: Use the LIECTROUX app to start, pause, or stop cleaning.
- Voice Control: The XR500 Pro is compatible with Alexa and Google Assistant. Link your robot to your smart home system and use commands like "Alexa, turn on the robot vacuum."

Image 5.1: The robot vacuum cleaner being controlled via voice command using Alexa, demonstrating smart home integration.
5.2 Cleaning Modes
The XR500 Pro offers versatile cleaning options:
- Simultaneous Vacuum & Mop: Attach the integrated dustbin/water tank and mop pad. The robot will vacuum and mop simultaneously for a comprehensive clean.
- Vacuum Only: Use the dry dustbin for vacuuming carpets and hard floors.
- Mop Only: Use the water tank and mop pad for wet cleaning hard floors. The robot performs a Y-shaped mopping pattern to simulate manual cleaning.
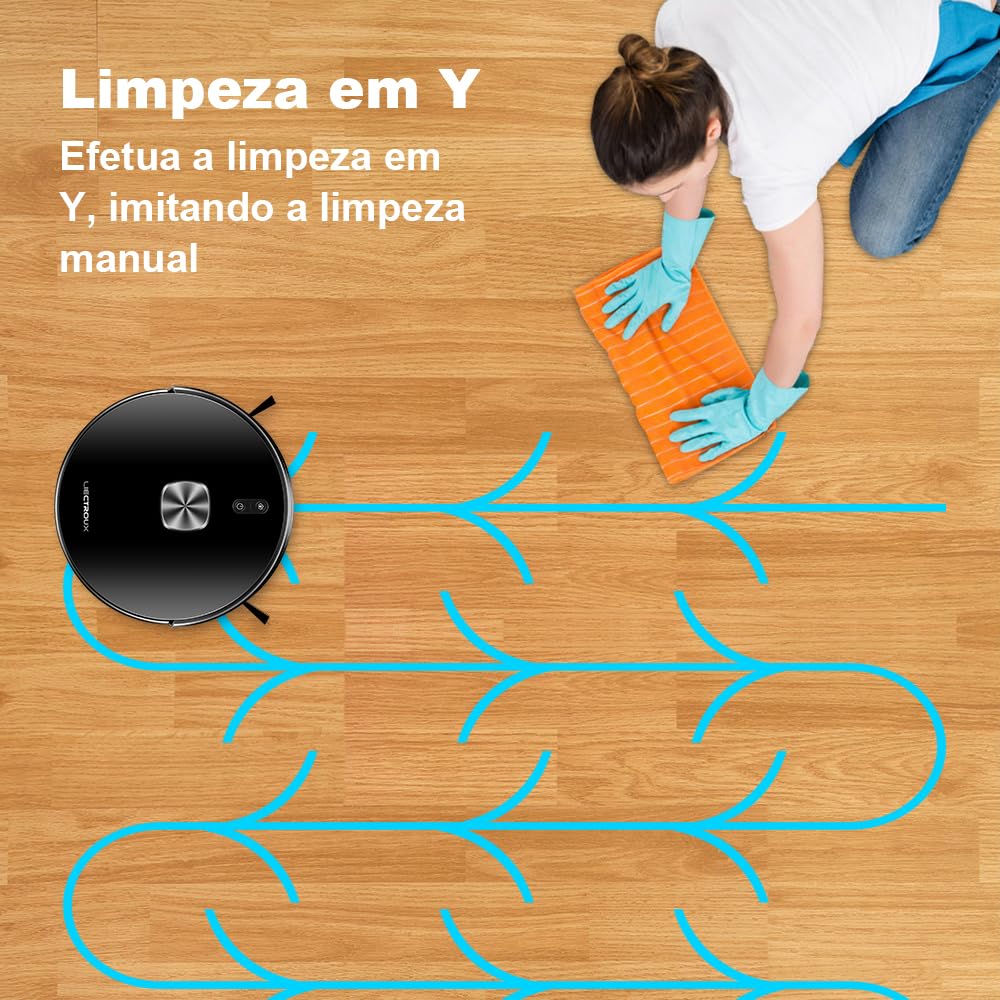
Image 5.2: Illustration of the robot's Y-shaped mopping pattern, designed to mimic manual cleaning motions for effective wet cleaning.
5.3 Smart Mapping and Navigation
The robot uses advanced sensors to map your home, allowing for efficient and systematic cleaning. Key features include:
- Map Saving: The robot saves maps of your home, enabling faster and more efficient cleaning in subsequent runs.
- Area Segmentation: Divide your home into specific cleaning zones via the app.
- Area Consolidation & Naming: Combine or rename areas for personalized cleaning management.
- Custom Clean: Select specific rooms or areas to clean, set no-go zones, or virtual walls through the app.
- Carpet Recognition: The robot automatically recognizes carpets and adjusts suction power accordingly.

Image 5.3: Visual representation of the map editing features available in the app, including area segmentation, consolidation, and naming for customized cleaning.
5.4 Automatic Return to Charging Dock
When the battery is low, or a cleaning cycle is complete, the robot will automatically return to its charging dock. If the battery runs low during a cleaning task, it will recharge and then resume cleaning from where it left off.

Image 5.4: Diagram showing the robot's ability to automatically return to its charging dock when the battery is low and resume cleaning from the last point of interruption.
6. Maintenance
Regular maintenance ensures optimal performance and extends the lifespan of your robot vacuum cleaner.
6.1 Emptying the Dustbin
After each cleaning cycle, or when indicated by the app, remove and empty the dustbin. Tap out debris and clean the filter as needed.
6.2 Refilling the Water Tank
For mopping functions, ensure the water tank is filled with clean water. Do not use detergents or cleaning solutions not approved for robot vacuums, as they may clog the system.
6.3 Cleaning Brushes
- Main Brush: Remove the main brush cover and lift out the brush. Use the cleaning tool (if provided) to remove hair and debris tangled around the brush. Clean regularly.
- Side Brushes: Check side brushes for tangled hair or debris. If damaged or worn, replace them.
6.4 Cleaning Sensors
Wipe all sensors (anti-drop, anti-collision, wall-following) with a clean, dry cloth to ensure they remain free of dust and debris, which can affect navigation.
6.5 Battery Care
To prolong battery life, fully charge the robot before storing it for extended periods. If not used daily, fully charge after last use and turn off.
7. Troubleshooting
If your robot vacuum cleaner encounters issues, refer to the following common solutions:
- Robot not charging: Ensure the charging dock is powered on and the robot's charging contacts are aligned with the dock's contacts. Clean contacts if dirty.
- Robot not starting: Check if the battery is charged. Ensure the power button is pressed firmly.
- Robot getting stuck frequently: Clear obstacles from the cleaning path. Ensure sensors are clean. Use virtual walls or no-go zones in the app for problematic areas.
- Poor cleaning performance: Empty the dustbin, clean or replace filters, clean main and side brushes. Ensure the water tank is filled for mopping.
- App connectivity issues: Ensure your Wi-Fi network is stable and the robot is within range. Restart the robot and your router if necessary. Re-pair the robot with the app if problems persist.
- Water tank leakage: Ensure the water tank is correctly installed and the seals are intact. Do not overfill.
For persistent issues, consult the in-app help section or contact LIECTROUX customer support.
8. Specifications
| Feature | Specification |
|---|---|
| Brand | LIECTROUX |
| Model Number | XR500PRO |
| Item Weight | 2.84 Kilograms |
| Product Dimensions (L x W x H) | 34.5 x 38.5 x 9.7 Centimeters |
| Battery Cell Composition | Lithium Ion |
| Color | Black |
| Dustbin Capacity | 400 ml |
| Water Tank Capacity | 250 ml |
| Voltage | Bivolt (Automatic voltage selection) |
9. Warranty and Support
For warranty information and customer support, please refer to the documentation included with your purchase or visit the official LIECTROUX website. Keep your purchase receipt as proof of purchase for warranty claims.


