1. Introduction
This manual provides essential instructions for the installation, operation, and maintenance of your DHUFKN H6C Electric Bike LCD Display Meter. This horizontal mid-mounted VA color LCD display is designed to provide clear and comprehensive information for electric bikes and scooters, featuring a high-definition display solution with full lamination technology.
The H6C display offers a more agile and three-dimensional visual experience with a larger display space. It includes functions such as battery indication, headlight control, boost function, boost gear, speed display, subtotal/total mileage, running time, metric conversion, and fault prompts.

Figure 1.1: The DHUFKN H6C Electric Bike LCD Display Meter, showing the main display unit and its associated wiring harness for connection to the e-bike or e-scooter system.
2. Specifications
Refer to the table below for detailed technical specifications of the H6C LCD Display Meter.
| Feature | Detail |
|---|---|
| Model | H6C |
| Display Type | Horizontal mid-mounted VA color LCD |
| Communication Protocol | UART |
| Voltage Compatibility | 24V / 36V / 48V / 60V (adjustable) |
| USB Charging Output | 5V / 500mA |
| Applicable Handlebar Size | 22.2mm / 25.4mm / 28.6mm / 31.8mm |
| Dimensions (L x W x H) | 71.3mm x 116.1mm x 22.8mm |
| Connector Type | SM 5+2PIN |
| Item Weight | 1.76 ounces (approximately 50 grams) |
3. Setup and Installation
Follow these steps to properly install the H6C LCD Display Meter on your electric bike or scooter.
- Mounting the Display: Secure the display unit to your handlebar using the integrated mounting bracket. Ensure it is positioned for optimal visibility and does not obstruct other controls. The bracket is compatible with handlebar diameters of 22.2mm, 25.4mm, 28.6mm, and 31.8mm.
- Connecting the Wiring: Locate the SM 5+2PIN connector on the display's wiring harness. Connect this to the corresponding port on your e-bike/e-scooter's controller or main wiring loom. Ensure the connection is firm and secure to prevent accidental disconnection during operation.
- Cable Management: Route the cables neatly along the handlebar and frame, securing them with cable ties if necessary, to prevent interference with moving parts and protect them from damage.

Figure 3.1: Rear view of the H6C display, illustrating the mounting brackets designed to attach to the handlebar.

Figure 3.2: Side view of the H6C display, highlighting the handlebar clamp mechanism for secure installation.
4. Operating Instructions
The H6C display provides various functions to enhance your riding experience. Familiarize yourself with the control buttons and display interface.
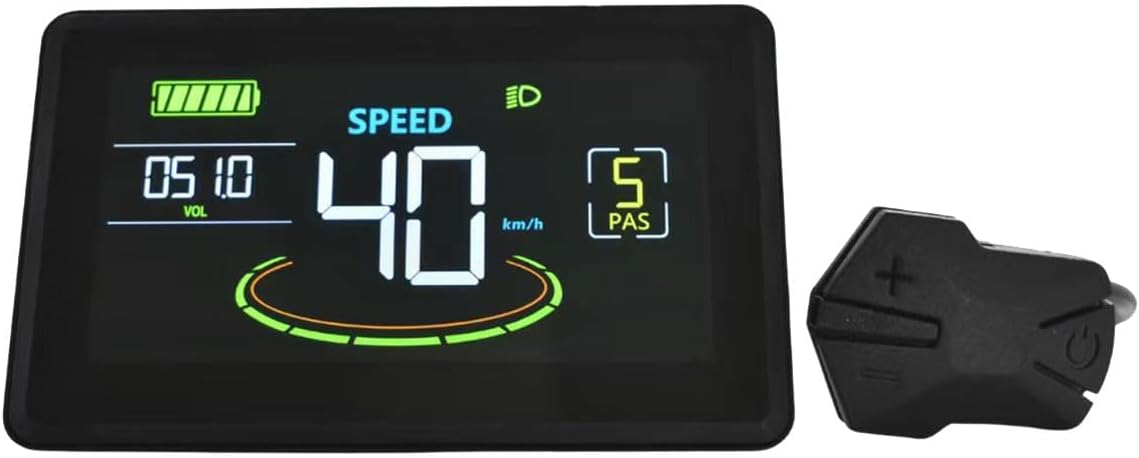
Figure 4.1: The H6C display alongside its external control unit, featuring '+' (up), '-' (down), and power buttons for navigation and function control.
4.1 Basic Functions
- Power On/Off: Press and hold the power button (usually indicated by a power symbol) on the external control unit to turn the display on or off.
- Battery Indicator: The display shows the current battery level, typically with a graphic icon and/or voltage reading.
- Speed Display: Your current speed is prominently displayed in kilometers per hour (km/h) or miles per hour (mph), depending on the selected metric.
- Headlight Control: Press the headlight button (if available on your control unit, often integrated with the power button or a dedicated button) to turn your e-bike's headlights on or off.
4.2 Advanced Functions
- Boost Function/Gear: Use the '+' and '-' buttons to adjust the assist level or boost gear. Higher numbers typically indicate more motor assistance.
- Mileage Display: Toggle between subtotal mileage (TRIP) for the current ride and total mileage (ODO) for the device's lifetime.
- Running Time: View the duration of your current ride.
- Metric Conversion: Access the settings menu (often by holding specific buttons) to switch between metric (km/h) and imperial (mph) units.
- Voltage Adjustment: The display supports 24V, 36V, 48V, and 60V systems. This setting is usually configured during initial setup or through a dedicated parameter menu to match your e-bike's battery voltage.
- Fault Prompt: The display will show error codes or symbols if a system fault is detected. Refer to your e-bike's main controller manual for specific fault code interpretations.

Figure 4.2: A close-up view of the H6C display in operation, showing the current speed (50 km/h), battery level, and assist level (PAS 5).
5. Maintenance
Proper maintenance ensures the longevity and optimal performance of your H6C LCD Display Meter.
- Cleaning: Use a soft, damp cloth to wipe the display screen and casing. Avoid abrasive cleaners, solvents, or harsh chemicals that could damage the screen or plastic components.
- Protection: While the display is designed for outdoor use, avoid prolonged exposure to direct sunlight, extreme temperatures, or heavy rain. If possible, cover your e-bike or remove the display when not in use for extended periods.
- Connections: Periodically check all wiring connections, especially the SM 5+2PIN connector, to ensure they are secure and free from corrosion or damage.
6. Troubleshooting
If you encounter issues with your H6C LCD Display Meter, refer to the following common problems and solutions.
- Display Not Turning On:
- Check if the e-bike battery is charged and turned on.
- Ensure all wiring connections, especially the main power connector, are securely attached.
- Verify that the display's voltage setting matches your e-bike's battery voltage.
- Incorrect Speed/Mileage Readings:
- Confirm that the wheel circumference setting in the display's parameters is correctly configured for your e-bike's wheel size.
- Check the speed sensor and its magnet for proper alignment and function.
- Display Shows Error Code:
- Note down the specific error code displayed.
- Consult your e-bike's main controller or motor manual for the meaning of the error code and recommended troubleshooting steps. Common issues include motor, controller, or sensor malfunctions.
- USB Charging Not Working:
- Ensure the display is powered on.
- Check the USB cable and the device being charged for proper connection and functionality.
If problems persist after attempting these solutions, please contact the manufacturer or your e-bike dealer for further assistance.
7. Warranty Information
Specific warranty details for the DHUFKN H6C Electric Bike LCD Display Meter are not provided in the product information. Please refer to the warranty documentation included with your purchase or contact the retailer/manufacturer directly for information regarding warranty coverage, terms, and conditions.
8. Customer Support
For technical assistance, spare parts, or further inquiries regarding your DHUFKN H6C Electric Bike LCD Display Meter, please contact the manufacturer or the authorized dealer from whom you purchased the product. Have your product model (H6C) and purchase details ready when contacting support.


