
1. Product Overview
The ORICO 40Gbps M.2 NVMe SSD Enclosure (Model CNM2-U4-GY) is designed for high-speed data transfer and external storage. It features a built-in cooling fan and an aluminum alloy shell to ensure optimal thermal management during intensive use. This enclosure supports M-Key NVMe SSDs and is compatible with various interfaces including USB4, Thunderbolt 4/3, USB 3.2, USB 3.1, and USB 3.0.

Image 1.1: Overview of the ORICO 40Gbps M.2 NVMe SSD Enclosure.
2. Package Contents
Please verify that all items are present in the package:
- 1 x ORICO 40Gbps NVMe SSD Enclosure
- 1 x 2-in-1 USB Cable (USB-C to USB-C 40Gbps, USB-C to USB-A 10Gbps)
- 1 x Thermal Silicone Pad
- 1 x Screwdriver
- Screws for SSD installation
- User Manual

Image 2.1: Contents included in the ORICO NVMe SSD Enclosure package.
3. Specifications
| Feature | Description |
|---|---|
| Model Number | CNM2-U4-GY |
| Interface | USB4 (40Gbps), Thunderbolt 4/3, USB 3.2/3.1/3.0 |
| SSD Compatibility | M-Key 2230/2242/2260/2280 NVMe SSDs (up to 8TB) |
| Cooling System | Built-in Fan, Aluminum Alloy Shell, Silicone Thermal Pads |
| Data Transfer Speed | Up to 40Gbps (Read: 3500 MB/s, Write: 3000 MB/s) |
| Dimensions (LxWxH) | 5.83 x 1.93 x 0.71 inches |
| Weight | 9.1 ounces |
| Material | Aluminum Alloy |
| Supported OS | Windows, macOS, Linux, Android |
Note: Not compatible with Intel CPUs prior to 12th Gen. Not recommended for SN750, 970 EVO Plus, or P3 SSDs. SATA SSDs are not supported.
4. Setup and Installation
Follow these steps to install your M.2 NVMe SSD into the enclosure:
- Remove the Cover: Use the provided screwdriver to unscrew the retaining screw and gently slide open the upper cover of the enclosure.
- Install the M.2 SSD: Insert your M.2 NVMe SSD into the M.2 interface at a 45-degree angle. Gently push down the SSD and secure it with the provided screw to fix it in place. Ensure the SSD is M-Key compatible and of size 2230, 2242, 2260, or 2280.
- Apply Thermal Pad: Place the silicone thermal pad onto the installed SSD. This helps in heat dissipation.
- Complete Installation: Close the upper cover and secure it with the retaining screw.

Image 4.1: Step-by-step guide for M.2 NVMe SSD installation.

Image 4.2: Supported M.2 NVMe SSD types and sizes.
5. Operation
Once the SSD is installed, connect the enclosure to your host device using the provided 2-in-1 USB cable. The enclosure is plug-and-play and does not require additional drivers for most operating systems.
5.1 Data Transfer
Utilize the USB-C to USB-C cable for 40Gbps transfer speeds when connecting to compatible Thunderbolt 3/4 or USB4 ports. For devices with USB-A ports, use the USB-C to USB-A cable for speeds up to 10Gbps. The enclosure supports UASP and TRIM commands for optimized performance and SSD longevity.

Image 5.1: Enclosure connected to a laptop for data transfer.
5.2 Power Delivery
The USB-C to USB-C cable also supports 100W Power Delivery (PD) fast charging, allowing for simultaneous data transfer and device charging if your host device supports it.

Image 5.2: The versatile 2-in-1 data cable for the enclosure.
6. Cooling System
The ORICO NVMe SSD Enclosure incorporates a multi-level cooling system to maintain optimal operating temperatures for your SSD, preventing performance throttling and ensuring stability during prolonged use.
- Built-in Cooling Fan: An integrated fan actively circulates air to dissipate heat. The fan operates at 7000 RPM, producing approximately 40-60 decibels of sound.
- Aluminum Alloy Shell: The entire enclosure is constructed from aluminum alloy, which acts as a large heatsink to draw heat away from the SSD.
- Silicone Thermal Pads: These pads create direct contact between the SSD and the aluminum casing, enhancing thermal conductivity.
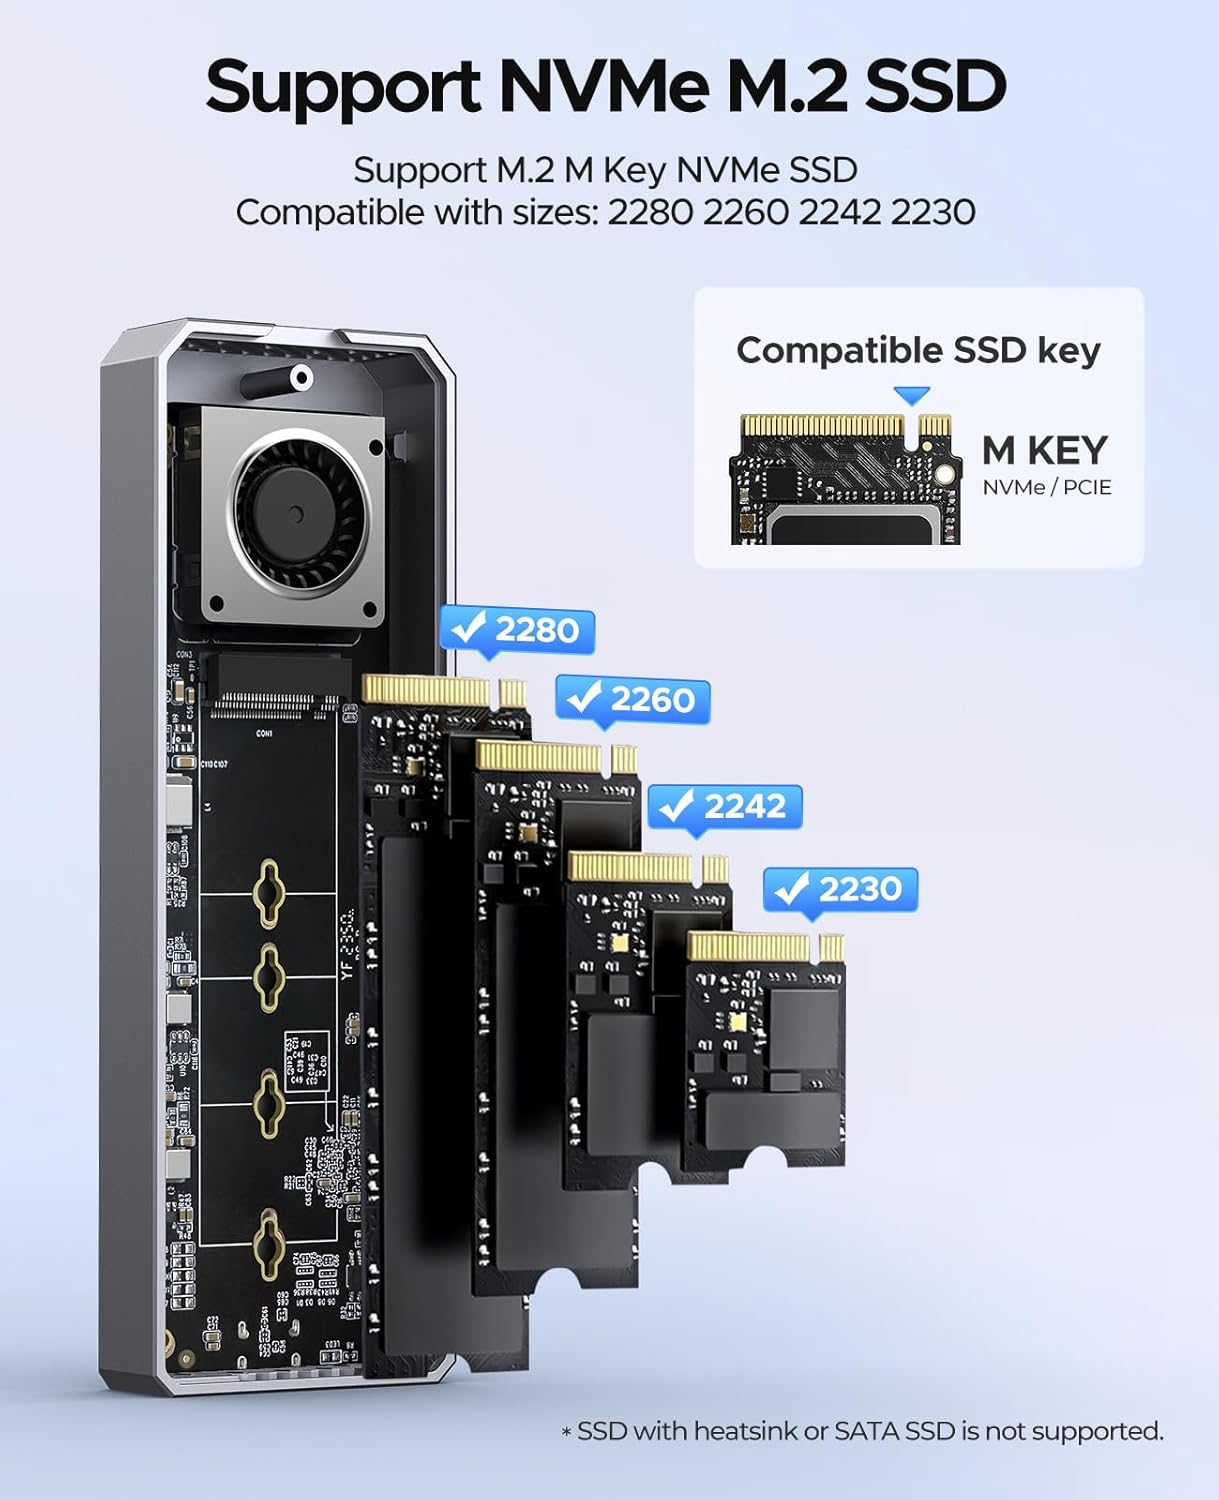
Image 6.1: Internal view highlighting the built-in cooling fan.

Image 6.2: Illustration of the multi-level cooling design.
7. Compatibility
The enclosure offers broad compatibility with various devices and operating systems:
7.1 Host Device Compatibility
- Intel 12th Gen CPUs and later
- Apple M1/M2/M3/M4 chips
- AMD CPUs
- Compatible with devices featuring Thunderbolt 3/4, USB4, USB 3.2, USB 3.1, and USB 3.0 interfaces.
Note: Not compatible with Intel CPUs prior to 12th Gen, including older Apple devices.
7.2 Operating System Compatibility
- Windows
- macOS
- iPad OS
- Linux
- Android

Image 7.1: Overview of device and system compatibility.
8. Troubleshooting
If you encounter issues with your ORICO NVMe SSD Enclosure, consider the following:
- Enclosure Not Detected:
- Ensure the SSD is correctly installed and secured within the enclosure.
- Try connecting the enclosure to a different USB/Thunderbolt port on your device.
- Test with a different USB cable if available.
- Verify that your host device's operating system is up to date and has the necessary drivers for USB/Thunderbolt.
- Check Disk Management (Windows) or Disk Utility (macOS) to see if the drive is recognized but uninitialized or unformatted.
- Slow Transfer Speeds:
- Ensure you are using a 40Gbps compatible port (Thunderbolt 3/4 or USB4) and the USB-C to USB-C cable for maximum speed.
- Confirm your SSD is capable of high speeds.
- Close other applications that might be consuming system resources or disk I/O.
- Check for background processes like antivirus scans.
- Overheating:
- Ensure the thermal silicone pad is correctly placed on the SSD.
- Avoid obstructing the ventilation holes on the enclosure.
- While the fan helps, continuous heavy load can still generate heat. Allow the device to cool if it becomes excessively hot.
- SSD Not Supported:
- Confirm your SSD is an M-Key NVMe SSD and not a SATA M.2 SSD. SATA M.2 SSDs are not compatible.
- Refer to the specifications for specific SSD models that are not recommended (e.g., SN750, 970 EVO Plus, P3).
9. Warranty and Support
ORICO products typically come with a manufacturer's warranty. Please refer to the warranty card included in your package or visit the official ORICO website for detailed warranty terms and conditions.
For technical support, product inquiries, or warranty claims, please contact ORICO customer service through their official channels. Contact information can usually be found on the ORICO website or in the product packaging.
When contacting support, please have your product model number (CNM2-U4-GY) and purchase information readily available.


