
1. Introduction
This manual provides comprehensive instructions for the ASURE 13.1" 2K QLED Touchscreen Stereo Radio. It is designed to assist users with the installation, operation, and maintenance of the device, ensuring optimal performance and user experience. Please read this manual thoroughly before using the product.
2. Product Overview
The ASURE 13.1" 2K QLED Touchscreen Stereo Radio is an advanced car infotainment system featuring an Octa-Core Android 15 operating system, Wireless CarPlay, and Android Auto. It is specifically designed for Benz Sprinter Freightliner W907 VS30 MK3 (2019-2023 low-end) models.

Figure 2.1: ASURE 13.1" Stereo Radio installed in a compatible vehicle dashboard.
Key Features:
- 13.1" 2K QLED Touchscreen: Provides sharp, vibrant visuals for navigation and media.
- Octa-Core Android 15: Ensures smooth multitasking and personalized user interface.
- Wireless CarPlay & Android Auto: Seamless smartphone connectivity via Bluetooth 5.0 for music, calls, messages, and real-time GPS navigation.
- HD Backup Camera: Includes a waterproof backup camera for safe navigation and parking.
- OEM Integration: Retains steering wheel controls and supports original car microphone and systems.
3. What's in the Box
Please verify that all components are present and in good condition upon unboxing:
- 1x 13.1inch 8core 4+64GB car stereo radio host
- 1x mounting bezel
- 1x wiring harness kit
- 1x Radio Cable
- 1x CAN BUS
- Audio Video Ports
- 1x GPS Cable
- 2x USB Cable
- 1x Microphone
- Screwdriver and User Manual
- 1x Wifi/BT antenna
- Reversing Camera Input
- 1x 4G LTE Antenna
- Reversing Camera
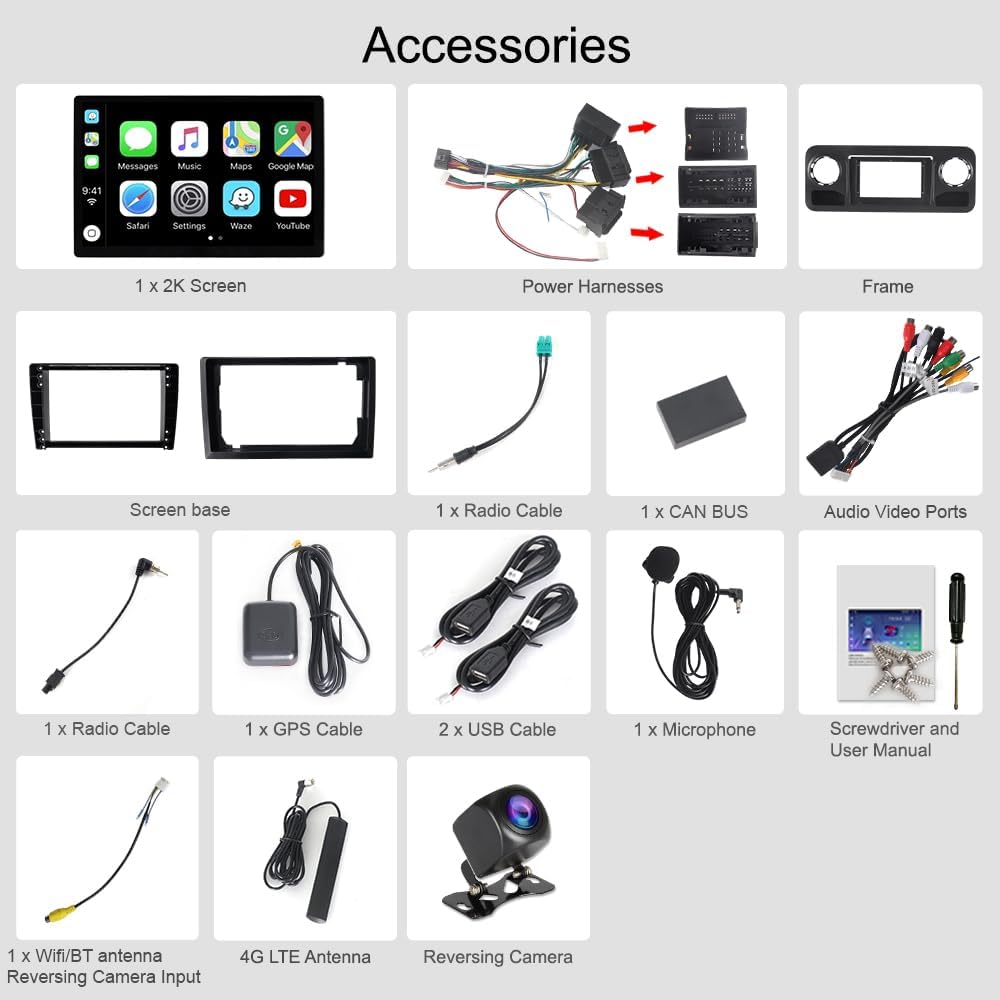
Figure 3.1: Included accessories and components.
4. Setup and Installation
This section guides you through the physical installation and initial configuration of your ASURE Stereo Radio.
4.1 Vehicle Compatibility
This unit is designed for Benz Sprinter W907 VS30 MK3 (2019-2023 low-end) models. If your vehicle has an OEM NAVI Screen, an extra wiring kit may be required. Please consult the second product image with red text for clarification or contact support.

Figure 4.1: Visual comparison of the dashboard before and after installing the ASURE Stereo Radio.
4.2 Physical Installation
The unit is designed for plug-and-play installation. Ensure all cables are securely connected. The screen base offers three installation positions for optimal viewing angle.
Video 4.1: Installation guide for the ASURE 13.1-inch Car Stereo Radio, demonstrating the process of mounting the screen and connecting components.
4.3 Rear View Camera Wiring
Connect the HD waterproof backup camera using the provided wiring diagram:
- Black power plug to the red socket.
- Connect to the Negative (-) of your car's Reversing Lamp Power.
- Connect the two Red wires to the Positive (+) of your car's Reversing Lamp Power.
- Connect the RCA female to the RCA male.
- Connect the RCA male to the RCA female.
- Connect to your head unit's "REVERSE" wire of reversing camera input trigger. Note: No need to connect this wire if your radio comes with CAN-BUS box/decoder.
- Connect to your radio's rear 10-Pin socket.

Figure 4.2: Detailed wiring instructions for the HD backup camera.
5. Operating Instructions
This section covers the daily use and various functionalities of your ASURE Stereo Radio.
5.1 Initial Power-On and Interface
Upon starting your vehicle, the unit will power on. The main interface provides quick access to navigation, Bluetooth, radio, apps, equalizer, video player, and settings.

Figure 5.1: Main user interface of the ASURE Stereo Radio.
5.2 Wireless CarPlay & Android Auto
Connect your smartphone wirelessly via Bluetooth 5.0 to access CarPlay or Android Auto. This allows for seamless integration of your phone's music, calls, messages, and navigation apps directly on the stereo display.

Figure 5.2: Wireless CarPlay and Android Auto functionality on the display.
5.3 Navigation and GPS
The unit supports worldwide map types and provides real-time GPS navigation. You can use pre-installed navigation apps or download others from the Play Store.
5.4 Media Playback
Enjoy music and videos through various sources including Bluetooth, USB, and streaming apps. The unit features DSP Audio for enhanced sound quality.

Figure 5.3: Connectivity options including 5G WiFi, Bluetooth 5.0, and DSP Audio.
5.5 Climate Control Integration
The unit integrates with your vehicle's climate control system, allowing you to adjust fan speed and temperature directly from the touchscreen.
5.6 Rear Seat Entertainment
The stereo radio supports video output to external headrest monitors, providing entertainment for rear passengers.

Figure 5.4: Example of rear seat entertainment using the video output feature.
6. Maintenance
To ensure the longevity and optimal performance of your ASURE Stereo Radio, follow these maintenance guidelines:
- Screen Cleaning: Use a soft, lint-free cloth to gently wipe the touchscreen. Avoid abrasive cleaners or solvents that could damage the display.
- Software Updates: Regularly check for and install software updates through the App Store or Play Store to ensure you have the latest features and security patches.
- Environmental Conditions: Avoid exposing the unit to extreme temperatures, direct sunlight for prolonged periods, or excessive moisture.
7. Troubleshooting
This section addresses common issues and their solutions.
7.1 Screen Not Activating on Startup
If the screen appears dim or black on startup and requires a touch to activate, you can adjust the "Stay Awake" setting:
- Go to Settings > System.
- Select Developer Options.
- Enter the factory password: 3368.
- Toggle Stay Awake (Screen will never sleep while charging) to ON.
Video 7.1: Demonstration of accessing factory settings and adjusting the "Stay Awake" option to prevent the screen from going black on startup.
7.2 Incorrect Car Model/CAN-BUS Protocol
If steering wheel controls or other OEM features are not functioning correctly, verify the car model and CAN-BUS settings:
- Go to Settings > Factory.
- Enter the factory password: 3368.
- Select Car Model.
- Choose the correct CAN Box type, Car Brand, and Car Model (e.g., HIWORLD->Benz->Sprinter->19-21).
7.3 Changing Mileage Unit (km/h to mph)
To switch between kilometers per hour (km/h) and miles per hour (mph):
- Go to Settings > Factory.
- Enter the factory password: 3368.
- Scroll down and find Mileage unit switching.
- Select your desired unit (Km or Mile).
7.4 Adjusting Date and Time
If the clock is incorrect:
- Go to Settings > System.
- Select Date And Time.
- Manually adjust the date and time or ensure "Use network-provided time" is enabled.
7.5 Customizing Boot Screen Logo
To set a custom boot screen logo:
- Ensure your image resolution is 1920x1200 pixels and the format is BMP.
- Save the image in a folder named "mycar" in the root directory of a USB disk or SD card.
- Insert the USB drive into the stereo unit.
- Go to Settings > Factory.
- Enter the factory password: 3368.
- Select Boot Screen Logo.
- Navigate to your image on the USB drive and press and hold to select it as the boot logo.
7.6 Changing UI Themes
To change the user interface theme:
- Go to Settings > Factory.
- Enter the factory password: 3368.
- Scroll down and find Home Launcher Selection.
- Select your desired UI theme (e.g., UI 28 for the original theme).
Note: Some elements within themes, such as the sport car graphic, may not be customizable. Only widgets can be added or removed.
8. Specifications
| Feature | Detail |
|---|---|
| Item Weight | 7.92 pounds |
| Product Dimensions | 11.8 x 7.7 x 1.4 inches |
| Display Size | 13.1 Inches |
| Screen Size | 13.1 Inches |
| Operating System | Android 15 |
| Processor | Octa-Core |
| RAM | 4GB |
| ROM | 64GB |
| Special Feature | Bluetooth, Touchscreen, WIFI |
| Connectivity Technology | Bluetooth, USB, Wi-Fi |
| Map Type | Worldwide |
| Audio Output Mode | Stereo |
| Mounting Type | Dashboard Mount |
| Vehicle Service Type | Truck |
9. Warranty and Support
The ASURE Stereo Radio comes with a 30-day free return and replacement policy. Additionally, a 1-year repair warranty is provided for manufacturing defects. For technical support or warranty claims, please contact ASURE customer service.

