1. Introduction
Thank you for choosing the Karinear 60cm Induction Cooktop with Integrated Hood. This manual provides essential information for the safe and efficient installation, operation, and maintenance of your appliance. Please read these instructions carefully before use and retain them for future reference.
2. Safety Instructions
To prevent accidents and ensure proper operation, always adhere to the following safety guidelines:
- Electrical Safety: Ensure the appliance is connected to a properly grounded electrical supply as specified in the installation section. Do not use extension cords or adapters.
- Cookware Compatibility: Only use induction-compatible cookware with a magnetic base. Incompatible cookware will not heat.
- Residual Heat: Induction zones remain hot after use. The residual heat indicator will illuminate. Avoid touching hot surfaces until the indicator turns off.
- Children and Vulnerable Persons: This appliance is not intended for use by persons with reduced physical, sensory, or mental capabilities, or lack of experience and knowledge, unless they have been given supervision or instruction concerning use of the appliance by a person responsible for their safety. Keep children away from the appliance during operation and cooling.
- Ventilation: Ensure adequate ventilation around the appliance as per installation instructions to prevent overheating.
- Cleaning: Disconnect power before cleaning. Allow the appliance to cool completely.
- Flammable Materials: Do not store flammable materials near or on the cooktop.
3. Product Features
- Versatile Cooking Zones: Four induction cooking zones with nine adjustable power levels and a boost function for rapid heating.
- Flexible Zones: Innovative flex zones allow combining adjacent cooking areas to accommodate larger or irregularly shaped cookware.
- Integrated Extraction System: A central extractor hood efficiently removes cooking vapors. It supports both ducted and recirculation modes.
- Easy-Clean Filtration: Features washable metal grease filters and an accessible drip tray for simplified maintenance.
- Precise Timer: An integrated timer can be set for up to 99 minutes, offering automatic shut-off for selected cooking zones.
- Residual Heat Indicators: Visual indicators for each zone alert you when surfaces are still hot after use.
- Touch Controls: Intuitive touch controls provide precise command over cooking zones and extraction functions.
- Elegant Design: The black ceramic glass surface offers a modern aesthetic and is easy to clean.
4. Specifications
| Brand | Karinear |
| Model Number | KNY-PXJ-KEH6015B-M47274-F2-CB-EU |
| Product Dimensions (L x W x H) | 60 cm x 52 cm x 20 cm |
| Weight | 27.99 kg |
| Installation Dimensions (L x W x H) | 57.5 cm x 49.5 cm x 20 cm (depth) |
| Material | Ceramic Glass |
| Total Wattage | 7200 W |
| Hood Wattage | 145 W |
| Control Type | Touch |
| Voltage | 220-240 V |
| Burner Type | Induction |
| Power Source | Electric |
| Included Components | Power cord, extractor hood |
5. Installation
Installation should be performed by a qualified technician in accordance with local regulations and electrical codes.
5.1. Countertop Cut-out
Ensure the countertop cut-out dimensions match the appliance requirements:
- Width: 57.5 cm
- Depth: 49.5 cm
- Minimum Depth Clearance: 20 cm below the countertop surface
5.2. Electrical Connection
The appliance requires a direct electrical connection (220-240V). A plug is not included; the connection is made via a cable. Consult the wiring diagrams provided with the appliance for correct connection. Ensure the power supply is disconnected before commencing any electrical work.
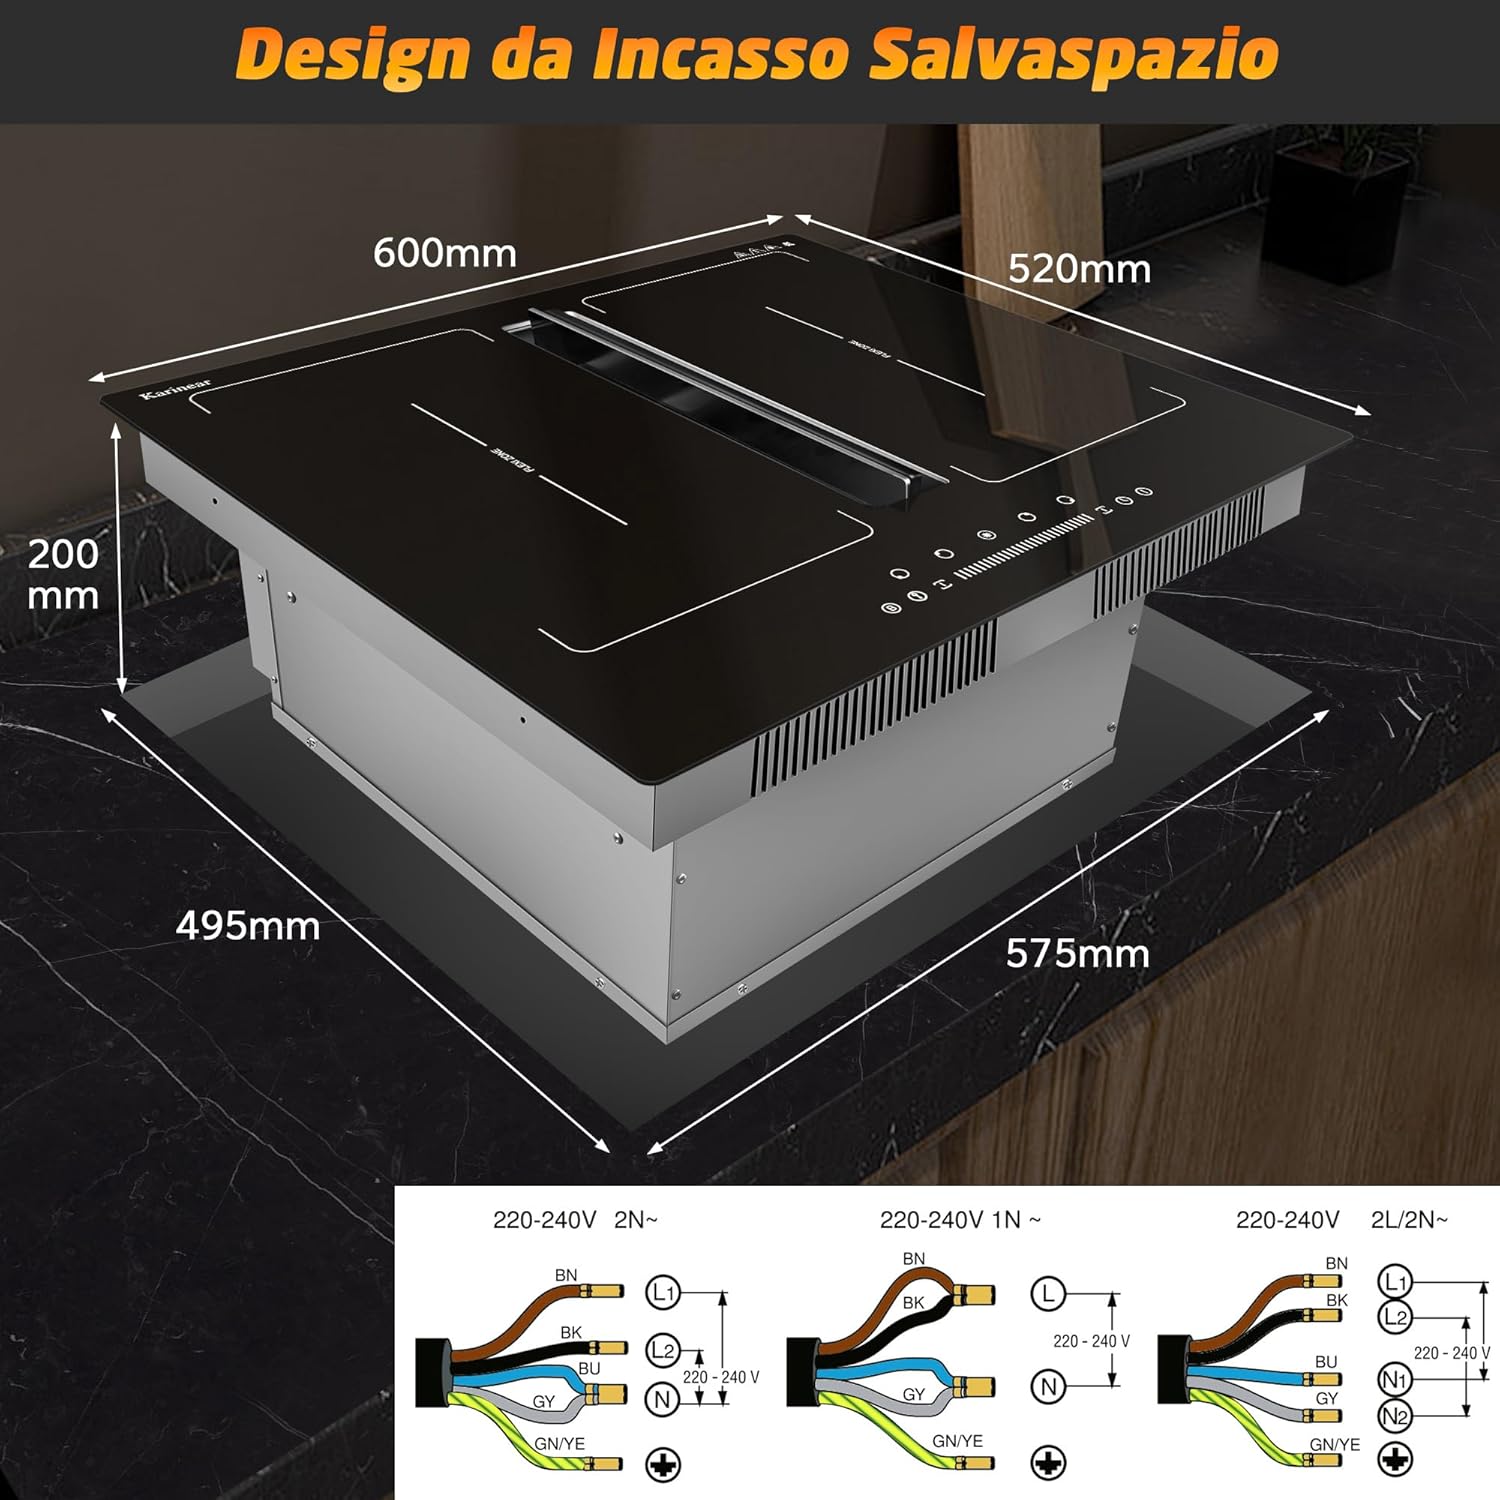
Image: This diagram illustrates the required installation dimensions (600mm width, 520mm depth, 200mm height for the unit, with a cut-out of 575mm x 495mm and 200mm depth) and various wiring configurations (220-240V 2N~, 220-240V 1N~, 220-240V 2L/2N~) for electrical connection.
6. Operation
The cooktop features intuitive touch controls. Familiarize yourself with the control panel before first use.
6.1. Control Panel Overview
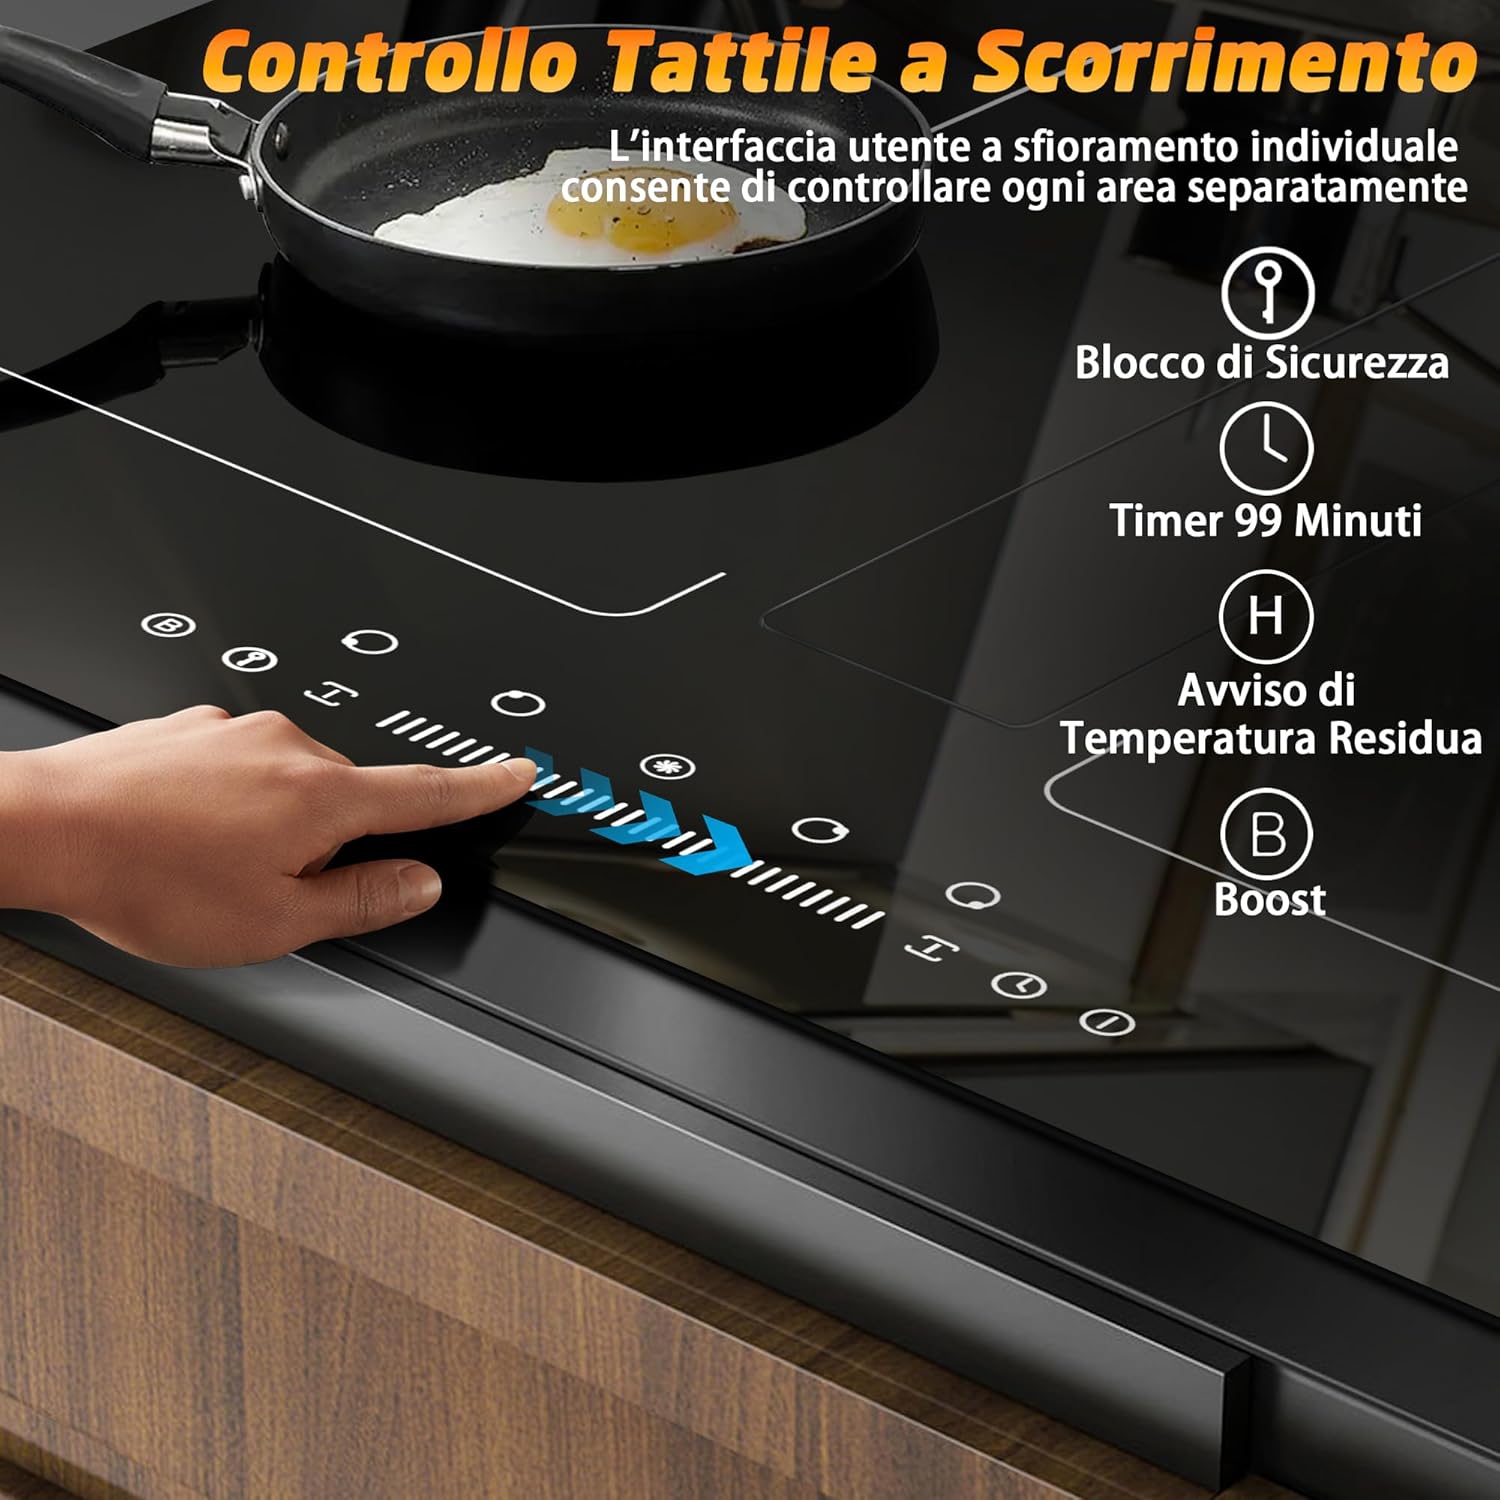
Image: This image displays the touch control panel of the induction cooktop, highlighting key functions such as Safety Lock, 99-minute Timer, Residual Heat Warning, and Boost function. A finger is shown interacting with the slider control for power adjustment.
- Power On/Off: Touch the power symbol to turn the appliance on or off.
- Cooking Zone Selection: Tap the corresponding zone indicator to select a cooking area.
- Power Level Adjustment: Use the slider or +/- touch buttons to set the desired power level (1-9).
- Boost Function (B): Activates maximum power for rapid heating. Tap the 'B' symbol for the selected zone.
- Timer (L): Set a cooking duration up to 99 minutes. The zone will automatically switch off when the timer expires.
- Safety Lock (Key Symbol): Prevents accidental changes to settings. Press and hold to activate/deactivate.
- Residual Heat Indicator (H): Indicates that a cooking zone is still hot after use.
6.2. Flex Zones
The flex zones allow you to combine two adjacent cooking zones into one large area, ideal for griddle plates or oversized pots.

Image: This graphic illustrates the flexibility of the cooktop, showing how it can operate as four independent cooking zones or combine two zones into a single, larger flexible zone for accommodating bigger cookware.
- To activate a flex zone, place your large cookware over the two adjacent zones and then select one of the zones. The system will automatically detect the combined area.
- Adjust the power level for the combined flex zone as you would for a single zone.
6.3. Integrated Hood Operation
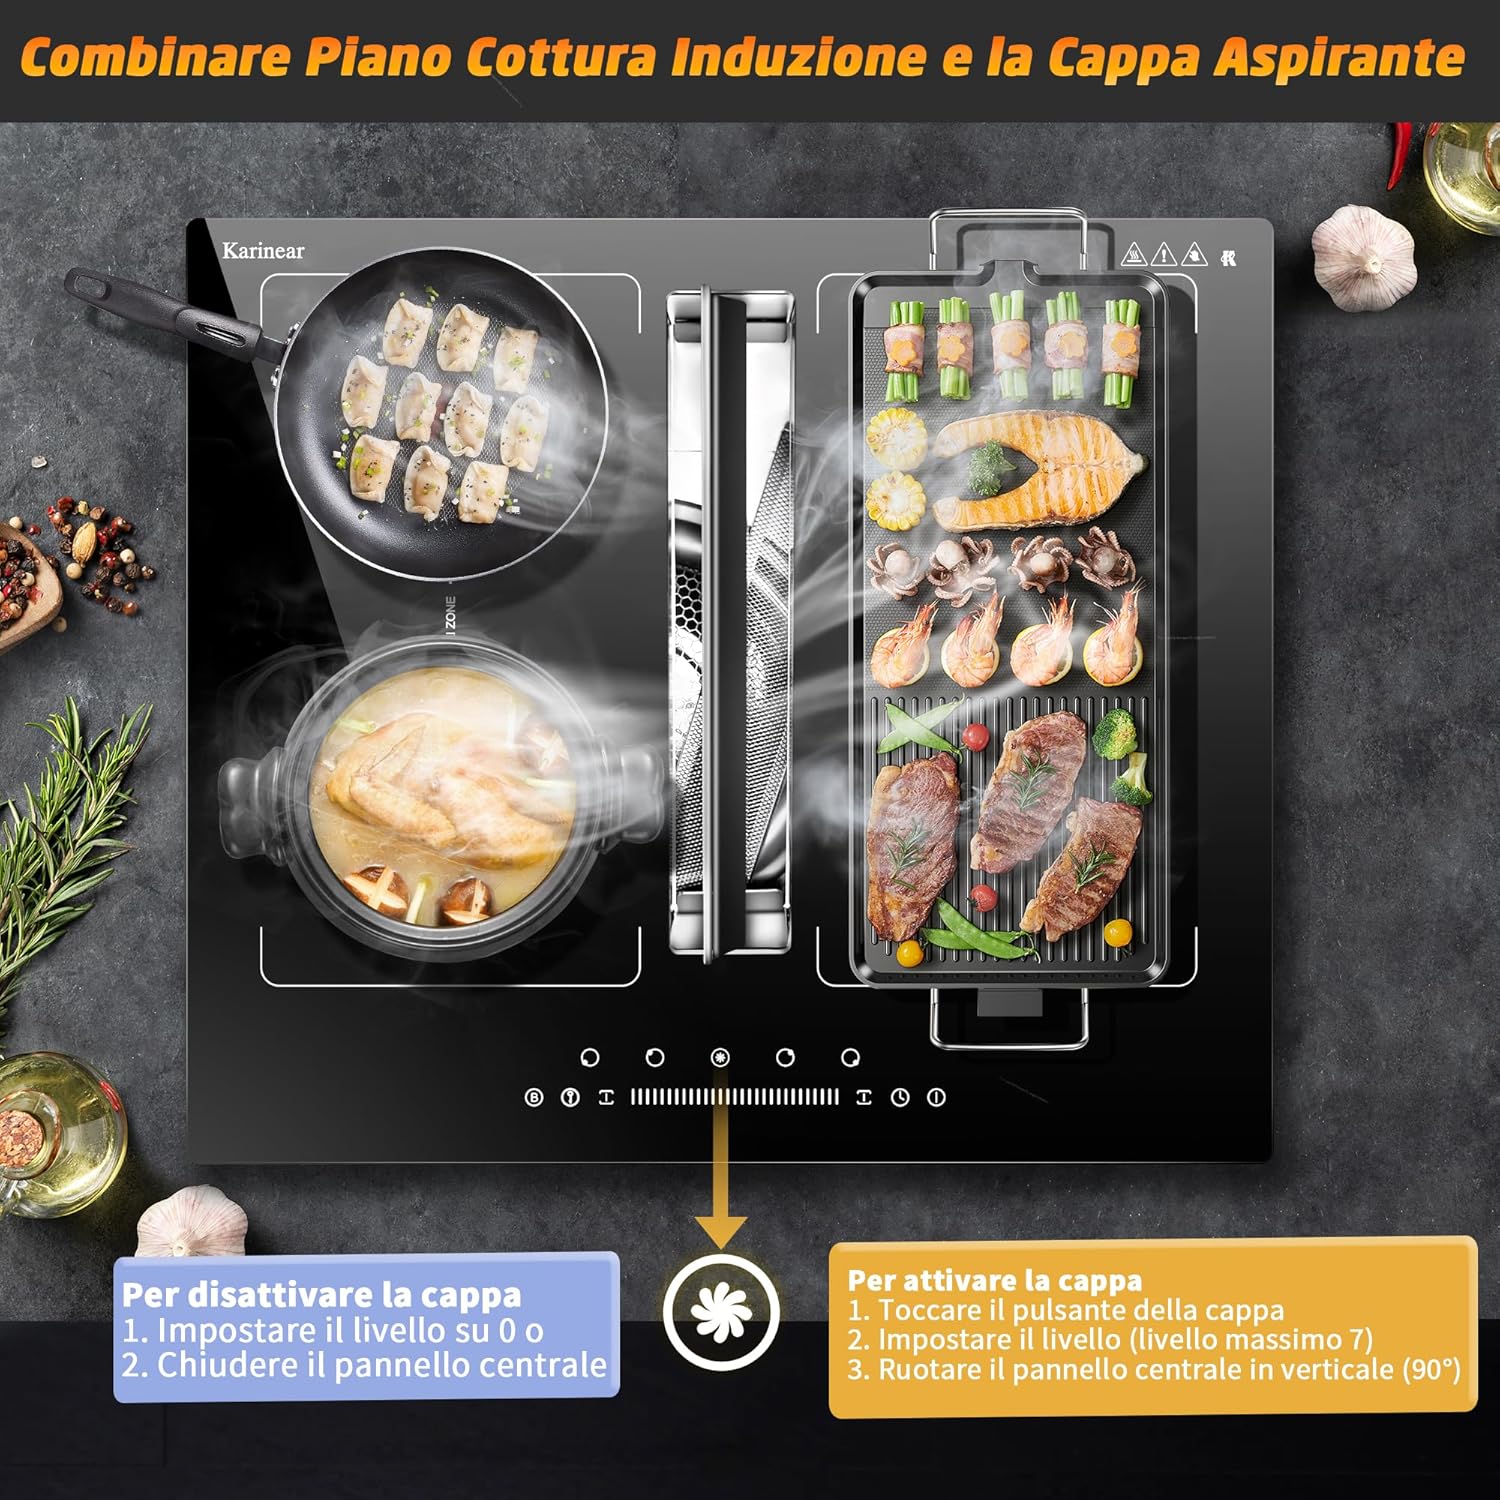
Image: This image demonstrates how to activate and deactivate the integrated extractor hood. To activate, touch the hood button, set the level (max 7), and rotate the central panel vertically. To deactivate, set the level to 0 or 1 and close the central panel.
- To Activate the Hood:
- Touch the hood button on the control panel.
- Set the desired extraction level (up to level 7).
- Rotate the central panel vertically (90 degrees) to open the extraction vent.
- To Deactivate the Hood:
- Set the extraction level to 0 or 1.
- Close the central panel.

Image: This image shows the Karinear induction cooktop in operation, with various dishes being prepared on the cooking zones and the integrated hood actively extracting steam and cooking odors from the center.
7. Compatible Cookware
Induction cooktops require cookware with a magnetic base. To check if your cookware is compatible, hold a magnet to the bottom. If it sticks, the cookware is suitable for induction.
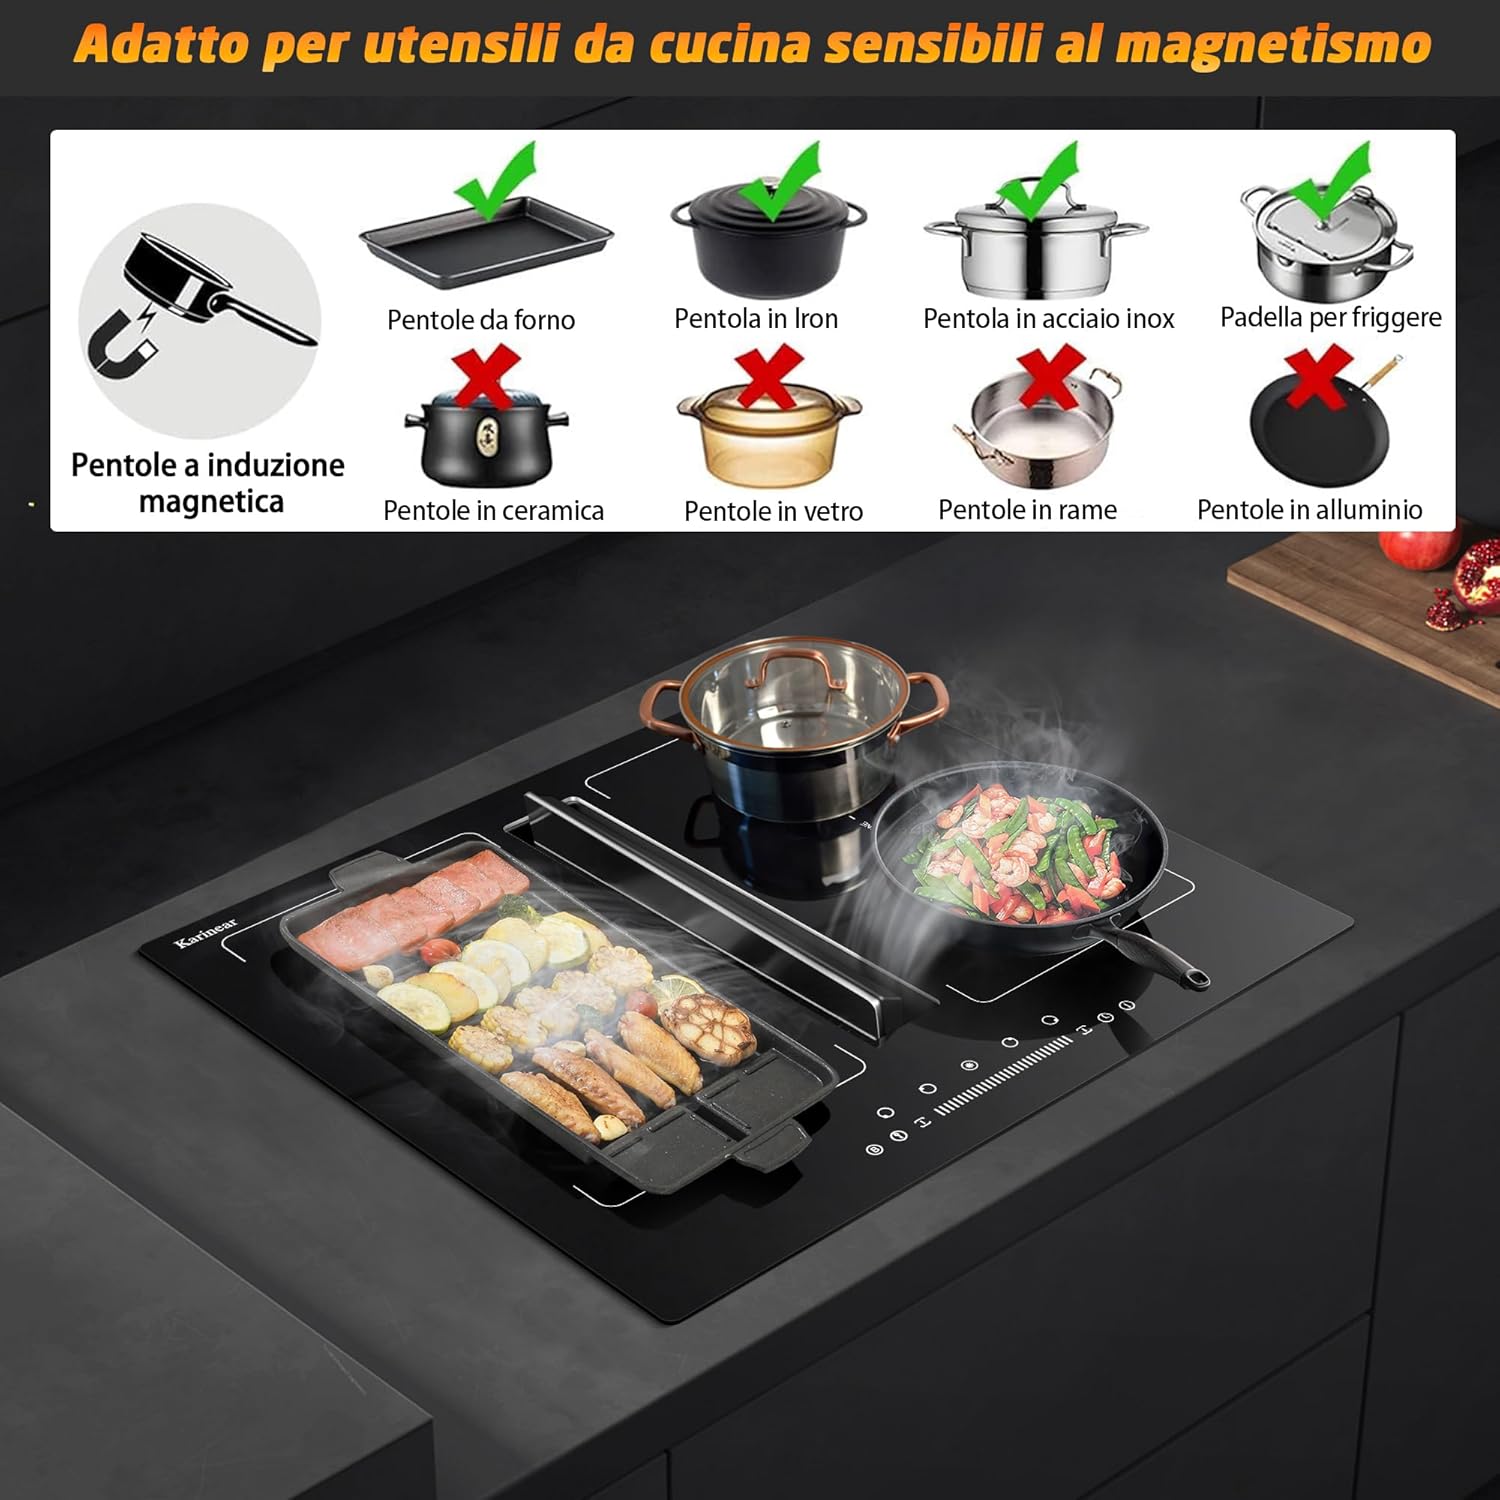
Image: This diagram illustrates which types of cookware are suitable for induction cooking (e.g., magnetic induction pots, cast iron, stainless steel pots, frying pans) and which are not (e.g., ceramic, glass, copper, aluminum pots without an induction base). A magnet test is also shown.
7.1. Suitable Cookware
- Cast iron pots and pans
- Steel pots and pans
- Enamelled iron cookware
- Stainless steel cookware with a magnetic base
7.2. Unsuitable Cookware
- Ceramic pots
- Glass pots
- Copper pots
- Aluminum pots (unless specifically designed for induction)
8. Cleaning and Maintenance
Regular cleaning and maintenance ensure the longevity and optimal performance of your appliance.
8.1. Ceramic Glass Surface
- Allow the cooktop to cool completely before cleaning.
- Wipe with a damp cloth and a mild detergent.
- For stubborn stains, use a specialized ceramic hob cleaner. Avoid abrasive cleaners or scourers.
8.2. Extractor Hood Filters and Drip Tray
The metal grease filters and drip tray should be cleaned regularly to maintain extraction efficiency.

Image: This image provides visual instructions for regularly disassembling the filter screen and collection tray for cleaning. It shows the metal filter being removed, the oil drip tray being emptied and washed, and mentions the inclusion of three carbon filters and two oil drip trays. Regular cleaning is recommended every 4-6 months for the filter and as needed for the drip tray.
- Metal Grease Filters: These are washable. Remove them by following the instructions in the diagram. Clean them with warm soapy water or in a dishwasher. Ensure they are completely dry before re-installing. Recommended cleaning frequency: every 4-6 months, or more often depending on usage.
- Drip Tray: The drip tray collects oil and condensation. Remove and empty it regularly. Wash with warm soapy water and dry thoroughly before re-inserting.
- Carbon Filters (if installed for recirculation mode): If your hood is set up for recirculation, carbon filters are used to remove odors. These are typically not washable and need to be replaced periodically. Refer to the product packaging or manufacturer's website for replacement intervals.
9. Troubleshooting
If you encounter issues with your appliance, consult the following table before contacting customer support.
| Problem | Possible Cause | Solution |
|---|---|---|
| Cooktop does not turn on. | No power supply; Safety lock activated. | Check circuit breaker; Deactivate safety lock. |
| Cooking zone not heating. | Incompatible cookware; Cookware not centered; Power level too low. | Use induction-compatible cookware; Center cookware; Increase power level. |
| Hood not extracting effectively. | Filters clogged; Hood panel closed; Fan speed too low. | Clean or replace filters; Open hood panel; Increase fan speed. |
| Display shows an error code. | Specific internal fault. | Note the error code and consult the full product manual or contact customer support. |
10. Warranty and Customer Support
For warranty information, please refer to the documentation provided with your purchase or visit the official Karinear website. If you require technical assistance or have questions not covered in this manual, please contact Karinear customer support.
Manufacturer: Karinear
Model: KNY-PXJ-KEH6015B-M47274-F2-CB-EU


