Introduction
This manual provides essential information for the safe and effective use of your GarveeTech 70-inch Rooftop Cargo Box Carrier. This hard-shell carrier is designed to provide additional storage space for your vehicle, offering 17.6 cubic feet of volume and supporting up to 165 lbs of evenly distributed cargo. Constructed from durable ABS material, it is built to withstand various weather conditions and road debris. Please read these instructions thoroughly before installation and operation.
Safety Information
- Weight Limit: Do not exceed the maximum load capacity of 165 lbs (75 kg) for the cargo box, or your vehicle's roof rack weight limit, whichever is lower.
- Even Distribution: Always distribute cargo weight evenly inside the box to maintain vehicle stability. Place heavier items at the bottom and center.
- Secure Cargo: Ensure all items inside the cargo box are securely fastened to prevent shifting during transit.
- Secure Mounting: Verify that the cargo box is securely attached to the roof rack before each trip and periodically during long journeys.
- Clearance: Be aware of the increased height of your vehicle with the cargo box installed, especially when entering garages, car washes, or low-clearance areas.
- Driving Speed: Adjust your driving speed to suit road conditions, wind, and the additional weight and drag of the cargo box. Avoid sudden maneuvers.
- Locking: Always ensure the cargo box is properly closed and locked before driving. Keys should be removed from the lock once secured.
- Maintenance: Regularly inspect the cargo box and mounting hardware for any signs of wear, damage, or loose components.
Package Contents
Please verify that all components are present before beginning installation:
- GarveeTech Rooftop Cargo Box
- Mounting Hardware (U-bolts, plates, knobs)
- Security Keys (2)
- Internal Straps (for securing cargo)

Figure 1: Included components: cargo box, mounting hardware, security keys, and internal straps.
Setup and Installation
The GarveeTech cargo box features a tool-free installation system designed for universal compatibility with most roof racks.
- Prepare Vehicle: Ensure your vehicle's roof rack crossbars are clean and properly installed according to your vehicle manufacturer's instructions. The cargo box is compatible with round, square, and most aerodynamic crossbars.
- Position Cargo Box: Carefully lift the cargo box onto your vehicle's crossbars. Center the box both front-to-back and side-to-side to ensure even weight distribution and optimal aerodynamics.
- Attach Mounting Hardware: Open the cargo box lid. Inside, locate the pre-assembled mounting points. Position the U-bolts around your crossbars and through the designated holes in the cargo box base. Secure them with the provided plates and hand-tighten the knobs from inside the box.
- Secure Fasteners: Ensure all four mounting points are firmly tightened. The box should not move or slide on the crossbars. Do not overtighten, as this may damage the box or crossbars.
- Final Check: Gently shake the cargo box to confirm it is securely attached to the roof rack. Close and lock the lid before driving.
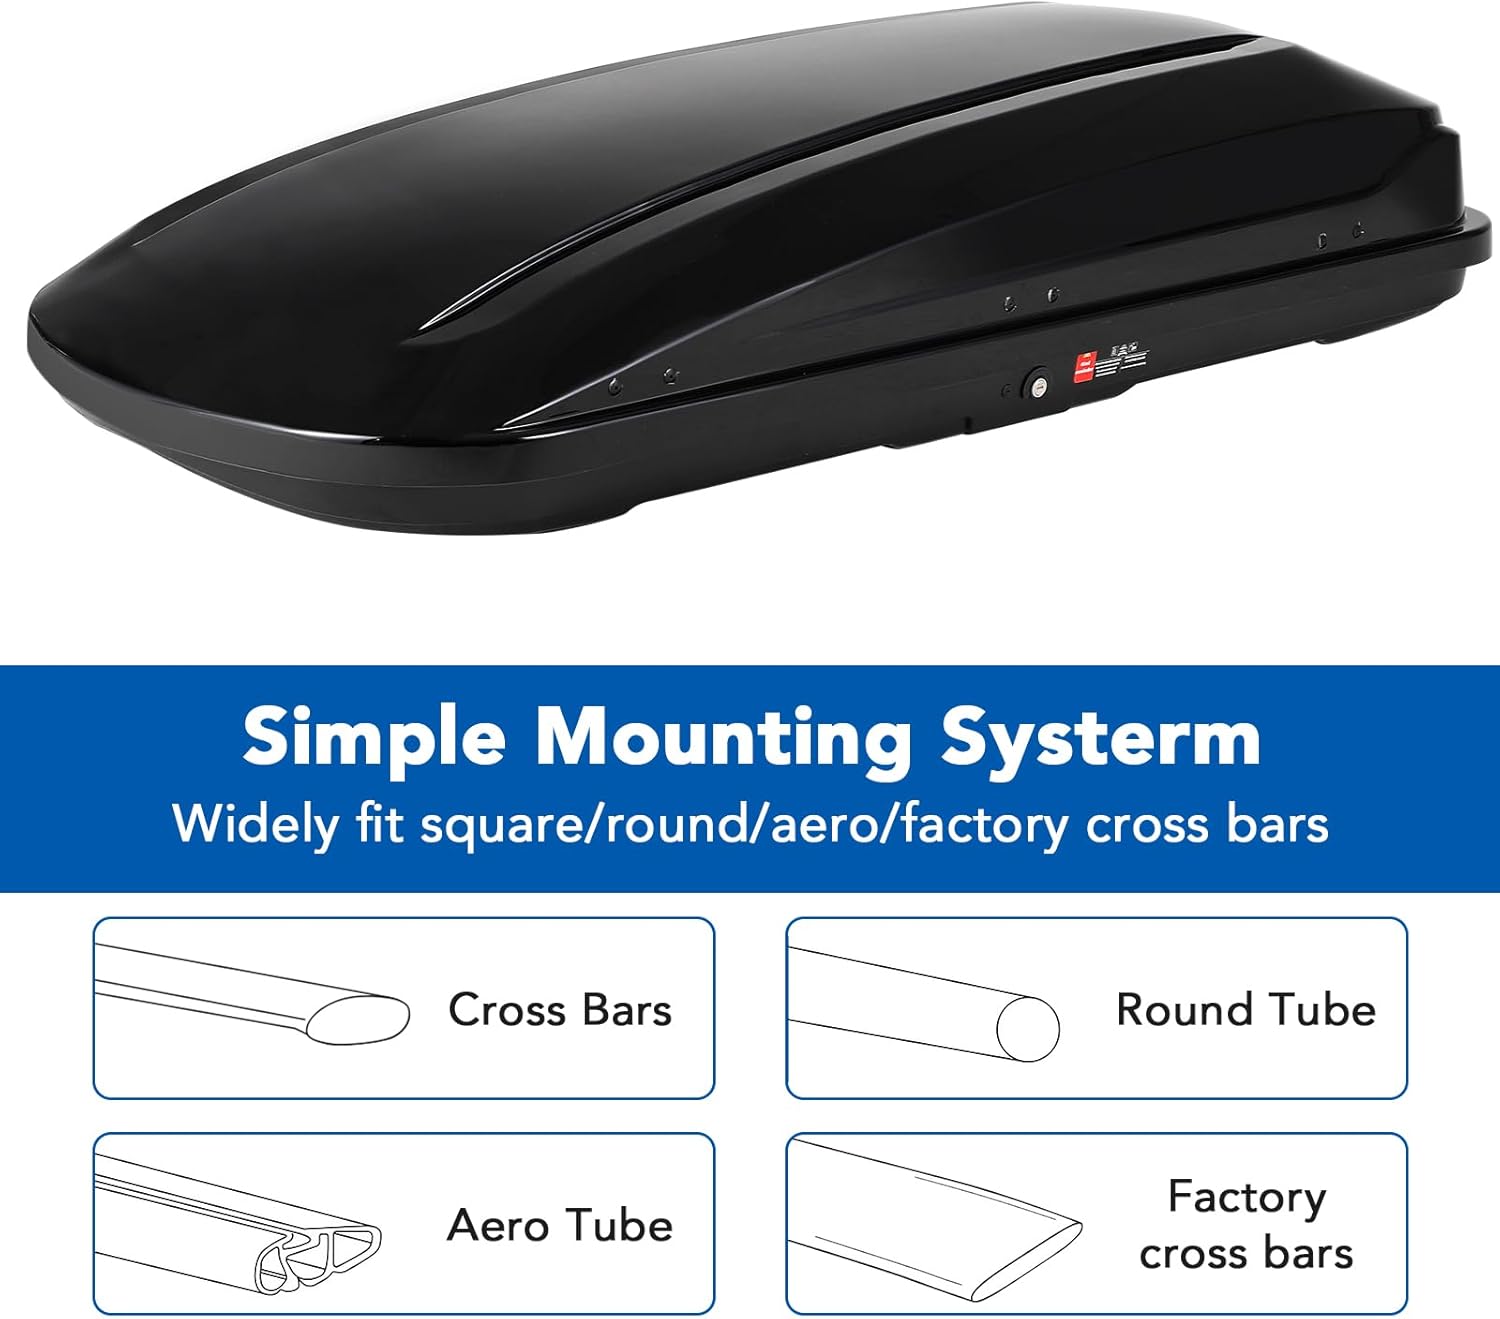
Figure 2: Crossbar compatibility for mounting.

Figure 3: Cargo box mounted on a vehicle.
Operating Instructions
The GarveeTech cargo box is designed for convenient and secure use.
- Opening the Box: Insert one of the provided security keys into the lock mechanism. Turn the key to unlock. The cargo box features a dual-side opening design, allowing access from either the driver's or passenger's side of the vehicle. Self-supporting gas struts will assist in holding the lid open.
- Loading Cargo: Place items inside the cargo box, ensuring that the total weight does not exceed 165 lbs and that the weight is evenly distributed. Use the internal straps to secure your cargo and prevent shifting during travel. Avoid placing sharp or abrasive objects directly against the interior walls without protection.
- Closing and Locking: Gently lower the lid until it clicks into place. Insert the key and turn it to lock the box. The keys can only be removed when the box is fully closed and securely locked. Always remove the keys before driving.
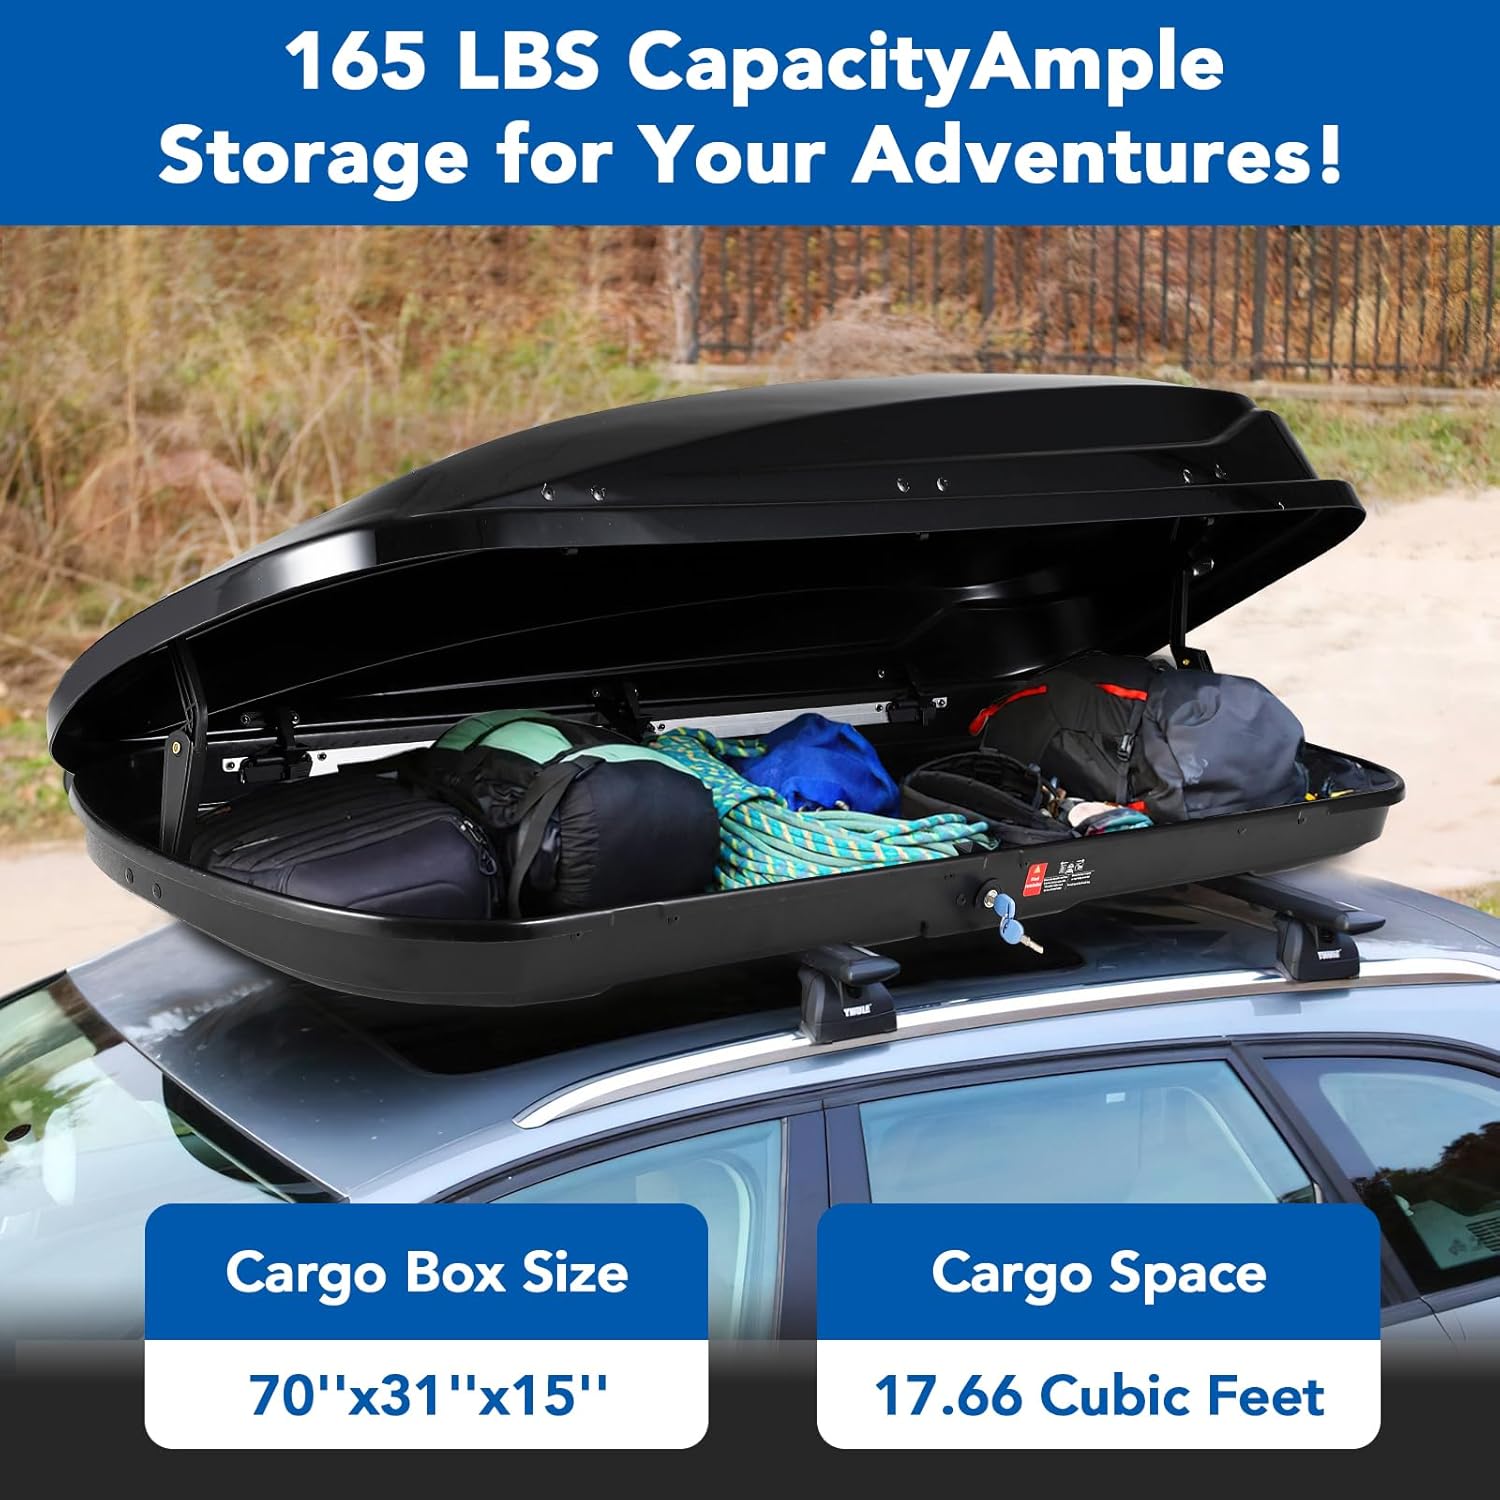
Figure 4: Cargo box loaded with gear.

Figure 5: Key features: support arm, key lock, and non-slip bottom.
Maintenance
Proper maintenance ensures the longevity and performance of your cargo box.
- Cleaning: Clean the exterior of the cargo box with mild soap and water. Avoid abrasive cleaners or solvents that could damage the ABS material or glossy finish. Rinse thoroughly and dry with a soft cloth.
- Inspection: Periodically inspect the cargo box for any cracks, dents, or damage. Check the mounting hardware for tightness and ensure all components are in good working order.
- Lubrication: If the lock mechanism becomes stiff, apply a small amount of graphite lubricant to the keyhole.
- Storage: When not in use, store the cargo box in a cool, dry place away from direct sunlight to prevent material degradation over time.

Figure 6: All-weather performance of the cargo box.
Troubleshooting
| Problem | Possible Cause | Solution |
|---|---|---|
| Lid will not close or lock | Cargo obstructing closure; lock mechanism jammed; key not fully inserted. | Rearrange cargo to ensure clear path for lid; check lock for debris; ensure key is fully inserted and turned correctly. |
| Excessive noise or whistling during driving | Improper installation; loose mounting hardware; cargo shifting. | Re-check mounting hardware for tightness; ensure cargo is secured; verify proper centering of the box on crossbars. |
| Water leakage inside the box | Lid not fully closed or sealed; damaged seal. | Ensure lid is completely closed and latched; inspect rubber seals for damage and replace if necessary. |
| Keys difficult to turn in lock | Dirt or corrosion in lock mechanism. | Apply a small amount of graphite lubricant to the keyhole. |
Specifications
| Feature | Detail |
|---|---|
| Model Number | QAZ-PAE_337C7ETH-dNDucB |
| Overall Dimensions (L x W x H) | 70.87" x 30.71" x 14.96" (180 cm x 78 cm x 38 cm) |
| Cargo Capacity | 17.6 Cubic Feet (500 Liters) |
| Weight Capacity | 165 lbs (75 kg) |
| Item Weight | 24.4 lbs (11.07 kg) |
| Material | Impact-resistant ABS |
| Color | Black |
| Opening Mechanism | Dual-side opening with gas struts |
| Locking System | Security key lock (keys removable only when fully closed) |
| Mounting Type | Roof Mount (tool-free clamp system) |
| Compatibility | Universal fit for most round, square, and aerodynamic crossbars |
| Water Resistance Level | Waterproof |
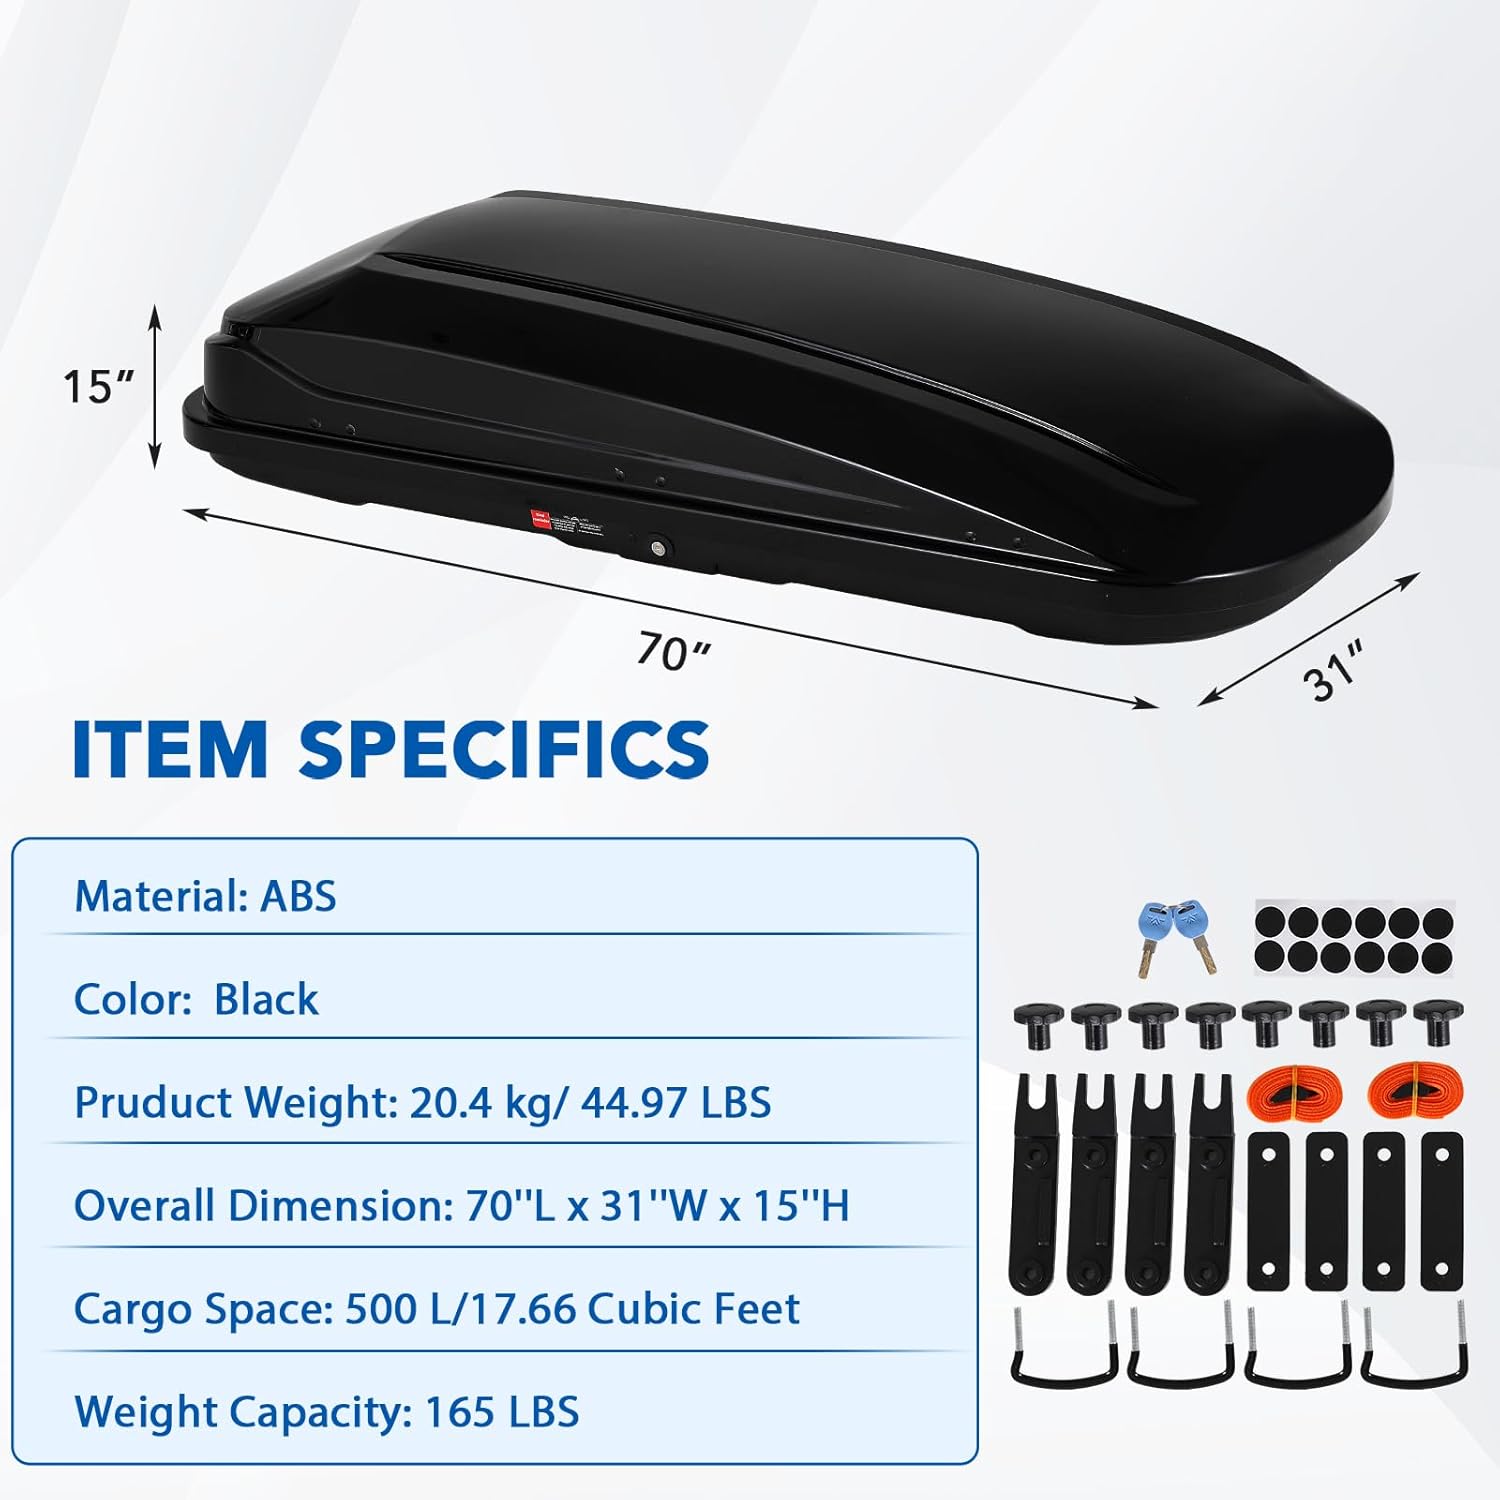
Figure 7: Product dimensions and key specifications.
Warranty and Support
For warranty information or customer support regarding your GarveeTech Rooftop Cargo Box Carrier, please refer to the purchase documentation or contact GarveeTech customer service directly. Contact details are typically available on the GarveeTech official website or through your retailer.


