Introduction
This manual provides detailed instructions for the installation, operation, and maintenance of your SunRider LED Flush Mount Ceiling Light Fixture. Please read this manual thoroughly before installation and retain it for future reference. This fixture features dual lighting modes: a 4000K neutral white main light and a 2000K warm night light, activated by a standard wall switch. It is designed for indoor use and offers smooth dimming capabilities.

Image: Overview of the SunRider LED Ceiling Light's key features, highlighting its dual lighting, dimmability, energy efficiency, and safety ratings.
Safety Information
WARNING: Risk of Electric Shock. Disconnect power at the fuse or circuit breaker before installing or servicing.
- Ensure the main power supply is turned off before beginning installation.
- All electrical connections must be in accordance with local and National Electrical Code (NEC) standards. If you are unfamiliar with proper electrical wiring connections, consult a qualified electrician.
- This fixture is designed for 120V AC power supply.
- Do not modify the fixture in any way. Any modifications may void the warranty and create a safety hazard.
- Do not install this fixture on a surface that is not structurally sound.
- The fixture is IP44 rated, suitable for damp locations like bathrooms and laundry rooms, but not for direct water exposure.
Package Contents
Verify that all components are present before installation:
- SunRider LED Flush Mount Ceiling Light Fixture (1 unit)
- Snap-fit Mounting Plate (pre-attached to fixture)
- Mounting Screws (typically 2-3)
- Wire Connectors (typically 3)
- User Manual (this document)
Specifications
| Feature | Specification |
|---|---|
| Model Number | FM10R12-24-8CCT-Y |
| Dimensions | 12"L x 12"W x 1"H (305mm diameter, 24mm thickness) |
| Power Source | AC 100-130V, 50/60Hz |
| Main Light Wattage | 24 Watts |
| Main Light Brightness | 2400 Lumens |
| Main Light Color Temperature | 4000K Neutral White |
| Night Light Wattage | 4 Watts |
| Night Light Brightness | 200 Lumens |
| Night Light Color Temperature | 2000K Warm White |
| Dimmable | Yes (0%-100% smooth dimming) |
| CRI | 85+ |
| Lifespan | 50,000+ Hours |
| Material | Plastic (Fire-resistant housing) |
| IP Rating | IP44 (Moisture-resistant) |
| Beam Angle | 120 Degrees |
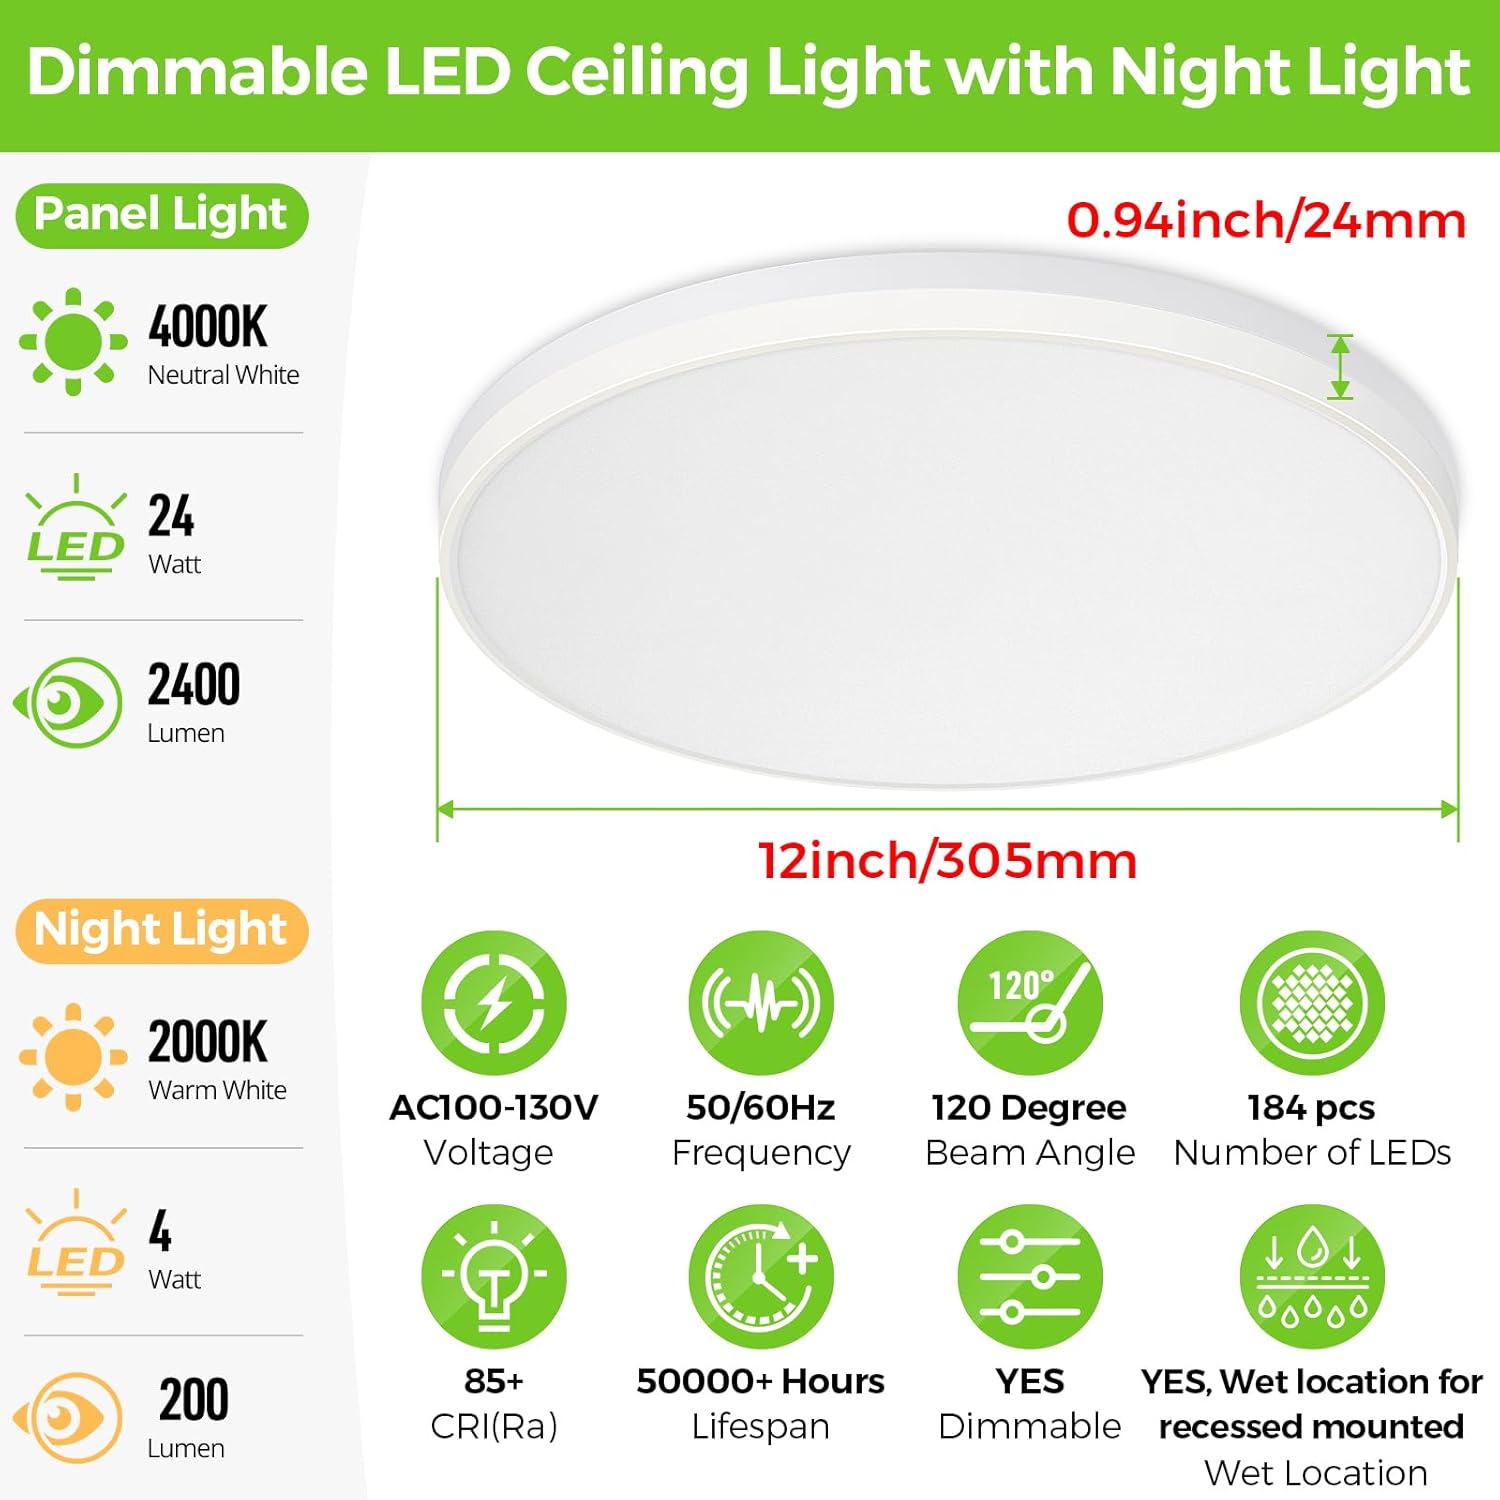
Image: Visual representation of the light's dimensions and key electrical specifications.
Installation Guide
The SunRider LED Flush Mount Ceiling Light is designed for easy installation and is compatible with most standard ceiling junction boxes (0.59" - 8.46" crossbar range).
Tools Required (Not Included):
- Phillips Head Screwdriver
- Wire Strippers (if needed)
- Electrical Tape (optional)
- Safety Glasses
Installation Steps:
- Prepare for Installation:
Turn off the power at the circuit breaker or fuse box to the outlet where you are installing the light fixture. Ensure the power is completely off before proceeding.
- Remove Mounting Plate:
Unscrew the snap-fit mounting plate from the base of the ceiling light fixture. This plate is typically secured with small screws.
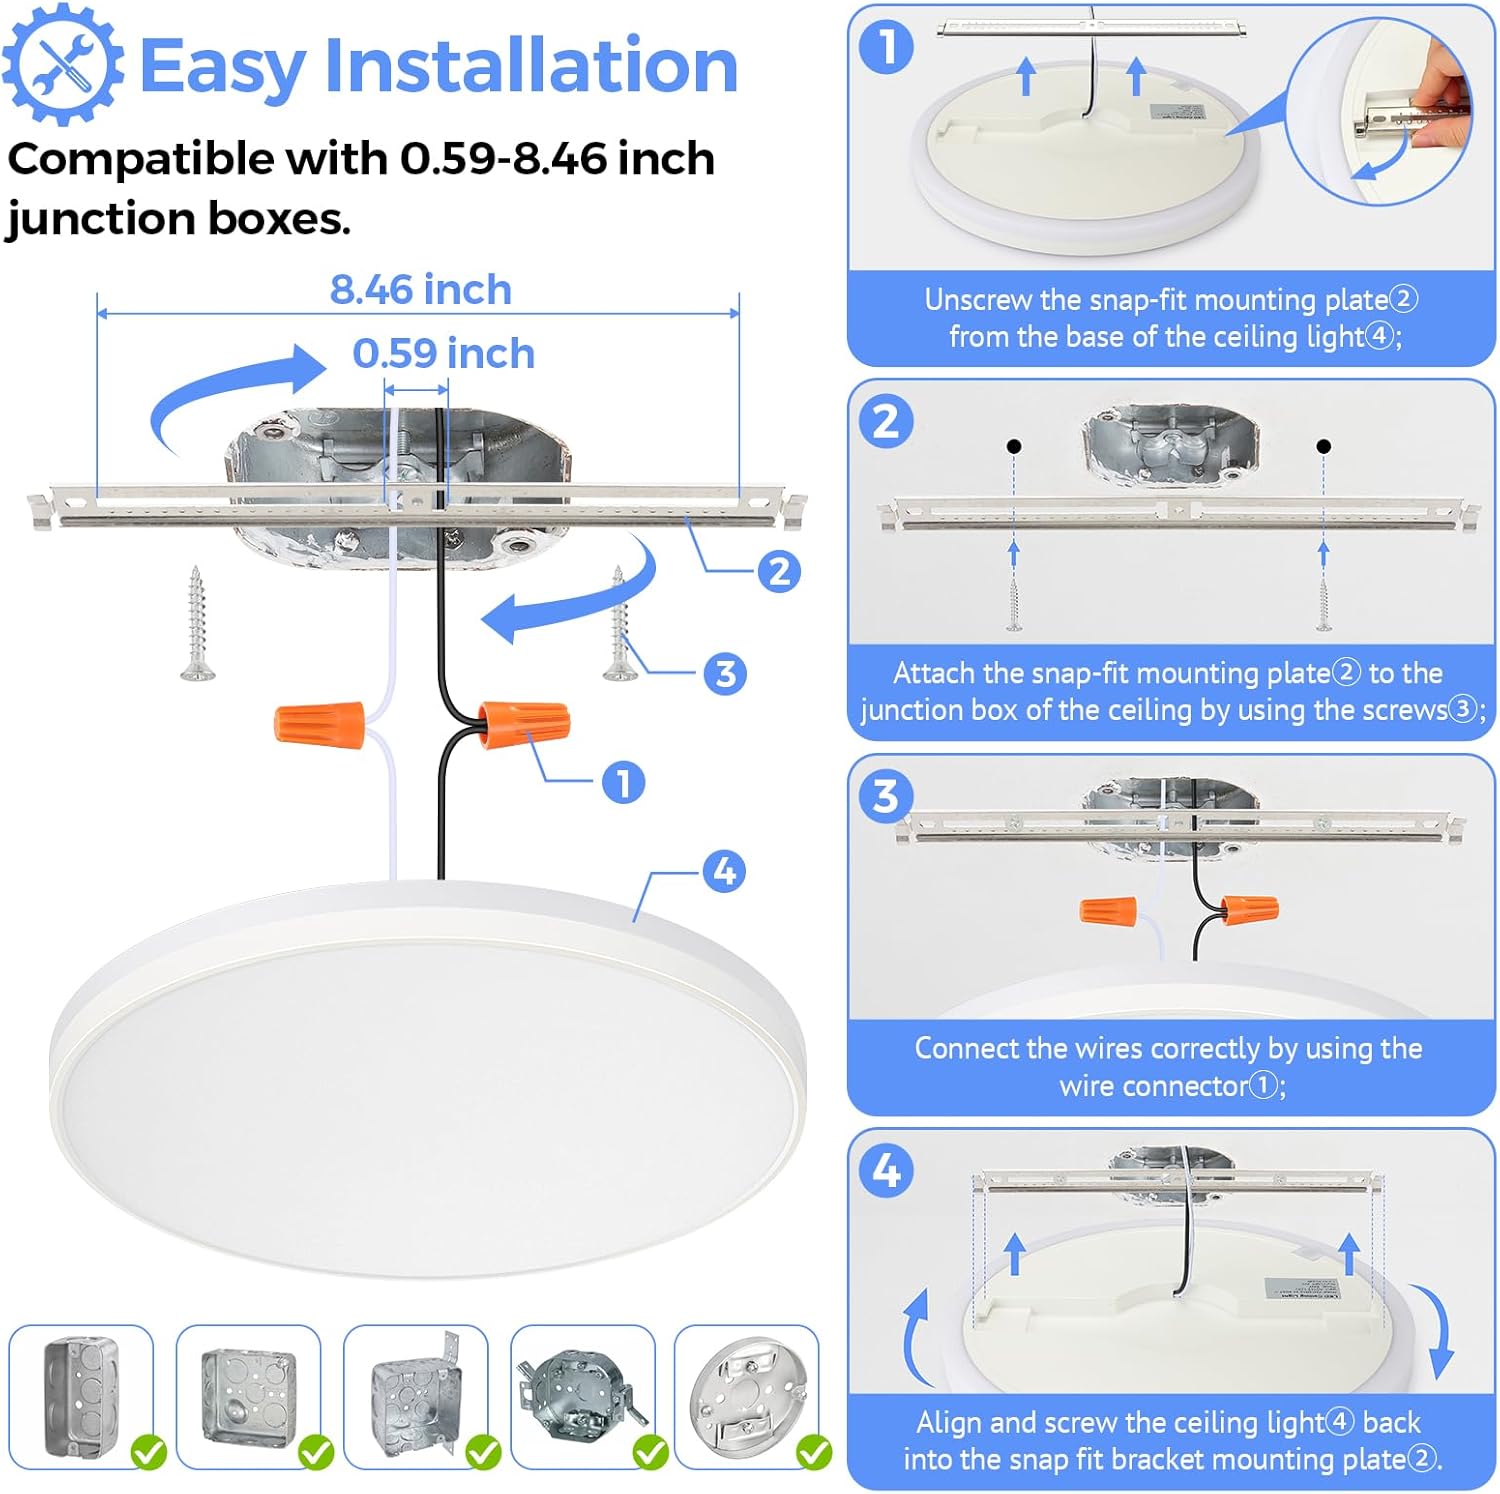
Image: Visual guide for the installation process, detailing the steps from detaching the mounting plate to securing the fixture.
- Attach Mounting Plate to Junction Box:
Align the snap-fit mounting plate with the screw holes on your ceiling junction box. Secure the plate to the junction box using the provided mounting screws. Ensure the plate is firmly attached.
- Connect Wiring:
Connect the electrical wires from the ceiling to the wires on the light fixture using the provided wire connectors. Typically, this involves connecting:
- Black (Live/Hot) wire from ceiling to Black wire from fixture.
- White (Neutral) wire from ceiling to White wire from fixture.
- Green or Bare Copper (Ground) wire from ceiling to the ground wire/screw on the mounting plate or fixture (if applicable). This fixture features double insulation, so a ground wire connection to the fixture itself may not be required, but always follow local codes.
Ensure all connections are secure and no bare wire is exposed. You may use electrical tape for added security.
- Mount the Fixture:
Carefully align the light fixture with the snap-fit mounting plate. Push the fixture upwards and twist or slide it into place until it securely locks onto the mounting plate. Ensure it is flush with the ceiling.
- Restore Power:
Once the fixture is securely installed, turn the power back on at the circuit breaker or fuse box.

Image: Banner illustrating the ease of installation for the SunRider LED Ceiling Light.
Operating Instructions
Switching Between Main Light and Night Light:
The SunRider LED Ceiling Light features a convenient dual-mode operation controlled by your existing wall switch:
- Main Light (4000K Neutral White): Turn the wall switch ON. The fixture will illuminate with the bright 4000K neutral white light, ideal for general illumination.
- Night Light (2000K Warm White): To activate the night light, turn the wall switch OFF, then immediately turn it back ON. The fixture will switch to the soft 2000K warm white night light mode.
- To return to the main light, simply turn the switch OFF and then ON again.
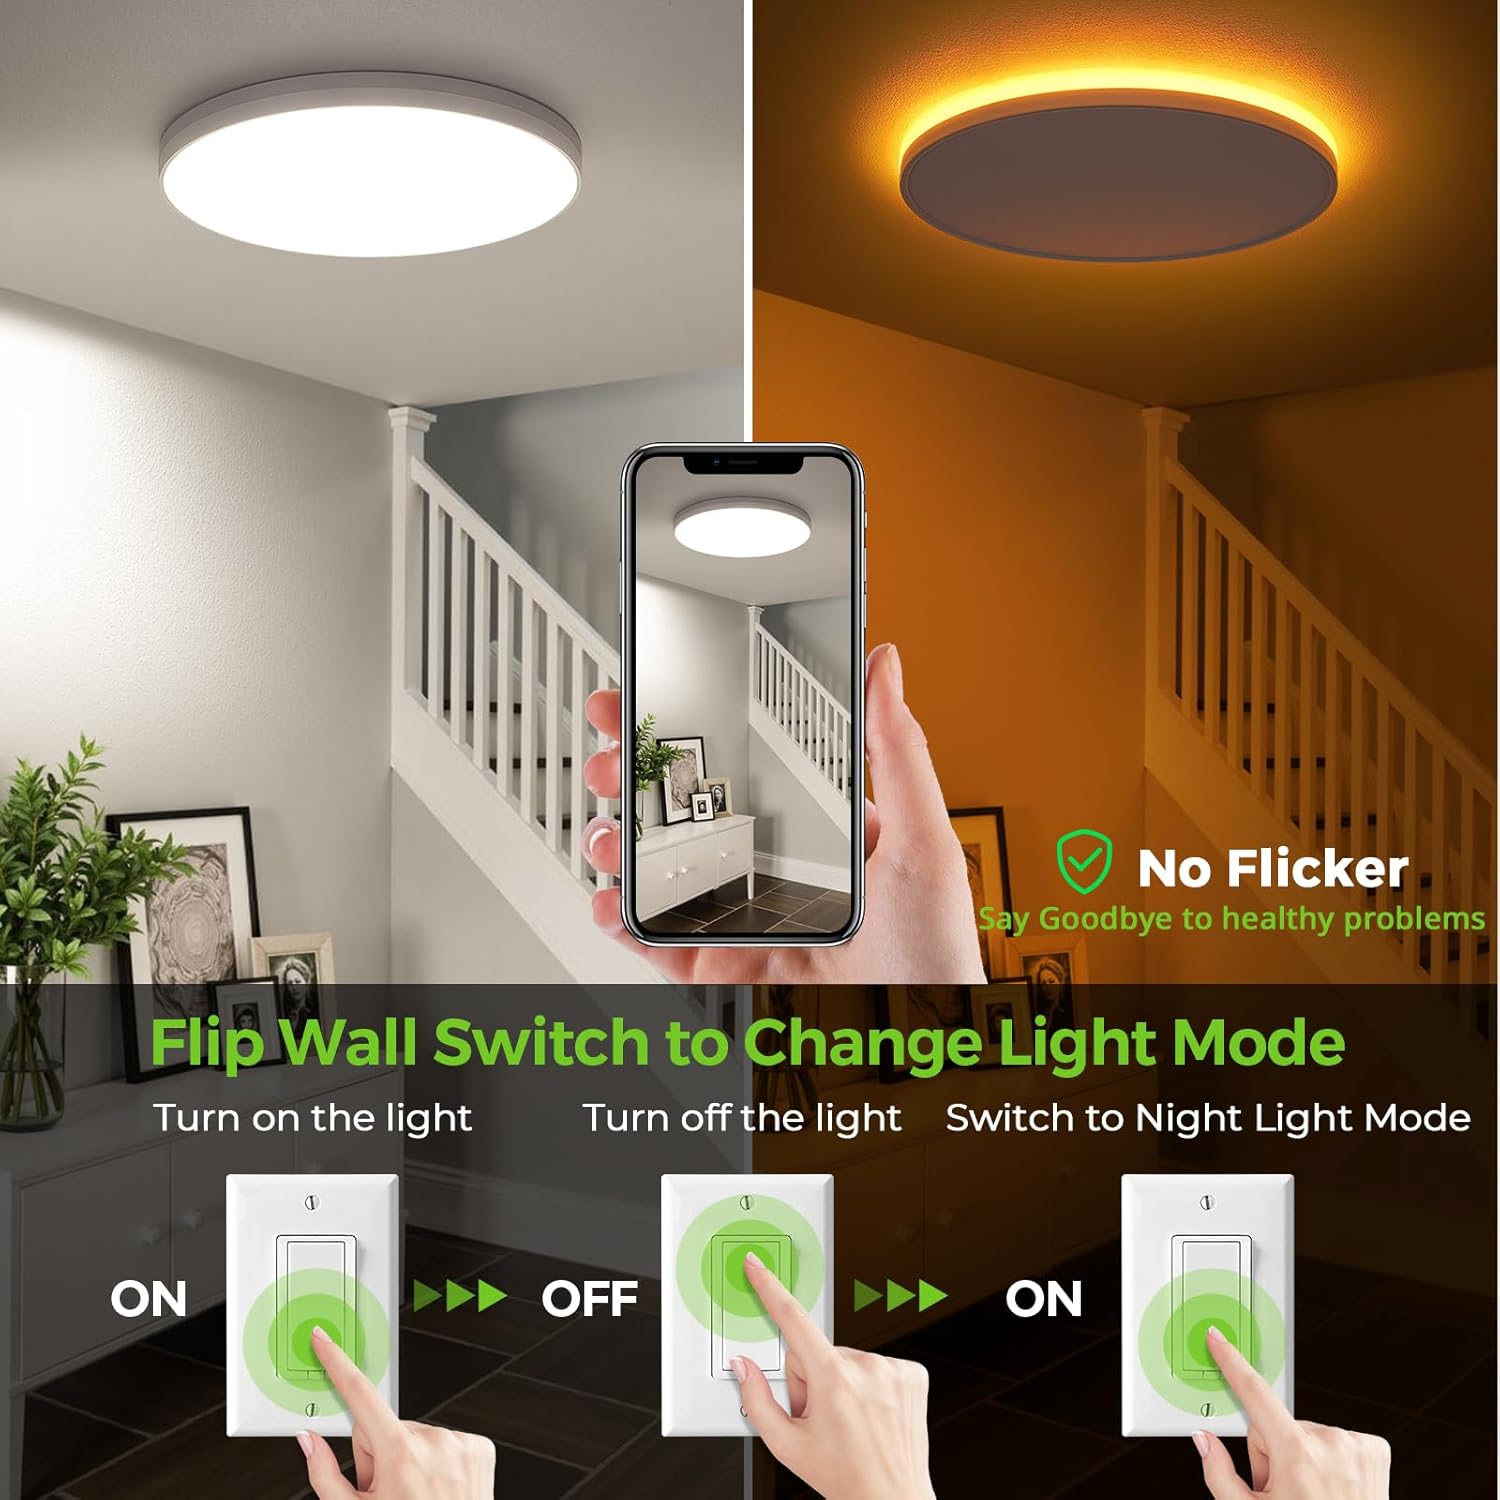
Image: Illustration of the wall switch operation to change between main light and night light modes.

Image: Banner highlighting the comfort and utility of the night light feature.
Dimming Functionality:
This fixture is fully dimmable from 0% to 100% when connected to a compatible LED dimmer switch (not included). Ensure your dimmer switch is designed for LED lighting to avoid flickering or damage.
Compatible Dimmer Models:
| Brand | Model Numbers |
|---|---|
| Lutron | DVWCL-153PH-LA, MSC-AD-PD, SCL-153P-AL, AYCL-153P-WH, AYCL-153P-AL, TGCL-153P, FSQ-2FH-DK |
| Leviton | SURESLIDE 6674, 6672-ILW, TSL06-ILW |

Image: Visual demonstration of the smooth dimming range and a table of recommended dimmer switches.

Image: Banner illustrating the smooth dimming feature in a kitchen setting.
Maintenance
The SunRider LED Flush Mount Ceiling Light is designed for long-lasting, maintenance-free operation. Follow these simple guidelines to ensure optimal performance:
- Cleaning: Before cleaning, ensure the power to the fixture is turned off. Use a soft, dry, or slightly damp cloth to wipe the surface of the fixture. Do not use abrasive cleaners, solvents, or cleaners containing alcohol, as these can damage the finish or electrical components.
- No Bulb Replacement: This fixture uses integrated LED technology, meaning there are no bulbs to replace.
- Inspection: Periodically inspect the fixture for any signs of damage or loose connections. If any issues are found, disconnect power and consult a qualified electrician.
Troubleshooting
If you encounter issues with your SunRider LED Ceiling Light, refer to the following common problems and solutions:
| Problem | Possible Cause | Solution |
|---|---|---|
| Light does not turn on. |
|
|
| Light flickers or dims unexpectedly. |
|
|
| Night light mode does not activate. |
|
|
| Light is not as bright as expected. |
|
|
If the problem persists after trying these solutions, please contact SunRider customer support.
Warranty and Support
SunRider products are manufactured to the highest quality standards. For warranty information and customer support, please refer to the warranty card included with your purchase or visit the official SunRider website. Please have your model number (FM10R12-24-8CCT-Y) and purchase date ready when contacting support.
For further assistance, you may visit the SunRider Store on Amazon: SunRider Store


