1. Safety Instructions
Please read all instructions carefully before using the appliance. Keep this manual for future reference.
- Always ensure the appliance is placed on a stable, heat-resistant surface.
- Do not immerse the appliance, cord, or plug in water or other liquids.
- Supervise children closely when the appliance is in use.
- Avoid contact with moving parts during operation.
- Do not touch hot surfaces. Use oven mitts when handling the bread pan or hot bread.
- Unplug the appliance from the outlet when not in use and before cleaning.
- Do not operate any appliance with a damaged cord or plug.
- This appliance is for household use only.
2. Product Overview
The Karinear Automatic Bread Maker is designed to simplify homemade bread preparation with its advanced features and user-friendly interface.
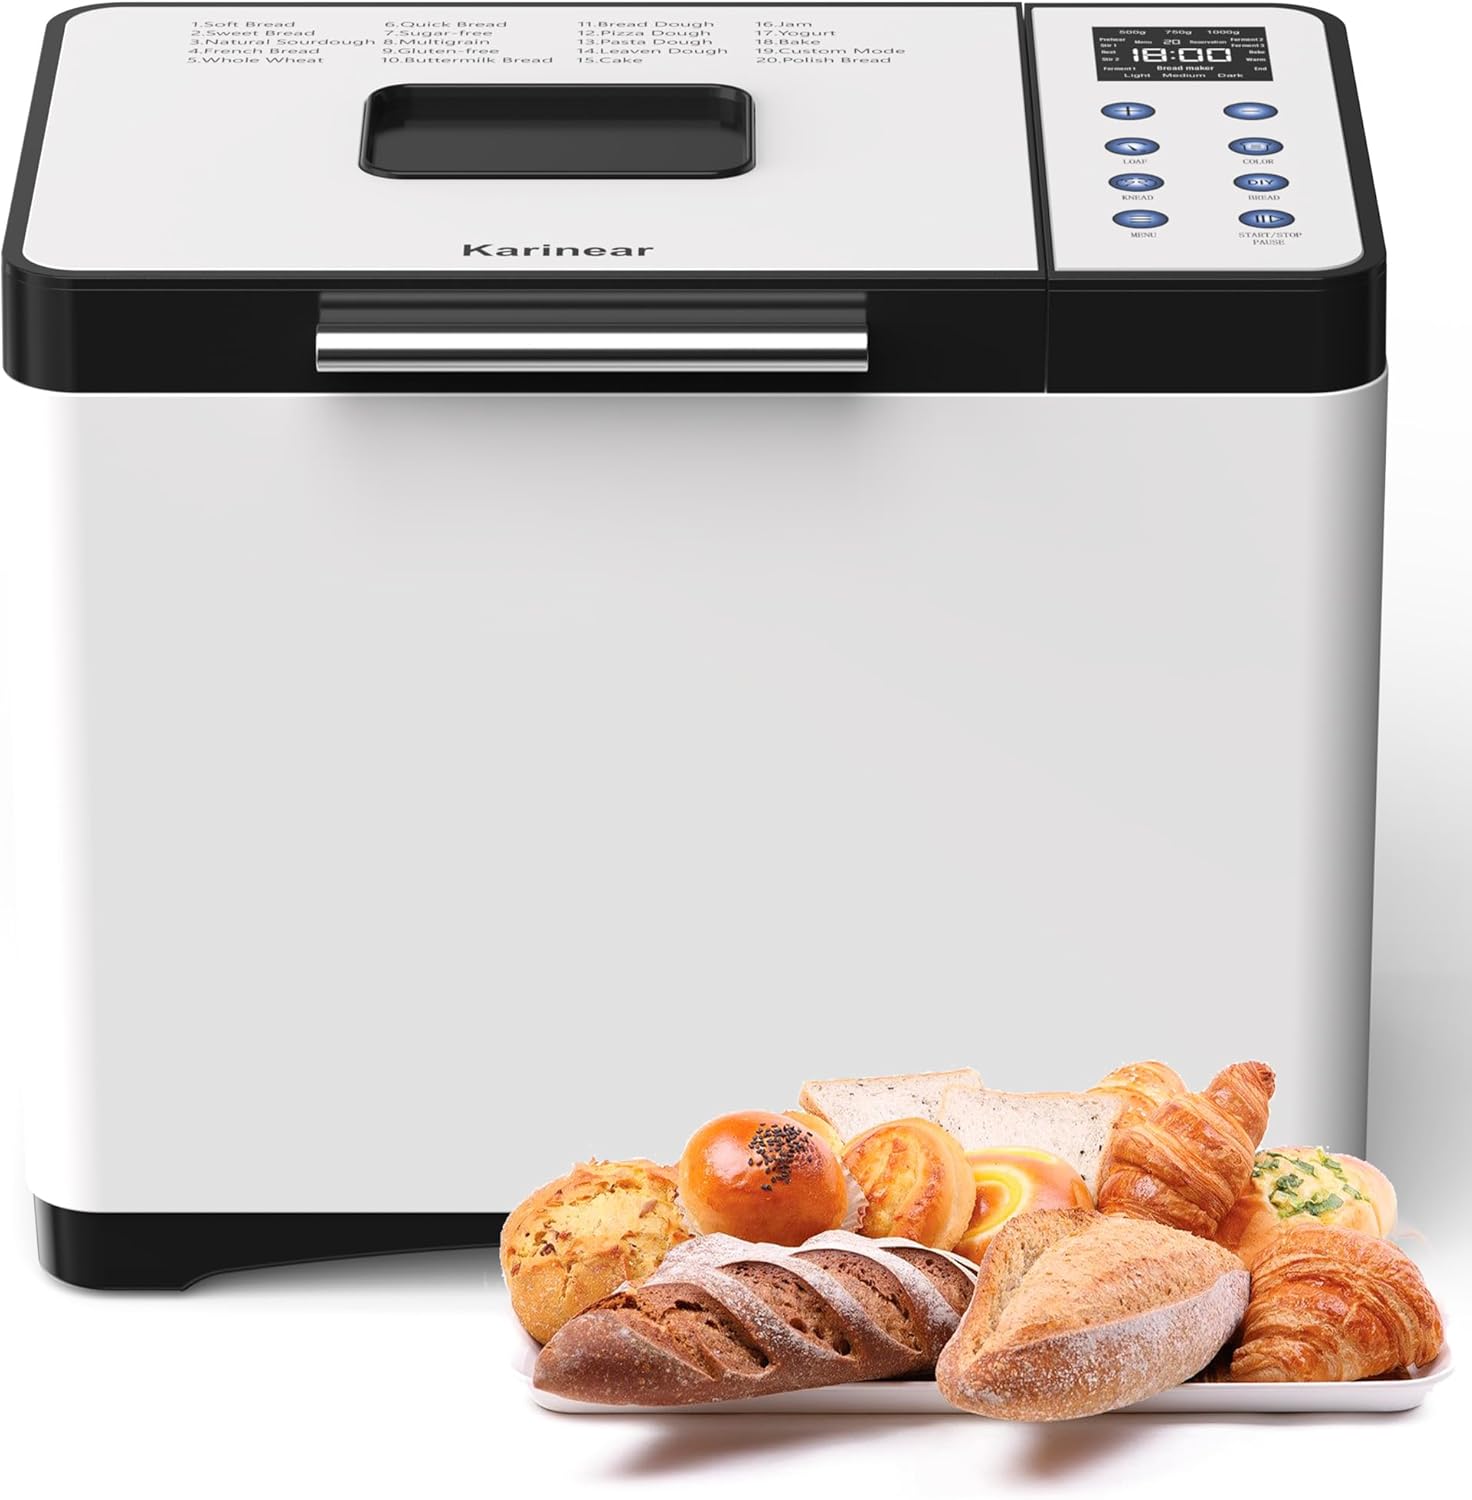
Image: Karinear Automatic Bread Maker, front view with various baked goods.
2.1 Components

Image: Diagram showing the bread maker and its accessories, including the hook, mixing paddle, measuring cup, measuring spoon, bread pan, gloves, and instruction manual.
- Hook: For removing the kneading paddle from the baked bread.
- Mixing Paddle: For kneading dough.
- Measuring Cup: For precise liquid measurements.
- Measuring Spoon: For precise dry ingredient measurements (e.g., yeast, salt).
- Bread Pan: Non-stick pan for baking.
- Gloves: Heat-resistant gloves for safe handling.
- Instruction Manual: This document.
2.2 Control Panel and Display

Image: Close-up of the bread maker's control panel, highlighting the LCD display, program list, loaf size, crust color, menu, and start/stop/pause buttons.
The intuitive LCD display shows program number, time, loaf size, and crust color. Buttons allow selection of menu, loaf size, crust color, and start/stop/pause functions.
2.3 Key Features
- 20 Preset Programs: Offers a wide variety of options for bread, dough, jam, and yogurt.
- Safety Materials: Features an aerospace-grade ceramic pot and a scratch-resistant, non-stick food-grade bread bucket.
- User-Friendly Settings: Includes a 15-hour delay timer, 1-hour keep-warm function (55-60°C), three loaf sizes (500g, 750g, 1000g), and three crust colors (light, medium, dark).
- Convenience: Equipped with an LCD display and a visual viewing window to monitor the baking process. The 360° wrap-around heating design ensures even baking.
- Precise Control: Manual settings are available for specific dough and fermentation processes.
3. Setup
3.1 Unpacking
Carefully remove the bread maker and all accessories from the packaging. Remove any protective films or stickers.
3.2 First Use Cleaning
Before first use, wash the bread pan and kneading paddle with warm, soapy water. Rinse thoroughly and dry. Wipe the exterior of the appliance with a damp cloth.
3.3 Placement
Place the bread maker on a dry, stable, and heat-resistant surface, away from direct sunlight and heat sources. Ensure adequate ventilation around the appliance.
4. Operating Instructions

Image: Visual guide showing four steps for using the bread maker: 1. Add ingredients, 2. Select program, loaf size, and crust color, 3. Press start, 4. Enjoy soft bread.
4.1 Basic Operation Steps
- Add Ingredients: Place the kneading paddle into the bread pan. Add ingredients according to your recipe, typically liquids first, then dry ingredients, with yeast added last, separate from salt and sugar.
- Select Program: Close the lid and plug in the appliance. Use the 'MENU' button to select the desired program (refer to Section 5 for program details).
- Select Loaf Size and Crust Color: Use the 'LOAF' button to choose your desired loaf size (500g, 750g, or 1000g) and the 'COLOR' button for crust preference (light, medium, or dark).
- Start Baking: Press the 'START/STOP/PAUSE' button to begin the program. The display will show the remaining time.
4.2 Delay Timer Function

Image: Illustration of the 15-hour timer function, showing the bread maker set at night and fresh bread ready in the morning.
The 15-hour delay timer allows you to set the bread maker to finish baking at a later time. After selecting your program, loaf size, and crust color, use the '+' and '-' buttons to adjust the delay time. Press 'START/STOP/PAUSE' to activate the timer. The displayed time includes both the delay and the program duration.
4.3 Keep Warm Function
After the baking cycle is complete, the bread maker automatically enters a 1-hour keep-warm phase, maintaining the bread at an optimal temperature of 55-60°C. This ensures your bread remains fresh and warm until you are ready to serve.
5. Programs

Image: Visual representation of 20 preset functions, including yogurt, jam, pizza dough, cake dough, and various bread types, along with loaf sizes and crust colors.
The Karinear Bread Maker offers 20 versatile programs to cater to various baking needs:
- 1. Soft Bread
- 2. Quick Bread
- 3. Sweet Bread
- 4. French Bread
- 5. Whole Wheat
- 6. Natural Sourdough
- 7. Multigrain
- 8. Buttermilk Bread
- 9. Gluten-Free
- 10. Dough
- 11. Pizza Dough
- 12. Pasta Dough
- 13. Leaven Dough
- 14. Cake
- 15. Jam
- 16. Yogurt
- 17. Bake
- 18. Custom Mode
- 19. Polish Bread
- 20. (Unspecified, often a manual or extra program)
Refer to the recipe section in the full manual for specific ingredient quantities and instructions for each program.
6. Maintenance and Cleaning

Image: Instructions for cleaning the bread pan: rotate counter-clockwise to unlock and lift, then clean with a soft, damp cloth and neutral detergent, and dry.
Proper cleaning and maintenance ensure the longevity and optimal performance of your bread maker.
6.1 Cleaning the Bread Pan and Kneading Paddle
- After each use, allow the bread pan to cool completely.
- Rotate the bread pan counter-clockwise to unlock and lift it out of the appliance.
- Remove the kneading paddle from the bread pan. If it's stuck, fill the pan with warm water for 30 minutes to loosen it.
- Wash the bread pan and kneading paddle with warm, soapy water using a soft sponge. Do not use abrasive cleaners or metal scouring pads, as this can damage the non-stick coating.
- Rinse thoroughly and dry completely before storing or next use.
6.2 Cleaning the Exterior
- Wipe the exterior of the bread maker with a soft, damp cloth.
- Do not use harsh chemicals or abrasive cleaners.
- Never immerse the main unit in water.
6.3 Storage
Ensure the appliance is clean and dry before storing. Store it in a cool, dry place, away from direct sunlight.
7. Troubleshooting
If you encounter issues with your bread maker, refer to the following common problems and solutions:
| Problem | Possible Cause | Solution |
|---|---|---|
| Bread does not rise | Expired yeast, too much salt/sugar, incorrect water temperature, wrong program selected. | Check yeast expiration, reduce salt/sugar, use lukewarm water (38-43°C), select appropriate program. |
| Bread is too dense | Too much flour, not enough liquid, insufficient kneading. | Measure ingredients precisely, ensure correct liquid-to-flour ratio, check kneading paddle is installed correctly. |
| Bread collapses in the middle | Too much liquid, too much yeast, high humidity. | Reduce liquid slightly, reduce yeast, ensure ingredients are at room temperature. |
| Uneven crust color | Incorrect crust setting, uneven heat distribution. | Adjust crust setting, ensure bread maker is not placed in a drafty area. |
| Machine does not start | Not plugged in, power outage, lid not closed properly. | Check power connection, ensure lid is securely closed. |
8. Specifications
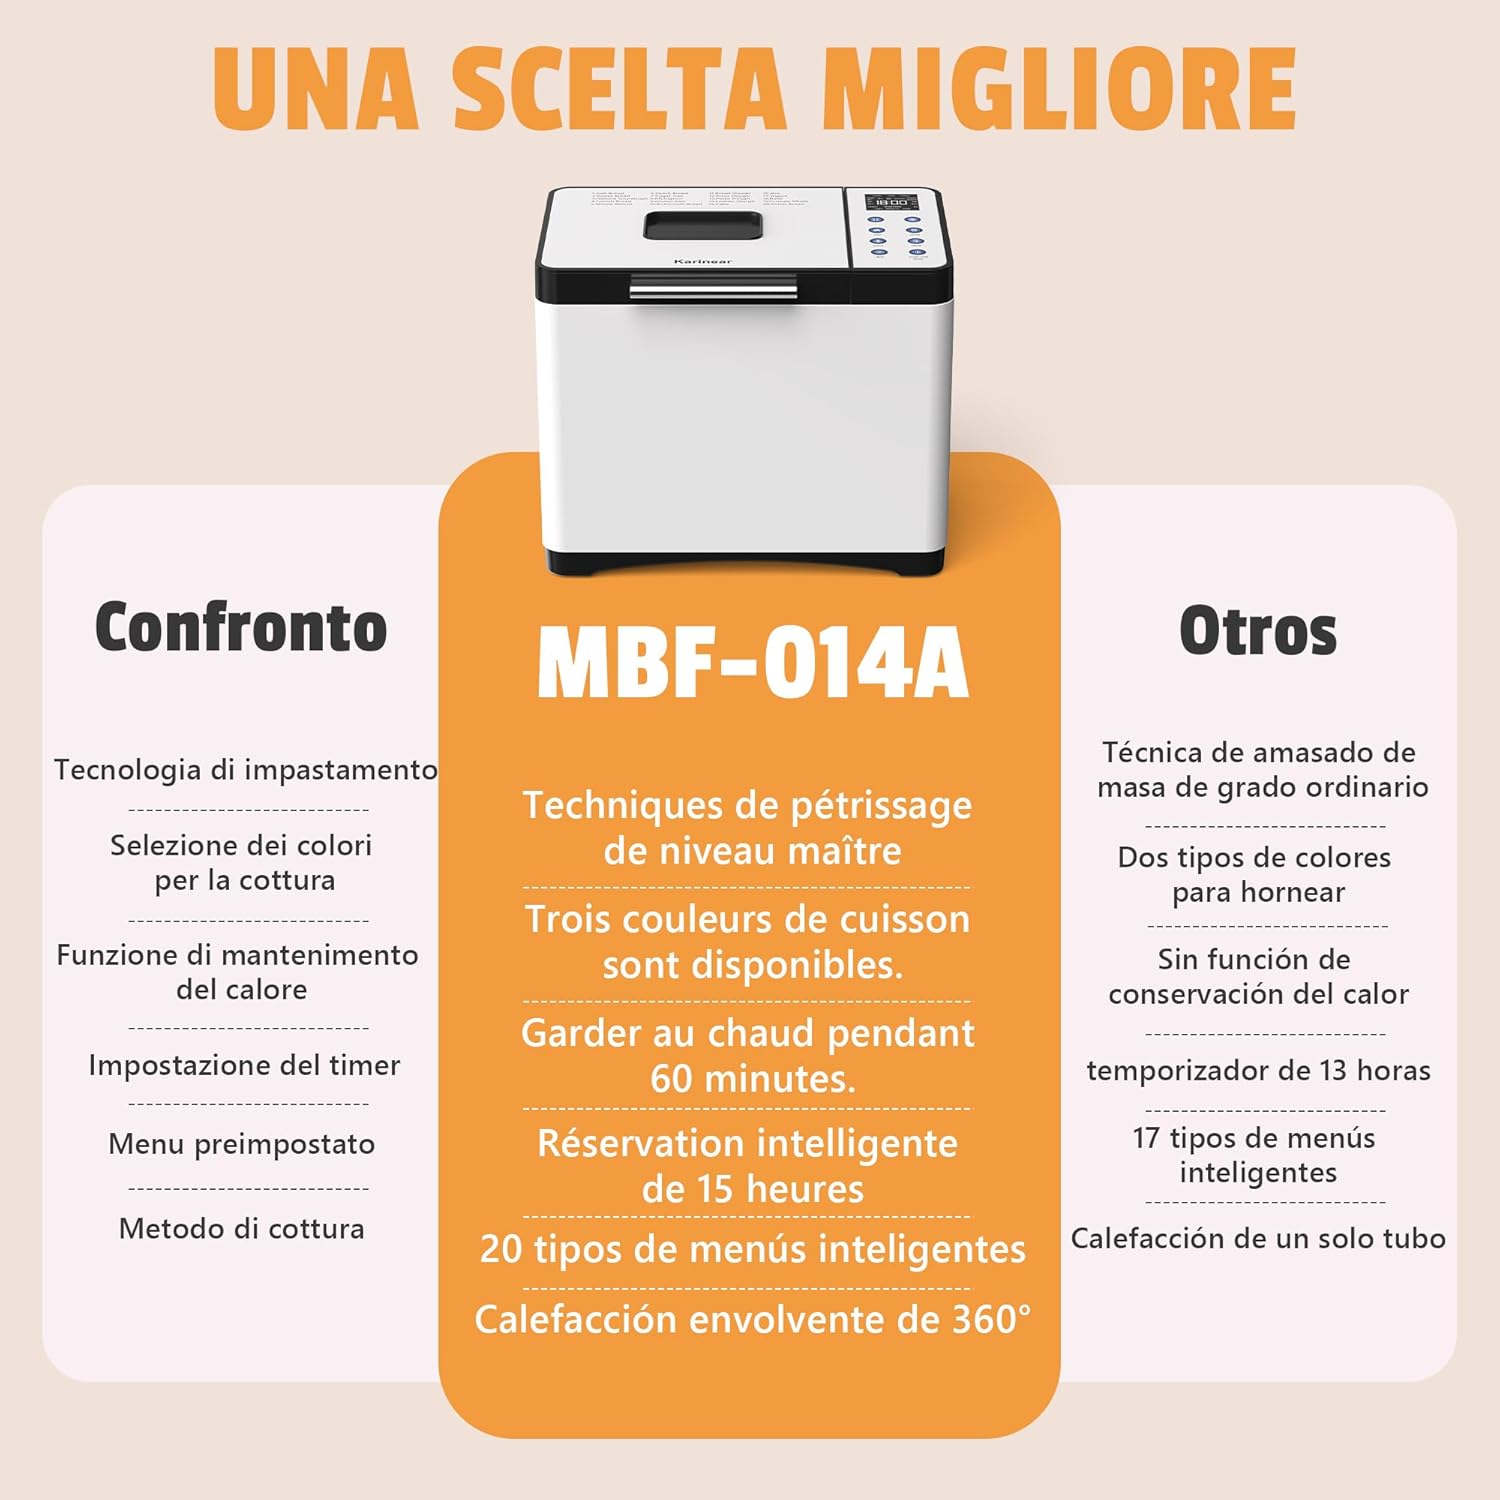
Image: Comparison chart highlighting features of model MBF-014A against other bread makers, including kneading techniques, crust colors, keep warm function, timer, smart menus, and 360° heating.
- Brand: Karinear
- Model: MBF-014A
- Color: White and Black
- Power: 650W
- Capacity: Up to 2 lbs (approx. 1000g)
- Product Dimensions: 34.5P x 24.8W x 28.3H cm (approx. 13.6 x 9.8 x 11.1 inches)
- Item Weight: 5.8 kg (approx. 12.8 lbs)
- Programs: 20 preset programs
- Timer: 15-hour delay timer
- Keep Warm: 1-hour automatic keep warm function
- Crust Settings: Light, Medium, Dark
- Loaf Sizes: 500g, 750g, 1000g
9. Warranty and Support
For warranty information, technical support, or customer service inquiries, please refer to the contact details provided with your purchase documentation or visit the official Karinear website. Keep your proof of purchase for warranty claims.


