
sainlogic BSV-IC205S
Sainlogic Automatic Plant Waterer User Manual
Model: BSV-IC205S
Introduction
Thank you for choosing the Sainlogic Automatic Plant Waterer. This smart self-watering system is designed to provide precise and efficient irrigation for up to 15 potted plants, ensuring they remain hydrated even when you are away. Featuring a humidity monitor display and programmable timer, it offers convenience and peace of mind for indoor gardens and patio setups.
This manual provides detailed instructions for the setup, operation, maintenance, and troubleshooting of your new watering system. Please read it thoroughly before use to ensure optimal performance and longevity of the product.
What's Included
Before you begin, please verify that all components are present in the package:
- Controller x1
- 33ft (10m) Tubing x1
- T-joints x15
- Drippers x15
- Filter x1
- Anti-siphon Valve x1
- Soil Moisture Sensor x1
- Type-C Cable x1
- User Manual x1

Image: All components of the Sainlogic Automatic Plant Waterer system, including the controller, tubing, drippers, T-joints, filter, anti-siphon valve, soil moisture sensor, and Type-C cable.
Setup Instructions
Follow these steps to set up your Sainlogic Automatic Plant Waterer:
- Prepare the Water Source: Place a water reservoir (e.g., a bucket or large container) near your plants. Ensure it is elevated if possible to aid water flow, though the system is designed to pump water.
- Connect the Filter and Anti-siphon Valve: Attach the filter to one end of the tubing and place it into your water reservoir. Connect the anti-siphon valve to the other end of the tubing that will connect to the controller's inlet. The anti-siphon valve must be positioned at the highest point of the entire system to prevent backflow.
- Connect Tubing to Controller: Connect the tubing from the water source to the "IN" port of the controller. Connect the remaining tubing to the "OUT" port of the controller.
- Measure and Cut Tubing: Measure the required length of tubing for each plant. Cut the tubing using scissors or a sharp knife.
- Install T-joints and Drippers: Insert T-joints into the main tubing at points where you want to branch off to individual plants. Attach smaller tubing segments from the T-joints to the drippers.
- Place Drippers: Insert the drippers directly into the soil near the roots of each plant. Ensure they are securely placed.
- Connect Soil Moisture Sensor: Plug the soil moisture sensor into the designated port on the controller. Insert the sensor probes into the soil of a representative plant.
- Power On: Connect the Type-C cable to the controller and a suitable power source (e.g., USB adapter, power bank).
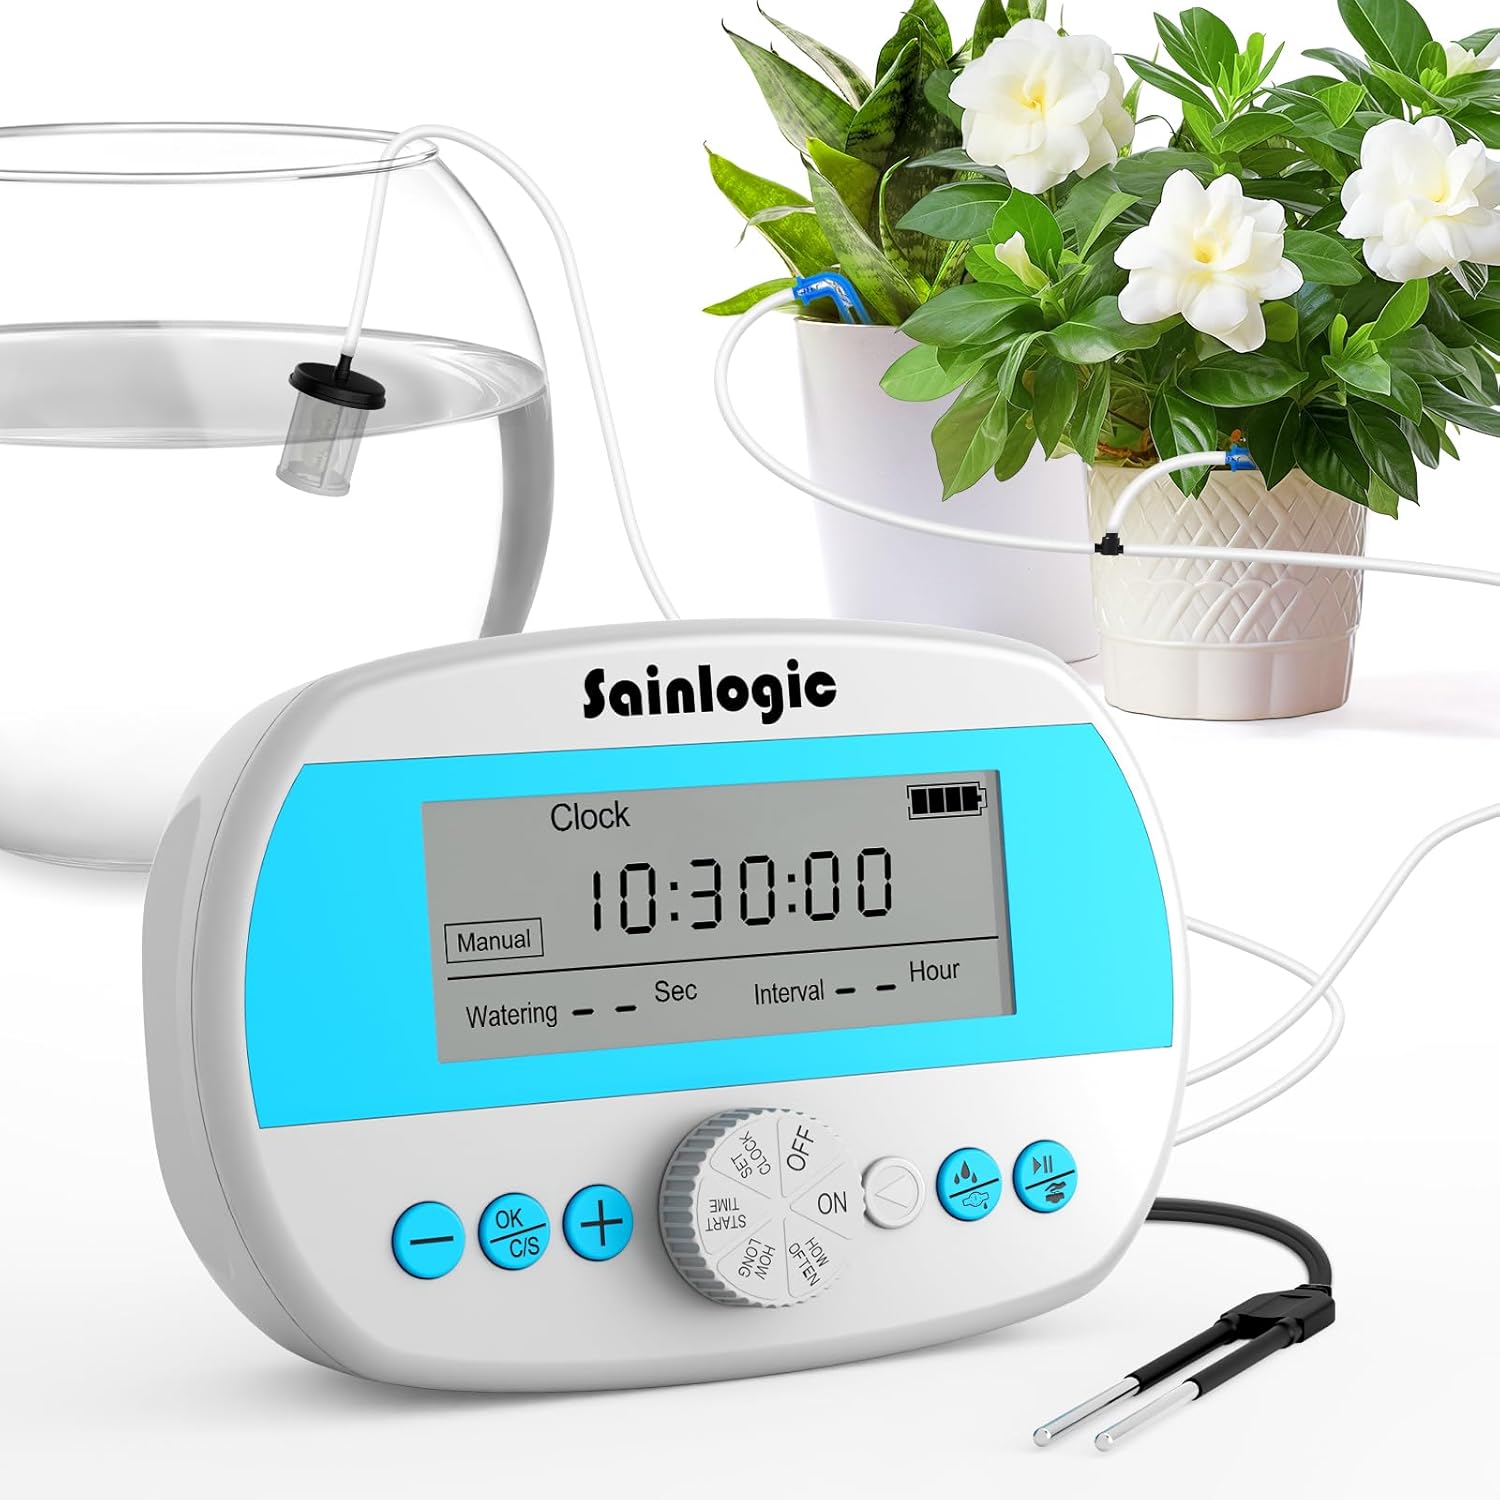
Image: The Sainlogic Automatic Plant Waterer controller with its tubing connected to a water container and two potted plants, demonstrating a basic setup.

Image: A comprehensive setup showing the Sainlogic 15-pot self-watering system in action, irrigating multiple plants on a tiered stand, highlighting the precise drip irrigation to roots.
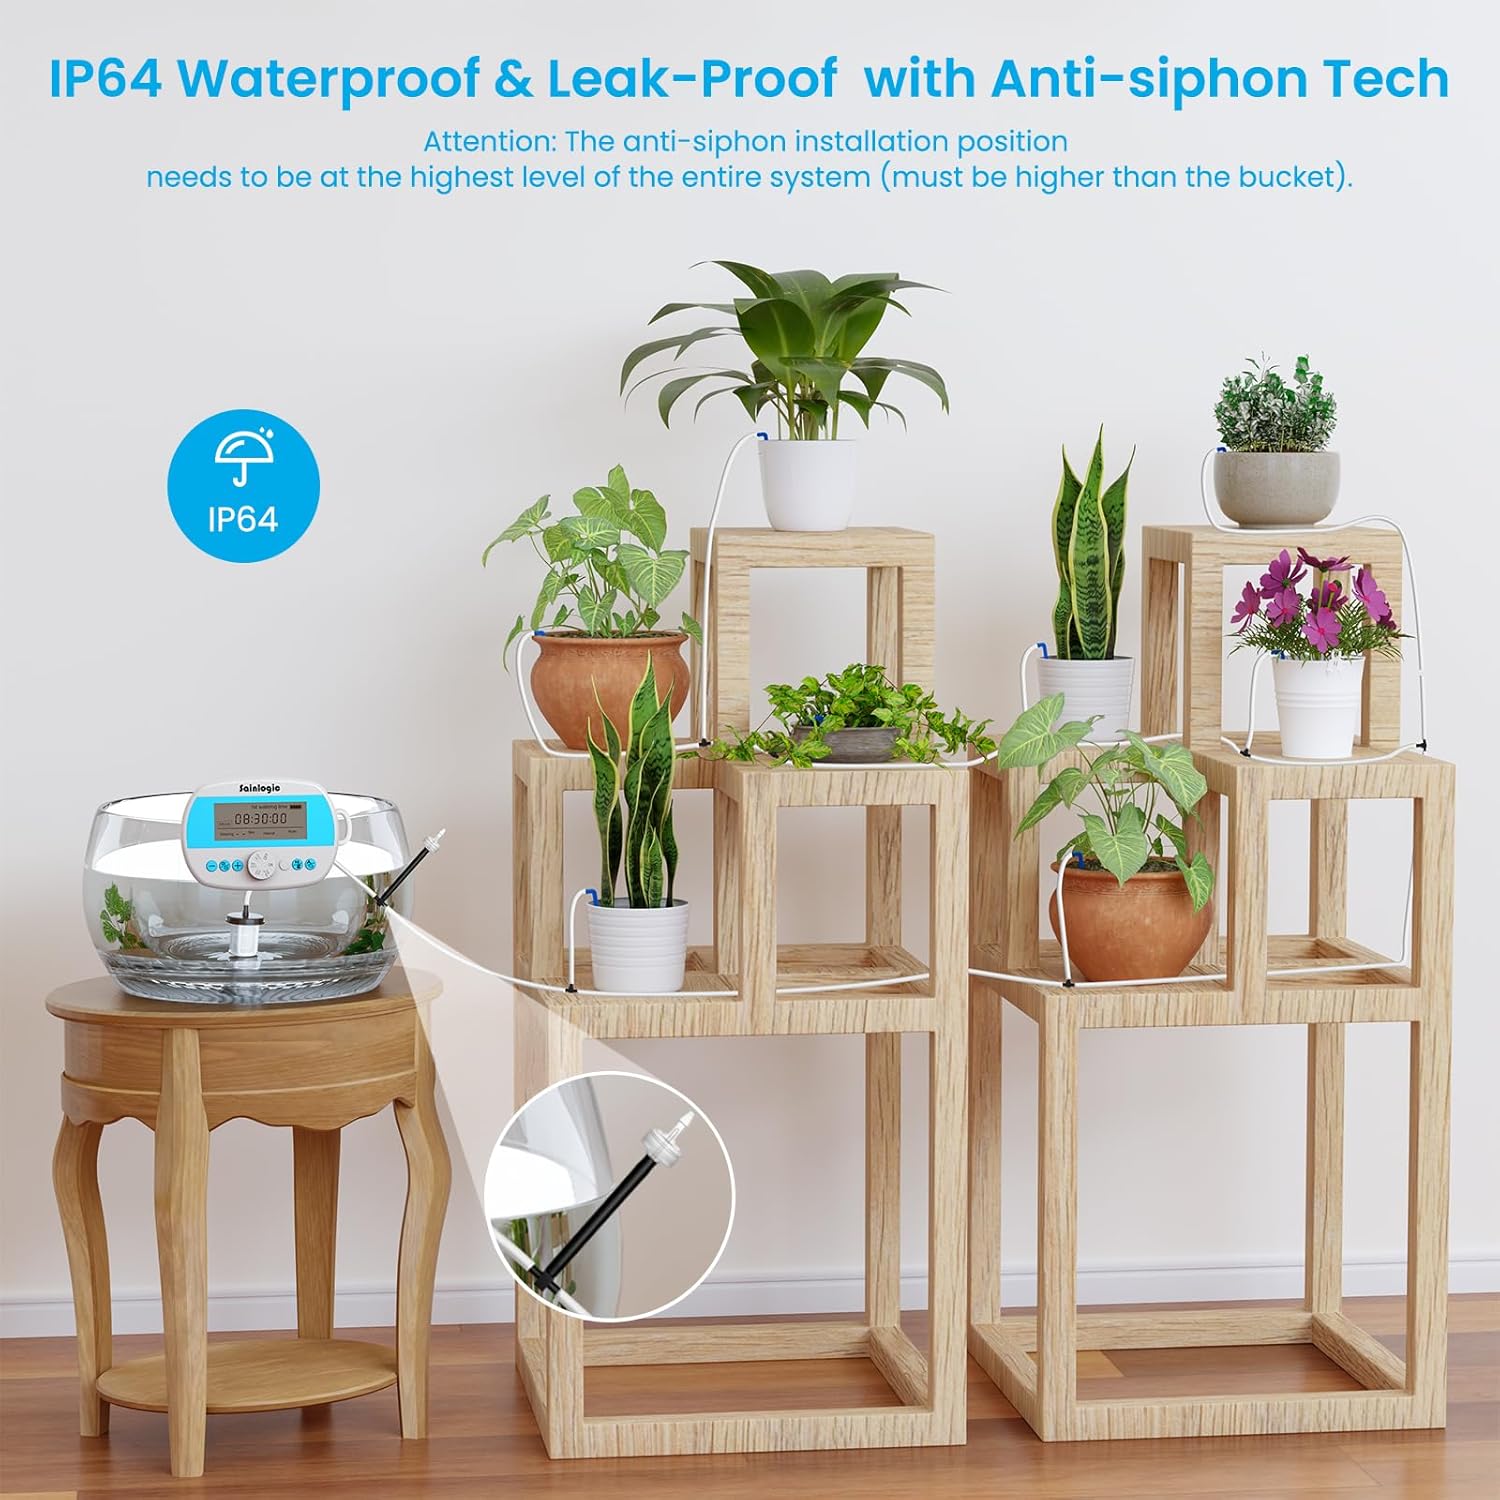
Image: Illustration of the IP64 waterproof and leak-proof design, showing the anti-siphon valve's required highest installation position relative to the water source and plants.
Operating Instructions
The Sainlogic Automatic Plant Waterer offers two primary operating modes: Humidity Mode and Timing Mode.
Controller Overview

Image: Detailed view of the 3.07" large LCD display on the Sainlogic controller, indicating: 1) Mode Display (Timing/Humidity/Manual), 2) Clock / 1st watering time, 3) Current Battery Capacity, 4) Suspend, 5) Humidity Display "WET", 6) Watering Time, 7) Interval Time Between Each Watering.

Image: Close-up of the Sainlogic controller's control dial and buttons, illustrating their functions: ON (Turn the device on), OFF (Turn the device off), SET CLOCK (Set Current Time), START TIME (Set the first watering timer), HOW LONG (Set the watering duration), HOW OFTEN (Set the watering frequency).
Humidity Mode (Smart Auto Watering)
In Humidity Mode, the system uses the soil moisture sensor to detect soil dryness. It will automatically water until the soil becomes wet, and the screen displays "WET". The maximum watering duration in this mode is 30 minutes.
- Turn the dial to the "Humidity" setting.
- The system will now monitor soil moisture. When the soil is dry, it will initiate watering.
- Watering will stop automatically once the sensor detects sufficient moisture ("WET" displayed).

Image: Diagram explaining the Smart Soil Moisture Monitor function. It shows that if the soil is wet, the device won't water. If dry, it waters until the screen displays "WET". An example schedule shows daily humidity detection and smart watering at 11:00 AM.
Timing Mode (Programmable Timer)
In Timing Mode, you can set specific watering schedules based on time and frequency.
- Turn the dial to "SET CLOCK" to set the current time. Use the '+' and '-' buttons to adjust and 'OK/C/S' to confirm.
- Turn the dial to "START TIME" to set the desired time for the first watering cycle.
- Turn the dial to "HOW LONG" to set the duration of each watering cycle (up to 30 minutes).
- Turn the dial to "HOW OFTEN" to set the frequency of watering (e.g., every 1 day, every 2 days, up to 7 days).
- Turn the dial to "ON" to activate the programmed schedule.
Image: Example of an automatic watering schedule in Timing Mode, showing watering at 11:00 AM for 10 minutes every 2 days, with a total of 1.06 gallons dispensed per cycle.
Maintenance
Regular maintenance ensures the longevity and optimal performance of your Sainlogic Automatic Plant Waterer.
- Clean the Filter: Periodically check and clean the water filter to prevent blockages and ensure smooth water flow. Rinse it under running water.
- Inspect Tubing and Drippers: Check the tubing and drippers for any kinks, blockages, or damage. Clear any debris that may accumulate.
- Water Reservoir: Keep the water reservoir clean to prevent algae growth and sediment buildup. Refill as needed.
- Controller Cleaning: Wipe the controller with a soft, damp cloth. Do not immerse the controller in water.
- Winter Storage: If storing the system for an extended period or during freezing temperatures, drain all water from the tubing and controller. Store in a dry, frost-free location.
Troubleshooting
If you encounter issues with your Sainlogic Automatic Plant Waterer, refer to the following common problems and solutions:
| Problem | Possible Cause | Solution |
|---|---|---|
| No water flow |
|
|
| System not watering in Humidity Mode |
|
|
| Water leaks |
|
|
| Display not working |
|
|
Specifications
| Feature | Detail |
|---|---|
| Model Name | BSV-IC205S |
| Brand | Sainlogic |
| Product Dimensions | 3.07 x 1.22 x 0.99 inches |
| Item Weight | 1.5 Pounds |
| Material | ABS |
| Watering Capacity | Up to 15 potted plants |
| Watering Modes | Humidity Mode, Timing Mode |
| Display | 3.07" Large LCD Screen |
| Waterproof Rating | IP64 |
| Tubing Length | 33ft (10m) |
Warranty and Support
For any questions, technical support, or warranty claims, please contact Sainlogic customer service. Refer to the contact information provided in your product packaging or visit the official Sainlogic website.
Safety Information: For external use only. Do not attempt to modify or repair the device yourself. Always ensure the anti-siphon valve is correctly installed to prevent backflow.
Ask a question about this manual
Ask about setup, troubleshooting, compatibility, parts, safety, or missing instructions. Manuals+ will review the question and use this page’s manual context to help answer it.