
1. Introduction
This manual provides essential information for the installation, operation, and maintenance of your Loniko ST945E Smart Toilet. Please read this manual thoroughly before installation and use to ensure proper function and safety. Keep this manual for future reference.

Image 1.1: The Loniko ST945E Smart Toilet, showcasing its sleek design and accompanying wireless remote control.
2. Important Safety Information
Observe the following safety precautions to prevent injury or damage to the product.
- Electrical Safety: Ensure the power outlet is properly grounded. Do not immerse the product in water. Disconnect power before cleaning or servicing.
- Water Supply: Ensure water connections are secure to prevent leaks. Use only potable water.
- Cleaning: Use mild, non-abrasive cleaners. Avoid harsh chemicals that may damage surfaces.
- Children and Individuals with Reduced Capabilities: Supervise children to ensure they do not play with the appliance. Individuals with reduced physical, sensory, or mental capabilities should use the product with supervision or instruction.
- Temperature Settings: Exercise caution when adjusting heated seat and water temperatures to avoid burns, especially for sensitive individuals.

Image 2.1: This diagram highlights the 8 layers of safety protection integrated into the smart toilet design, including power-on self-check, leakage protection, seat temperature protection, water temperature protection, wind temperature protection, water and electricity separation, IPX4 waterproof rating, and dry burn protection.
3. Package Contents
Verify that all components are present before beginning installation:
- Smart Toilet Unit
- Wireless Remote Control
- Flange Ring
- Mounting Bracket
- Screws and Anchors
- Water Shutoff Valve
- Installation Accessories (e.g., water supply hose, wax ring)
- Installation Template
- User Manual

Image 3.1: A visual representation of the included components for installation, such as the remote control, mounting bracket, screws, valve, wax ring, screw plate, installation template, and optional battery.
4. Specifications
| Feature | Specification |
|---|---|
| Model Number | U5-1-WK |
| Product Dimensions (D x W x H) | 26.77" x 15.95" x 20.08" |
| Item Weight | 90.4 Pounds |
| Material | Ceramic, Polypropylene (PP) |
| Installation Type | Floor Mounted |
| Rough-in Distance | Standard 12 inches (from wall to drain center) |
| Flush Volume | 1.28 GPF (Gallons Per Flush) |
| Bidet Water Temperature Settings | Normal, 93°F, 96°F, 99°F |
| Heated Seat Temperature Settings | Normal, 93°F, 96°F, 99°F |

Image 4.1: Detailed dimensions of the Loniko ST945E Smart Toilet, including depth, width, height, and rough-in distance, crucial for installation planning.
5. Installation Guide
5.1. Before You Begin
- Ensure the rough-in distance (from the wall to the center of the drain pipe) is 12 inches.
- Confirm a standard 120V AC electrical outlet is available within reach of the toilet's power cord.
- Turn off the main water supply to the bathroom.
- Remove any existing toilet and clean the flange area thoroughly.
5.2. Step-by-Step Installation
- Prepare the Flange: Install the flange ring onto the floor drain.
- Position the Toilet: Carefully align the toilet over the flange and lower it into place. Ensure a secure seal.
- Secure the Toilet: Use the provided mounting bracket and screws to firmly attach the toilet to the floor.
- Connect Water Supply: Connect the water supply hose from the shutoff valve to the toilet's water inlet. Hand-tighten, then use a wrench for a quarter turn.
- Connect Power: Plug the power cord into a grounded electrical outlet.
- Restore Water and Power: Turn on the main water supply and then the electrical power. Check for leaks.
- Test Functions: Perform a test flush and check all smart features.
6. Operating Instructions
6.1. Power On/Off
The toilet powers on automatically when plugged in. A power indicator light will illuminate. To power off, unplug the unit.
6.2. Flushing Functions
The Loniko ST945E offers multiple flushing options:
- Automatic Flushing: The toilet will automatically flush after you leave the seat.
- Foot Sensor Flushing: A sensor at the base allows for hands-free flushing by a gentle foot tap.
- Remote Control Flushing: Use the dedicated flush button on the wireless remote.
- Side Button Flush: A manual flush button is located on the side of the toilet unit.

Image 6.1: This image demonstrates the automatic lid opening and closing, foot sensor flush, and off-seat auto flushing features for hands-free operation.
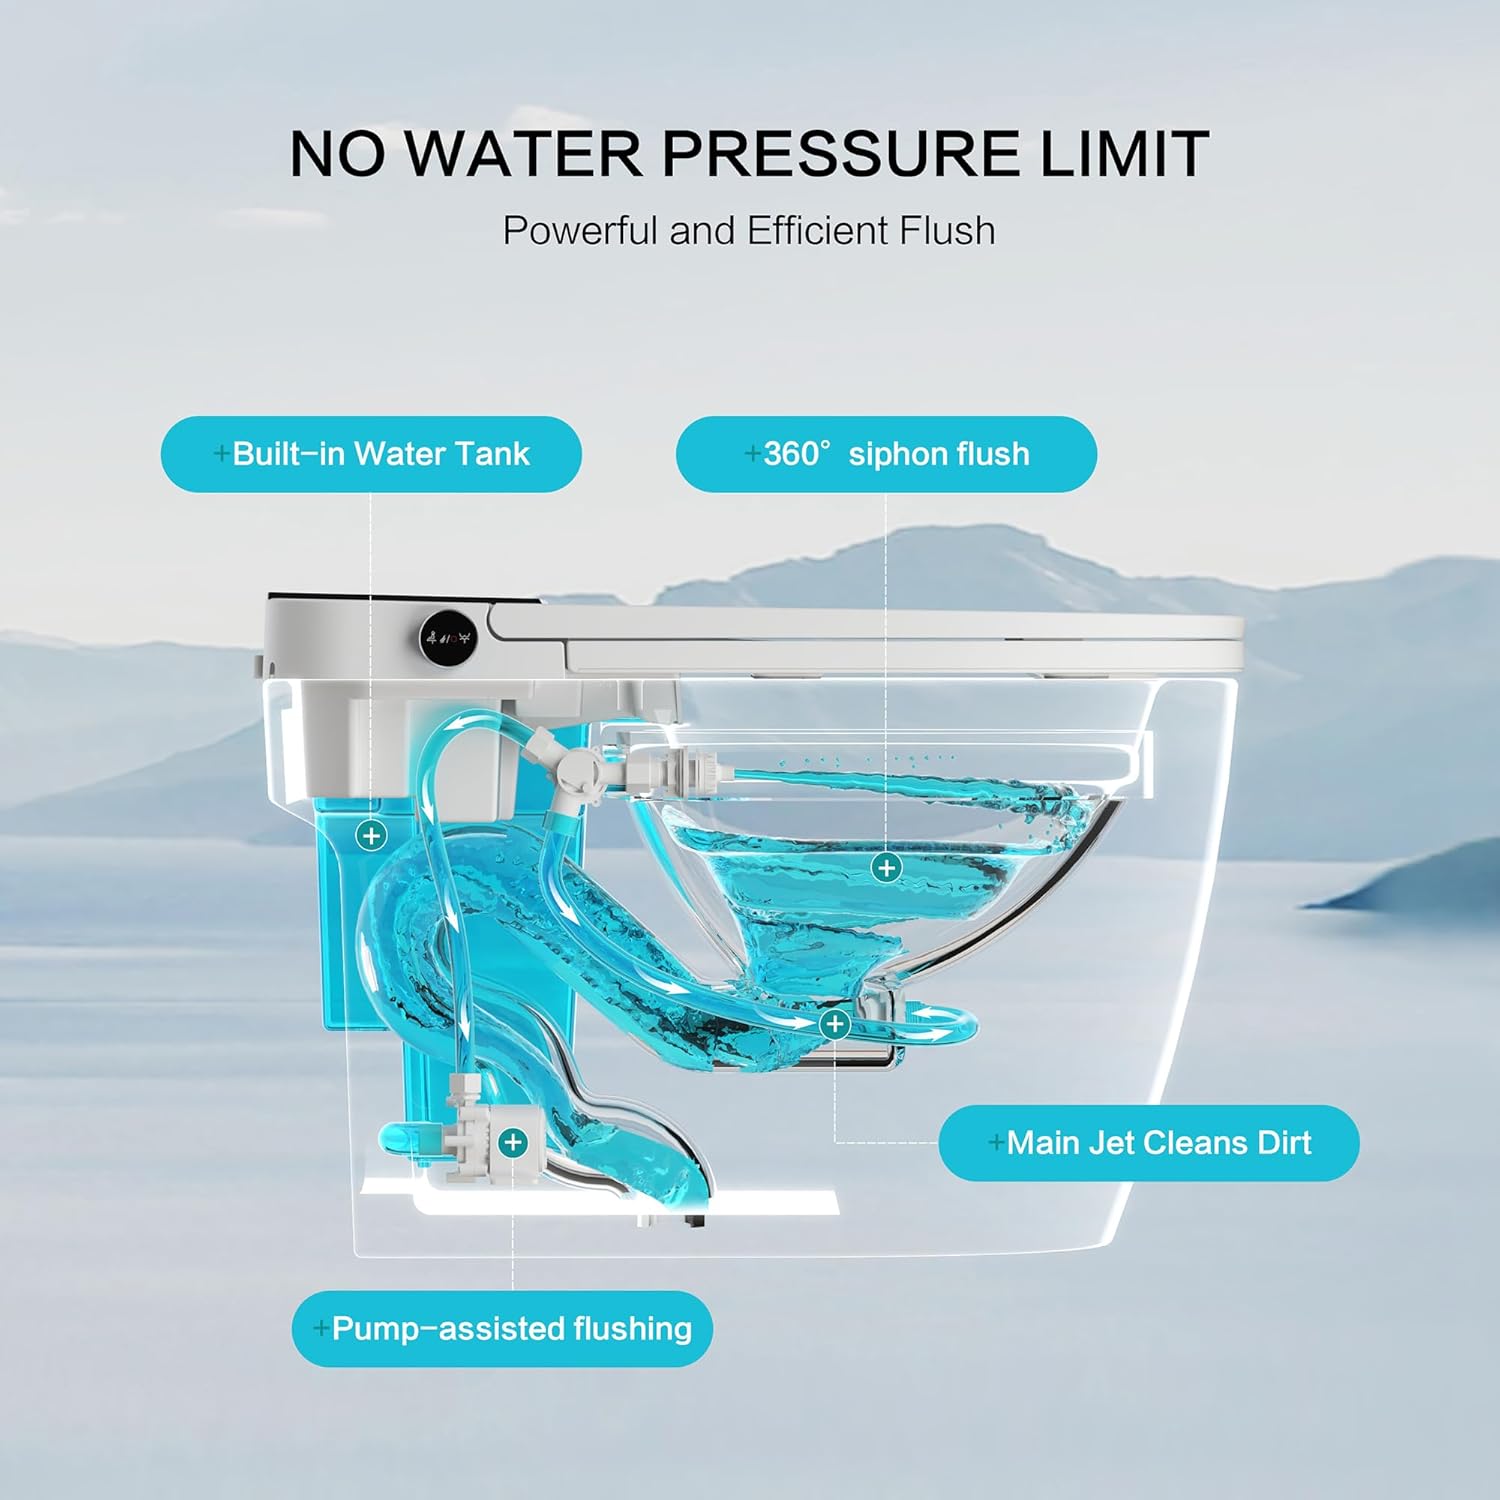
Image 6.2: An internal diagram illustrating the powerful and efficient flushing system, featuring a built-in water tank, pump-assisted flushing, 360° siphon flush, and a main jet for dirt cleaning, ensuring no water pressure limit.
6.3. Bidet and Drying Functions
Personalize your cleaning experience with various wash modes and a warm air dryer:
- Posterior Wash: For general cleansing.
- Feminine Wash: A softer, wider spray for feminine hygiene.
- Oscillating Wash: The nozzle moves back and forth for a broader cleaning area.
- Massage Mode: Pulsating water stream for a soothing effect.
- Warm Air Dryer: After washing, activate the dryer for a paperless finish.
- Water Temperature Adjustment: Select from Normal, 93°F, 96°F, and 99°F using the remote or knob.

Image 6.3: This image illustrates the various bidet wash modes, including self-cleaning, hip washing, female washing, and mobile washing, along with adjustable water temperature settings.
6.4. Heated Seat and Night Light
- Heated Seat: Adjust the seat temperature to your preference (Normal, 93°F, 96°F, 99°F) for comfort in any season.
- Night Light: A soft LED night light provides gentle illumination for safe nighttime use.

Image 6.4: This visual highlights the heated seat function and the integrated night light, ensuring comfort and visibility regardless of ambient temperature or time of day.
6.5. Control Methods
- Wireless Remote Control: The included remote allows full control over all functions, including flushing, wash modes, temperature adjustments, and night light.
- One-Touch Knob: A convenient knob on the side of the toilet provides quick access to essential functions like women's wash (left rotation), hip wash (right rotation), and stop/start heating/flushing (short press).

Image 6.5: A clear depiction of the wireless remote control, showing buttons for flush, dryer, various wash modes, temperature settings, night light, and pressure adjustments.
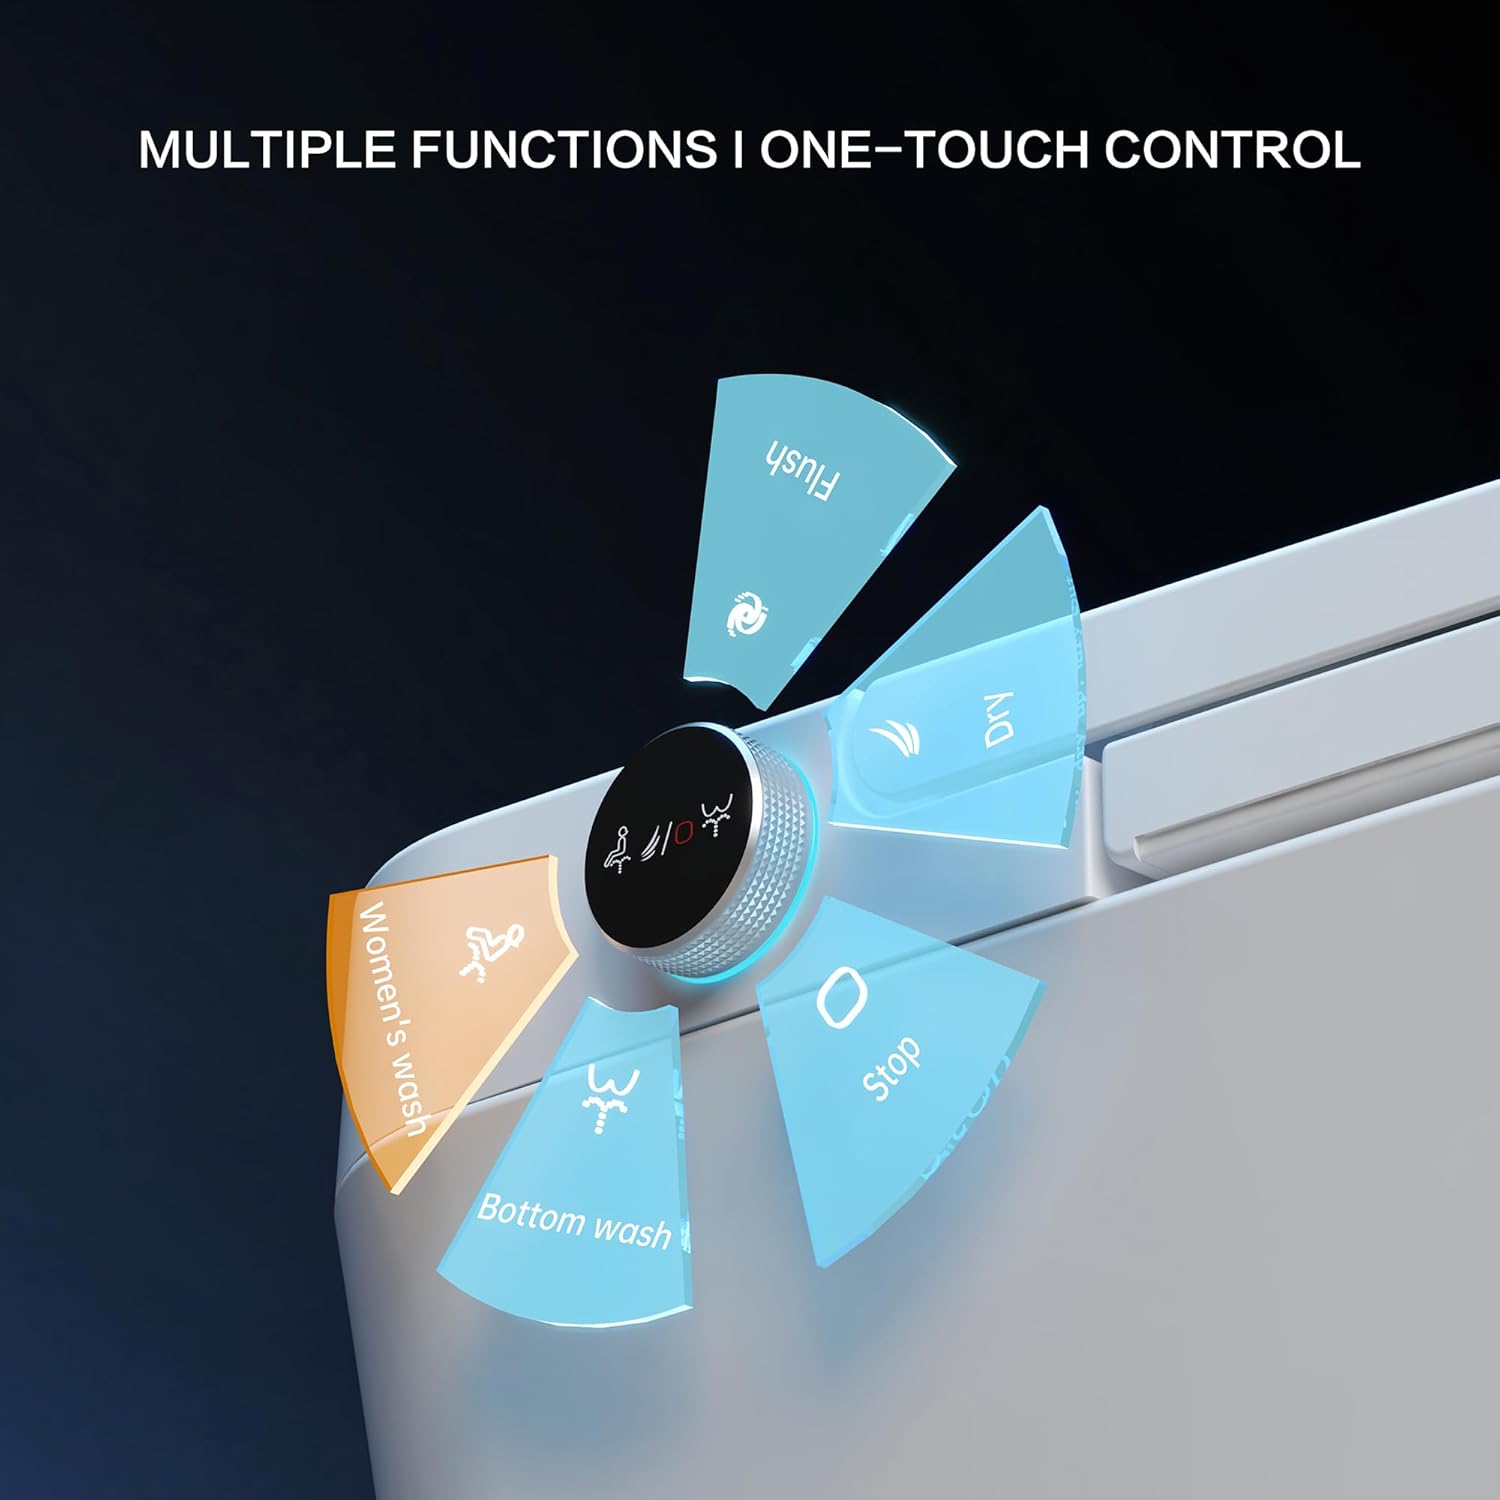
Image 6.6: A close-up view of the one-touch knob, illustrating its rotational and press functions for easy control of washing and flushing, suitable for all users.
7. Maintenance and Care
7.1. Cleaning the Toilet
- Exterior: Wipe the exterior surfaces with a soft, damp cloth and a mild, non-abrasive cleaner. Avoid spraying water directly onto electrical components.
- Seat: Clean the seat with a soft cloth and a gentle, non-corrosive cleaner.
- Bowl: Use a toilet brush and standard toilet bowl cleaner for the ceramic bowl.
- Do Not Use: Abrasive pads, strong acids, alkaline cleaners, or benzene-based solvents, as these can damage the finish.
7.2. Nozzle Cleaning
The bidet nozzle features a self-cleaning function. To activate, refer to the remote control or one-touch knob instructions. Periodically, you may gently wipe the nozzle with a soft cloth if visible residue is present. Ensure the nozzle is retracted before cleaning.
8. Troubleshooting
If you encounter issues, consult the following table for common problems and solutions:
| Problem | Possible Cause | Solution |
|---|---|---|
| No power/Unit unresponsive | Power cord unplugged, circuit breaker tripped, power outage. | Check power connection, reset circuit breaker, verify power supply. |
| Weak or no flush | Water supply valve closed, low water pressure, clogged nozzle. | Open water supply valve fully. Ensure adequate household water pressure. Clean flush nozzles. |
| Bidet spray not working | Water supply off, nozzle clogged, sensor not detecting user. | Check water supply. Clean bidet nozzle. Ensure proper seating for sensor activation. |
| Heated seat not warming | Temperature setting too low, heating element malfunction. | Adjust seat temperature setting. If issue persists, contact customer support. |
| Remote control not working | Dead batteries, remote out of range, signal obstruction. | Replace batteries. Ensure remote is within range and pointed towards the toilet. Remove obstructions. |
| Leakage | Loose water connections, damaged seal. | Tighten water connections. Inspect seals and replace if damaged. Contact support if leak persists. |
9. Warranty and Support
9.1. Warranty Information
Your Loniko ST945E Smart Toilet is backed by a 12-month replacement warranty from the date of purchase. This warranty covers manufacturing defects and malfunctions under normal use. Please retain your proof of purchase for warranty claims.
9.2. Customer Support
For any questions, technical assistance, or warranty claims, our 24/7 customer support team is available to assist you. Please refer to your purchase documentation or the Loniko website for contact details.
10. Product Videos
No official product videos with seller creator type and relevant content were found in the provided data to embed. Please refer to the manufacturer's website for any available video tutorials or demonstrations.

