1. Introduction
This manual provides detailed instructions for the assembly, operation, and maintenance of your O'SKOOL RTS022 Precision Router Table Accessory Kit. This kit is designed to enhance the accuracy, safety, and dust control of your routing operations. Please read this manual thoroughly before use to ensure proper and safe operation.
1.1 Safety Information
Always prioritize safety when operating power tools. Familiarize yourself with your router's manual and general woodworking safety practices. Wear appropriate personal protective equipment (PPE) including eye protection, hearing protection, and dust masks. Ensure the router table is stable and securely positioned before beginning any work. Disconnect power to the router before making adjustments or changing bits.

Figure 1.1: The O'SKOOL RTS022 Precision Router Table Accessory Kit, fully assembled.
2. Components List
The O'SKOOL RTS022 Precision Router Table Accessory Kit includes the following main components:
- Sturdy Steel-Tube Stand with Leveling Feet
- Precision MDF Tabletop with Combo T-track
- Fence with Parallelogram Mechanism
- Calibrated Stop Blocks (2 units)
- Router Bit Guard/Dust Shield
- 2.5" Dust Port
- Feather Boards (2 units)
- Necessary Fasteners and Hardware for Assembly
3. Setup and Assembly
3.1 Stand Assembly
Assemble the steel-tube stand according to the included hardware instructions. Ensure all connections are secure. The stand features adjustable leveling feet to compensate for uneven floor surfaces. Adjust these feet to achieve a stable and level base for the router table.

Figure 3.1: The steel-tube stand with adjustable leveling feet.
3.2 Tabletop Installation
Carefully place the MDF tabletop onto the assembled stand. Secure the tabletop to the stand using the provided fasteners. The tabletop measures 31-5/8" x 23-3/4" x 1-7/16" and includes a combo T-track for various accessories.

Figure 3.2: The precision MDF tabletop with key dimensions and features highlighted.
3.3 Fence Assembly and Attachment
Attach the fence to the tabletop using the designated T-tracks. The fence incorporates a parallelogram mechanism, designed to maintain parallel alignment with the table edge. Ensure the fence slides smoothly along the tracks. Secure the fence firmly once positioned.
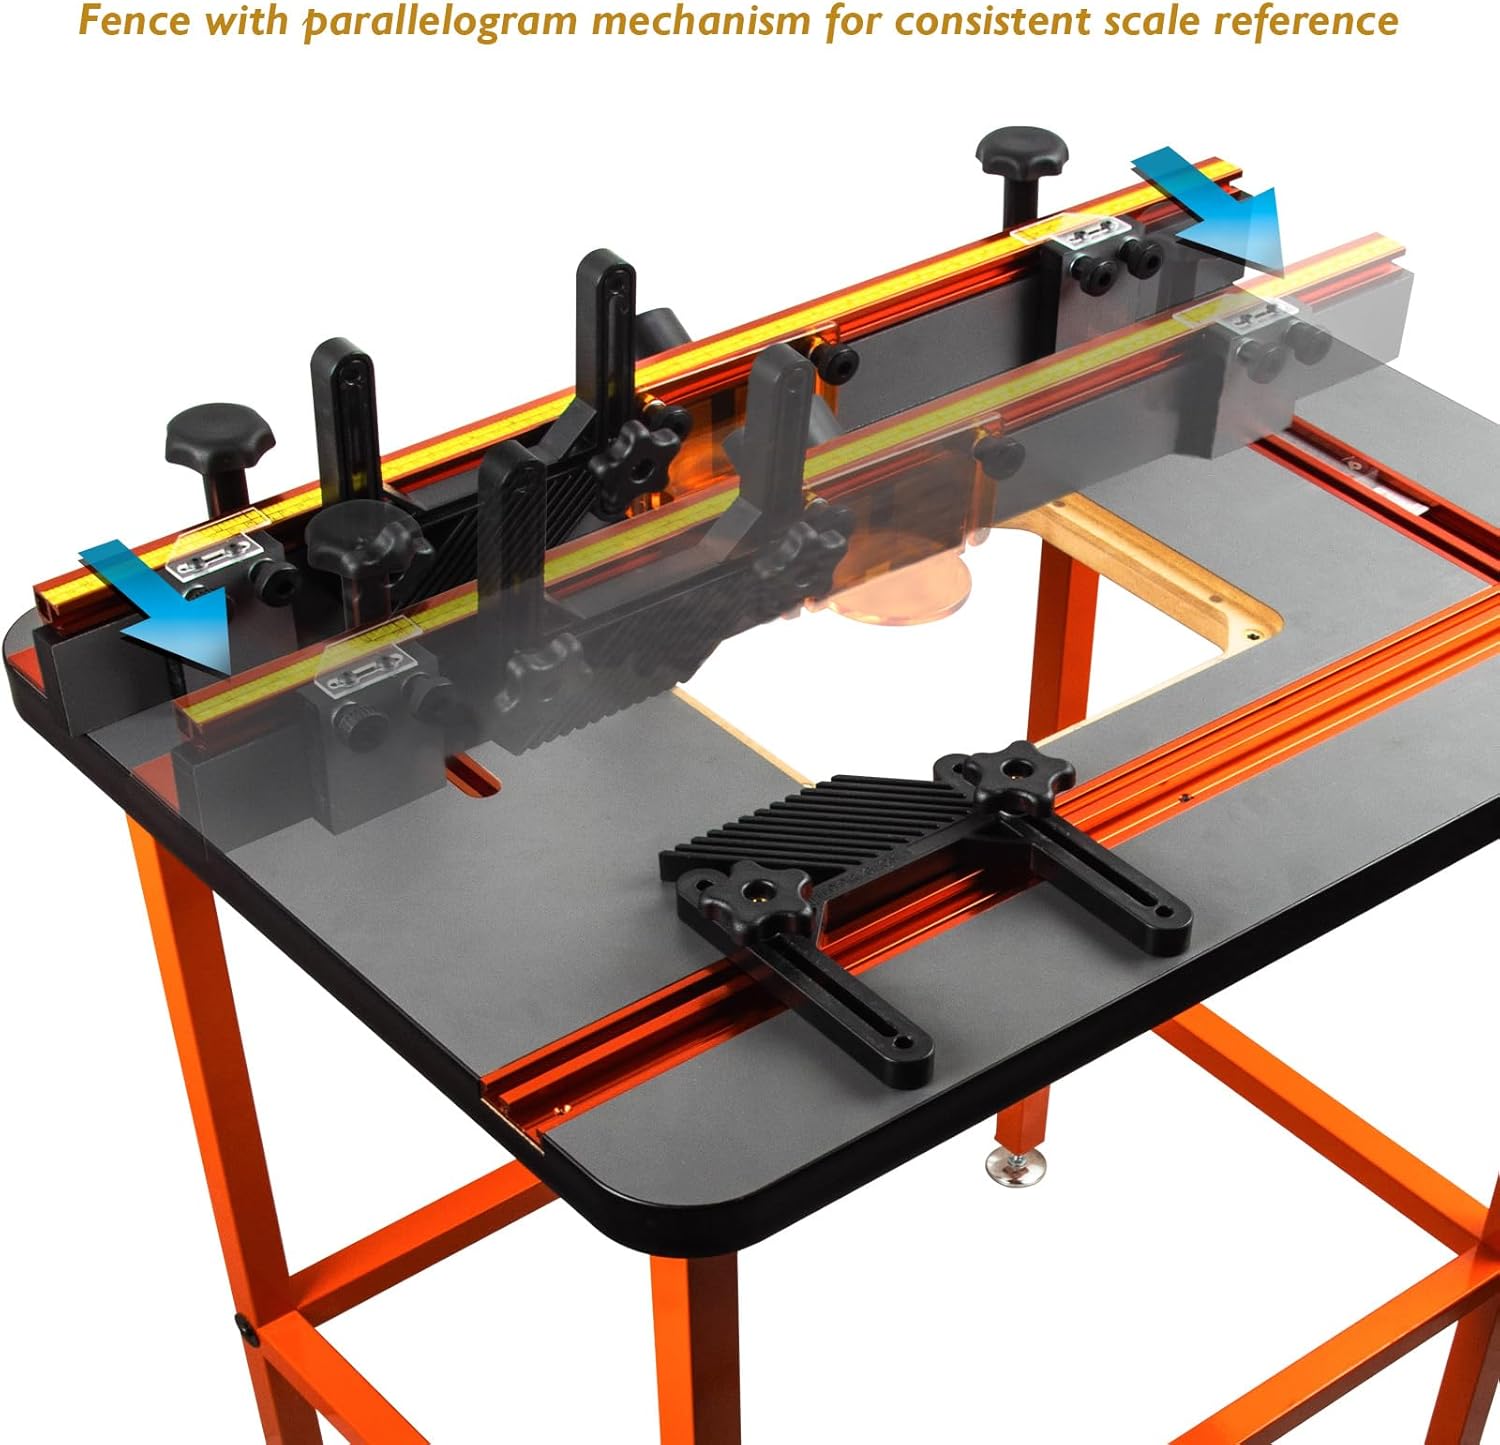
Figure 3.3: The fence demonstrating its parallelogram movement for consistent alignment.
3.4 Dust Port and Router Bit Guard Installation
Install the 2.5" dust port and the router bit guard/dust shield onto the fence. These components are crucial for maintaining a clean and safe work environment by capturing dust and providing protection during operation.
3.5 Feather Board Attachment
The top slot on the fence is designed to accept feather boards. Attach the two included feather boards as needed for specific operations. These provide both horizontal pressure and vertical hold-down for better stock control.

Figure 3.4: A feather board attached to the router table fence, providing stock control.
4. Operating Instructions
4.1 Router Mounting
The router table does not include an insert plate, allowing flexibility to install either a router lift or a standard insert plate compatible with your router model. Follow the instructions provided with your chosen router lift or insert plate for proper installation.
4.2 Fence Adjustment
The parallelogram fence mechanism ensures the fence remains parallel to the table edge. To adjust the fence position, loosen the locking knobs, slide the fence to the desired position, and then firmly tighten the knobs. This design maintains the alignment between the scale markings and the router bit center, simplifying repeatable setups.
4.3 Using Calibrated Stop Blocks
The two calibrated stop blocks are used to define the start and stop points of a cut, particularly useful for non-through dados or mortises. Each block features a hairline acrylic indexing plate for precise alignment. Position the stop blocks in the T-track on the fence, adjust them to your desired start and end points, and secure them.

Figure 4.1: Hands adjusting the calibrated stop blocks for precise routing.
4.4 Dust Collection
Connect a dust collection system to the 2.5" dust port on the fence. Effective dust collection is essential for maintaining a clear view of your work, improving air quality, and extending the life of your router bits.
5. Maintenance
Regular maintenance ensures the longevity and optimal performance of your router table.
- Cleaning: After each use, clean the tabletop, fence, and T-tracks to remove sawdust and debris. A damp cloth can be used for the tabletop, ensuring it is dried thoroughly afterward.
- Fastener Check: Periodically check all fasteners and knobs for tightness. Tighten any loose components to maintain stability and accuracy.
- Lubrication: Lightly lubricate the T-tracks and any moving parts of the fence mechanism with a dry lubricant to ensure smooth operation.
6. Troubleshooting
- Fence Alignment Issues: If the fence does not maintain squareness or shifts during adjustment, ensure the screws connecting the miter bar to the fence are tightened securely. When adjusting, try to move both sides of the fence simultaneously to maintain alignment.
- Fence Movement Resistance: If the fence does not slide freely, check for debris in the T-tracks. Ensure the T-bolts are not overly tightened, which can cause binding. Lifting the fence slightly while sliding can help overcome minor resistance.
- Table Instability: If the table wobbles, adjust the leveling feet on the stand until all four feet make firm contact with the floor and the table is stable.
7. Specifications
| Feature | Specification |
|---|---|
| Model Number | RTS022 |
| Manufacturer | O'SKOOL |
| Item Weight | 56.1 pounds |
| Package Dimensions | 36.25 x 27.75 x 7.5 inches |
| Material | Medium Density Fiberboard, Metal |
| Power Source | Hand Powered (for router, not included) |
| Stand Height | 36 inches (adjustable for leveling) |
| Stand Footprint | 28-1/8" x 20-1/8" |
| Tabletop Dimensions | 31-5/8" x 23-3/4" x 1-7/16" |
| Dust Port Size | 2.5 inches OD |
8. Customer Support
For any questions, technical assistance, or support regarding your O'SKOOL RTS022 Precision Router Table Accessory Kit, please contact O'SKOOL customer service. Refer to the product packaging or the O'SKOOL official website for the most current contact information.


