1. Introduction
Thank you for choosing the Jocoevol Twin Size Loft Bed. This instruction manual provides essential information for the safe assembly, setup, operation, and maintenance of your new loft bed. Please read this manual thoroughly before beginning assembly and retain it for future reference.
2. Safety Information
Your safety is paramount. Please adhere to the following guidelines:
- Always use the guardrails when occupying the top bunk.
- Exercise caution with objects placed on the desk to prevent them from falling onto the area below.
- This product may not be suitable for individuals with certain health conditions or mobility issues. Consult a healthcare professional if unsure.
- Follow all assembly instructions precisely to ensure the bed's stability and prevent collapse.
- Ensure the anti-tip kit is properly installed to secure the bed to the wall, preventing accidental tipping.
- Do not exceed the recommended weight limit for the top bunk.
3. Package Contents
Before assembly, verify that all components are present and undamaged. Refer to the included parts list for a complete inventory. Key components include:
- Metal Bed Frame (1.5-inch thick white round metal tubes with gold accents)
- Headboard and Footboard (natural wood panels)
- L-Shaped Desk components
- 3 Storage Shelves
- 3 Fabric Drawers
- Guardrails
- Ladder
- Built-in Smart RGB LED Light Strip
- Built-in Charging Station (2 AC outlets, 2 USB ports, 6.5-foot power cord)
- Bedside Storage Bag
- 4 Movable Hooks
- Anti-Tip Kit
- Assembly Hardware and Tools
4. Assembly Instructions
Assembly is required for this loft bed. It is recommended to have at least two adults for the assembly process. All necessary tools are included, and parts are clearly labeled for ease of installation. Precision-drilled holes facilitate a straightforward assembly.
- Unpack and Organize: Carefully unpack all components and lay them out on a clean, soft surface to prevent scratches. Group similar parts and hardware.
- Review Instructions: Read the entire assembly manual provided in the package before starting. Familiarize yourself with the steps and diagrams.
- Assemble the Main Frame: Begin by connecting the main metal frame components as per the diagrams. Ensure all connections are secure but do not fully tighten screws until instructed.
- Install Guardrails and Ladder: Attach the full-length guardrails to the top bunk and secure the ladder in its designated position.
- Construct the L-Shaped Desk and Shelves: Assemble the L-shaped desk and integrate the storage shelves into the frame structure.
- Insert Fabric Drawers: Once the shelf structure is complete, insert the fabric drawers into their compartments.
- Install LED Lights and Charging Station: Integrate the LED light strip and the charging station into the designated areas of the desk. Ensure the power cord is routed safely.
- Attach Accessories: Place the bedside storage bag and movable hooks as desired.
- Final Tightening: Once all components are in place and aligned, systematically tighten all screws and bolts. Do not overtighten.
- Install Anti-Tip Kit: Securely attach the anti-tip device to the bed frame and then to a wall stud, following the specific instructions provided with the kit. This is crucial for stability.
For visual guidance, refer to the diagrams below:

Figure 4.1: Fully assembled Jocoevol Twin Size Loft Bed with L-shaped desk, LED lighting, and storage.

Figure 4.2: Diagram illustrating the heavy-duty metal frame construction, including 2-layer enclosed guardrail protection, sturdy triangle construction, metal slats support, buckle design, non-slip pads, and anti-tipping device.
5. Setup
After assembly, proceed with the setup of the bed's features:
5.1 L-Shaped Desk and Storage
The L-shaped desk provides a spacious surface for various activities. The integrated shelves and fabric drawers offer organized storage. Arrange your items on the shelves and utilize the drawers for personal belongings.

Figure 5.1: The L-shaped desk area, showing its dimensions (e.g., 63.7" length, 40.5" depth on the L-extension, 29.7" height from floor).
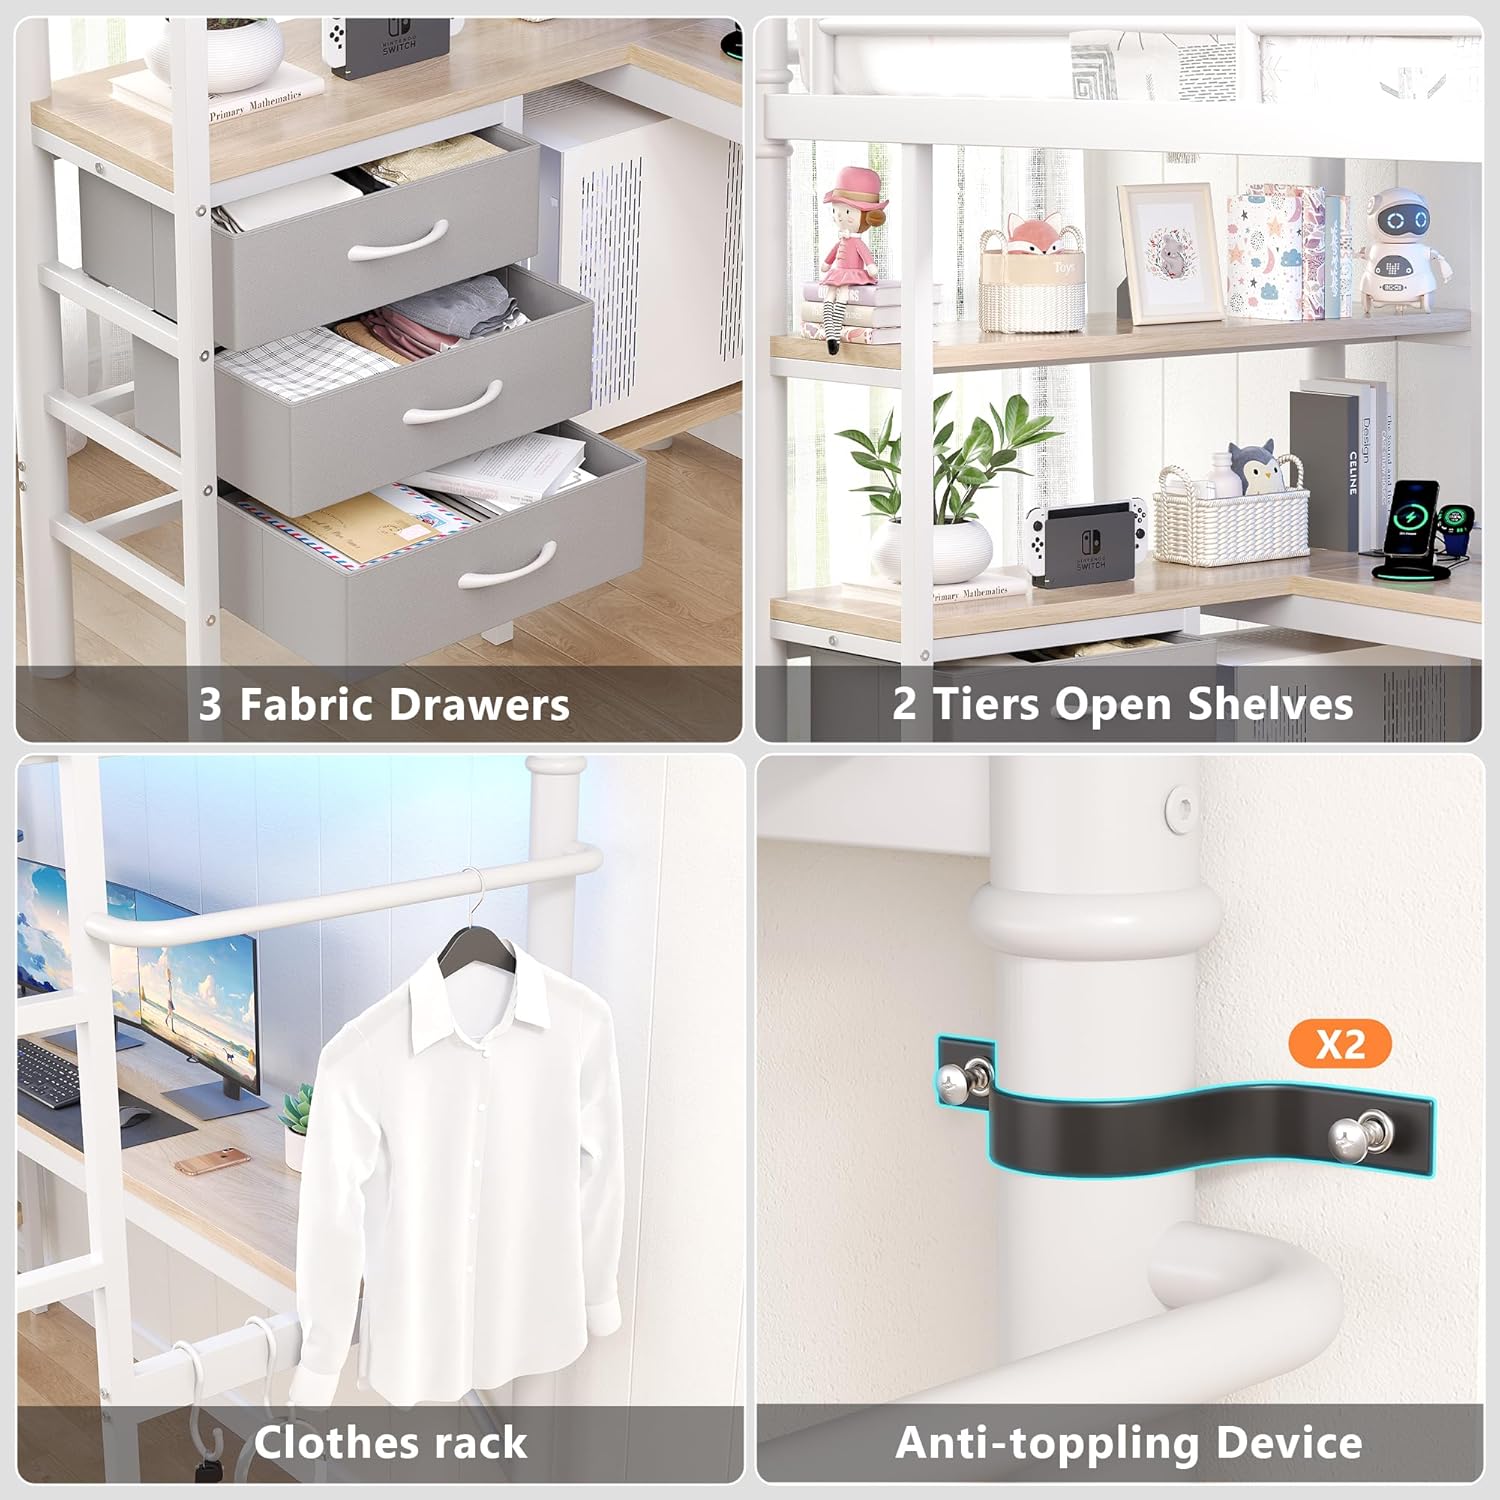
Figure 5.2: Close-up view of the three fabric drawers and two tiers of open shelves, providing ample storage space.
5.2 Bedside Storage and Hooks
Attach the bedside storage bag to the top bunk railing for easy access to small items. Utilize the four movable hooks for hanging bags, scarves, hats, or keys.
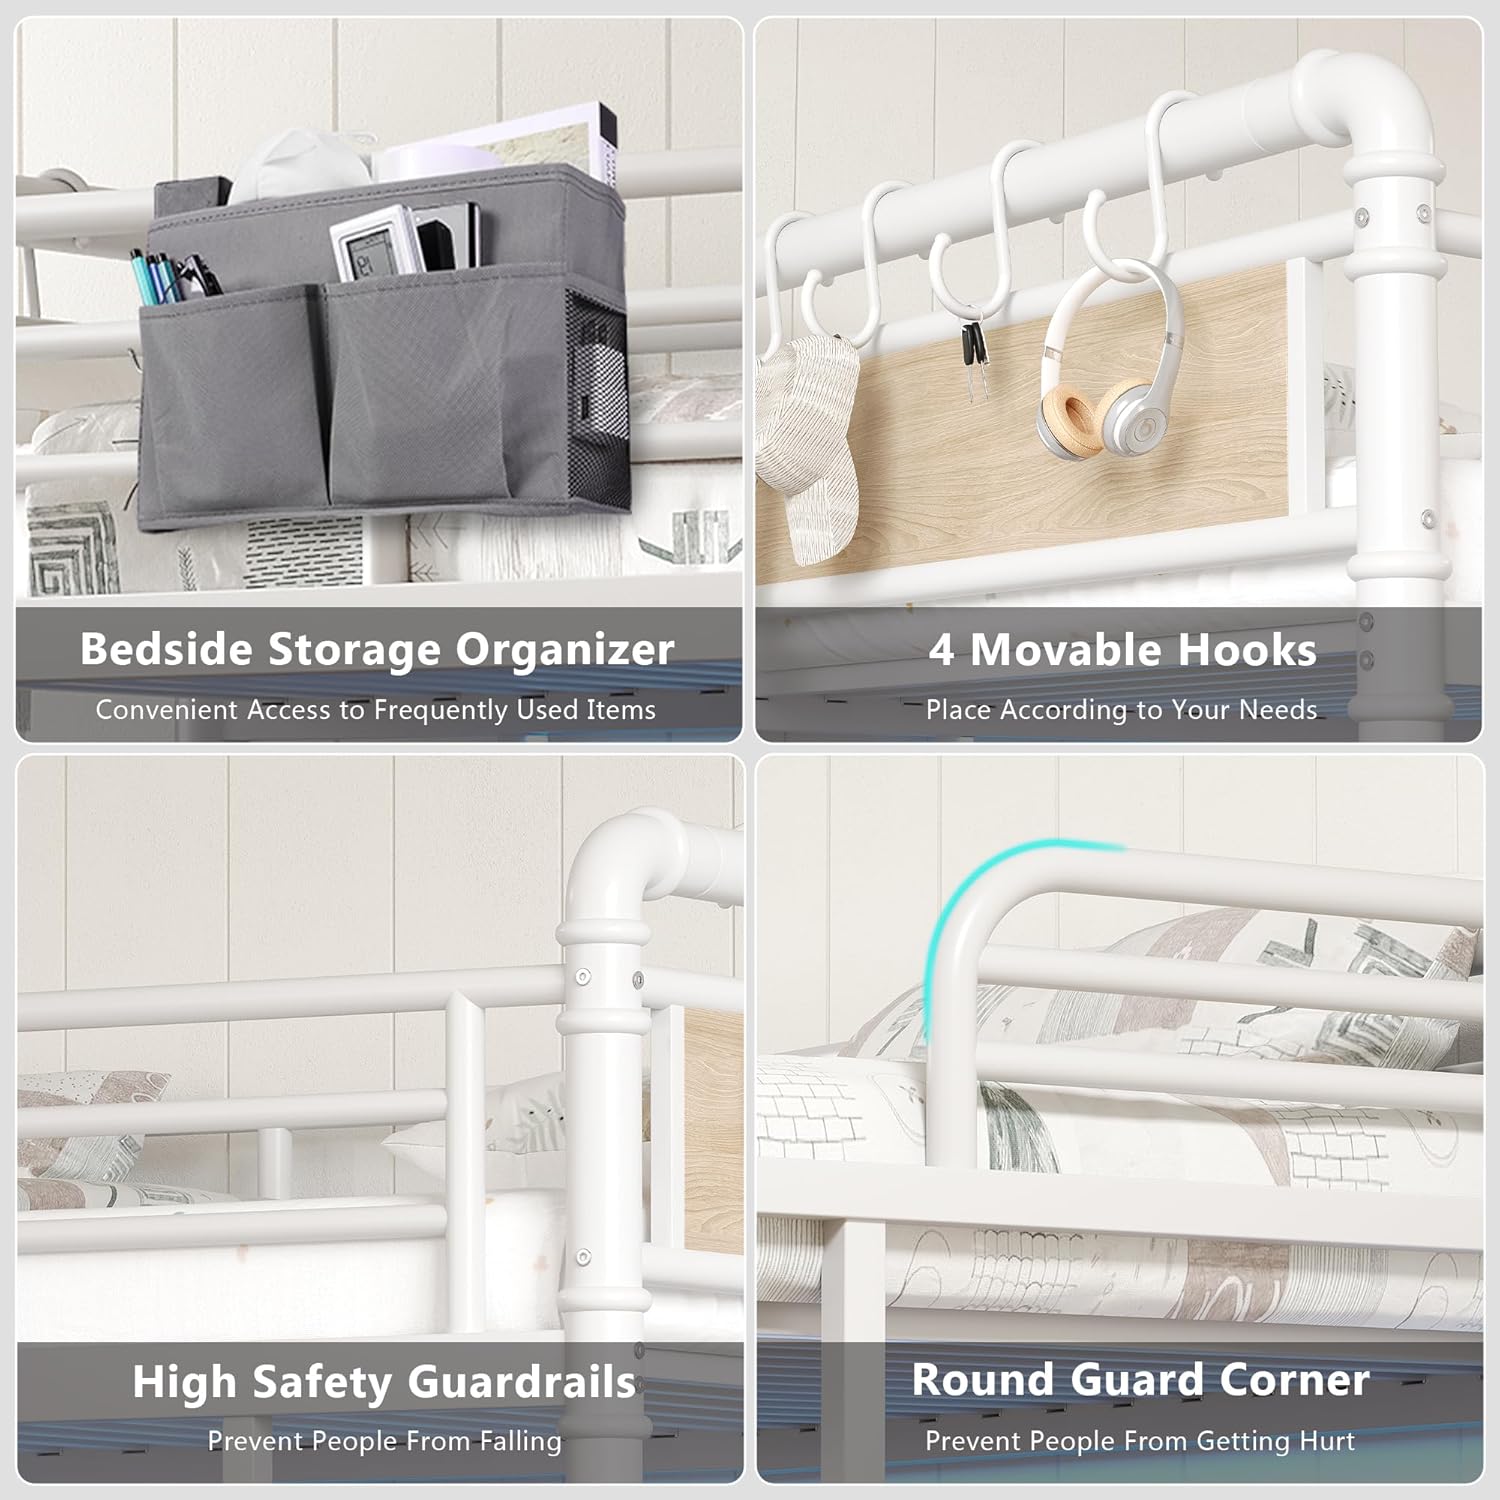
Figure 5.3: Details of the bedside storage organizer for frequently used items and four movable hooks for hanging accessories.
6. Operating Instructions
6.1 RGB LED Lights
The integrated smart RGB LED light strip offers customizable lighting options. You can control the lights using:
- Buttons: Use the physical control buttons on the light strip for basic functions.
- Mobile App: Download the dedicated app (compatible with iOS/Android) to access over 16 million colors, 20+ preset lighting effects, brightness adjustment, and advanced features.
- Remote Control: Use the included remote control for convenient adjustments.
- Music Sync Mode: Activate the intelligent music sync mode via the app or remote to make the LED lights flash in rhythm with music.

Figure 6.1: Overview of the RGB LED light features, including iOS/Android app control, brightness adjustment, over 60,000 colors, mic mode, music mode, timing function, and remote control.
6.2 Charging Station
The built-in charging station provides convenient power access for your electronic devices.
- AC Outlets: Two 125V/12A AC outlets are available for standard plugs.
- USB Ports: Two 5V/2A USB ports are provided for charging smartphones, tablets, and other USB-powered devices.
- Power Connection: Ensure the 6.5-foot power cord is securely plugged into a functional wall outlet.
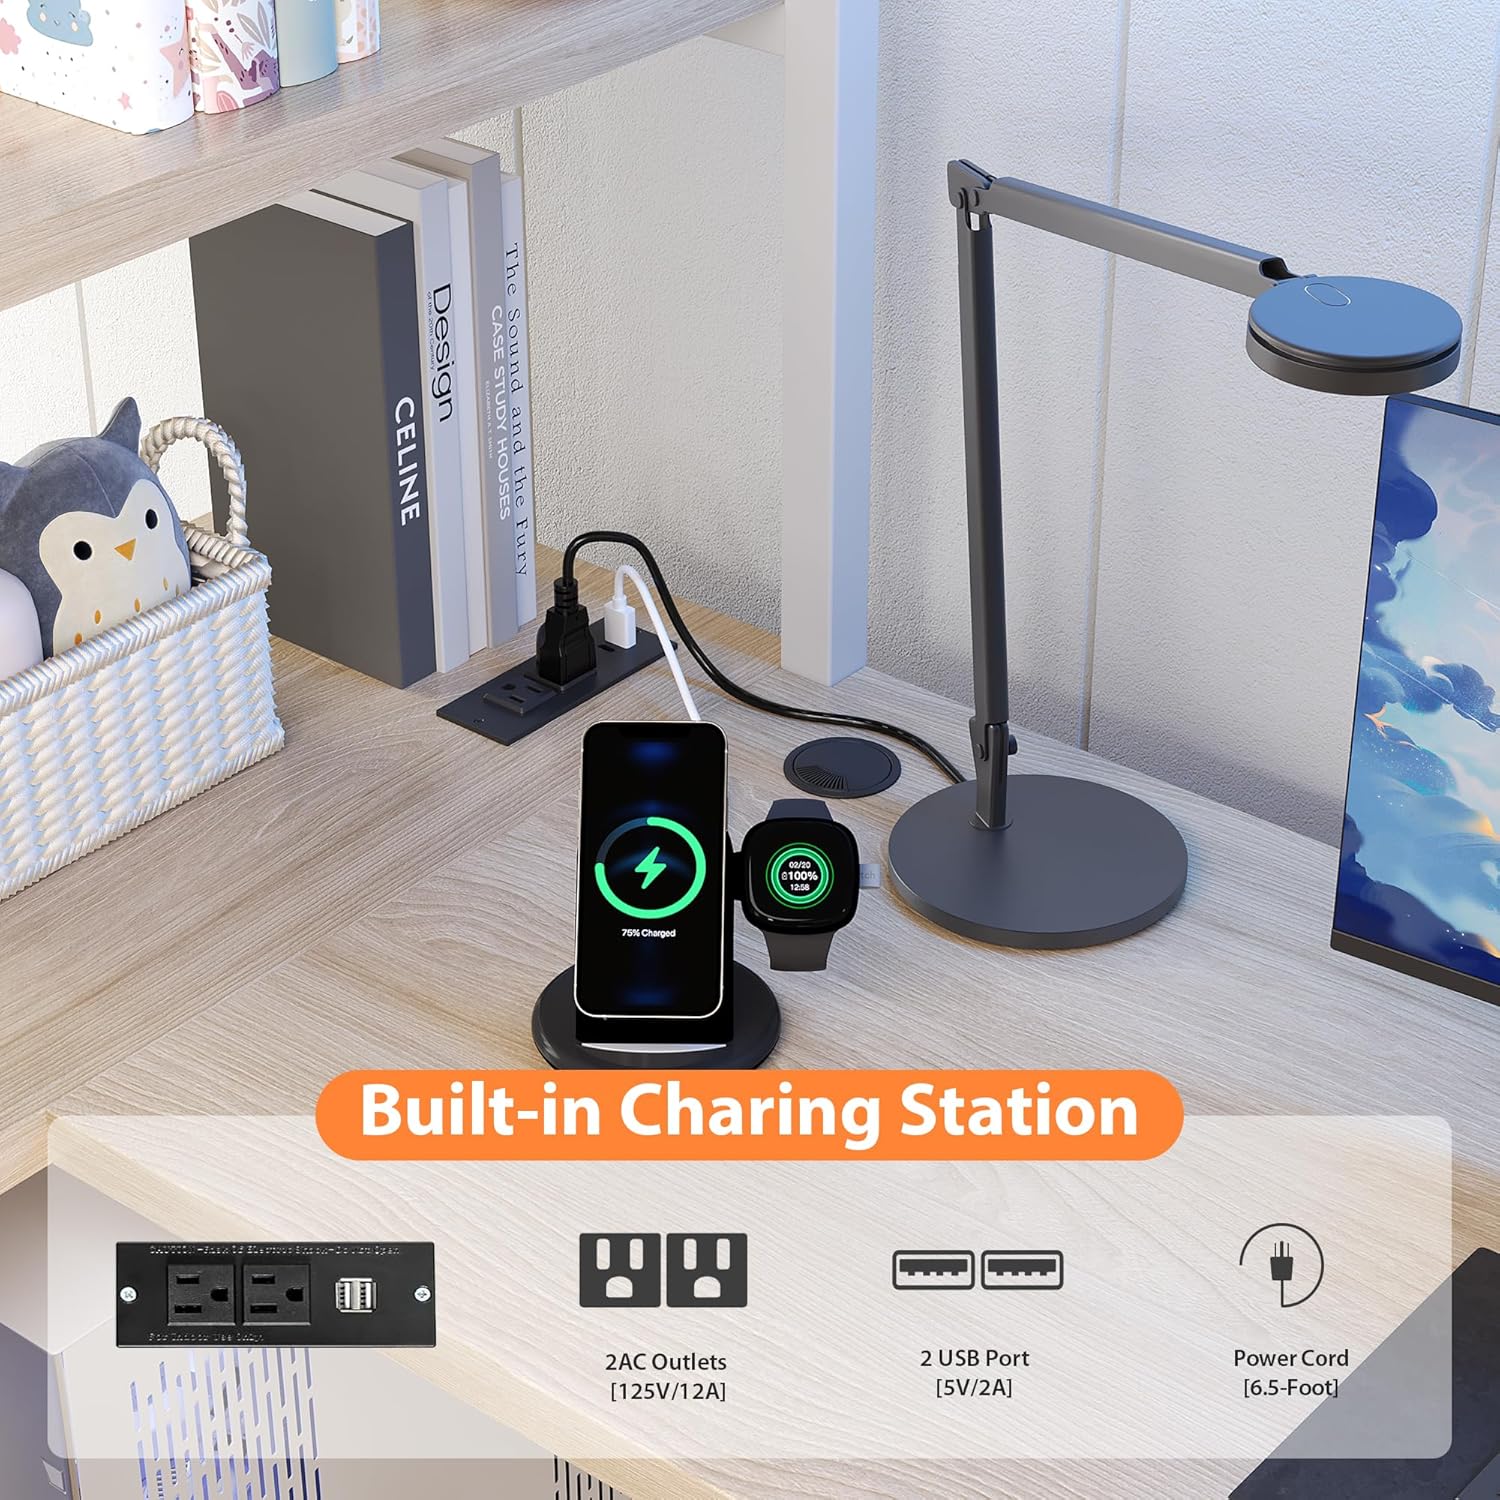
Figure 6.2: Detailed view of the built-in charging station, highlighting the 2 AC outlets, 2 USB ports, and the 6.5-foot power cord.
7. Maintenance
Regular maintenance will help preserve the appearance and functionality of your loft bed.
- Cleaning the Frame: Wipe the metal frame and wood panels with a soft, damp cloth. Avoid abrasive cleaners or harsh chemicals that could damage the finish.
- Fabric Drawers: The fabric drawers can be spot cleaned with a mild detergent and water. Allow them to air dry completely.
- Hardware Check: Periodically check all screws and bolts to ensure they remain tight. Retighten as necessary to maintain structural integrity.
- LED Lights: If the LED lights become dusty, gently wipe them with a dry, soft cloth. Do not use liquids directly on the light strip or charging station.
8. Troubleshooting
If you encounter issues with your loft bed, refer to the following common problems and solutions:
- Bed Feels Wobbly:
- Ensure all assembly hardware (screws, bolts) are fully tightened.
- Verify that the anti-tip kit is correctly installed and secured to a wall stud.
- Check that all frame components are properly aligned and seated.
- LED Lights Not Working:
- Confirm the power cord for the LED lights is securely plugged into a functional power source.
- Check the remote control battery if using the remote.
- Ensure the light strip is properly connected to its power adapter.
- Charging Station Not Providing Power:
- Verify the charging station's power cord is firmly plugged into a working wall outlet.
- Test the wall outlet with another device to ensure it is functional.
- Ensure devices are correctly plugged into the AC outlets or USB ports.
- Parts Do Not Align During Assembly:
- Double-check the assembly diagrams and ensure you are using the correct parts for each step.
- Loosen previously tightened screws slightly to allow for adjustment, then retighten once aligned.
- Ensure no parts are installed backward or upside down.
If you continue to experience issues, please contact our customer support team.
9. Specifications
| Feature | Specification |
|---|---|
| Model Number | FZZH25033101 |
| Size | Twin |
| Product Dimensions | 77.3"L x 41.3"W x 72"H |
| Special Feature | Heavy Duty |
| Color | White |
| Finish Type | Polished |
| Included Components | Guardrails, Headboard, Slat |
| Compatible Mattress Size | Twin |
| Assembly Required | Yes |
| Headboard Material | Engineered Wood |
| Item Weight | 111.3 pounds |

Figure 9.1: Detailed dimensions of the Jocoevol Twin Size Loft Bed, including overall length, width, height, and specific measurements for the desk, shelves, and bed clearance.
10. Warranty and Support
While specific warranty details are not provided in this manual, Jocoevol is committed to customer satisfaction. If you have any questions or require assistance before or after purchase, our dedicated support team is available to help and will respond within 24 hours.
Please refer to your purchase documentation or the retailer's website for any available warranty information.


