
12V/10A-24V/5A
Generic 10-Amp 12V/24V Smart Battery Charger
Model: 12V/10A-24V/5A
1. Introduction
This manual provides essential information for the safe and effective operation of your Generic 10-Amp 12V/24V Smart Battery Charger. This intelligent charger is designed for a wide range of 12V and 24V lead-acid batteries, including Calcium, Gel, AGM, Wet, and LiFePO4 types. It features a 7-stage automatic charging process, pulse repair function, and multiple safety protections to ensure optimal battery health and longevity.

Figure 1: Front view of the Smart Battery Charger, highlighting its 12V 10A - 24V 5A capabilities and key features like MCU Control, Temp Detection, Repair Mode, Full Protect, Fast Charge, and Auto Memory.
2. Safety Instructions
Read all safety warnings and instructions before using this product. Failure to follow the warnings and instructions may result in electric shock, fire, and/or serious injury.
- Ventilation: Ensure the charging area is well-ventilated. Batteries can produce explosive gases during charging.
- Eye and Skin Protection: Always wear eye protection and protective clothing when working with batteries. Avoid touching eyes while working near batteries.
- Sparks and Flames: Keep sparks, flames, and smoking materials away from batteries and charging equipment.
- Connection Order: Connect the output clips to the battery first, then plug the charger into the power outlet. Disconnect in reverse order.
- Polarity: Connect the RED (+) clip to the positive battery terminal and the BLACK (-) clip to the negative battery terminal. Incorrect polarity can damage the battery and charger.
- Damaged Batteries: Do not attempt to charge frozen, damaged, or non-rechargeable batteries.
- Charger Condition: Do not operate the charger if it has been dropped, damaged, or exposed to water.
- Children: Keep the charger and batteries out of reach of children.
- Indoor Use: This charger is designed for indoor use. Do not expose it to rain or moisture.
3. Product Overview
The Generic Smart Battery Charger features an intuitive LCD digital display and a single mode selection button for ease of use. It is equipped with advanced safety features including polarity protection, output short protection, non-battery link protection, over-voltage protection, and over-temperature protection.
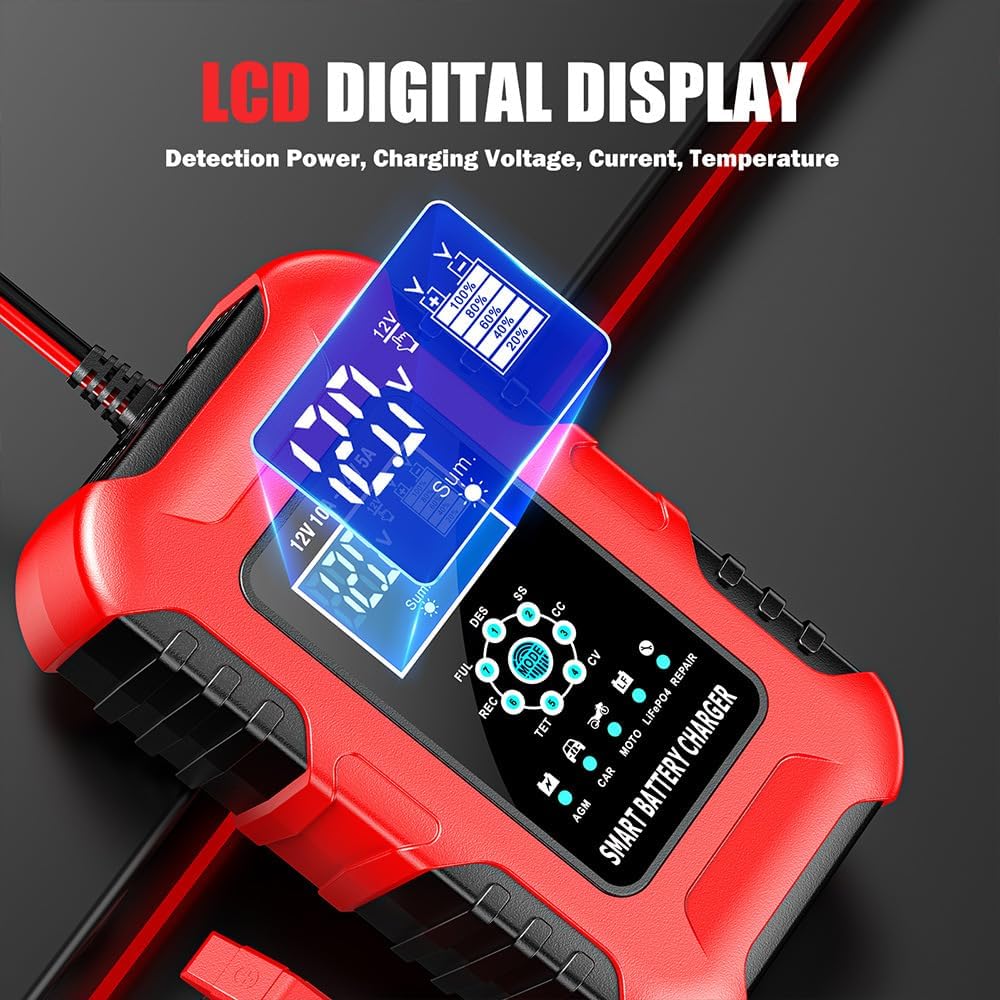
Figure 2: The LCD Digital Display provides real-time information on power detection, charging voltage, current, and temperature.
Key Features:
- Microprocessor Control (CPU): Ensures precise and efficient charging.
- 7-Stage Automatic Charging: Optimizes battery charging and prevents overcharging.
- Pulse Repair Function: Helps restore drained and sulfated batteries (Note: Cannot activate dead batteries or repair severely damaged ones).
- Wide Battery Compatibility: Suitable for Calcium, Gel, AGM, LiFePO4, Wet, and Lead-Acid batteries.
- Multiple Charging Modes: Dedicated modes for AGM, Car, Motorcycle, LiFePO4, and Repair.
- Safety Protections: Polarity, short circuit, over-voltage, over-temperature, and non-battery link protection.
- Cooling Fan: Integrated fan for efficient heat dissipation.
4. Setup and Operation
4.1 Initial Setup
- Ensure the charger is placed on a stable, non-flammable surface in a well-ventilated area.
- Verify that the battery terminals are clean and free of corrosion.
4.2 Charging Procedure

Figure 3: Step-by-step guide for connecting and operating the charger.
- Step 1: Plug into Power Source. Connect the charger's AC power cord into a standard 100-240V AC, 50-60Hz electrical outlet. The LCD display will illuminate.
- Step 2: Select Charging Mode. Before connecting to the battery, press the 'MODE' button to cycle through the available charging modes (AGM, CAR, MOTO, LiFePO4, REPAIR) and select the appropriate one for your battery type. The selected mode will be indicated on the LCD display.
- Step 3: Connect to Battery. Connect the RED (+) alligator clip to the positive terminal of the battery. Connect the BLACK (-) alligator clip to the negative terminal of the battery. Ensure a secure connection.
- The charger will automatically begin the charging process according to the selected mode. Monitor the LCD display for charging status.
- Once charging is complete (indicated by 'FUL' on the display), disconnect the charger from the power outlet first, then remove the battery clips.
4.3 Charging Modes

Figure 4: Overview of the available charging modes and their applications.
- AGM Mode: For AGM batteries.
- CAR Mode: For GEL, SLA, WET, Deep Cycle, EFB, and Calcium batteries (typically 12V).
- MOTO Mode: For motorcycle batteries (typically 12V).
- LiFePO4 Mode: For Lithium Iron Phosphate batteries.
- REPAIR Mode: An advanced battery recovery mode (up to 16 hours) for repairing and restoring old, idle, damaged, stratified, or sulfated batteries.
Important: Be sure to select the mode before connecting the battery. Otherwise, the mode button will be locked.
4.4 Charging 12V vs. 24V Batteries

Figure 5: Instructions for connecting the charger to 12V and 24V battery systems.
- For 12V Battery:
- Plug the battery charger into a household 110/220V power supply.
- Select the corresponding mode.
- Connect the RED clamp to the positive pole (+) of the battery.
- Connect the BLACK clip to the negative pole (-) of the battery. Charging will start.
- For 24V Battery:
- Connect two 12V batteries in series to create a 24V system.
- Plug the battery charger into a household 110/220V power supply.
- Select the corresponding mode.
- Connect the RED clamp to the positive pole (+) of the 24V battery system.
- Connect the BLACK clip to the negative pole (-) of the 24V battery system. Charging will start.
4.5 7-Stage Charging Process

Figure 6: Visual representation of the 7-stage charging cycle for optimal battery care.
- Stage 1: Battery Desulfation - Uses pulse voltage to break down lead sulfate crystals.
- Stage 2: Soft Start Charging - Gently introduces current to the battery.
- Stage 3: Bulk Charging - Charges at maximum current until the battery reaches approximately 80% capacity.
- Stage 4: Absorption Charging - Charges at a decreasing current to bring the battery to 100% capacity.
- Stage 5: Battery Test - Checks battery condition to ensure it can hold a charge.
- Stage 6: Recondition Charging - Applies a higher voltage to recondition deeply discharged batteries.
- Stage 7: Float & Maintenance Charging - Maintains the battery at full charge with a low, constant voltage.
5. Maintenance
- Cleaning: Disconnect the charger from power before cleaning. Wipe the exterior with a soft, dry cloth. Do not use solvents or abrasive cleaners.
- Storage: Store the charger in a cool, dry place when not in use. Keep cables neatly coiled.
- Cable Inspection: Regularly inspect the power cord and charging cables for any signs of damage, fraying, or exposed wires. Do not use if damaged.
6. Troubleshooting
| Problem | Possible Cause | Solution |
|---|---|---|
| Charger does not turn on. | No power from outlet; damaged power cord. | Check power outlet; inspect power cord for damage. |
| Charger not charging battery. | Incorrect mode selected; poor connection; battery too deeply discharged or damaged. | Ensure correct mode is selected; check battery clip connections; battery may be beyond repair. |
Ask a question about this manualAsk about setup, troubleshooting, compatibility, parts, safety, or missing instructions. Manuals+ will review the question and use this page’s manual context to help answer it. |