1. Introduction
This manual provides essential information for the safe and effective operation, maintenance, and troubleshooting of your BUUBO F320 Mug Heat Press Machine. Please read this manual thoroughly before using the device and retain it for future reference.
2. Safety Instructions
Observe the following safety precautions to prevent injury or damage to the machine:
- Always connect the machine to a grounded power outlet.
- Do not operate the machine with wet hands or in damp environments.
- Keep children and pets away from the machine during operation.
- Wear heat-resistant gloves when handling hot mugs or machine parts.
- Ensure adequate ventilation in the work area to dissipate fumes from sublimation.
- Unplug the machine from the power source before cleaning or maintenance.
- Do not attempt to modify or repair the machine yourself. Contact qualified service personnel for assistance.
3. Product Overview
The BUUBO F320 is a compact heat press designed for sublimation transfer onto various cylindrical items such as mugs and tumblers.
3.1 Package Contents
Verify that all items are present in the package:
- 1 x Mug Heat Press Machine
- 20 x Sublimation Papers
- 1 x Roll of Tape
- 1 x Pair of Heat-resist Gloves
- 1 x User Manual
- 1 x Power Cord
3.2 Machine Components

Figure 1: Front view of the BUUBO F320 Mug Heat Press Machine, showing the main unit with handles and control panel.
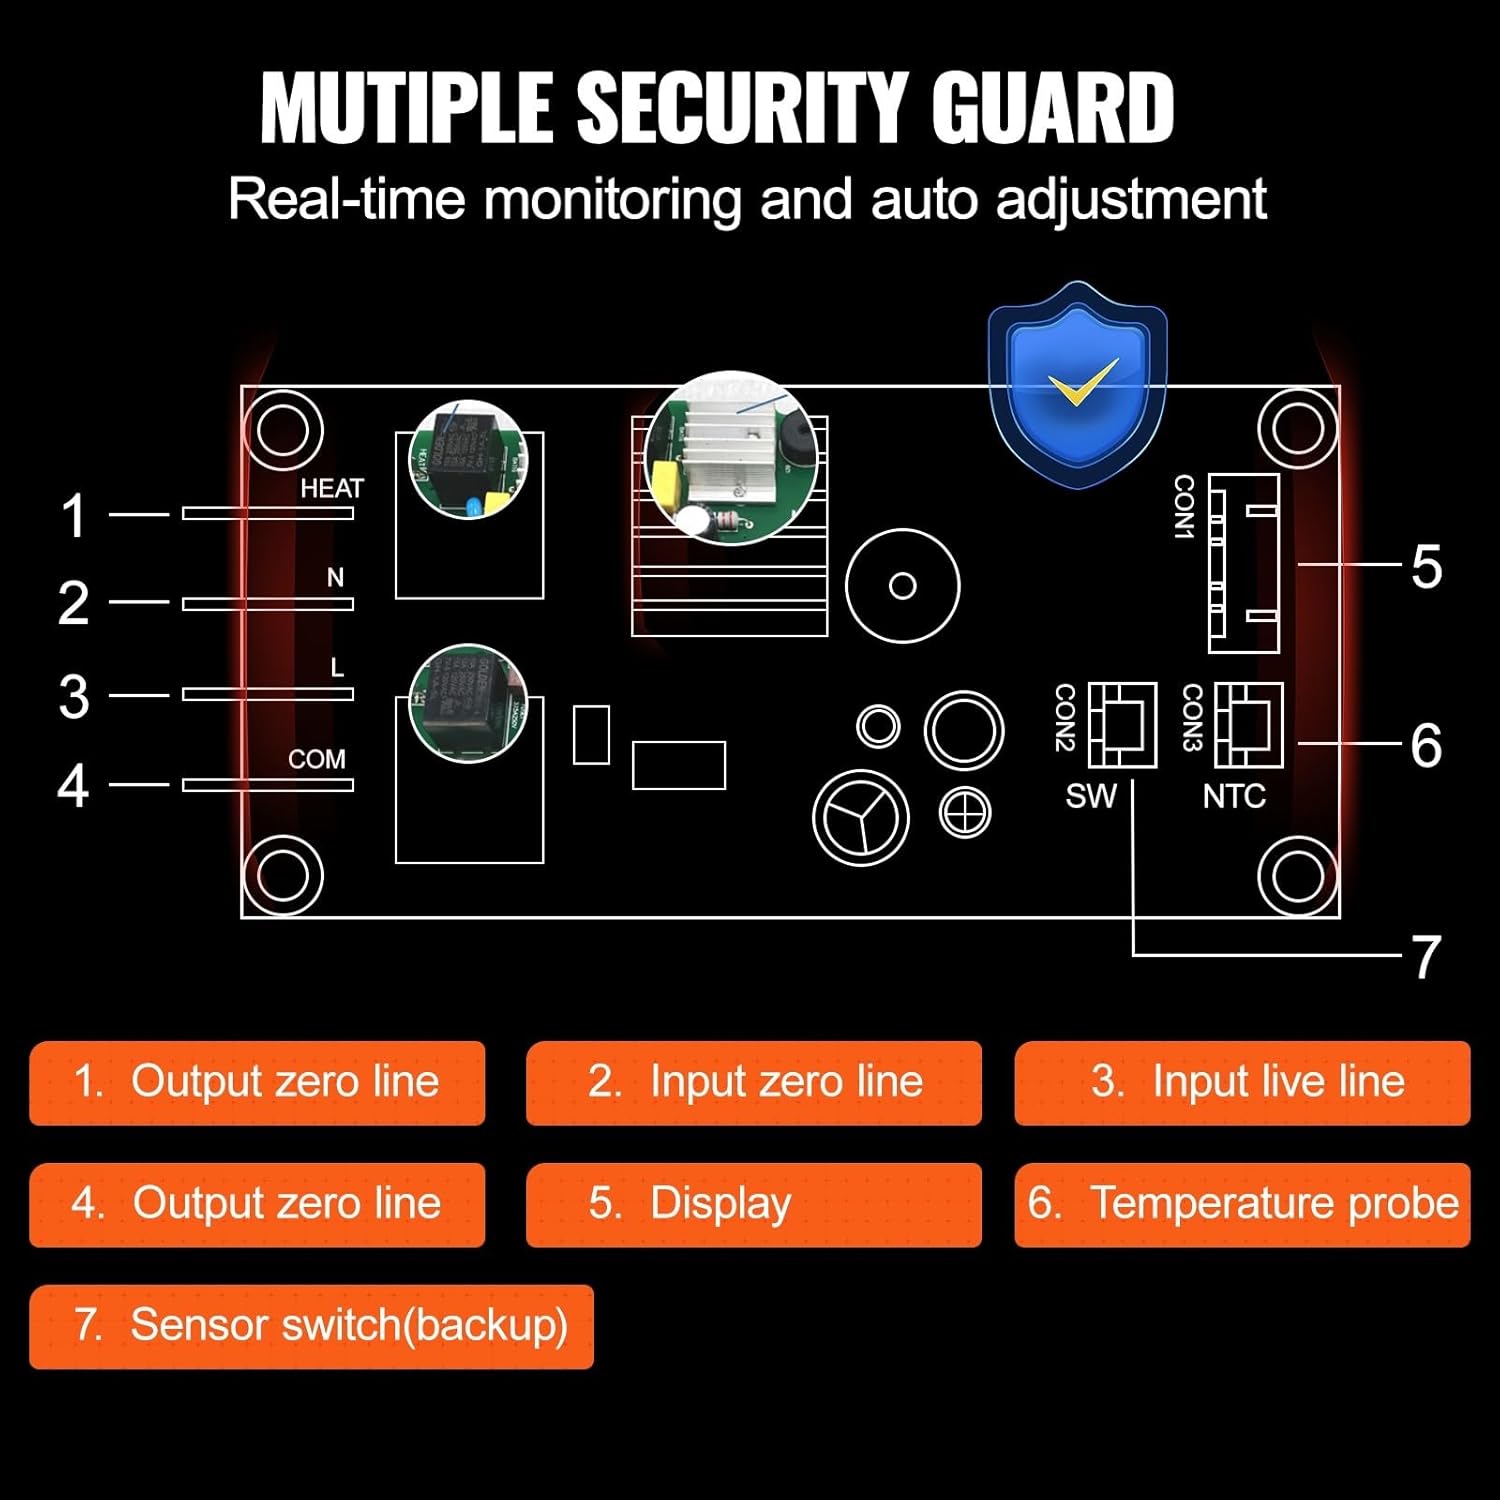
Figure 2: Diagram illustrating the internal circuit board components and their labels, including heat, input/output lines, display, and temperature probe connections.
4. Setup
Follow these steps to set up your heat press machine:
- Unpacking: Carefully remove all components from the packaging. Inspect for any damage during transit.
- Placement: Place the machine on a stable, heat-resistant, and level surface. Ensure there is sufficient space around the machine for ventilation and safe operation.
- Power Connection: Connect the power cord to the machine and then plug it into a standard grounded electrical outlet.
5. Operating Instructions
This section details the steps for operating your BUUBO F320 Mug Heat Press Machine.
5.1 Powering On and Off
- To power on, press the power button located on the control panel. The display will illuminate.
- To power off, press and hold the power button until the display turns off.
5.2 Setting Temperature and Time

Figure 3: The innovative knob control panel allows for easy adjustment of temperature and time settings. Turn right to set temperature, turn left to set time.
- Temperature Setting: Turn the control knob to the right. The temperature value on the LCD display will flash. Rotate the knob to adjust the desired temperature (e.g., 380°F / 193°C). Press the knob once to confirm.
- Time Setting: Turn the control knob to the left. The time value on the LCD display will flash. Rotate the knob to adjust the desired time (e.g., 180 seconds). Press the knob once to confirm.
- The machine will begin heating to the set temperature. An audible alarm will sound upon reaching the target temperature.
5.3 Preparing the Mug/Tumbler

Figure 4: This image illustrates the various cup types and sizes compatible with the heat press, including tumblers, can coolers, glasses, sippy cups, and mugs, along with maximum height and diameter specifications.
- Ensure the mug or tumbler is clean and dry.
- Print your design onto sublimation paper using sublimation ink.
- Securely attach the sublimation paper to the mug/tumbler using heat-resistant tape, ensuring the design is flat against the surface.
5.4 Sublimation Process

Figure 5: This diagram highlights the 620W high-power heating element and the anti-scalding Teflon coating with a thermal silica-gel inner layer, ensuring efficient and uniform heat transfer for quick sublimation.
- Once the machine reaches the set temperature, carefully open the press.
- Place the prepared mug/tumbler into the heating element. Ensure it is centered and the pressure is evenly applied.
- Close the press handle firmly. The timer will automatically start counting down.
- When the timer reaches zero, an alarm will sound. Carefully open the press handle.
- Wearing heat-resistant gloves, remove the hot mug/tumbler and place it on a heat-resistant surface to cool.
- Once cooled, carefully remove the sublimation paper to reveal the transferred design.
6. Maintenance
Proper maintenance ensures the longevity and optimal performance of your heat press.
- Cleaning: After each use, ensure the machine is unplugged and cooled. Wipe down the heating element and exterior surfaces with a soft, dry cloth. Do not use abrasive cleaners or solvents.
- Storage: Store the machine in a clean, dry, and dust-free environment when not in use.
7. Troubleshooting
Refer to the following table for common issues and their solutions:
| Problem | Possible Cause | Solution |
|---|---|---|
| Machine does not power on | No power supply; Loose power cord | Check power outlet; Ensure power cord is securely plugged in |
| Uneven heat transfer | Incorrect pressure; Damaged heating element | Adjust pressure; Contact support if heating element is damaged |
| Design not transferring fully | Insufficient temperature or time; Incorrect sublimation paper/ink | Increase temperature/time; Ensure correct materials are used |
| Alarm sounds continuously | Process completed; Error detected | Check if transfer is complete; Refer to error codes if displayed |
8. Specifications
Technical specifications for the BUUBO F320 Mug Heat Press Machine:
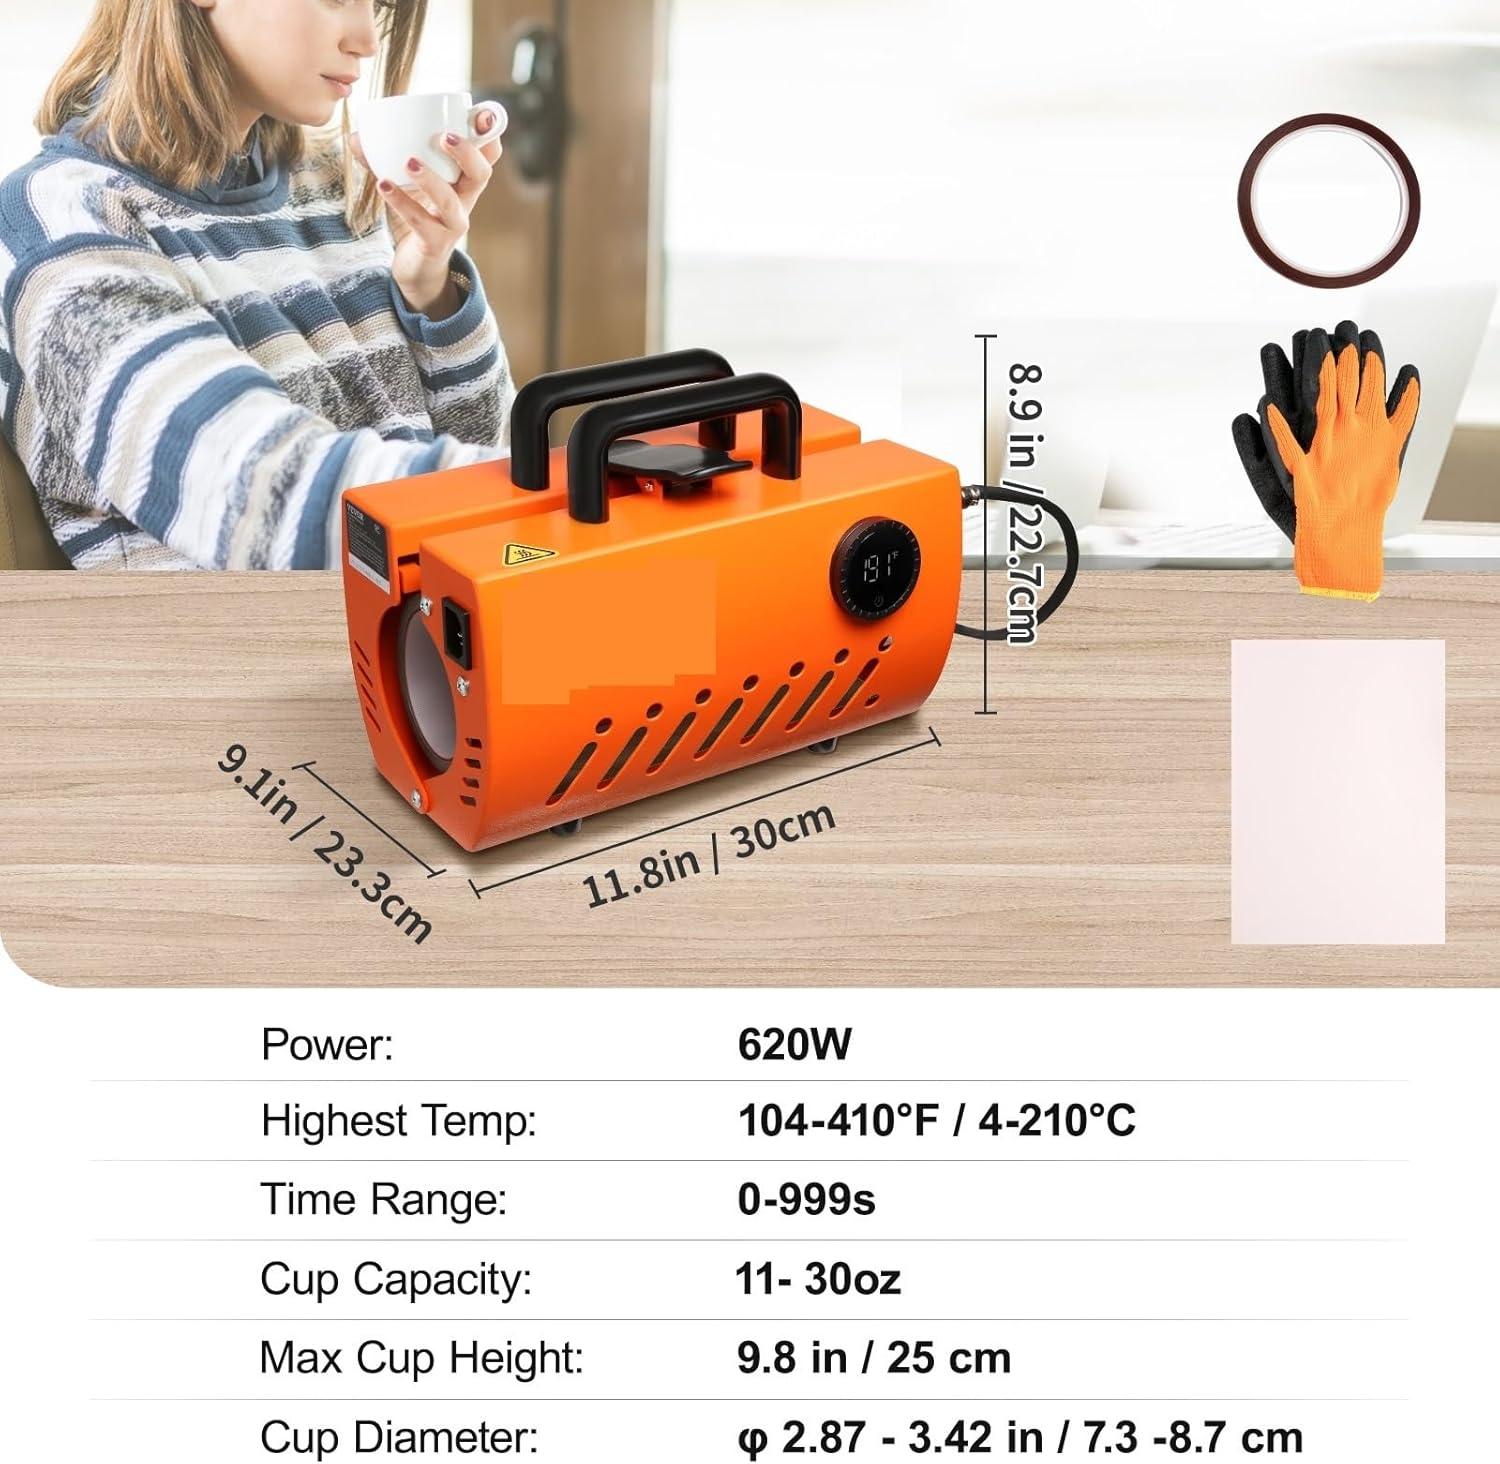
Figure 6: This image provides a visual representation of the machine's dimensions and a summary table of its key specifications, including power, temperature range, time range, cup capacity, height, and diameter.
| Specification | Value |
|---|---|
| Model | F320 |
| Power | 620W |
| Temperature Range | 104°F-410°F / 40°C-210°C |
| Time Range | 0 - 999s |
| Applicable Cup Capacity | 11-30oz |
| Max Cup Height | 9.84 in / 25 cm |
| Applicable Cup Diameter | 2.87 - 3.42 in / 7.3 - 8.7 cm |
| Product Size (L x W x H) | 11.81 x 9.17 x 8.93 in / 30 x 23.3 x 22.7 cm |
| Net Weight | 10.58 lbs / 4.8 kg |
| Applicable Cup Material | Ceramic / Stainless Steel / Aluminum Alloy |
9. Warranty and Support
This product comes with a standard manufacturer's warranty. For specific warranty details, please refer to the documentation included with your purchase or contact the retailer.
For technical support, troubleshooting assistance, or to inquire about replacement parts, please contact BUUBO customer service through the official website or your purchase platform.


