1. Introduction
This manual provides detailed instructions for the installation, configuration, and operation of your visiPower G90C Wireless 2.4GHz WiFi GPRS Home Alarm System. This system is designed to enhance the security of your home or property by providing real-time alerts and monitoring capabilities through its dual Wi-Fi and GSM/4G network connectivity.
Please read this manual thoroughly before attempting to install or operate the system to ensure proper functionality and safety.
2. Package Contents
Upon unpacking, please verify that all the following components are included in your package. If any items are missing or damaged, contact visiPower customer support immediately.
- 1 x G90C Alarm Panel (Main Host)
- 1 x Wireless PIR Motion Sensor
- 1 x Wireless Door/Window Sensor
- 2 x Remote Controllers
- 1 x Wired Mini Siren
- 1 x AC Power Adapter (DC 12V/1A)
- 1 x User Manual (this document)
- 1 x Bag of Installation Accessories (screws, adhesive tape)

Image: The complete visiPower G90C alarm system kit, including the main alarm panel, a passive infrared (PIR) motion sensor, a door/window sensor, two remote controls, and a wired siren, all packaged with the user manual and power adapter.
3. System Overview and Features
The visiPower G90C is a versatile security system offering robust protection for your premises. Key features include:
- Dual Network Connectivity: Supports both 2.4GHz Wi-Fi and GSM/4G networks for reliable communication. (Note: 5G SIM cards are not supported.)
- LCD Touch Screen Keypad: Intuitive interface for system control and configuration.
- Multi-Channel Alarm Modes: Delivers alerts via app push notifications, SMS messages, and voice calls.
- Mobile App Control: Compatible with both Kooyii App (for smart home integration and alarm) and Safety Guard App (alarm system only) for remote management on Android and iOS devices.
- Integrated with IP Camera: Allows viewing of surveillance camera video directly within the alarm app when an alarm is triggered.
- Extensive Zone Support: Up to 99 wireless defense zones and 8 wired zones can be configured.
- Emergency Contact System: Pre-set up to 5 phone numbers for alarming calls and 5 mobile numbers for SMS alerts.
- Backup Battery: Built-in rechargeable lithium battery provides power during AC power outages for extended operation.
- Customizable Zone Names: Users can personalize defense zone names via the touch screen.
- Central Monitoring Platform Compatibility: Designed to work with visiPower's Alarm Center Monitoring Platform.
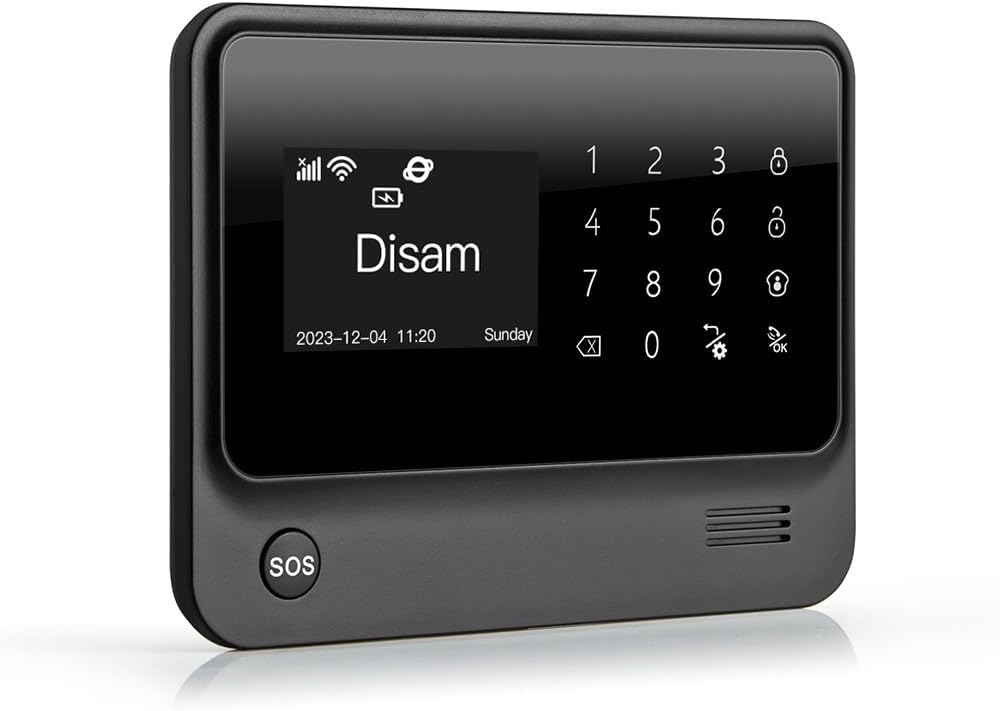
Image: A detailed view of the G90C alarm panel's LCD touch screen, showing the disarmed status, current date and time, and the integrated numeric keypad with various control icons.

Image: An infographic illustrating the core features of the G90C system, including its 10-hour backup battery life, 95dB built-in siren, timed arm/disarm functions, integrated surveillance, mobile app control, and dual 4G+WiFi network capabilities.

Image: A comprehensive system diagram illustrating how the G90C alarm host integrates with various security components like sensors, sirens, and cameras, all managed through a cloud server and mobile applications for a complete smart security solution.
4. Setup and Installation
The visiPower G90C system is designed for easy self-installation without the need for professional assistance. Follow these steps for a successful setup.
4.1. Alarm Panel (Main Host) Setup
- Power Connection: Connect the AC power adapter to the alarm panel and plug it into a standard wall outlet. The built-in backup battery will automatically charge.
- SIM Card Installation (Optional for GSM/4G): If you intend to use GSM/4G features, insert a 2G/3G/4G SIM card into the designated slot on the alarm panel. Ensure the SIM card is active and has sufficient credit/data. (Note: 5G SIM cards are not supported.)
- Initial Power On: The panel will power on automatically. Follow the on-screen prompts for initial language and time settings.
4.2. Wi-Fi Network Configuration
- On the alarm panel's touch screen, navigate to the Wi-Fi settings.
- Select your 2.4GHz Wi-Fi network from the list. (Note: 5GHz networks are not supported.)
- Enter your Wi-Fi password and confirm. The panel should connect to your network.
4.3. Sensor Installation and Pairing
Each wireless accessory comes with screws or adhesive tape for easy mounting.
- Wireless PIR Motion Sensor:
- Mount the sensor in a corner or on a wall at a height of approximately 2-2.5 meters (6.5-8 feet) where it can cover the desired area without obstructions.
- Avoid pointing the sensor directly at heat sources, windows, or areas with significant air currents.
- To pair, put the alarm panel into "learning mode" (refer to the panel's menu for "Add Sensor" or "Learning"). Trigger the motion sensor by waving your hand in front of it. The panel will confirm successful pairing.
- Wireless Door/Window Sensor:
- Attach the main part of the sensor to the door/window frame and the smaller magnetic part to the door/window itself. Ensure they are aligned and within 1 cm (0.4 inches) of each other when the door/window is closed.
- To pair, put the alarm panel into "learning mode." Open and close the door/window to separate and connect the sensor parts. The panel will confirm successful pairing.

Image: Examples of outdoor security installations, showing waterproof beam detectors for perimeter protection and highlighted windows on a house indicating strategic placement for outdoor fence detectors to secure vulnerable entry points.
4.4. Remote Controller Pairing
- Put the alarm panel into "learning mode" for remote controls.
- Press any button on the remote controller. The panel will confirm successful pairing.
4.5. Mobile App Setup
- Download the "Kooyii" or "Safety Guard" app from your smartphone's app store (Android or iOS).
- Register for an account and log in.
- Follow the in-app instructions to add your G90C alarm system. This typically involves scanning a QR code on the panel or entering its device ID.
- Once connected, you can manage your alarm system remotely.
5. Operating Instructions
5.1. Arming and Disarming the System
- Arm (Away Mode): Activates all configured sensors. Use the "Arm" button on the panel, remote control, or the mobile app.
- Home Arm (Stay Mode): Activates perimeter sensors (e.g., door/window sensors) while allowing movement within the property. Use the "Home Arm" button on the panel, remote, or app.
- Disarm: Deactivates all sensors. Use the "Disarm" button on the panel (requires password), remote control, or the mobile app.
- SOS Function: Press the SOS button on the panel or remote control to trigger an immediate emergency alarm.
5.2. Receiving Alarm Alerts
When an alarm is triggered, the system will respond according to your configuration:
- The built-in siren will sound.
- App Push Notifications: Your mobile app will receive real-time alerts. If integrated with an IP camera, you can view live video through the app.
- SMS Messages: The system will send SMS alerts to the pre-set mobile numbers (requires SIM card).
- Voice Calls: The system will dial the pre-set phone numbers (requires SIM card).
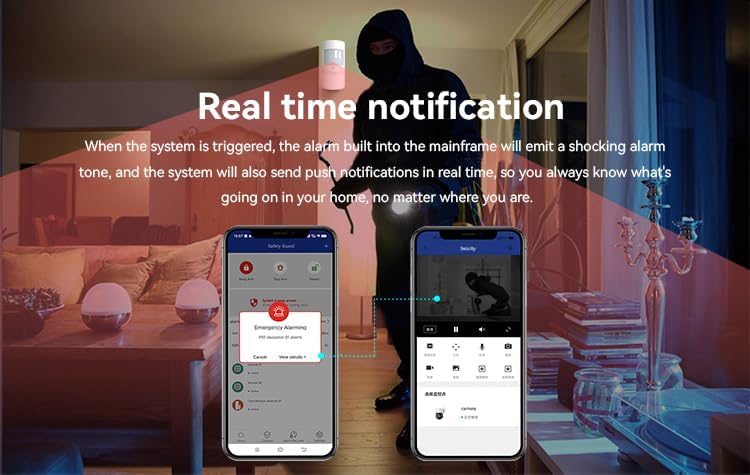
Image: This image illustrates the real-time notification capabilities of the system, showing a mobile phone receiving an emergency alarm push notification and another phone displaying live camera footage of an intruder, demonstrating immediate alert and visual verification.

Image: This infographic explains the G90C's alert distribution, showing that the system will initiate calls to five pre-programmed phone numbers and send SMS messages to two pre-programmed mobile numbers upon alarm activation, ensuring multiple contacts are notified.
5.3. Advanced App Control (Kooyii Smart Home)
The Kooyii app extends beyond basic alarm functions, allowing integration with other smart home devices for centralized control.
- Remote Device Control: Manage compatible smart home devices (e.g., lights, thermostats) directly from the app.
- Scene Creation: Set up automated scenes or routines based on alarm status or time schedules.

Image: Five smartphone screens showcasing the Kooyii smart home application, demonstrating its capabilities for controlling various smart devices such as lighting, curtains, and media, alongside displaying environmental data, highlighting its comprehensive smart home management features.
6. Maintenance
- Battery Check: Regularly check the battery status of wireless sensors and the main panel's backup battery. Replace sensor batteries as needed. The panel's backup battery provides over 10 hours of operation during power outages.
- Cleaning: Clean the alarm panel's screen and sensors with a soft, dry cloth. Avoid using abrasive cleaners or solvents.
- Firmware Updates: Check the mobile app or visiPower website for any available firmware updates for the alarm panel to ensure optimal performance and security.
- Signal Strength: Periodically verify Wi-Fi and GSM/4G signal strength on the alarm panel to ensure reliable communication.
7. Troubleshooting
If you encounter issues with your visiPower G90C system, refer to the following common problems and solutions:
| Problem | Possible Cause | Solution |
|---|---|---|
| Alarm panel not powering on. | No AC power, backup battery depleted. | Ensure AC adapter is securely plugged in. Allow time for the backup battery to charge. |
| No Wi-Fi connection. | Incorrect password, 5GHz network selected, router issues, weak signal. | Verify Wi-Fi password. Ensure you are connecting to a 2.4GHz network. Restart your router. Move the panel closer to the router. |
| No GSM/4G signal or SMS/calls not working. | SIM card not inserted correctly, inactive SIM, no credit, poor network coverage. | Reinsert SIM card. Check SIM card status with your carrier. Ensure sufficient credit. Check network coverage in your area. |
| Wireless sensor not triggering alarm. | Sensor battery low/dead, sensor not paired, sensor out of range, incorrect installation. | Replace sensor battery. Re-pair the sensor with the alarm panel. Move sensor closer to the panel. Verify correct installation and alignment. |
| Mobile app not receiving push notifications. | App not configured correctly, phone notification settings disabled, no internet connection on phone or panel. | Check app settings for push notifications. Enable notifications for the app in your phone's settings. Ensure both phone and panel have active internet connections. |
8. Specifications
Detailed technical specifications for the visiPower G90C Alarm System:
| Model Number | G90C |
| Network | 4G + Wi-Fi (2.4GHz) Dual Network |
| Power Supply | DC 12V/1A |
| Backup Battery | 3.7V/1000mAh Lithium Ion (included) |
| Wi-Fi Frequency | 2.4G |
| Alarm Current | <500mA (built-in siren) |
| Working Current | <250mA |
| Receiving & Emitting Frequency | 433.92MHz |
| Dimensions (L x W x H) | 11 x 7.1 x 5.1 inches (27.9 x 18 x 13 cm) |
| Item Weight | 2.2 pounds (1 kg) |
| Color | Black/White |
| Manufacturer | visiPower |
| UPC | 762833834367 |
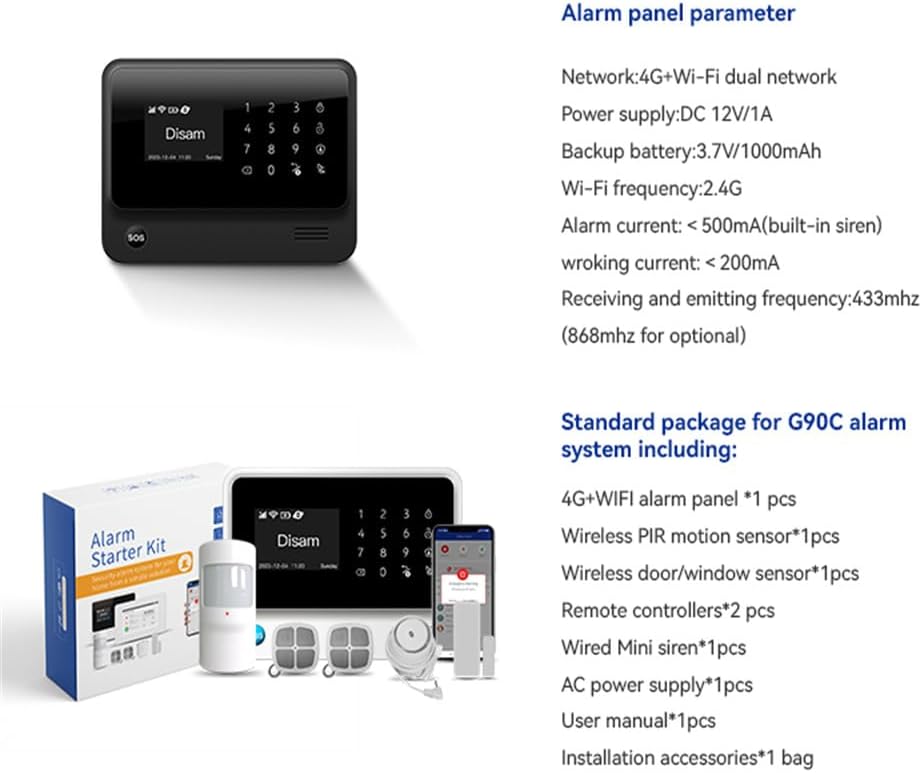
Image: This image provides a summary of the G90C alarm panel's technical specifications and a detailed list of all components included in the standard package, serving as a quick reference for system capabilities and contents.
9. Warranty and Support
For warranty information, please refer to the warranty card included with your product or visit the official visiPower website. If you require technical assistance, troubleshooting beyond this manual, or have questions regarding your product, please contact visiPower customer support through their official channels.
You can find contact information on the visiPower website or through your purchase platform.
