Product Overview
The AINAVI 10.25 inch Touch Screen is designed to upgrade your Audi Q5 (2009-2017) with an original Audi multimedia radio system. It features a 1920*720 HD QLED display, offering an excellent visual experience while seamlessly integrating with your vehicle's existing features.
- Applicable Car Models: Exclusively designed for Audi Q5 2009-2017 with original Audi multimedia radio system. Please verify your car has the "Audi multimedia" CD amplifier system. This unit is not compatible with Original Audi Concert or Audi Symphony systems.
- HD Touch Screen and AHD Backup Camera: Features a 10.25 Inch, 1920*720 HD QLED display. Supports AHD 720P backup camera for clearer visuals.
- Wireless CarPlay and Android Auto: Built-in Wireless CarPlay and Wired Android Auto for easy access to smartphone apps, GPS navigation, calls, messages, and music. Connect wirelessly via Bluetooth.
- Original Functions Retained: Operates with dual systems, retaining original car CD system functions while adding Linux system features. Compatible with original radio features such as iDrive Knob control, Bluetooth, Radio, OEM rear camera, Radar, and steering wheel control.
- Bluetooth Function: Bluetooth Specification v2.1 + EDR and v4.1 LE for audio streaming, automatic Phone Book transfer, and hands-free calling. Ensure no device is connected to the Audi original Bluetooth when using CarPlay.
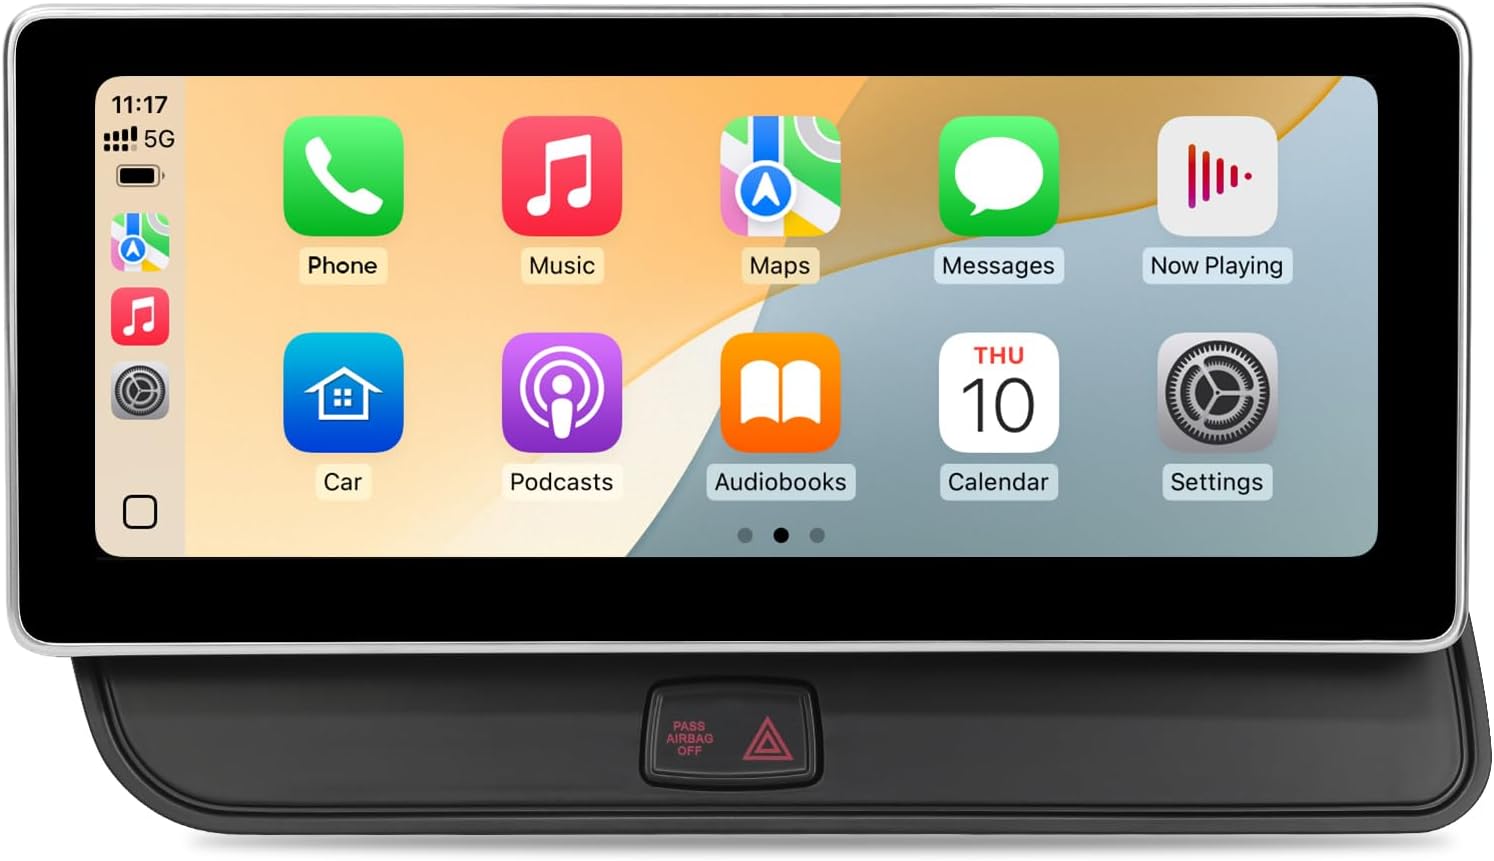
Figure 1: AINAVI 10.25 inch Touch Screen for Audi Q5 Multimedia.
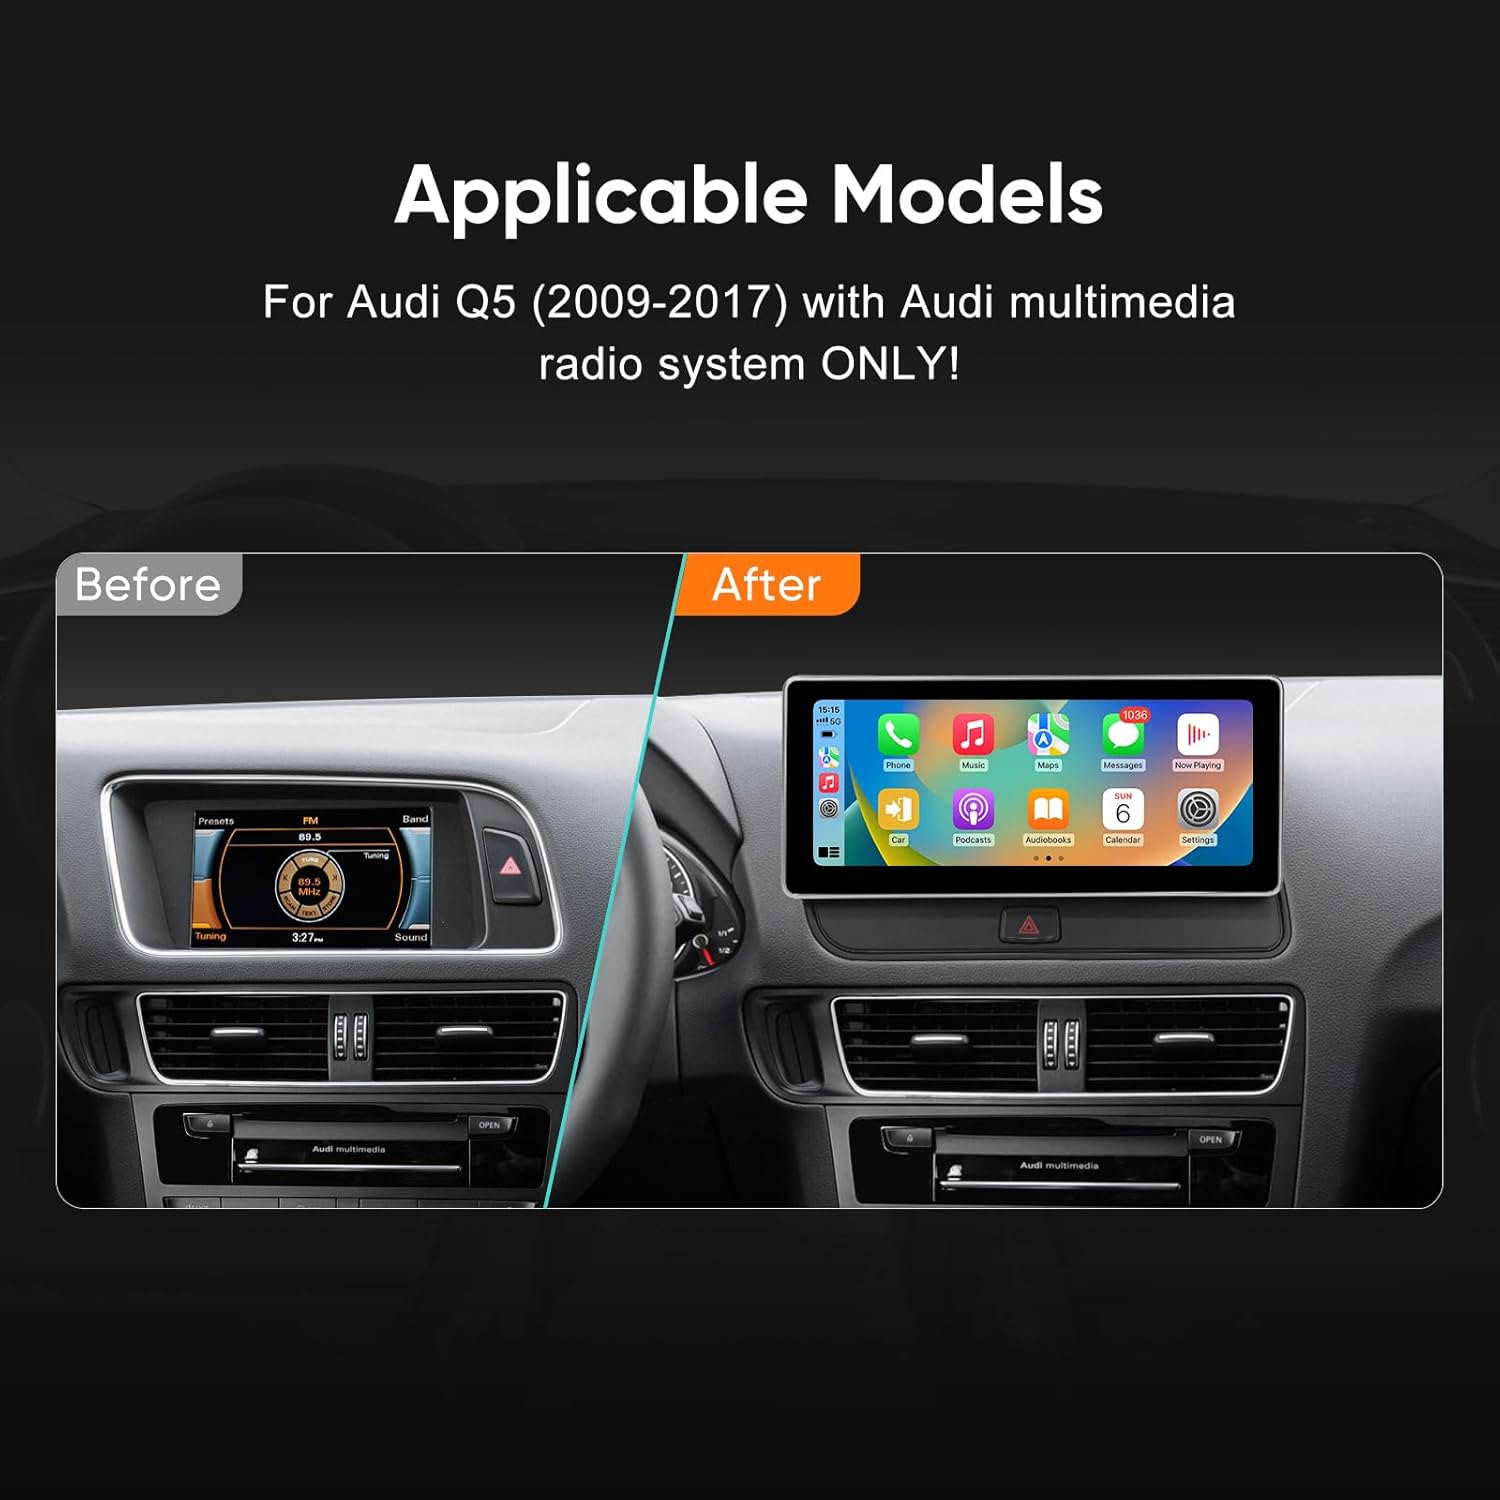
Figure 2: Visual comparison of the Audi Q5 dashboard before and after installing the AINAVI 10.25 inch Touch Screen.
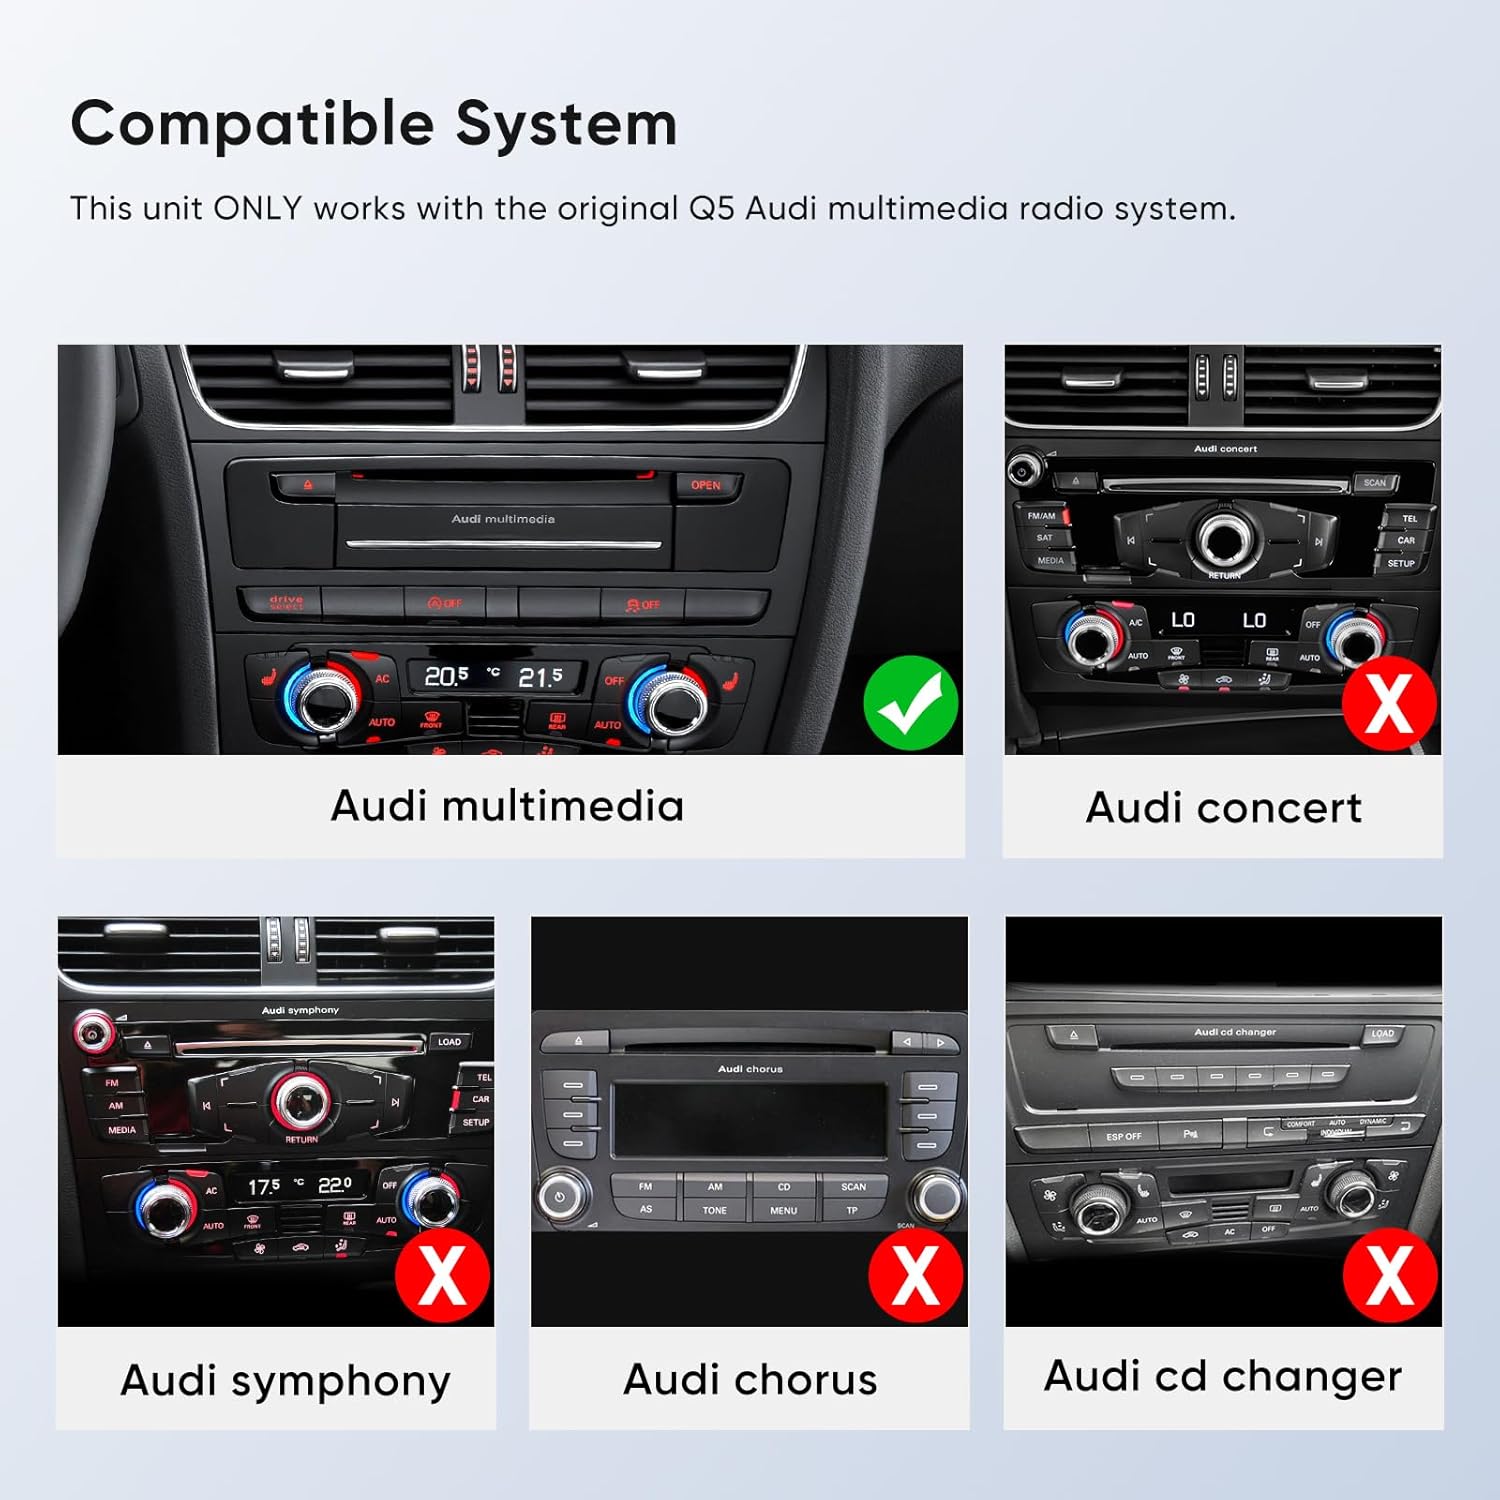
Figure 3: Illustration showing compatible (Audi multimedia) and incompatible (Audi concert, symphony, chorus, CD changer) radio systems for the AINAVI unit.
Setup and Installation
Installation of the AINAVI 10.25 inch Touch Screen requires careful handling of vehicle components and wiring. It is recommended to watch the official installation video for detailed visual guidance. Below is a summary of the key steps.
Official installation video: "How to install Touchscreen CarPlay Auto for an Audi vehicle" by HomeCar. This video provides a comprehensive step-by-step guide for the installation process.
Installation Steps Overview:
- Preparation: Gather necessary tools including screwdrivers (T20), an 8mm socket, and specialized prying tools.
- Remove Original Components:
- Carefully pry off the original faceplate and unplug its cable.
- Remove the four screws securing the original display screen and unplug its connection cable.
- Remove the side cover on the passenger side and unscrew the visible screws.
- Use a special tool to pull out the CD player and unplug all cables behind it.
- Remove screws from inside and at the bottom of the storage box to access wiring.
- Unplug the storage box connection cable.
- Pull out the host panel using a special tool.
- Wiring Connections:
- Unplug the power connection cable from the host panel.
- Connect the new power cable to the adapter cable, then insert the adapter cable into the device's power interface.
- Thread the main power harness from the host compartment to under the passenger side.
- Leave the USB cable outside for future access.
- Thread other cables back into the radio compartment from under the passenger side.
- Connect all necessary cables according to the provided video instructions.
- Unplug the original car gateway plug, connect the adapter plug, and then plug the adapter cable back into the original car gateway plug.
- Place the CD host cable into the storage box and plug in the storage box interface.
- Reassembly and Final Installation:
- Cover the panel and tighten the screws using an 8mm socket tool.
- Cover the side panel.
- Plug in the CD player plug tightly and reinstall it. Important: If the CD player host is not plugged in and installed tightly, the original car information will not be displayed.
- Reinstall the media host and remove the installation tool.
- Expose the three required cables, ensuring two pass through the cover plate.
- Install the iron cover plate, noting that the protruding side faces outwards and the double-hole side faces upwards.
- Tighten the four fixing screws.
- When installing the decorative faceplate, check if your car has the original car airbag light. If it does, turn the corresponding switch to the ON position; otherwise, turn it to the other side.
- Thread the wires that pass through the iron cover plate through the radio decorative panel.
- Tighten the four screws to secure the panel.
- Insert and install the device on-site according to the corresponding holes, fixing it from top to bottom.

Figure 4: Diagram illustrating the installation points for the head unit, installation frame, and metal bracket.
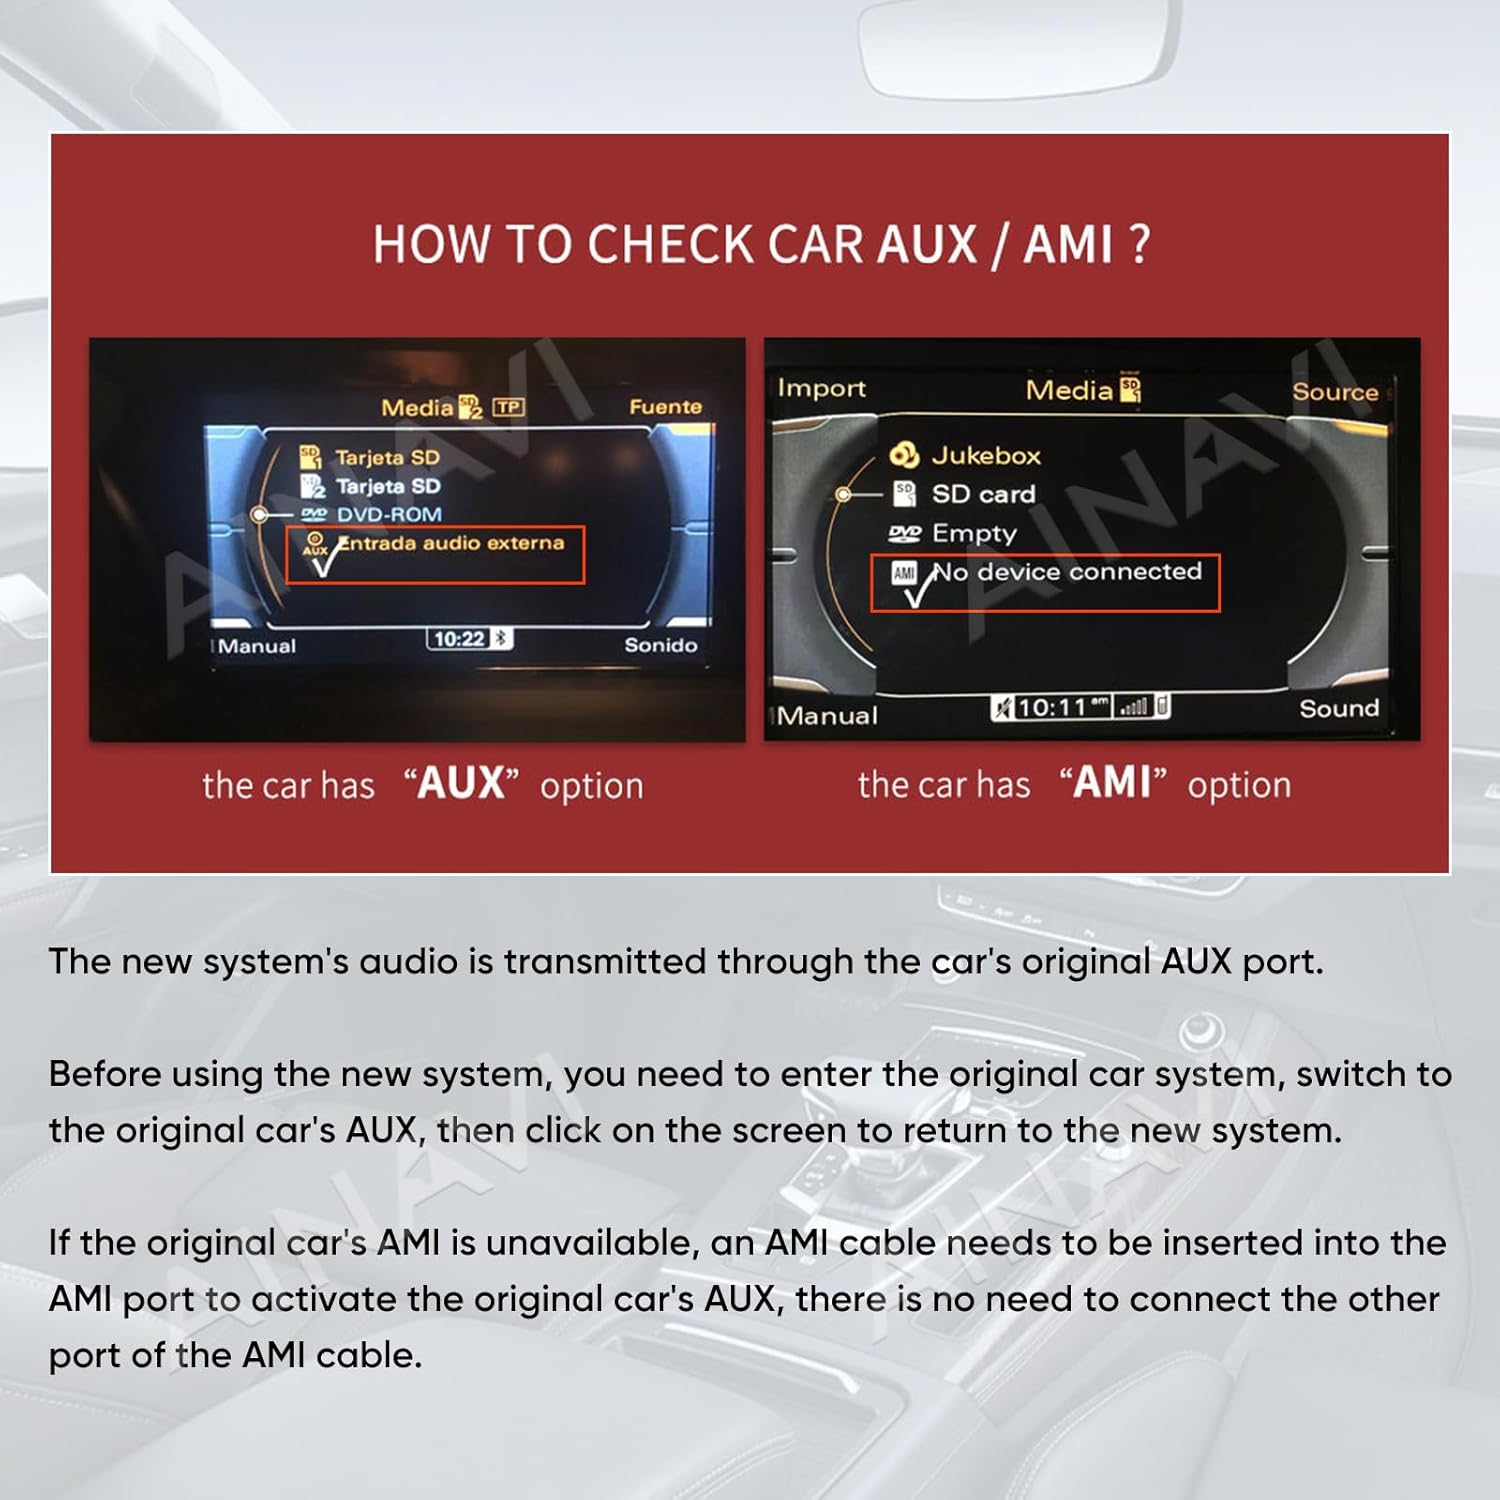
Figure 5: Instructions on how to check for AUX/AMI options in your car's original system, crucial for audio transmission.
Operating Instructions
The AINAVI 10.25 inch Touch Screen operates with a user-friendly interface, integrating seamlessly with your vehicle's original system while providing enhanced features.
Key Features and Operation:
- Dual System Operation: The unit retains all original car CD system functions and integrates a Linux system for advanced features. You can switch between the original Audi system and the new Linux system.
- Wireless CarPlay & Wired Android Auto: Connect your iPhone or Android phone wirelessly via Bluetooth for CarPlay or Android Auto. This allows access to navigation, calls, messages, and music directly from the touch screen. The system supports auto-connect within 3-5 seconds when Bluetooth and Wi-Fi are enabled.
- Bluetooth Connectivity: Utilize Bluetooth v2.1 + EDR and v4.1 LE for audio streaming, automatic phone book transfer, and hands-free calling.
- Retained Original Controls: Continue to use your iDrive Knob, steering wheel controls, original radio, OEM rear camera, and radar functions.
- HD QLED Display: Enjoy a clear and vibrant visual experience on the 10.25-inch, 1920*720 HD QLED display.
- AHD Backup Camera Support: If connected, the unit supports AHD 720P backup cameras for improved rear visibility.
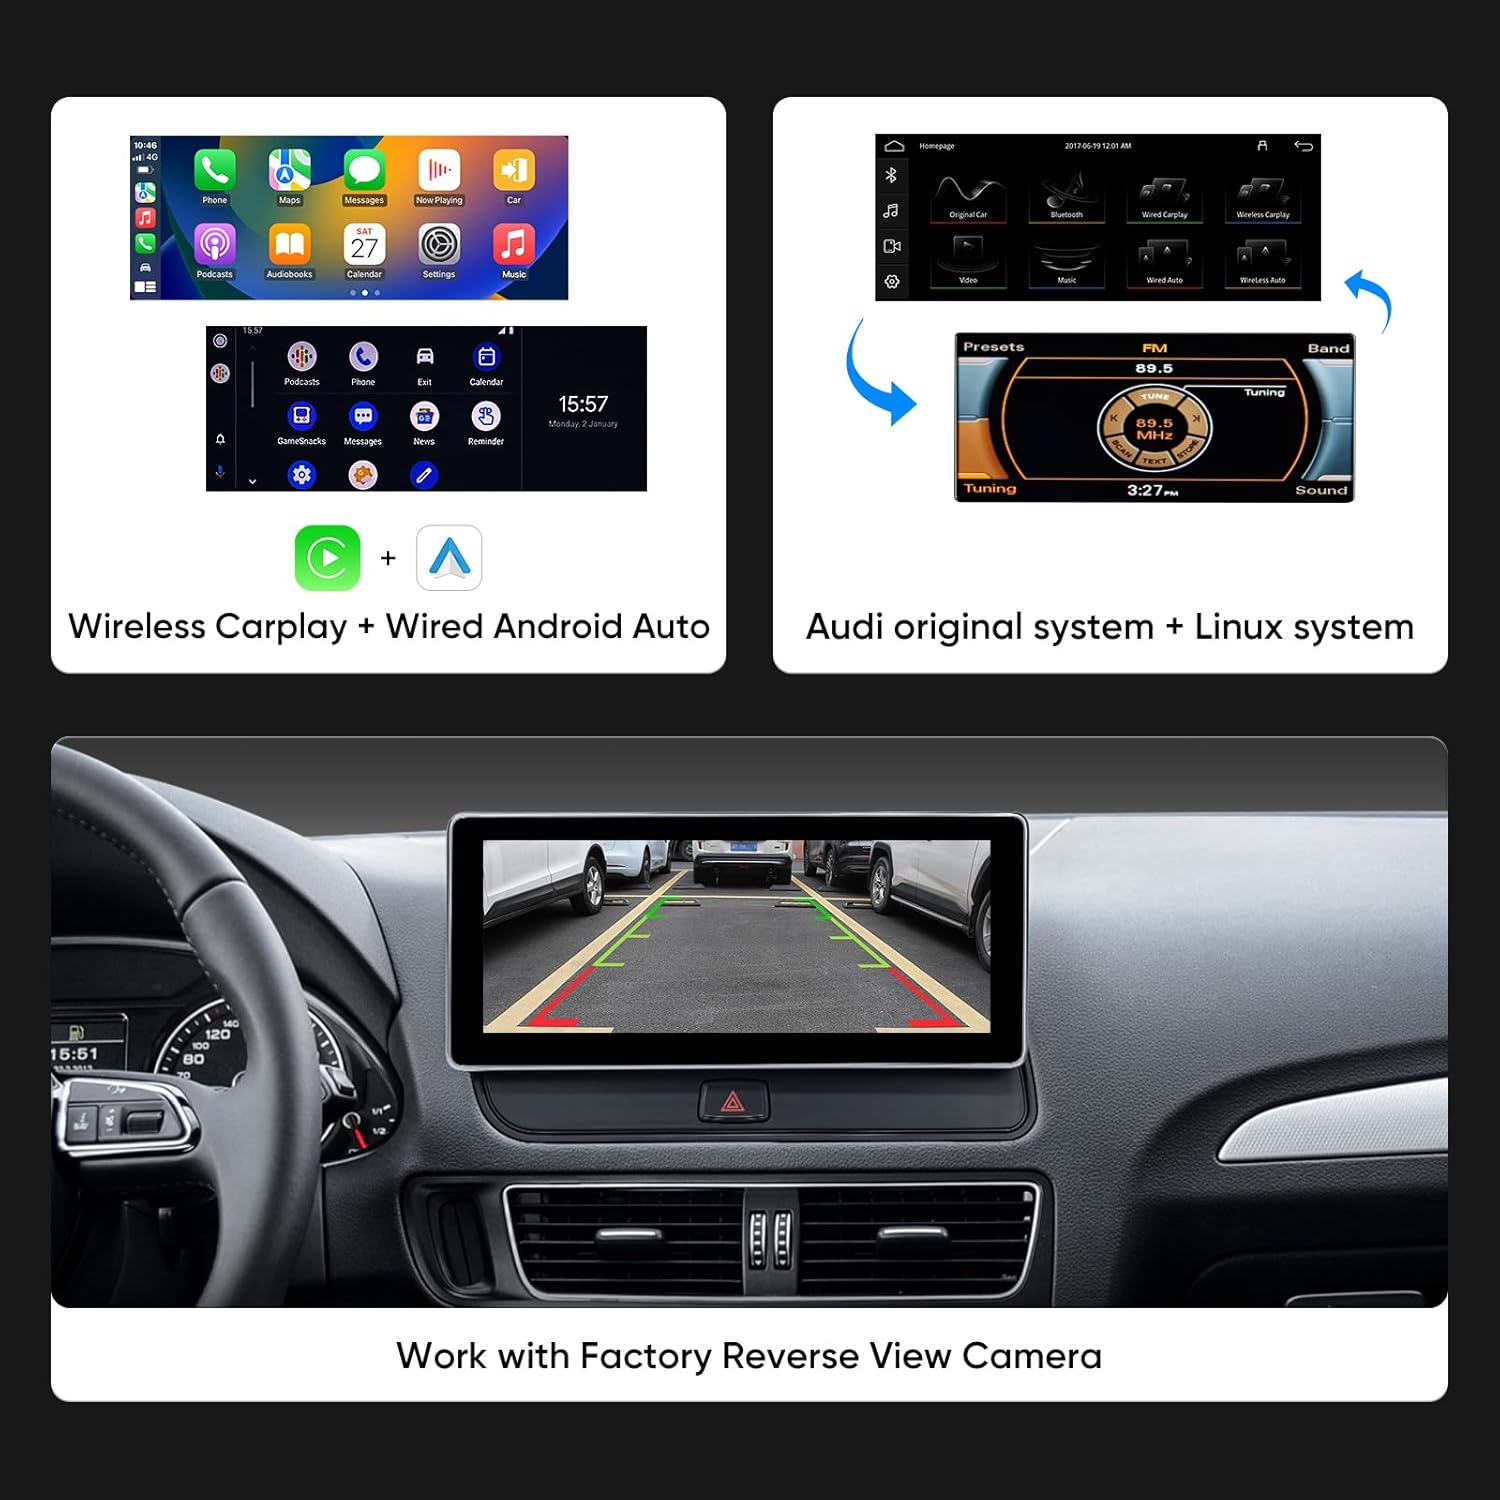
Figure 6: The user interface displaying options for Wireless CarPlay and Wired Android Auto, alongside the original Audi system.

Figure 7: Visual representation of original car functions such as steering wheel control, radio, amplifier system, CD player, Bluetooth, and backup camera that are retained with the new system.
Maintenance
To ensure the longevity and optimal performance of your AINAVI 10.25 inch Touch Screen, follow these general maintenance guidelines:
- Cleaning: Use a soft, lint-free cloth to clean the screen. For stubborn smudges, slightly dampen the cloth with water or a screen-safe cleaner. Avoid abrasive materials or harsh chemicals.
- Temperature Control: Avoid exposing the device to extreme temperatures (very hot or very cold) for extended periods, as this can affect performance and lifespan.
- Cable Management: Ensure all cables are securely connected and not pinched or strained, especially after installation.
- Software Updates: Periodically check for any available software updates from AINAVI to ensure optimal performance and access to new features.
Troubleshooting
If you encounter issues with your AINAVI 10.25 inch Touch Screen, consider the following basic troubleshooting steps:
- No Power/Screen Blank: Check all power connections to ensure they are securely plugged in. Verify the car's ignition is on.
- No Sound: Ensure the original car's AUX input is selected. Check all audio cable connections. Adjust volume settings on both the unit and the car's original stereo.
- CarPlay/Android Auto Not Connecting: Ensure Bluetooth is enabled on both your phone and the unit. For wireless connection, ensure Wi-Fi is also enabled on your phone. Try restarting both the phone and the unit.
- Original Car Information Not Displaying: As noted in installation, ensure the original CD player host is plugged in and installed tightly.
- Touch Screen Unresponsive: Try restarting the unit. Ensure the screen is clean and free of debris.
- Intermittent Issues: Check all wiring connections for looseness or damage.
For persistent issues or complex problems, please refer to the Warranty and Support section for technical assistance.
Specifications
| Feature | Detail |
|---|---|
| Item Weight | 4.88 pounds |
| Package Dimensions | 16.26 x 8.78 x 7.05 inches |
| Item Model Number | 10.25 Q5 Multimedia D168 |
| Display Size | 10.25 Inches |
| Screen Size | 10.25 Inches |
| Operating System | Linux |
| Connectivity Technology | Wireless/Wire Carplay & Android Auto |
| Voice Command | Microphone, Touchscreen |
| Audio Output Mode | Stereo |
| Vehicle Service Type | SUV |
| Manufacturer | AINAVI |
| Warranty | 12 Months |
What's in the Box
The following components are included with your AINAVI 10.25 inch Touch Screen:
- 10.25" Head Unit (x1)
- ISO Wiring Harness Cable (x1)
- Metal Bracket (x1)
- Screws (x8)
- Installation Frame (x1)
- LVDS cable (x1)
- 24 Hours Engineer--Customer Support (Information)

Figure 8: Visual representation of the product dimensions and the accessories included in the box.
Warranty and Support
Your AINAVI 10.25 inch Touch Screen comes with a 12-month warranty.
For installation assistance or any technical questions, our professional technical support team is available to help. Please do not hesitate to reach out if you need support.


